[Cocoa]深入浅出 Cocoa 之 Core Data(3)- 使用绑定
2012-07-27 11:34
351 查看
深入浅出 Cocoa 之 Core Data(3)- 使用绑定
罗朝辉(http://blog.csdn.net/kesalin)
CC 许可,转载请注明出处
前面讲解了 Core Data 的框架,并完全手动编写代码演示了 Core Data 的运作过程。下面我们来演示如何结合 XCode 强大的可视化编辑以及 Cocoa 键值编码,绑定机制来使用 Core Data。有了上面提到的哪些利器,在这个示例中,我们无需编写 NSManagedObjectModel 代码,也无需编写 NSManagedObjectContext,工程模版在背后为我们做了这些事情。
今天要完成的这个示例,有两个 Entity:StudentEntity 与 ClassEntity,各自有一个名为 name 的 Attribute。其中 StudentEntity 通过一个名为 inClass 的 relationship 与 ClassEntity关联,而 ClassEntity 也有一个名为 students 的 relationship 与 StudentEntity 关联,这是一个一对多的关系。此外 ClassEntity 还有一个名为 monitor 的 relationship
关联到 StudentEntity,表示该班的班长。
代码下载:点此下载
最终的效果图如下:


下面我们一步一步来完成这个示例:
1,创建工程:
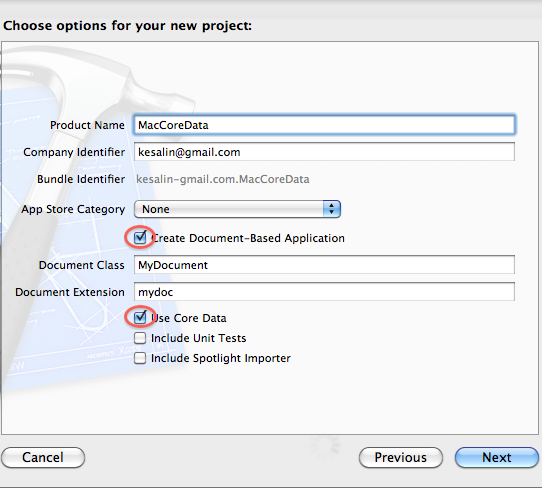
创建一个 Cocoa Application,工程名为:MacCoreData,并勾选 Create Document-Based Application 和 Use Core Data,在这里要用到 Core Data 和 Document 工程模版,以简化代码的编写。
2,分类文件:
在 MacCoreData 下新建 Src 和 Res 两个 Group,并将 MyDocument.h 和 MyDocument 拖到 Src 下,将其他 xib 和 xcdatamodeld 拖到 Res 中。将文件分类是个好习惯,尤其是对大项目来说。后面请自觉将文件分类~~

3,创建 Entity:
在工程中,我们可以看到名为 MyDocument.xcdatamodeld 的文件,其后缀表明这是一个 core data model文件,框架就是读取该模型文件生成模型的。下面我们选中这个文件,向其中添加两个实体。点击下方的 Add Entity 增加两个新 Entity: ClassEntity 和 StudentEntity。
向 StudentEntity 中添加名为 name 的 string 类型的 Attribute,并设置其 Default Value 为学生甲,去除 Optional 前勾选状态;
向 ClassEntity 中添加名为 name 的 string 类型的 Attribute,并设置其 Default Value 为XX班,去除 Optional 前勾选状态;
选项 Optional 是表示该 Attribute 可选与否的,在这里 name 都是必须的。
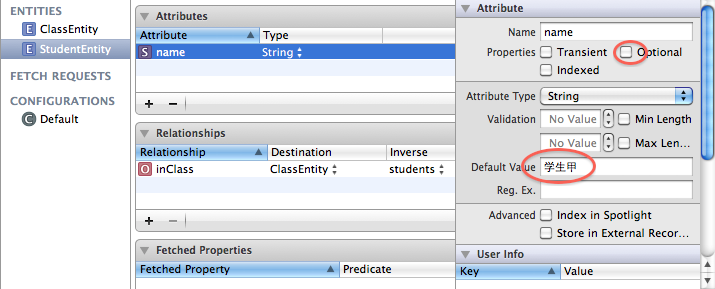
向 StudentEntity 中添加名为 inClass 指向 ClassEntity 的 Relationship,其 Inverse 栏要等 ClassEntity 添加了反向关系才能选择,后面回提到;
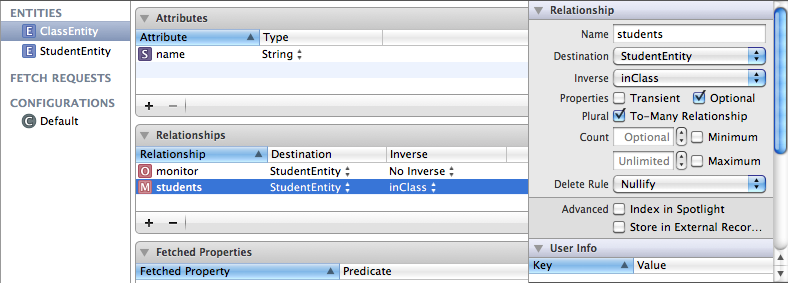
向 ClassEntity 中添加名为 students 指向 StudentEntity 的 Relationship,其 Inverse 栏选择 inClass,表明这是一个双向关系,勾选 To-Many Relationship,因为一个班级可以有多名学生,这是一对多关系。设定之后,我们可以可以将 StudentEntity 的 inClass 关系的 Inverse 设置为 students了。
再向 ClassEntity 中添加名为 monitor 指向 StudentEntity 的 Relationship,表示该班的班长。
4,生成 NSManagedObject 类:
选中 StudentEntity,然后点击菜单 File-> New -> New file…,添加 Core Data -> NSManagerObject subclass, XCode 就会自动为我们生成 StudentEntity.h 和 StudentEntity.m 文件,记得将这两个文件拖放到 Src Group 下。下面我们来看看这两个文件中有什么内容:
StudentEntity.h
[cpp] view
plaincopyprint?
#import <Foundation/Foundation.h>
#import <CoreData/CoreData.h>
@class ClassEntity;
@interface StudentEntity : NSManagedObject {
@private
}
@property (nonatomic, retain) NSString * name;
@property (nonatomic, retain) ClassEntity * inClass;
@end
StudentEntity.m
[cpp] view
plaincopyprint?
#import "StudentEntity.h"
#import "ClassEntity.h"
@implementation StudentEntity
@dynamic name;
@dynamic inClass;
@end
在前面手动代码的示例中,我们是自己编写 Run NSManagedObject的代码,而现在,XCode 已经根据模型文件的描述,自动为我们生成了,方便吧。有时候自动生成的代码不一定满足我们的需要,我们就得对代码进行修改,比如对 ClassEntity 来说,班长只能是其 students 中的一员,如果我们在 students 中移除了班长那个学生,那么该班级的班长就应该置空。
选中 ClassEntity,重复上面的步骤,自动生成 ClassEntity.h 和 ClassEntity.m,下面我们根据需求来修改 ClassEntity.m。
在 - (void)removeStudentsObject:(StudentEntity *)value 的开头添加如下代码:
[cpp] view
plaincopyprint?
if (value == [self monitor])
[self setMonitor:nil];
在 - (void)removeStudents:(NSSet *)value 的开头添加如下代码:
[cpp] view
plaincopyprint?
if ([value containsObject:[self monitor]])
[self setMonitor:nil];
这样当我们在 students 中删除一个学生时,就会检测该学生是不是班长,如果是,就将该班的班长置空。
5,下面来生成 UI 界面:
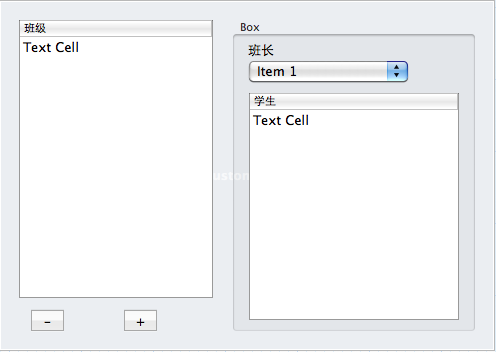
在这里,我们是通过切换 view 的方法来显现学生与班级两个界面,因此我们需要主界面,班级以及学生共三个界面。
向 MyDocument.xib 中添加如下一个 popup button 和一个 NSBox。并删除 popup 控件中的 menu item,因为我们要通过代码来添加班级,学生项的。

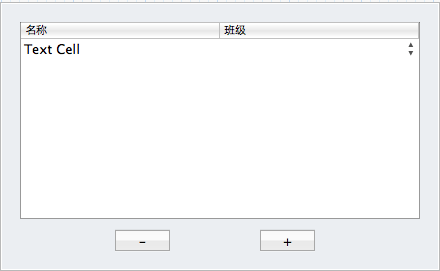
然后在 Res 中添加两个新 Empty xib 文件:StudentView.xib 和 ClassView.xib,分别向这两个 xib 文件中拖入一个 Custom View,然后在这个 view 添加相关控件构成 UI。记得设置 ClassView 中两个 tableView 的列数为 1,拖入一个 PopupButtonCell 到 StudentView 中班级那一列。效果如下:
6,添加 ViewController:
下面我们创建 ViewController 来在程序中转载 xib 文件,显示和切换 view。为了便于切换 view,我们创建一个继承自 NSViewController 的名为:ManagedViewController的类(记得不要创建该类对应的 xib 文件!创建一个 NSObject子类,然后修改其父类为 NSViewController),然后让 StudentViewController 和 ClassViewController 从它继承。ManagedViewController 类的代码如下:
ManagedViewController.h
[cpp] view
plaincopyprint?
#import <Cocoa/Cocoa.h>
@interface ManagedViewController : NSViewController {
@private
NSManagedObjectContext * managedObjectContext;
NSArrayController * contentArrayController;
}
@property (nonatomic, retain) NSManagedObjectContext * managedObjectContext;
@property (nonatomic, retain) IBOutlet NSArrayController *contentArrayController;
@end
ManagedViewController.m
[cpp] view
plaincopyprint?
#import "ManagedViewController.h"
@implementation ManagedViewController
@synthesize managedObjectContext;
@synthesize contentArrayController;
- (void)dealloc
{
self.contentArrayController = nil;
self.managedObjectContext = nil;
[super dealloc];
}
// deal with "Delete" key event.
//
- (void) keyDown:(NSEvent *)theEvent
{
if (contentArrayController) {
if ([theEvent keyCode] == 51) {
[contentArrayController remove:nil];
}
else {
[super keyDown:theEvent];
}
}
else {
[super keyDown:theEvent];
}
}
@end
在上面代码中,我们有一个 NSManagedObjectContext * managedObjectContext 指针,它指向 MyDocument 框架中的NSManagedObjectContext对象,后面我们会说到,至于 NSArrayController * contentArrayController,它是一个 IBOutlet,将与xib 中创建的 NSArrayController关联,后面也会说到。在这里引入 contentArrayController 是为了让 delete 能够删除记录。
ClassViewController 类的代码如下:
[cpp] view
plaincopyprint?
#import "ManagedViewController.h"
@interface ClassViewController : ManagedViewController {
@private
}
@end
#import "ClassViewController.h"
@implementation ClassViewController
- (id)init
{
self = [super initWithNibName:@"ClassView" bundle:nil];
if (self) {
[self setTitle:@"班级"];
}
return self;
}
- (void)dealloc
{
[super dealloc];
}
@end
StudentViewController 类的代码如下:
[cpp] view
plaincopyprint?
#import "ManagedViewController.h"
@interface StudentViewController : ManagedViewController {
@private
}
@end
#import "StudentViewController.h"
@implementation StudentViewController
- (id)init
{
self = [super initWithNibName:@"StudentView" bundle:nil];
if (self) {
[self setTitle:@"学生"];
}
return self;
}
- (void)dealloc
{
[super dealloc];
}
@end
在这两个子类中,我们在 init 方法中载入 xib 文件,然后设置其 title。
罗朝辉(http://blog.csdn.net/kesalin)
CC 许可,转载请注明出处
前面讲解了 Core Data 的框架,并完全手动编写代码演示了 Core Data 的运作过程。下面我们来演示如何结合 XCode 强大的可视化编辑以及 Cocoa 键值编码,绑定机制来使用 Core Data。有了上面提到的哪些利器,在这个示例中,我们无需编写 NSManagedObjectModel 代码,也无需编写 NSManagedObjectContext,工程模版在背后为我们做了这些事情。
今天要完成的这个示例,有两个 Entity:StudentEntity 与 ClassEntity,各自有一个名为 name 的 Attribute。其中 StudentEntity 通过一个名为 inClass 的 relationship 与 ClassEntity关联,而 ClassEntity 也有一个名为 students 的 relationship 与 StudentEntity 关联,这是一个一对多的关系。此外 ClassEntity 还有一个名为 monitor 的 relationship
关联到 StudentEntity,表示该班的班长。
代码下载:点此下载
最终的效果图如下:


下面我们一步一步来完成这个示例:
1,创建工程:
创建一个 Cocoa Application,工程名为:MacCoreData,并勾选 Create Document-Based Application 和 Use Core Data,在这里要用到 Core Data 和 Document 工程模版,以简化代码的编写。

2,分类文件:
在 MacCoreData 下新建 Src 和 Res 两个 Group,并将 MyDocument.h 和 MyDocument 拖到 Src 下,将其他 xib 和 xcdatamodeld 拖到 Res 中。将文件分类是个好习惯,尤其是对大项目来说。后面请自觉将文件分类~~

3,创建 Entity:
在工程中,我们可以看到名为 MyDocument.xcdatamodeld 的文件,其后缀表明这是一个 core data model文件,框架就是读取该模型文件生成模型的。下面我们选中这个文件,向其中添加两个实体。点击下方的 Add Entity 增加两个新 Entity: ClassEntity 和 StudentEntity。
向 StudentEntity 中添加名为 name 的 string 类型的 Attribute,并设置其 Default Value 为学生甲,去除 Optional 前勾选状态;
向 ClassEntity 中添加名为 name 的 string 类型的 Attribute,并设置其 Default Value 为XX班,去除 Optional 前勾选状态;
选项 Optional 是表示该 Attribute 可选与否的,在这里 name 都是必须的。

向 StudentEntity 中添加名为 inClass 指向 ClassEntity 的 Relationship,其 Inverse 栏要等 ClassEntity 添加了反向关系才能选择,后面回提到;
向 ClassEntity 中添加名为 students 指向 StudentEntity 的 Relationship,其 Inverse 栏选择 inClass,表明这是一个双向关系,勾选 To-Many Relationship,因为一个班级可以有多名学生,这是一对多关系。设定之后,我们可以可以将 StudentEntity 的 inClass 关系的 Inverse 设置为 students了。
再向 ClassEntity 中添加名为 monitor 指向 StudentEntity 的 Relationship,表示该班的班长。

4,生成 NSManagedObject 类:
选中 StudentEntity,然后点击菜单 File-> New -> New file…,添加 Core Data -> NSManagerObject subclass, XCode 就会自动为我们生成 StudentEntity.h 和 StudentEntity.m 文件,记得将这两个文件拖放到 Src Group 下。下面我们来看看这两个文件中有什么内容:
StudentEntity.h
[cpp] view
plaincopyprint?
#import <Foundation/Foundation.h>
#import <CoreData/CoreData.h>
@class ClassEntity;
@interface StudentEntity : NSManagedObject {
@private
}
@property (nonatomic, retain) NSString * name;
@property (nonatomic, retain) ClassEntity * inClass;
@end
StudentEntity.m
[cpp] view
plaincopyprint?
#import "StudentEntity.h"
#import "ClassEntity.h"
@implementation StudentEntity
@dynamic name;
@dynamic inClass;
@end
在前面手动代码的示例中,我们是自己编写 Run NSManagedObject的代码,而现在,XCode 已经根据模型文件的描述,自动为我们生成了,方便吧。有时候自动生成的代码不一定满足我们的需要,我们就得对代码进行修改,比如对 ClassEntity 来说,班长只能是其 students 中的一员,如果我们在 students 中移除了班长那个学生,那么该班级的班长就应该置空。
选中 ClassEntity,重复上面的步骤,自动生成 ClassEntity.h 和 ClassEntity.m,下面我们根据需求来修改 ClassEntity.m。
在 - (void)removeStudentsObject:(StudentEntity *)value 的开头添加如下代码:
[cpp] view
plaincopyprint?
if (value == [self monitor])
[self setMonitor:nil];
在 - (void)removeStudents:(NSSet *)value 的开头添加如下代码:
[cpp] view
plaincopyprint?
if ([value containsObject:[self monitor]])
[self setMonitor:nil];
这样当我们在 students 中删除一个学生时,就会检测该学生是不是班长,如果是,就将该班的班长置空。
5,下面来生成 UI 界面:
在这里,我们是通过切换 view 的方法来显现学生与班级两个界面,因此我们需要主界面,班级以及学生共三个界面。
向 MyDocument.xib 中添加如下一个 popup button 和一个 NSBox。并删除 popup 控件中的 menu item,因为我们要通过代码来添加班级,学生项的。

然后在 Res 中添加两个新 Empty xib 文件:StudentView.xib 和 ClassView.xib,分别向这两个 xib 文件中拖入一个 Custom View,然后在这个 view 添加相关控件构成 UI。记得设置 ClassView 中两个 tableView 的列数为 1,拖入一个 PopupButtonCell 到 StudentView 中班级那一列。效果如下:


6,添加 ViewController:
下面我们创建 ViewController 来在程序中转载 xib 文件,显示和切换 view。为了便于切换 view,我们创建一个继承自 NSViewController 的名为:ManagedViewController的类(记得不要创建该类对应的 xib 文件!创建一个 NSObject子类,然后修改其父类为 NSViewController),然后让 StudentViewController 和 ClassViewController 从它继承。ManagedViewController 类的代码如下:
ManagedViewController.h
[cpp] view
plaincopyprint?
#import <Cocoa/Cocoa.h>
@interface ManagedViewController : NSViewController {
@private
NSManagedObjectContext * managedObjectContext;
NSArrayController * contentArrayController;
}
@property (nonatomic, retain) NSManagedObjectContext * managedObjectContext;
@property (nonatomic, retain) IBOutlet NSArrayController *contentArrayController;
@end
ManagedViewController.m
[cpp] view
plaincopyprint?
#import "ManagedViewController.h"
@implementation ManagedViewController
@synthesize managedObjectContext;
@synthesize contentArrayController;
- (void)dealloc
{
self.contentArrayController = nil;
self.managedObjectContext = nil;
[super dealloc];
}
// deal with "Delete" key event.
//
- (void) keyDown:(NSEvent *)theEvent
{
if (contentArrayController) {
if ([theEvent keyCode] == 51) {
[contentArrayController remove:nil];
}
else {
[super keyDown:theEvent];
}
}
else {
[super keyDown:theEvent];
}
}
@end
在上面代码中,我们有一个 NSManagedObjectContext * managedObjectContext 指针,它指向 MyDocument 框架中的NSManagedObjectContext对象,后面我们会说到,至于 NSArrayController * contentArrayController,它是一个 IBOutlet,将与xib 中创建的 NSArrayController关联,后面也会说到。在这里引入 contentArrayController 是为了让 delete 能够删除记录。
ClassViewController 类的代码如下:
[cpp] view
plaincopyprint?
#import "ManagedViewController.h"
@interface ClassViewController : ManagedViewController {
@private
}
@end
#import "ClassViewController.h"
@implementation ClassViewController
- (id)init
{
self = [super initWithNibName:@"ClassView" bundle:nil];
if (self) {
[self setTitle:@"班级"];
}
return self;
}
- (void)dealloc
{
[super dealloc];
}
@end
StudentViewController 类的代码如下:
[cpp] view
plaincopyprint?
#import "ManagedViewController.h"
@interface StudentViewController : ManagedViewController {
@private
}
@end
#import "StudentViewController.h"
@implementation StudentViewController
- (id)init
{
self = [super initWithNibName:@"StudentView" bundle:nil];
if (self) {
[self setTitle:@"学生"];
}
return self;
}
- (void)dealloc
{
[super dealloc];
}
@end
在这两个子类中,我们在 init 方法中载入 xib 文件,然后设置其 title。
相关文章推荐
- [Cocoa]深入浅出Cocoa之Core Data(4)- 使用绑定
- 深入浅出 Cocoa 之 Core Data(3)- 使用绑定
- 深入浅出Cocoa之Core Data(3)- 使用绑定
- [Cocoa]深入浅出 Cocoa 之 Core Data(4)- 使用绑定
- [Cocoa]深入浅出 Cocoa 之 Core Data(3)- 使用绑定
- [Cocoa]深入浅出 Cocoa 之 Core Data(4)- 使用绑定
- 深入浅出 Cocoa 之 Core Data(4)- 使用绑定
- [Cocoa]深入浅出 Cocoa 之 Core Data(4)- 使用绑定
- 深入浅出 Cocoa 之 Core Data(3)- 使用绑定
- 深入浅出 Cocoa 之 Core Data(3)- 使用绑定
- 深入浅出 Cocoa 之 Core Data(3)- 使用绑定
- [Cocoa]深入浅出Cocoa之Core Data(3)- 使用绑定
- 深入浅出 Cocoa 之 Core Data(3)- 使用绑定
- [Cocoa]深入浅出 Cocoa 之 Core Data(3)- 使用绑定
- [Cocoa]深入浅出 Cocoa 之 Core Data(3)- 使用绑定
- [Cocoa]深入浅出 Cocoa 之 Core Data(4)- 使用绑定
- 深入浅出Cocoa之Core Data(2)- 代码示例
- [Cocoa]深入浅出 Cocoa 之 Core Data(1)- 框架详解
- [Cocoa]深入浅出 Cocoa 之 Core Data(1)- 框架详解
- [Cocoa]深入浅出 Cocoa 之 Core Data
