android ftp客户端
2012-06-07 10:49
176 查看
1.
建立FTPClient对象,连接服务器ftp.connect("169.254.xxx.xxx", 21);
public String[] connect(String host, int port)
throws IllegalStateException, IOException,
FTPIllegalReplyException, FTPException {

synchronized (this.lock) {
if (this.connected) {
throw new IllegalStateException("Client already connected to "
+ host + " on port " + port);
}
Socket connection = null;

try {
connection = this.connector.connectForCommunicationChannel(
host, port);
if (this.security == 1) {
connection = ssl(connection, host, port);
}

this.communication = new FTPCommunicationChannel(connection,
"UTF-8");
for (Iterator i = this.communicationListeners.iterator(); i
.hasNext();) {
this.communication
.addCommunicationListener((FTPCommunicationListener) i
.next());
}

FTPReply wm = this.communication.readFTPReply();
if (!wm.isSuccessCode()) {
throw new FTPException(wm);
}

this.connected = true;
// this.authenticated = false;
// this.parser = null;
this.host = host;
this.port = port;
this.username = null;
this.password = null;
this.utf8Supported = false;
this.restSupported = false;
this.mlsdSupported = false;
this.modezSupported = false;
// this.dataChannelEncrypted = false;

// Returns the welcome message.
return wm.getMessages();
} catch (IOException e) {
// D'oh!
throw e;
} finally {
// If connection has failed...
if (!connected) {
if (connection != null) {
// Close the connection, 'cause it should be open.
try {
connection.close();
} catch (Throwable t) {
;
}
}
}
}
}
}
在连接服务器过程中,
connection = this.connector.connectForCommunicationChannel( host, port);
创建了控制通道的socket
this.communication
= new FTPCommunicationChannel(connection,
"UTF-8");
然后管理socket创建控制通道的管理类,监听信息入口的接收与发送,建立socket完成后通过FTPReply wm =
this.communication.readFTPReply(); 获取服务器的信息,判断是否成功。
2.
public FTPCommunicationChannel(Socket connection, String charsetName)
throws IOException {
this.connection = connection;
this.charsetName = charsetName;
InputStream inStream = connection.getInputStream();
OutputStream outStream = connection.getOutputStream();
// Wrap the streams into reader and writer objects.
reader = new NVTASCIIReader(inStream, charsetName);
writer = new NVTASCIIWriter(outStream, charsetName);
}
private String read() throws IOException {
// Read the line from the server.
String line = reader.readLine();
if (line == null) {
throw new IOException("FTPConnection closed");
}
// Call received() method on every communication listener
// registered.
for (Iterator iter = communicationListeners.iterator(); iter.hasNext();) {
FTPCommunicationListener l = (FTPCommunicationListener) iter.next();
l.received(line);
}
// Return the line read.
return line;
}public void sendFTPCommand(String command) throws IOException {
writer.writeLine(command);
for (Iterator iter = communicationListeners.iterator(); iter.hasNext();) {
FTPCommunicationListener l = (FTPCommunicationListener) iter.next();
l.sent(command);
}
}监听socket信息接收与发送的管理类,该类创建了两个继承Reader和Writer的类来接收与发送信息——NVTASCIIReader与NVTASCIIWriter,read() 读取方法,sendFTPCommand(String command) 发送信息,每次发送与接收都会触发监听事件
3.
NVTASCIIReader 类读取信息方法:public String readLine() throws IOException {
StringBuffer buffer = new StringBuffer();
int previous = -1;
int current = -1;
while (true) {
int i = this.reader.read();
if (i == -1) {
if (buffer.length() == 0) {
return null;
}
return buffer.toString();
}
previous = current;
current = i;
if (/* previous == '\r' && */current == '\n') {
// End of line.
return buffer.toString();
} else if (previous == '\r' && current == 0) {
// Literal new line.
buffer.append(SYSTEM_LINE_SEPARATOR);
} else if (current != 0 && current != '\r') {
buffer.append((char) current);
}
}
}该方法每次读取一行一旦遇到\n就返回。相反NVTASCIIReader 类发送信息也是如此:
public void writeLine(String str) throws IOException {
StringBuffer buffer = new StringBuffer();
boolean atLeastOne = false;
StringTokenizer st = new StringTokenizer(str, LINE_SEPARATOR);
int count = st.countTokens();
for (int i = 0; i < count; i++) {
String line = st.nextToken();
if (line.length() > 0) {
if (atLeastOne) {
buffer.append('\r');
buffer.append('\000');
}
buffer.append(line);
atLeastOne = true;
}
}
if (buffer.length() > 0) {
String statement = buffer.toString();

this.writer.write(statement);
this.writer.write("\r\n");
this.writer.flush();
}
}
该方法主要根据换行符分离字符串,然后加上回车符,直到要发送的文字结束才加上换行符。
4.
FTPReply wm = this.communication.readFTPReply();读取并分析服务器返回的数据,返回一个包括服务器的返回码和信息的FTPReply 类。代码比较无聊,就不贴出来了,可以去查看项目源码。5.
接下来是登陆服务器。该方法一步一步验证用户名、密码最后是public void login(String username, String password, String account)
throws IllegalStateException, IOException,
FTPIllegalReplyException, FTPException {
synchronized (this.lock) {
this.authenticated = false;
this.communication.sendFTPCommand("USER " + username);
FTPReply r = this.communication.readFTPReply();
boolean passwordRequired;
boolean accountRequired;
switch (r.getCode()) {
case 230:
passwordRequired = false;
accountRequired = false;
break;
case 331:
passwordRequired = true;
accountRequired = false;
break;
case 332:
passwordRequired = false;
accountRequired = true;
default:
throw new FTPException(r);
}
if (passwordRequired) {
if (password == null) {
throw new FTPException(331);
}
this.communication.sendFTPCommand("PASS " + password);
r = this.communication.readFTPReply();
switch (r.getCode()) {
case 230:
accountRequired = false;
break;
case 332:
accountRequired = true;
break;
default:
throw new FTPException(r);
}
}
if (accountRequired) {
if (account == null) {
throw new FTPException(332);
}
this.communication.sendFTPCommand("ACCT " + account);
r = this.communication.readFTPReply();
switch (r.getCode()) {
case 230:
break;
default:
throw new FTPException(r);
}
}
this.authenticated = true;
this.username = username;
this.password = password;
}
postLoginOperations();
startAutoNoopTimer();
}登陆成功后,运行postLoginOperations() 和startAutoNoopTimer()方法,前一个是获取服务器支持哪些功能,后一个是启动循环等待计时,每段时间都去请求服务器的承认。
6.
FTPFile[] list = ftp.list();这里是重点,主要是获取服务器当前目录的文件。该方法去除了很多判断的枝末^0^,如果想要完整地看它是如何处理的就要去研究查看源码,也不难就是变量多了点。这里使用被动方式,这个方式在文章开头理论就有说明。很简单,先在控制通道(比如A通道)发送一个PASV这个协议(说:hey,man 我想建立socket来传输数据,给个端口我),服务器返回一个随机端口告诉客户端,客户端分析出这个端口,然后与服务器建立一个新的socket。private FTPDataTransferConnectionProvider openPassiveDataTransferChannel()
throws IOException, FTPIllegalReplyException, FTPException {
// Send the PASV command.
communication.sendFTPCommand("PASV");
// Read the reply.
FTPReply r = communication.readFTPReply();
touchAutoNoopTimer();
if (!r.isSuccessCode()) {
throw new FTPException(r);
}
// Use a regexp to extract the remote address and port.
String addressAndPort = null;
String[] messages = r.getMessages();
for (int i = 0; i < messages.length; i++) {
Matcher m = PASV_PATTERN.matcher(messages[i]);
if (m.find()) {
int start = m.start();
int end = m.end();
addressAndPort = messages[i].substring(start, end);
break;
}
}
if (addressAndPort == null) {
// The remote server has not sent the coordinates for the
// data transfer connection.
throw new FTPIllegalReplyException();
}
// Parse the string extracted from the reply.
StringTokenizer st = new StringTokenizer(addressAndPort, ",");
int b1 = Integer.parseInt(st.nextToken());
int b2 = Integer.parseInt(st.nextToken());
int b3 = Integer.parseInt(st.nextToken());
int b4 = Integer.parseInt(st.nextToken());
int p1 = Integer.parseInt(st.nextToken());
int p2 = Integer.parseInt(st.nextToken());
final InetAddress remoteAddress;
// Ignore address?
// String useSuggestedAddress = System
// .getProperty(FTPKeys.PASSIVE_DT_USE_SUGGESTED_ADDRESS);
String useSuggestedAddress = "IP";
if ("true".equalsIgnoreCase(useSuggestedAddress)
|| "yes".equalsIgnoreCase(useSuggestedAddress)
|| "1".equals(useSuggestedAddress)) {
remoteAddress = InetAddress.getByAddress(new byte[] { (byte) b1,
(byte) b2, (byte) b3, (byte) b4 });
} else {
remoteAddress = InetAddress.getByName(host);
}
final int remotePort = (p1 << 8) | p2;
FTPDataTransferConnectionProvider provider = new FTPDataTransferConnectionProvider() {
public Socket openDataTransferConnection() {
// Establish the connection.
Socket dtConnection = null;
String remoteHost = remoteAddress.getHostAddress();
try {
dtConnection = connector.connectForDataTransferChannel(
remoteHost, remotePort);
} catch (IOException e) {
}
return dtConnection;
}
public void dispose() {
// nothing to do
}
};
return provider;
}该方法返回一个新的socket。
然后就是通过新的socket来接收服务器端返回的file列表,(谨记:所有请求协议都是通过控制通道(A通道)发送的)
FTPDataTransferConnectionProvider provider = openDataTransferChannel();

String command = "LIST";
// Adds the file/directory selector.
if (fileSpec != null && fileSpec.length() > 0) {
command += " " + fileSpec;
}
// Sends the command.
communication.sendFTPCommand(command);
Socket dtConnection;
try {
try {
dtConnection = provider.openDataTransferConnection();
} finally {
r = communication.readFTPReply();
touchAutoNoopTimer();
if (r.getCode() != 150 && r.getCode() != 125) {
throw new FTPException(r);
}
}
} finally {
provider.dispose();
}
// Fetch the list from the data transfer connection.
ArrayList lines = new ArrayList();
NVTASCIIReader dataReader = null;
try {
// Opens the data transfer connection.
dataTransferInputStream = dtConnection.getInputStream();
// MODE Z enabled?
if (modezEnabled) {
dataTransferInputStream = new InflaterInputStream(
dataTransferInputStream);
}
// Let's do it!
dataReader = new NVTASCIIReader(dataTransferInputStream,
"UTF-8");
String line;
while ((line = dataReader.readLine()) != null) {
if (line.length() > 0) {
lines.add(line);
}
}
} catch (IOException e) {
} finally {
if (dataReader != null) {
try {
dataReader.close();
} catch (Throwable t) {
;
}
}
try {
dtConnection.close();
} catch (Throwable t) {
;
}
// Consume the result reply of the transfer.
communication.readFTPReply();
// Set to null the instance-level input stream.
dataTransferInputStream = null;
}
这样一个文件目录的获取就完成了,举一反三,下载、上传同样道理。
^0^看得这么辛苦,最后给个该流程的思维导图,导图没有什么规范,就是按照我觉得比较容易理解的方式画出来。(图片好像过大了……)
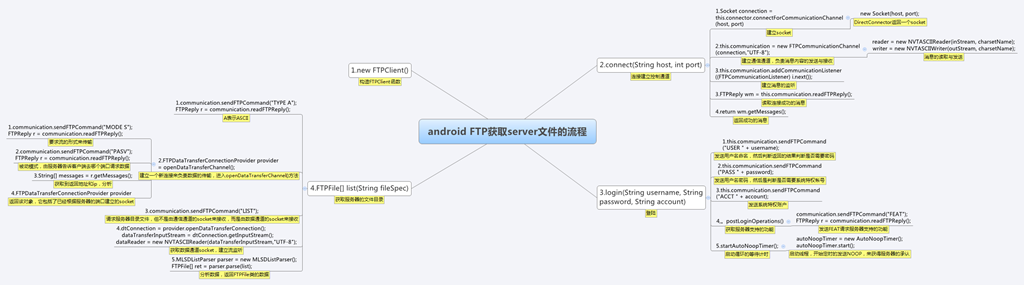
总结:
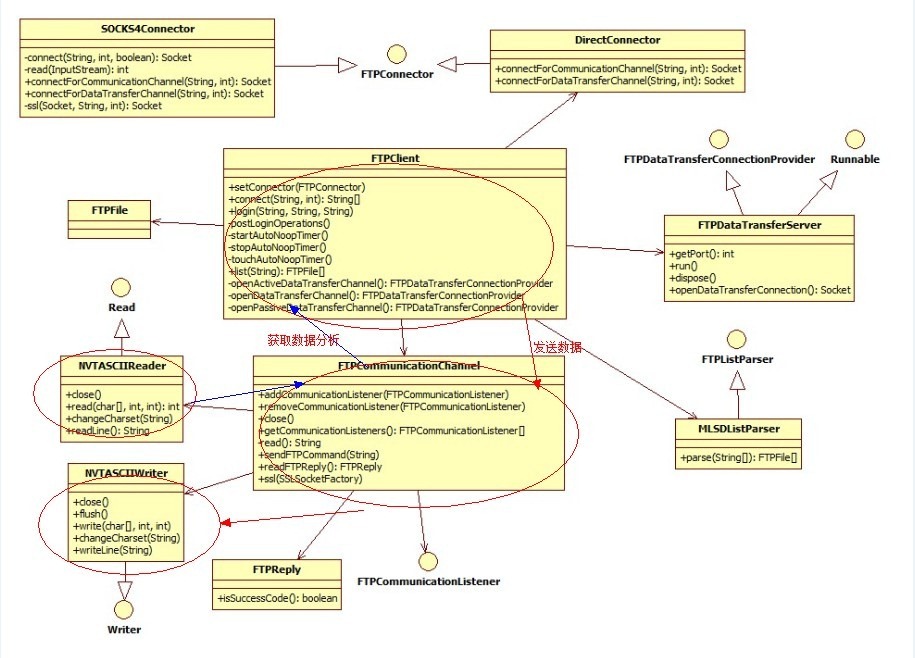
红色线发送数据请求,蓝色线获取数据分析,主的线索就是这么简单。剩余的就是socket类建立的设计,信息协议类的设计。
个人观点:可能是协议的不同,我看的这个ftp源码跟smack源码比较发现还是smack源码项目设计得比较好,有很多地方可以扩展自定义消息,当然整个设计也是复杂多一点。

相关文章推荐
- AndroidFtp客户端(二)
- FTP-Android客户端实现笔记
- Android FTP 客户端 上传/下载 带进度条实战源码
- Android中FTP服务器、客户端搭建以及SwiFTP、ftp4j介绍
- Android中FTP服务器、客户端搭建以及SwiFTP、ftp4j介绍
- Android中FTP服务器、客户端搭建以及SwiFTP、ftp4j介绍
- Android中FTP服务器、客户端搭建以及SwiFTP、ftp4j介绍
- android ftp客户端开发
- Android实现FTP客户端服务端多图下载【两部android手机之间传输】
- android ftp客户端简单实现
- android 下 ftp 客户端软件编写(ftp4j)
- android ftp 客户端编写(ftp4j)
- Android中FTP服务器、客户端搭建以及SwiFTP、ftp4j介绍
- Android中FTP服务器搭建、客户端编写
- Android中FTP服务器、客户端搭建以及SwiFTP、ftp4j介绍
- Android中FTP服务器、客户端搭建以及SwiFTP、ftp4j介绍
- Android中FTP服务器、客户端搭建以及SwiFTP、ftp4j介绍
- Android中FTP服务器、客户端搭建以及SwiFTP、ftp4j介绍
- Jenkins结合.net平台之ftp客户端
- ftp 下载文件到 客户端输出流 文件名却是download