How to install ZXing in Xcode 4
2012-05-25 22:38
501 查看
After an upgrading to Xcode 4, I have been having trouble compiling my own ZXing iOS project.
So I decided to explain you how to install easily ZXing with Xcode 4.
First of all (for those who don’t know), ZXing is an open-source library to read the 1D/2D barcodes. This library is available on
many platforms such as the iOS, Android, Blackberry, ect. You can find it here: http://code.google.com/p/zxing/.
Before to start, be sure that you have the latest version of ZXing on your computer. If you don’t, you must download it via a SVN client here: http://zxing.googlecode.com/svn/trunk/.
To use ZXing into your project in Xcode 4 follow these steps:
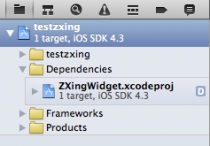
Firstly go to the “zxing/iphone/ZXingWidget/” and drag and drop the ZXingWidget.xcodeproj file
onto your Xcode “Project navigator” sidebar. If a dialog appears uncheck the “Copy items” and verify that the “Reference Type” is “Relative to Project” before clicking “Add”.
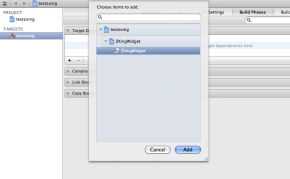
Now we are going to add ZXingWidget as a dependency of your project to allow Xcode to compile it whenever you compile the main project:
First select your project file in the “Project navigator”.
Then select the corresponding target.
After choose the “Build Phases” tab and expand the “Target Dependencies”
section.
Click the “+” (add) button to display a dialog.
To finish add the “ZXingWidget” target as shown above.
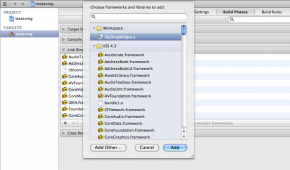
Now we are going to link the ZXingWidget static library (libZXingWidget.a) to the project:
Firstly choose the “Build Phases” tab and expand the “Link Binary
With Libraries” section.
Then click the “+” (add) button to display a dialog.
To finish add the “libZXingWidget.a” which is located in the “Workspace” category as shown above.
By the way add the following iOS frameworks too:
AddressBook
AddressBookUI
AudioToolbox
AVFoundation
CoreMedia
CoreVideo
libiconv.dylib
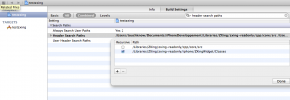
Then you must configure the header search path of your project to allow Xcode to find the ZXingWidget headers. To do that:
In the “Project navigator” select the main project (not the target).
Go to the “Build Settings” tab and search the “Header Search Paths“.
Double-click on it and add:
The full path of the “zxing/iphone/ZXingWidget/Classes” directory. Check the “recursive path“.
The full path of the “zxing/cpp/core/src/” directory. Uncheck the “recursive path“.
Now you just have to import the “ZXingWidgetController.h” and the “QRCodeReader.h” to your project and use them.
Attention: Make sure that the files in which you are using the ZXing headers have the .mm extension
because they use c++ library files.
Voilà! Now all should be ok. I hope it’ll help you!

相关文章推荐
- How to install packages in Bioconductor
- How To Use Git Source Control with Xcode in iOS 6
- How to install sun java in ubuntu
- How to Install GMP in Ubuntu
- How to Install GCC 4.8 via PPA in Ubuntu 12.04, 13.04, 10.04
- How to Install ATI/AMD Catalyst 13.4 Linux Driver in Ubuntu 10.04
- How to Install And Configure Apache In Ubuntu
- How to install mplayer in Fedora Core
- How to install Android SDK and play with Android 2.0 in the emulator
- How to install the latest Eclipse in Ubuntu 14+
- How to Install Wine 1.8 Stable via New PPA in Ubuntu
- How to install OS X Mountain Lion in Virtualbox with iAtkos
- How to install Open Source Java version in Ubantu
- How to install Adobe flash 10.2 (Preview) in Ubuntu 10.10 (maverick) Using PPA
- [Ubuntu] How to install memcache in Ubuntu 10.10 with xampp
- (全英文)How to install and run a simple Asp.Net 5 Application in a Docker Container
- how to install putty in linux
- How to Use Instruments in Xcode
- Linux----How to install flash player in debian?
- How to install MySQL JDBC driver in Eclipse web project without java.lang.ClassNotFoundexception com