DirectX 11 Tutorials-Tutorial 3:初始化DirectX 11
2012-05-09 19:59
399 查看
这章教程首要介绍如何使用DirectX 11.我们将说明如何初始化和关闭Direct3D和如何渲染窗口:
更新框架
我们打算在框架中添加一个类,这个类能够处理所有的Direct3D系统函数,我们称之为D3DClass.更新的框架图如下:
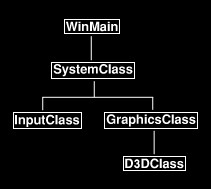
就如你看到的,D3DClass位于GraphicsClass中.在先前的教程中提及新的图形相关类将会被封装在GraphicsClass中,这就是为什么这是放D3DClass最好的地方.现在让我们看看GraphicsClass
改变的地方.
Graphicsclass.h
Graphicsclass.cpp
如果你记得先前的教程这个类完全是空的,现在我们有个D3DClass成员,我们开始在GraphicsClass中填写一些代码来初始化和关闭D3DClass对象.我们也会添加调用BeginScene和EndScene在
Render函数中,所以我们开始使用Direct3D在窗口中绘制.
所以先在类的构造函数中改变.这里我们初始化这个指针为null.
现在让我们看下新的D3DClass头文件
D3dclass.h
如果早已熟悉Direct3D的话,你可能已经注意到在这个类中我没包含矩阵变量.因为我把它放在Camera类中,我们将会在以后的教程中看到.
更新框架
我们打算在框架中添加一个类,这个类能够处理所有的Direct3D系统函数,我们称之为D3DClass.更新的框架图如下:
就如你看到的,D3DClass位于GraphicsClass中.在先前的教程中提及新的图形相关类将会被封装在GraphicsClass中,这就是为什么这是放D3DClass最好的地方.现在让我们看看GraphicsClass
改变的地方.
Graphicsclass.h
////////////////////////////////////////////////////////////////////////////////
// Filename: graphicsclass.h
////////////////////////////////////////////////////////////////////////////////
#ifndef _GRAPHICSCLASS_H_
#define _GRAPHICSCLASS_H_

这是第一处改变.我们取出include windows.h让include d3dclass.h代替他

///////////////////////
// MY CLASS INCLUDES //
///////////////////////
#include "d3dclass.h"

/////////////
// GLOBALS //
/////////////
const bool FULL_SCREEN = false;
const bool VSYNC_ENABLED = true;
const float SCREEN_DEPTH = 1000.0f;
const float SCREEN_NEAR = 0.1f;

////////////////////////////////////////////////////////////////////////////////
// Class name: GraphicsClass
////////////////////////////////////////////////////////////////////////////////
class GraphicsClass
{
public:
	GraphicsClass();
	GraphicsClass(const GraphicsClass&);
	~GraphicsClass();

	bool Initialize(int, int, HWND);
	void Shutdown();
	bool Frame();

private:
	bool Render();

private:

第二处改变是有个私有指针指向D3DClass我们取名m_D3D. 避免疑惑, 我使用前缀m_ 在所有类成员变量前.这样,当我编写代码时我能快速记得哪些是类的成员变量, 哪些不是.

	D3DClass* m_D3D;
};

#endif
Graphicsclass.cpp
如果你记得先前的教程这个类完全是空的,现在我们有个D3DClass成员,我们开始在GraphicsClass中填写一些代码来初始化和关闭D3DClass对象.我们也会添加调用BeginScene和EndScene在
Render函数中,所以我们开始使用Direct3D在窗口中绘制.
所以先在类的构造函数中改变.这里我们初始化这个指针为null.
GraphicsClass::GraphicsClass()
{
	m_D3D = 0;
}

然后改变GraphicsClass中的Initialize函数.这里我们创建D3DClass对象并且调用Initialize函数.我们给这个函数发送窗口的screenwidth, screenheight,句柄,和4个在GraphicsClass中

的全局变量.D3DClass会使用这些变量来设置Direct3D系统.我们将会探究更多关于它的细节,当我们看d3dclass.cpp文件时.

bool GraphicsClass::Initialize(int screenWidth, int screenHeight, HWND hwnd)
{
	bool result;


	// Create the Direct3D object.
	m_D3D = new D3DClass;
	if(!m_D3D)
	{
		return false;
	}

	// Initialize the Direct3D object.
	result = m_D3D->Initialize(screenWidth, screenHeight, VSYNC_ENABLED, hwnd, FULL_SCREEN, SCREEN_DEPTH, SCREEN_NEAR);
	if(!result)
	{
		MessageBox(hwnd, L"Could not initialize Direct3D", L"Error", MB_OK);
		return false;
	}

	return true;
}

接下来的改变是GraphicsClass中的Shutdown函数.关闭所有图形对象,所以我们把它放在D3DClass 的 Shutdown函数中.注意我检查指针是否被初始化,如果没有被初始化,我们假设它从未建立并且不去关闭它.所以为什么在构造函数中把指针设置为null是很重要的.如果发现指针有被初始化过,然后它会尝试去关闭D3DClass然后清理指针指向的空间.
void GraphicsClass::Shutdown()
{
	if(m_D3D)
	{
		m_D3D->Shutdown();
		delete m_D3D;
		m_D3D = 0;
	}

	return;
}

Frame函数被更新,所以在每一帧调用Render函数.

bool GraphicsClass::Frame()
{
	bool result;

	// Render the graphics scene.
	result = Render();
	if(!result)
	{
		return false;
	}

	return true;
}

该类的最后改变在Render函数中.我们调用D3D 对象来清理屏幕为灰色.在我们调用EndScene后灰色在窗口呈现.

bool GraphicsClass::Render()
{
	// Clear the buffers to begin the scene.
	m_D3D->BeginScene(0.5f, 0.5f, 0.5f, 1.0f);

	// Present the rendered scene to the screen.
	m_D3D->EndScene();

	return true;
}
现在让我们看下新的D3DClass头文件
D3dclass.h
////////////////////////////////////////////////////////////////////////////////
// Filename: d3dclass.h
////////////////////////////////////////////////////////////////////////////////
#ifndef _D3DCLASS_H_
#define _D3DCLASS_H_

在我们使用库中的对象模块时第一件要做的事是在头部指明链接库。这些库中包含所有Direct3D函数来设

置DirectX中的3D图形渲染,也有电脑硬件接口工具来获得有关监听刷新速率信息和显卡使用,等等。你

会注意到有些DirectX10的库也仍然被使用,因为DirectX11的函数没必要改变所以这些库没被更新。

/////////////
// LINKING //
/////////////
#pragma comment(lib, "dxgi.lib")
#pragma comment(lib, "d3d11.lib")
#pragma comment(lib, "d3dx11.lib")
#pragma comment(lib, "d3dx10.lib")

然后我们为这些库包含头文件,也要包含DirectX类型定义的头文件。

//////////////
// INCLUDES //
//////////////
#include <dxgi.h>
#include <d3dcommon.h>
#include <d3d11.h>
#include <d3dx10math.h>

D3DClass类的定义仍保持尽量的简单。它通常都包含构造函数,复制构造函数,析构函数。更重要的是它

有Initialize和Shutdown函数。在这章教程中我们主要关注这两个函数。除此之外,我们有一些不那么重

要的帮助函数和一些私有成员变量当我们测试d3dclass.cpp时会被看到。现在,我们只关注Initialize和

Shutdown函数。
////////////////////////////////////////////////////////////////////////////////
// Class name: D3DClass
////////////////////////////////////////////////////////////////////////////////
class D3DClass
{
public:
	D3DClass();
	D3DClass(const D3DClass&);
	~D3DClass();

	bool Initialize(int, int, bool, HWND, bool, float, float);
	void Shutdown();

	void BeginScene(float, float, float, float);
	void EndScene();

	ID3D11Device* GetDevice();
	ID3D11DeviceContext* GetDeviceContext();

	void GetProjectionMatrix(D3DXMATRIX&);
	void GetWorldMatrix(D3DXMATRIX&);
	void GetOrthoMatrix(D3DXMATRIX&);

	void GetVideoCardInfo(char*, int&);

private:
	bool m_vsync_enabled;
	int m_videoCardMemory;
	char m_videoCardDescription[128];
	IDXGISwapChain* m_swapChain;
	ID3D11Device* m_device;
	ID3D11DeviceContext* m_deviceContext;
	ID3D11RenderTargetView* m_renderTargetView;
	ID3D11Texture2D* m_depthStencilBuffer;
	ID3D11DepthStencilState* m_depthStencilState;
	ID3D11DepthStencilView* m_depthStencilView;
	ID3D11RasterizerState* m_rasterState;
	D3DXMATRIX m_projectionMatrix;
	D3DXMATRIX m_worldMatrix;
	D3DXMATRIX m_orthoMatrix;
};

#endif
如果早已熟悉Direct3D的话,你可能已经注意到在这个类中我没包含矩阵变量.因为我把它放在Camera类中,我们将会在以后的教程中看到.

相关文章推荐
- DirectX 11 Tutorials-Tutorial 2:创建框架和窗口
- DirectX 11 Tutorials-Tutorial 1: 在visual studio上建立directx11
- Directx 11初始化
- DirectX 11 Compute Shader tutorial
- Introduction to 3D Game Programming with DirectX 11学习笔记 4.2Direct3D进行初始化
- Directx 11 World View and local spaces
- Tutorial 2: Rendering a Triangle(Directx手册)
- 冰封王座 war3 win7 windows7 运行 不能初始化DirectX 的问题
- OC笔记10(成员变量默认值,alloc和init)笔记11(对象的初始化与self)12(id类型与super关键字)
- DirectX 11 SDK文档(七)
- directx 11 64位
- Direct3D 11的初始化
- DiRT2 DirectX 11 Technology
- DirectX10 学习笔记2:在多文档框架中初始化DirectX 10
- D3D11之一,初始化窗口
- D3D11之二,初始化Direct 11
- Unreal3 DirectX 11 中的延迟着色
- 【Visual C++】游戏开发笔记二十六 DirectX 11各组件的介绍&第一个DirectX 11 Demo的创建
- 最简化的DirectX 11开发环境的配置
- 最简化的DirectX 11开发环境的配置 VS2010