秒杀多线程第二篇 多线程第一次亲密接触 CreateThread与_beginthreadex本质区别 .
2012-04-26 09:47
633 查看
原文地址:http://blog.csdn.net/morewindows/article/details/7421759
本文将带领你与多线程作第一次亲密接触,并深入分析CreateThread与_beginthreadex的本质区别,相信阅读本文后你能轻松的使用多线程并能流畅准确的回答CreateThread与_beginthreadex到底有什么区别,在实际的编程中到底应该使用CreateThread还是_beginthreadex?
使用多线程其实是非常容易的,下面这个程序的主线程会创建了一个子线程并等待其运行完毕,子线程就输出它的线程ID号然后输出一句经典名言——Hello World。整个程序的代码非常简短,只有区区几行。
[cpp]
view plaincopyprint?
//最简单的创建多线程实例
#include <stdio.h>
#include <windows.h>
//子线程函数
DWORD WINAPI ThreadFun(LPVOID pM)
{
printf("子线程的线程ID号为:%d\n子线程输出Hello World\n", GetCurrentThreadId());
return 0;
}
//主函数,所谓主函数其实就是主线程执行的函数。
int main()
{
printf(" 最简单的创建多线程实例\n");
printf(" -- by MoreWindows( http://blog.csdn.net/MoreWindows ) --\n\n");
HANDLE handle = CreateThread(NULL, 0, ThreadFun, NULL, 0, NULL);
WaitForSingleObject(handle, INFINITE);
return 0;
}
[cpp]
view plaincopyprint?

if (system("notepad.exe readme.txt") == -1)
{
    switch(errno)
    {
        ...//错误处理代码
    }
}

if (system("notepad.exe readme.txt") == -1)
{
switch(errno)
{
...//错误处理代码
}
}
假设某个线程A在执行上面的代码,该线程在调用system()之后且尚未调用switch()语句时另外一个线程B启动了,这个线程B也调用了标准C运行库的函数,不幸的是这个函数执行出错了并将错误代号写入全局变量errno中。这样线程A一旦开始执行switch()语句时,它将访问一个被B线程改动了的errno。这种情况必须要加以避免!因为不单单是这一个变量会出问题,其它像strerror()、strtok()、tmpnam()、gmtime()、asctime()等函数也会遇到这种由多个线程访问修改导致的数据覆盖问题。
为了解决这个问题,Windows操作系统提供了这样的一种解决方案——每个线程都将拥有自己专用的一块内存区域来供标准C运行库中所有有需要的函数使用。而且这块内存区域的创建就是由C/C++运行库函数_beginthreadex()来负责的。下面列出_beginthreadex()函数的源代码(我在这份代码中增加了一些注释)以便读者更好的理解_beginthreadex()函数与CreateThread()函数的区别。
[cpp]
view plaincopyprint?
//_beginthreadex源码整理By MoreWindows( http://blog.csdn.net/MoreWindows )
_MCRTIMP uintptr_t __cdecl _beginthreadex(
void *security,
unsigned stacksize,
unsigned (__CLR_OR_STD_CALL * initialcode) (void *),
void * argument,
unsigned createflag,
unsigned *thrdaddr
)
{
_ptiddata ptd; //pointer to per-thread data 见注1
uintptr_t thdl; //thread handle 线程句柄
unsigned long err = 0L; //Return from GetLastError()
unsigned dummyid; //dummy returned thread ID 线程ID号
// validation section 检查initialcode是否为NULL
_VALIDATE_RETURN(initialcode != NULL, EINVAL, 0);
//Initialize FlsGetValue function pointer
__set_flsgetvalue();
//Allocate and initialize a per-thread data structure for the to-be-created thread.
//相当于new一个_tiddata结构,并赋给_ptiddata指针。
if ( (ptd = (_ptiddata)_calloc_crt(1, sizeof(struct _tiddata))) == NULL )
goto error_return;
// Initialize the per-thread data
//初始化线程的_tiddata块即CRT数据区域 见注2
_initptd(ptd, _getptd()->ptlocinfo);
//设置_tiddata结构中的其它数据,这样这块_tiddata块就与线程联系在一起了。
ptd->_initaddr = (void *) initialcode; //线程函数地址
ptd->_initarg = argument; //传入的线程参数
ptd->_thandle = (uintptr_t)(-1);
#if defined (_M_CEE) || defined (MRTDLL)
if(!_getdomain(&(ptd->__initDomain))) //见注3
{
goto error_return;
}
#endif // defined (_M_CEE) || defined (MRTDLL)
// Make sure non-NULL thrdaddr is passed to CreateThread
if ( thrdaddr == NULL )//判断是否需要返回线程ID号
thrdaddr = &dummyid;
// Create the new thread using the parameters supplied by the caller.
//_beginthreadex()最终还是会调用CreateThread()来向系统申请创建线程
if ( (thdl = (uintptr_t)CreateThread(
(LPSECURITY_ATTRIBUTES)security,
stacksize,
_threadstartex,
(LPVOID)ptd,
createflag,
(LPDWORD)thrdaddr))
== (uintptr_t)0 )
{
err = GetLastError();
goto error_return;
}
//Good return
return(thdl); //线程创建成功,返回新线程的句柄.
//Error return
error_return:
//Either ptd is NULL, or it points to the no-longer-necessary block
//calloc-ed for the _tiddata struct which should now be freed up.
//回收由_calloc_crt()申请的_tiddata块
_free_crt(ptd);
// Map the error, if necessary.
// Note: this routine returns 0 for failure, just like the Win32
// API CreateThread, but _beginthread() returns -1 for failure.
//校正错误代号(可以调用GetLastError()得到错误代号)
if ( err != 0L )
_dosmaperr(err);
return( (uintptr_t)0 ); //返回值为NULL的效句柄
}
[cpp]
view plaincopyprint?

//创建多子个线程实例
#include <stdio.h>
#include <process.h>

#include <windows.h>
//子线程函数
unsigned int __stdcall ThreadFun(PVOID pM)
{
    printf("线程ID号为%4d的子线程说:Hello World\n", GetCurrentThreadId());
    return 0;
}
//主函数,所谓主函数其实就是主线程执行的函数。

int main()
{
    printf("     创建多个子线程实例 \n");
    printf(" -- by MoreWindows( http://blog.csdn.net/MoreWindows ) --\n\n");

    const int THREAD_NUM = 5;
    HANDLE handle[THREAD_NUM];
    for (int i = 0; i < THREAD_NUM; i++)
        handle[i] = (HANDLE)_beginthreadex(NULL, 0, ThreadFun, NULL, 0, NULL);
    WaitForMultipleObjects(THREAD_NUM, handle, TRUE, INFINITE);
    return 0;
}

//创建多子个线程实例
#include <stdio.h>
#include <process.h>
#include <windows.h>
//子线程函数
unsigned int __stdcall ThreadFun(PVOID pM)
{
printf("线程ID号为%4d的子线程说:Hello World\n", GetCurrentThreadId());
return 0;
}
//主函数,所谓主函数其实就是主线程执行的函数。
int main()
{
printf("     创建多个子线程实例 \n");
printf(" -- by MoreWindows( http://blog.csdn.net/MoreWindows ) --\n\n");

const int THREAD_NUM = 5;
HANDLE handle[THREAD_NUM];
for (int i = 0; i < THREAD_NUM; i++)
handle[i] = (HANDLE)_beginthreadex(NULL, 0, ThreadFun, NULL, 0, NULL);
WaitForMultipleObjects(THREAD_NUM, handle, TRUE, INFINITE);
return 0;
}
运行结果如下:
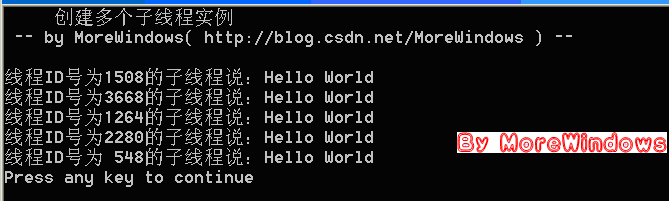
图中每个子线程说的都是同一句话,不太好看。能不能来一个线程报数功能,即第一个子线程输出1,第二个子线程输出2,第三个子线程输出3,……。要实现这个功能似乎非常简单——每个子线程对一个全局变量进行递增并输出就可以了。代码如下:
[cpp]
view plaincopyprint?
//子线程报数
#include <stdio.h>
#include <process.h>
#include <windows.h>
int g_nCount;
//子线程函数
unsigned int __stdcall ThreadFun(PVOID pM)
{
g_nCount++;
printf("线程ID号为%4d的子线程报数%d\n", GetCurrentThreadId(), g_nCount);
return 0;
}
//主函数,所谓主函数其实就是主线程执行的函数。
int main()
{
printf(" 子线程报数 \n");
printf(" -- by MoreWindows( http://blog.csdn.net/MoreWindows ) --\n\n");
const int THREAD_NUM = 10;
HANDLE handle[THREAD_NUM];
g_nCount = 0;
for (int i = 0; i < THREAD_NUM; i++)
handle[i] = (HANDLE)_beginthreadex(NULL, 0, ThreadFun, NULL, 0, NULL);
WaitForMultipleObjects(THREAD_NUM, handle, TRUE, INFINITE);
return 0;
}
//子线程报数
#include <stdio.h>
#include <process.h>
#include <windows.h>
int g_nCount;
//子线程函数
unsigned int __stdcall ThreadFun(PVOID pM)
{
g_nCount++;
printf("线程ID号为%4d的子线程报数%d\n", GetCurrentThreadId(), g_nCount);
return 0;
}
//主函数,所谓主函数其实就是主线程执行的函数。
int main()
{
printf(" 子线程报数 \n");
printf(" -- by MoreWindows( http://blog.csdn.net/MoreWindows ) --\n\n");
const int THREAD_NUM = 10;
HANDLE handle[THREAD_NUM];
g_nCount = 0;
for (int i = 0; i < THREAD_NUM; i++)
handle[i] = (HANDLE)_beginthreadex(NULL, 0, ThreadFun, NULL, 0, NULL);
WaitForMultipleObjects(THREAD_NUM, handle, TRUE, INFINITE);
return 0;
}对一次运行结果截图如下:
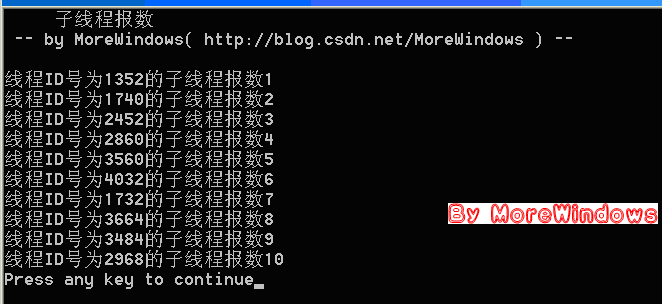
显示结果从1数到10,看起来好象没有问题。
答案是不对的,虽然这种做法在逻辑上是正确的,但在多线程环境下这样做是会产生严重的问题,下一篇《秒杀多线程第三篇 原子操作 Interlocked系列函数》将为你演示错误的结果(可能非常出人意料)并解释产生这个结果的详细原因。
原文地址:http://blog.csdn.net/morewindows/article/details/7421759

相关文章推荐
- 秒杀多线程第二篇 多线程第一次亲密接触 CreateThread与_beginthreadex本质区别
- 秒杀多线程第二篇 多线程第一次亲密接触 CreateThread与_beginthreadex本质区别
- 秒杀多线程第二篇 多线程第一次亲密接触 CreateThread与_beginthreadex本质区别
- 秒杀多线程第二篇 多线程第一次亲密接触 CreateThread与_beginthreadex本质区别
- 秒杀多线程第二篇 多线程第一次亲密接触 CreateThread与_beginthreadex本质区别
- 秒杀多线程第二篇 多线程第一次亲密接触 CreateThread与_beginthreadex本质区别
- 秒杀多线程第二篇 多线程第一次亲密接触 CreateThread与_beginthreadex本质区别
- 秒杀多线程第二篇 多线程第一次亲密接触 CreateThread与_beginthreadex本质区别
- 秒杀多线程第二篇 多线程第一次亲密接触 CreateThread与_beginthreadex本质区别
- 秒杀多线程第二篇 多线程第一次亲密接触 CreateThread与_beginthreadex本质区别
- 秒杀多线程第二篇 多线程第一次亲密接触 CreateThread与_beginthreadex本质区别
- 秒杀多线程第二篇 多线程第一次亲密接触 CreateThread与_beginthreadex本质区别 .
- 秒杀多线程第二篇 多线程第一次亲密接触 CreateThread与_beginthreadex本质区别
- 秒杀多线程第二篇 多线程第一次亲密接触 CreateThread与_beginthreadex本质区别
- 秒杀多线程第二篇 多线程第一次亲密接触 CreateThread与_beginthreadex本质区别
- 秒杀多线程第二篇 多线程第一次亲密接触 CreateThread与_beginthreadex本质区别
- 秒杀多线程第二篇 多线程第一次亲密接触 CreateThread与_beginthreadex本质区别
- 秒杀多线程第二篇 多线程第一次亲密接触 CreateThread与_beginthreadex本质区别
- 秒杀多线程第二篇 多线程第一次亲密接触 CreateThread与_beginthreadex本质区别
- 秒杀多线程第二篇 多线程第一次亲密接触 CreateThread与_beginthreadex本质区别