Practices on Umbraco DataType Development
2012-04-22 18:30
337 查看
Umbraco is the most powerful and flexible CMS I have ever seen so far. I just write this essay to demonstrate how to develop an Umbraco DataType for the folks who have basic Asp.net development knowledge.
Here we go, outlines for the steps.
Create an Asp.net application project Add reference to umbraco.editorControls.dll Add the usercontrol Copy the dll and ascx to Umbraco site Run in Umbraco site

The purpose of the Asp.net application project is to debug the usercontrol directly. It is not convenient if you try to debug your usercontrol in Umbraco site environment. It is recommended to name of the project as that you expect in the deployment. Let’s say, the expected assembly name is “NovaDev3.UmbracoComponents”. We name the Asp.net application project “NovaDev3.UmbracoComponents”.
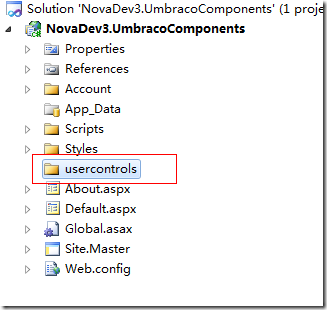
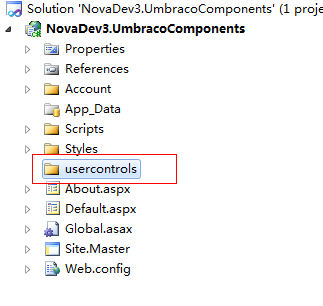
Then create a folder named “usercontrols” in the project. You will find that umbraco site probe the *.ascx file in “usercontrols” folder as well. You created usercontrol will be put in this folder.
.csharpcode, .csharpcode pre
{
font-size: small;
color: black;
font-family: consolas, "Courier New", courier, monospace;
background-color: #ffffff;
/*white-space: pre;*/
}
.csharpcode pre { margin: 0em; }
.csharpcode .rem { color: #008000; }
.csharpcode .kwrd { color: #0000ff; }
.csharpcode .str { color: #006080; }
.csharpcode .op { color: #0000c0; }
.csharpcode .preproc { color: #cc6633; }
.csharpcode .asp { background-color: #ffff00; }
.csharpcode .html { color: #800000; }
.csharpcode .attr { color: #ff0000; }
.csharpcode .alt
{
background-color: #f4f4f4;
width: 100%;
margin: 0em;
}
.csharpcode .lnum { color: #606060; }

Let’s just add some simple code to categoriesControl and add it to Default.aspx to test.
categoriesControl.ascx
categoriesControl.cs
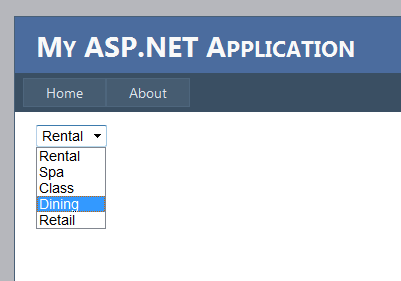
When you run your Asp.net project, the dropdownlist display successfully as below.
You can develop usercontrol with complex business logic in this way for incremental coding and debugging in the asp.net application site.
Copying NovaDev3.UmbracoComponents.dll and its dependency dlls to umbraco site/bin folder
Copying *.ascx files to umbraco site/usercontrols folder.
It is recommended to write a copying bat to do it at the beginning of the development.
After you click "Save” button, the “Usercontrol” dropdown list appear under the Database datatype, and then select “categoriesControl.ascx”
Now, you have added the usercontrol as an Umbraco datatype into Umbraco site successfully.
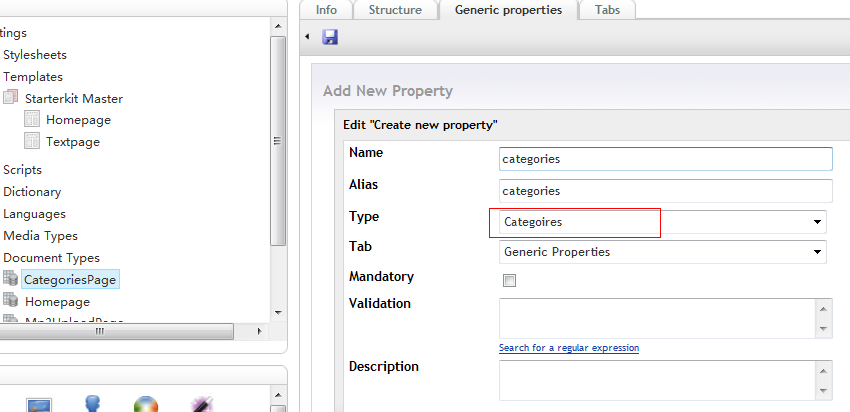
Let’s add a CategoriesPage document type(don’t select “Creating matching template” option) to hold the “Categories” datatype.
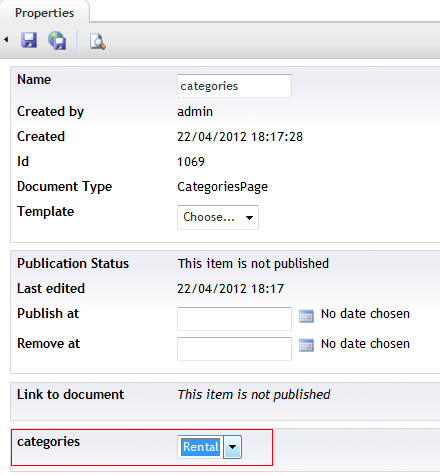
Then add a content of “CategoriesPage” to get the category dropdownlist you have just completed in the Asp.net application project.

Other considerations such as the database access layer and settings in the configuration file are ignored here. So you may have additional step to add the database connection string or dependency web service configuration to the web.config in the umbraco site if your usercontrol consumes data from database or other web services.
I will appreciate if you have any suggestions on the practices.
Please refer the source code at my Code Plex
Supported by Nova Umbraco
Here we go, outlines for the steps.
Create an Asp.net application project Add reference to umbraco.editorControls.dll Add the usercontrol Copy the dll and ascx to Umbraco site Run in Umbraco site
1. Create an Asp.net Application project
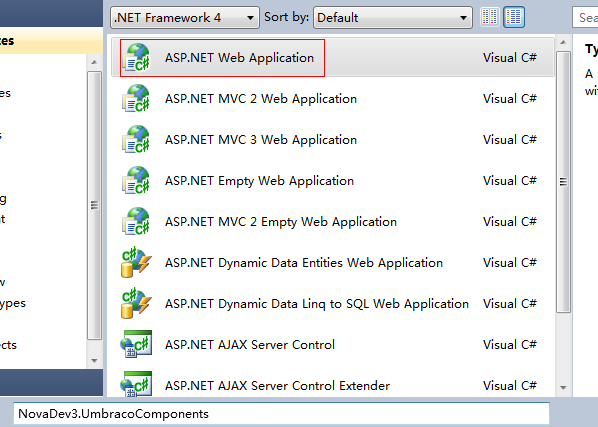
The purpose of the Asp.net application project is to debug the usercontrol directly. It is not convenient if you try to debug your usercontrol in Umbraco site environment. It is recommended to name of the project as that you expect in the deployment. Let’s say, the expected assembly name is “NovaDev3.UmbracoComponents”. We name the Asp.net application project “NovaDev3.UmbracoComponents”.
Then create a folder named “usercontrols” in the project. You will find that umbraco site probe the *.ascx file in “usercontrols” folder as well. You created usercontrol will be put in this folder.
2. Add reference to umbraco.editorControls.dll
You can add the reference of umbraco.editorContorls.dll from your umbraco site/bin folder directly. We will implement umbraco.editorControls.userControlGrapper.IUsercontrolDataEditor when we create the usercontrol for the umbraco site. IUsercontrolDataEditor has only one property defined and you could ignore it at all if you don’t plan to save the value in the umbraco db.namespace umbraco.editorControls.userControlGrapper
{
public interface IUsercontrolDataEditor
{
object value { get; set; }
}
}.csharpcode, .csharpcode pre
{
font-size: small;
color: black;
font-family: consolas, "Courier New", courier, monospace;
background-color: #ffffff;
/*white-space: pre;*/
}
.csharpcode pre { margin: 0em; }
.csharpcode .rem { color: #008000; }
.csharpcode .kwrd { color: #0000ff; }
.csharpcode .str { color: #006080; }
.csharpcode .op { color: #0000c0; }
.csharpcode .preproc { color: #cc6633; }
.csharpcode .asp { background-color: #ffff00; }
.csharpcode .html { color: #800000; }
.csharpcode .attr { color: #ff0000; }
.csharpcode .alt
{
background-color: #f4f4f4;
width: 100%;
margin: 0em;
}
.csharpcode .lnum { color: #606060; }
3. Add the usercontrol
Let’s add the usercontrol named “InventoryItemCategories”. It is recommended to follow umbraco naming convention that use camel style to name the control. The difference between normal asp.net usercontrol and the umbraco-featured user control is the implementation of IUsercontrolDataEditor.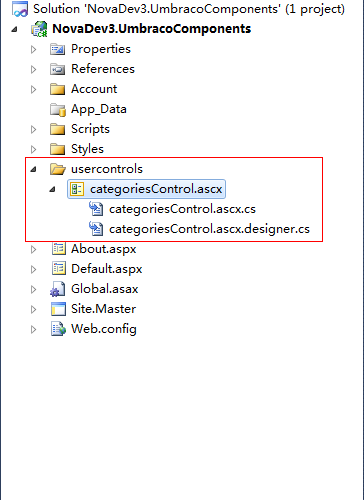
Let’s just add some simple code to categoriesControl and add it to Default.aspx to test.
categoriesControl.ascx
<%@ Control Language="C#" AutoEventWireup="true" CodeBehind="categoriesControl.ascx.cs" Inherits="NovaDev3.UmbracoComponents.usercontrols.categoriesControl" %>
<asp:DropDownList ID="categoriesDropdown" runat="server" />
categoriesControl.cs
using System;
using System.Collections.Generic;
using System.Linq;
using System.Web;
using System.Web.UI;
using System.Web.UI.WebControls;
using umbraco.editorControls.userControlGrapper;

namespace NovaDev3.UmbracoComponents.usercontrols
{
public partial class categoriesControl : System.Web.UI.UserControl, IUsercontrolDataEditor
{
protected void Page_Load(object sender, EventArgs e)
{
if (!IsPostBack)
{
categoriesDropdown.DataSource = new string[] {
"Rental",
"Spa",
"Class",
"Dining",
"Retail"
};

categoriesDropdown.DataBind();
}
}

public object value
{
get
{
return string.Empty;
}
set
{
//do nothing
}
}
}
}
Default.aspx
<%@ Page Title="Home Page" Language="C#" MasterPageFile="~/Site.master" AutoEventWireup="true"
CodeBehind="Default.aspx.cs" Inherits="NovaDev3.UmbracoComponents._Default" %>
<%@ Register TagPrefix="novaCtrl" TagName="categoriesControl" Src="~/usercontrols/categoriesControl.ascx" %>
<asp:Content ID="HeaderContent" runat="server" ContentPlaceHolderID="HeadContent">
</asp:Content>
<asp:Content ID="BodyContent" runat="server" ContentPlaceHolderID="MainContent">
<div>
<novaCtrl:categoriesControl ID="categories" runat="server" />
</div>
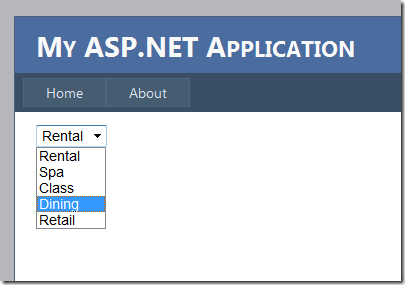
</asp:Content>When you run your Asp.net project, the dropdownlist display successfully as below.
You can develop usercontrol with complex business logic in this way for incremental coding and debugging in the asp.net application site.
4. Copy the dll and ascx to Umbraco site
When you development completes, you can copy the dll and ascx to the umbraco site folder.Copying NovaDev3.UmbracoComponents.dll and its dependency dlls to umbraco site/bin folder
Copying *.ascx files to umbraco site/usercontrols folder.
It is recommended to write a copying bat to do it at the beginning of the development.
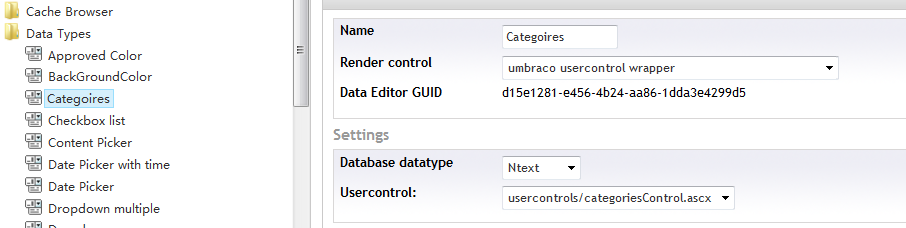
5. Run in Umbraco site
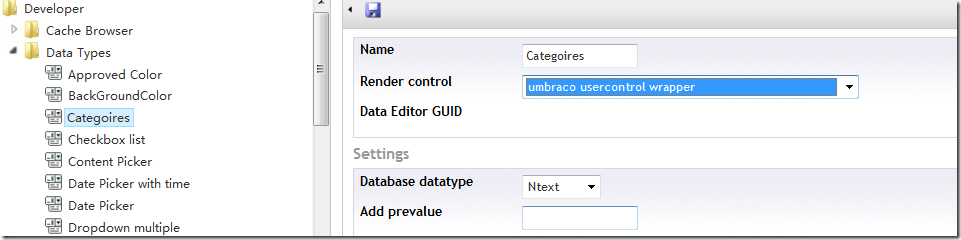
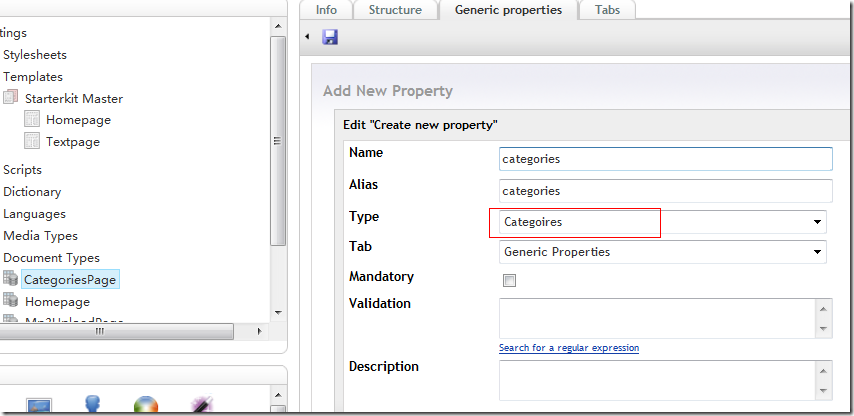
Go to the Data Types node in the Developer section in umbraco backoffice after you copy the *.dll and *.adcx files to umbraco site folders. Create a datatype named “Categories” and select its render control as “umbraco usercontrol wrapper”.
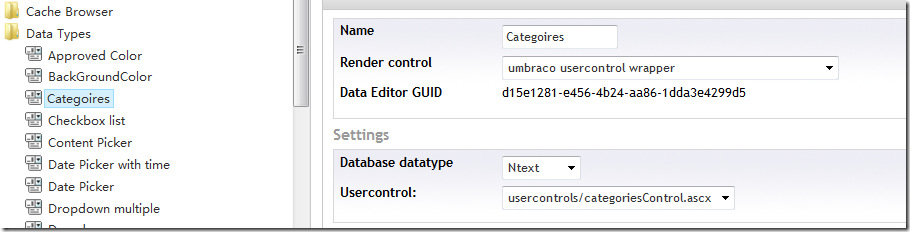
After you click "Save” button, the “Usercontrol” dropdown list appear under the Database datatype, and then select “categoriesControl.ascx”
Now, you have added the usercontrol as an Umbraco datatype into Umbraco site successfully.
Let’s add a CategoriesPage document type(don’t select “Creating matching template” option) to hold the “Categories” datatype.
Then add a content of “CategoriesPage” to get the category dropdownlist you have just completed in the Asp.net application project.
Other considerations such as the database access layer and settings in the configuration file are ignored here. So you may have additional step to add the database connection string or dependency web service configuration to the web.config in the umbraco site if your usercontrol consumes data from database or other web services.
I will appreciate if you have any suggestions on the practices.
Please refer the source code at my Code Plex
Supported by Nova Umbraco

相关文章推荐
- Umbraco-DataType-First-Glance
- mount: wrong fs type, bad option, bad superblock on 125.64.41.244:/data/img
- [EntLib]解决The type or namespace name 'Data' does not exist in the namespace 'Microsoft.Practices.EnterpriseLibrary' 的错误
- [Umbraco] Data Type之Render control
- join on different data type
- ajax上传图片TypeError: 'append' called on an object that does not implement interface FormData.
- 解决方法!:getImageData on 'CanvasRenderingContext2D': The canvas has been tainted by cross-origin data.
- 【明哥报错簿】之【 "javax.servlet.http.HttpServlet" was not found on the Java Build Path || HttpServletRequest/HttpServletResponse cannot be resolved to a type】
- activemq Unknown data type: 69
- Validform_v5.1.js BUG 动态加载 datatype 属性
- Expert one on one J2EE development without EJB 摘要(4)
- TypeError: validator.settings[("on" + event.type)].call is not a function
- 基础概念辨析:重访数据抽象(On Understanding Data Abstraction, Revisited)
- Vbscript data type
- 一劳永逸解决:TypeError: cannot use a string pattern on a bytes-like object
- 报错:Uncaught SecurityError: Failed to execute 'getImageData' on 'CanvasRenderingContext2D': The canva
- 关于“The type *** is not accessible due to restriction on required library”问题的解决
- SQLServer 中 错误 Error converting data type varchar to datetime 的解决方法
- Postgresql:内置数据类型(data type)
- Spring的JUnit错误:NoSuchBeanDefinitionException: No unique bean of type,expected single matching bean but found 2 [dataSource1,data