SQL 完整性约束-单个关系上的完整性约束
2012-04-21 09:01
211 查看
拓扑:
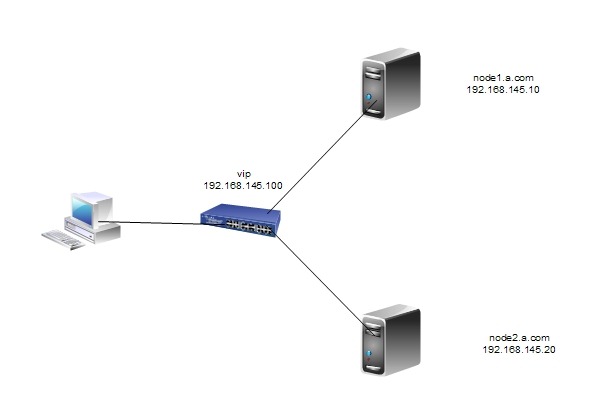
配置:
首先在两台主机上进行准备工作:
192.168.145.10主机:
[root@localhost ~]# vim /etc/sysconfig/network
编辑结果:
3 HOSTNAME=node1.a.com
[root@localhost ~]# vim /etc/hosts
编辑结果:
5 192.168.145.10 node1.a.com node1
6 192.168.145.20 node2.a.com node2
[root@localhost ~]# hostname node1.a.com
重新登录。
192.168.145.20主机:
[root@localhost ~]# vim /etc/sysconfig/network
编辑结果:
3 HOSTNAME=node2.a.com
[root@localhost ~]# vim /etc/hosts
编辑结果:
5 192.168.145.10 node1.a.com node1
6 192.168.145.20 node2.a.com node2
[root@localhost ~]# hostname node2.a.com
重新登录。
corosync配置
node1配置:
[root@node1 ~]# hwclock –s
编辑本地yum:
[root@node1 ~]# vim /etc/yum.repos.d/rhel-debuginfo.repo
编辑结果:
1 [rhel-server]
2 name=Red Hat Enterprise Linux server 3 baseurl=file:///mnt/cdrom/Server
4 enabled=1
5 gpgcheck=1
6 gpgkey=file:///mnt/cdrom/RPM-GPG-KEY-redhat-release
7
8 [rhel-cluster]
9 name=Red Hat Enterprise Linux cluster
10 baseurl=file:///mnt/cdrom/Cluster
11 enabled=1
12 gpgcheck=1
13 gpgkey=file:///mnt/cdrom/RPM-GPG-KEY-redhat-release
产生钥匙对:
[root@node1 ~]# ssh-keygen -t rsa
Generating public/private rsa key pair.
Enter file in which to save the key (/root/.ssh/id_rsa):
Created directory '/root/.ssh'.
Enter passphrase (empty for no passphrase):
Enter same passphrase again:
Your identification has been saved in /root/.ssh/id_rsa.
Your public key has been saved in /root/.ssh/id_rsa.pub.
The key fingerprint is:
e4:d6:8f:41:d9:f8:cd:1a:29:05:19:ec:57:fa:bb:63 root@node1.a.com
[root@node1 ~]# cd .ssh/
[root@node1 .ssh]# ll
总计 8
-rw------- 1 root root 1679 08-10 15:30 id_rsa
-rw-r--r-- 1 root root 398 08-10 15:30 id_rsa.pub
将公钥复制给node2:
[root@node1 .ssh]# ssh-copy-id -i id_rsa.pub node2
10
The authenticity of host 'node2 (192.168.145.20)' can't be established.
RSA key fingerprint is 3e:d3:a4:79:cf:7f:20:39:91:b5:49:cc:71:73:51:34.
Are you sure you want to continue connecting (yes/no)? yes
Warning: Permanently added 'node2,192.168.145.20' (RSA) to the list of known hosts.
root@node2's password:
Now try logging into the machine, with "ssh 'node2'", and check in:
.ssh/authorized_keys
to make sure we haven't added extra keys that you weren't expecting.
[root@node1 ~]# ll
总计 3372
-rw------- 1 root root 1176 08-03 04:07 anaconda-ks.cfg
-rw-r--r-- 1 root root 271360 08-10 15:45 cluster-glue-1.0.6-1.6.el5.i386.rpm
-rw-r--r-- 1 root root 133254 08-10 15:45 cluster-glue-libs-1.0.6-1.6.el5.i386.rpm
-rw-r--r-- 1 root root 170052 08-10 15:45 corosync-1.2.7-1.1.el5.i386.rpm
-rw-r--r-- 1 root root 158502 08-10 15:45 corosynclib-1.2.7-1.1.el5.i386.rpm
drwxr-xr-x 2 root root 4096 08-02 20:16 Desktop
-rw-r--r-- 1 root root 165591 08-10 15:45 heartbeat-3.0.3-2.3.el5.i386.rpm
-rw-r--r-- 1 root root 289600 08-10 15:45 heartbeat-libs-3.0.3-2.3.el5.i386.rpm
-rw-r--r-- 1 root root 35236 08-03 04:07 install.log
-rw-r--r-- 1 root root 3995 08-03 04:06 install.log.syslog
-rw-r--r-- 1 root root 60458 08-10 15:45 libesmtp-1.0.4-5.el5.i386.rpm
-rw-r--r-- 1 root root 207085 08-10 15:45 openais-1.1.3-1.6.el5.i386.rpm
-rw-r--r-- 1 root root 94614 08-10 15:45 openaislib-1.1.3-1.6.el5.i386.rpm
-rw-r--r-- 1 root root 796813 08-10 15:45 pacemaker-1.1.5-1.1.el5.i386.rpm
-rw-r--r-- 1 root root 207925 08-10 15:45 pacemaker-cts-1.1.5-1.1.el5.i386.rpm
-rw-r--r-- 1 root root 332026 08-10 15:45 pacemaker-libs-1.1.5-1.1.el5.i386.rpm
-rw-r--r-- 1 root root 32818 08-10 15:45 perl-TimeDate-1.16-5.el5.noarch.rpm
-rw-r--r-- 1 root root 388632 08-10 15:45 resource-agents-1.0.4-1.1.el5.i386.rpm
挂载:
[root@node1 ~]# mkdir /mnt/cdrom
[root@node1 ~]# mount /dev/cdrom /mnt/cdrom
mount: block device /dev/cdrom is write-protected, mounting read-only
安装软件:
[root@node1 ~]# yum localinstall -y *.rpm –nogpgcheck
[root@node1 ~]# cd /etc/corosync/
[root@node1 corosync]# ll
总计 20
-rw-r--r-- 1 root root 5384 2010-07-28 amf.conf.example
-rw-r--r-- 1 root root 436 2010-07-28 corosync.conf.example
drwxr-xr-x 2 root root 4096 2010-07-28 service.d
drwxr-xr-x 2 root root 4096 2010-07-28 uidgid.d
[root@node1 corosync]# cp corosync.conf.example corosync.conf
[root@node1 corosync]# vim corosync.conf
编辑结果:
34 service {
35 ver: 0
36 name: pacemaker
37 }
38
39 aisexec {
40 user: root
41 group: root
42 }
生成钥匙对:
[root@node1 corosync]# corosync-keygen
Corosync Cluster Engine Authentication key generator.
Gathering 1024 bits for key from /dev/random.
Press keys on your keyboard to generate entropy.
Writing corosync key to /etc/corosync/authkey.
[root@node1 corosync]# ll
总计 28
-rw-r--r-- 1 root root 5384 2010-07-28 amf.conf.example
-r-------- 1 root root 128 08-10 22:47 authkey
-rw-r--r-- 1 root root 541 08-10 20:47 corosync.conf
-rw-r--r-- 1 root root 436 2010-07-28 corosync.conf.example
drwxr-xr-x 2 root root 4096 2010-07-28 service.d
drwxr-xr-x 2 root root 4096 2010-07-28 uidgid.d
复制文件到node2:
[root@node1 corosync]# scp -p authkey corosync.conf node2:/etc/corosync/
authkey 100% 128 0.1KB/s 00:00
corosync.conf 100% 541 0.5KB/s 00:00
创建日志文件:
[root@node1 corosync]# mkdir /var/log/cluster
[root@node1 corosync]# ssh node2 'mkdir /var/log/cluster'
启动服务:
[root@node1 corosync]# service corosync start
Starting Corosync Cluster Engine (corosync): [确定]
[root@node1 corosync]# ssh node2 'service corosync start'
Starting Corosync Cluster Engine (corosync): [确定]
验证corosync引擎是否正常启动了:
[root@node1 corosync]# grep -i -e "corosync cluster engine" -e "configuration file" /var/log/messages
查看初始化成员节点通知是否发出:
[root@node1 corosync]# grep -i totem /var/log/messages
检查过程中是否有错误产生:
[root@node1 corosync]# grep -i error: /var/log/messages |grep -v unpack_resources
检查pacemaker是否已经启动:
[root@node1 corosync]# grep -i pcmk_startup /var/log/messages
查看群集成员状态:
[root@node1 corosync]# crm status
禁用stonith:
[root@node1 corosync]# crm
crm(live)# configure
crm(live)configure# property stonith-enabled=false
crm(live)configure# commit
定义资源:
crm(live)configure# primitive webip ocf:heartbeat:IPaddr params ip=192.168.145.100
crm(live)configure# commit
安装web服务:
[root@node1 ~]# yum install -y httpd
[root@node1 ~]# echo "node1.a.com" >/var/www/html/index.html
定义web资源:
[root@node1 ~]# crm
crm(live)# configure
crm(live)configure# primitive webserver lsb:httpd
crm(live)configure# commit
crm(live)configure# group web webip webserver
crm(live)configure# commit
node2配置:
产生钥匙对:
[root@node2 ~]# ssh-keygen -t rsa
Generating public/private rsa key pair.
Enter file in which to save the key (/root/.ssh/id_rsa):
Enter passphrase (empty for no passphrase):
Enter same passphrase again:
Your identification has been saved in /root/.ssh/id_rsa.
Your public key has been saved in /root/.ssh/id_rsa.pub.
The key fingerprint is:
4c:a9:ec:03:2f:d2:29:9b:b1:29:a5:f3:fa:20:1c:71 root@node2.a.com
[root@node2 ~]# cd .ssh/
复制公钥给node1:
[root@node2 .ssh]# ssh-copy-id -i id_rsa.pub node1
10
The authenticity of host 'node1 (192.168.145.10)' can't be established.
RSA key fingerprint is 3e:d3:a4:79:cf:7f:20:39:91:b5:49:cc:71:73:51:34.
Are you sure you want to continue connecting (yes/no)? yes
Warning: Permanently added 'node1,192.168.145.10' (RSA) to the list of known hosts.
root@node1's password:
Now try logging into the machine, with "ssh 'node1'", and check in:
.ssh/authorized_keys
to make sure we haven't added extra keys that you weren't expecting.
复制node1的yum客户端配置:
[root@node2 .ssh]# scp node1:/etc/yum.repos.d/rhel-debuginfo.repo /etc/yum.repos.d/rhel-debuginfo.repo
rhel-debuginfo.repo 100% 318 0.3KB/s 00:00
[root@node2 .ssh]# hwclock –s
[root@node2 .ssh]# date
2012年 08月 10日 星期五 15:42:12 CST
[root@node2 .ssh]# ssh node1 'date'
2012年 08月 10日 星期五 15:42:24 CST
复制node1中的软件包:
[root@node2 ~]# scp node1:/root/*.rpm ./
cluster-glue-1.0.6-1.6.el5.i386.rpm 100% 265KB 265.0KB/s 00:00
cluster-glue-libs-1.0.6-1.6.el5.i386.rpm 100% 130KB 130.1KB/s 00:00
corosync-1.2.7-1.1.el5.i386.rpm 100% 166KB 166.1KB/s 00:00
corosynclib-1.2.7-1.1.el5.i386.rpm 100% 155KB 154.8KB/s 00:00
heartbeat-3.0.3-2.3.el5.i386.rpm 100% 162KB 161.7KB/s 00:00
heartbeat-libs-3.0.3-2.3.el5.i386.rpm 100% 283KB 282.8KB/s 00:00
libesmtp-1.0.4-5.el5.i386.rpm 100% 59KB 59.0KB/s 00:00
openais-1.1.3-1.6.el5.i386.rpm 100% 202KB 202.2KB/s 00:00
openaislib-1.1.3-1.6.el5.i386.rpm 100% 92KB 92.4KB/s 00:00
pacemaker-1.1.5-1.1.el5.i386.rpm 100% 778KB 778.1KB/s 00:00
pacemaker-cts-1.1.5-1.1.el5.i386.rpm 100% 203KB 203.1KB/s 00:00
pacemaker-libs-1.1.5-1.1.el5.i386.rpm 100% 324KB 324.2KB/s 00:00
perl-TimeDate-1.16-5.el5.noarch.rpm 100% 32KB 32.1KB/s 00:01
resource-agents-1.0.4-1.1.el5.i386.rpm 100% 380KB 379.5KB/s 00:00
挂载:
[root@node2 ~]# mkdir /mnt/cdrom
[root@node2 ~]# mount /dev/cdrom /mnt/cdrom
mount: block device /dev/cdrom is write-protected, mounting read-only
安装软件包:
[root@node2 ~]# yum localinstall -y *.rpm –nogpgcheck
验证corosync引擎是否正常启动了:
[root@node2 corosync]# grep -i -e "corosync cluster engine" -e "configuration file" /var/log/messages
查看初始化成员节点通知是否发出:
[root@node2 corosync]# grep -i totem /var/log/messages
检查过程中是否有错误产生:
[root@node1 corosync]# grep -i error: /var/log/messages |grep -v unpack_resources
检查pacemaker是否已经启动:
[root@node2 corosync]# grep -i pcmk_startup /var/log/messages
查看群集成员状态:
[root@node2 corosync]# crm status
安装web服务:
[root@node2 ~]# yum install -y httpd
[root@node2 ~]# echo "node2.a.com" >/var/www/html/index.html
DRBD配置
添加分区[root@node2 ~]# fdisk /dev/sda
The number of cylinders for this disk is set to 2610.
There is nothing wrong with that, but this is larger than 1024,
and could in certain setups cause problems with:
1) software that runs at boot time (e.g., old versions of LILO)
2) booting and partitioning software from other OSs
(e.g., DOS FDISK, OS/2 FDISK)
Command (m for help): p
Disk /dev/sda: 21.4 GB, 21474836480 bytes
255 heads, 63 sectors/track, 2610 cylinders
Units = cylinders of 16065 * 512 = 8225280 bytes
Device Boot Start End Blocks Id System
/dev/sda1 * 1 13 104391 83 Linux
/dev/sda2 14 1288 10241437+ 83 Linux
/dev/sda3 1289 1386 787185 82 Linux swap / Solaris
Command (m for help): n
Command action
e extended
p primary partition (1-4)
e
Selected partition 4
First cylinder (1387-2610, default 1387):
Using default value 1387
Last cylinder or +size or +sizeM or +sizeK (1387-2610, default 2610):
Using default value 2610
Command (m for help): p
Disk /dev/sda: 21.4 GB, 21474836480 bytes
255 heads, 63 sectors/track, 2610 cylinders
Units = cylinders of 16065 * 512 = 8225280 bytes
Device Boot Start End Blocks Id System
/dev/sda1 * 1 13 104391 83 Linux
/dev/sda2 14 1288 10241437+ 83 Linux
/dev/sda3 1289 1386 787185 82 Linux swap / Solaris
/dev/sda4 1387 2610 9831780 5 Extended
Command (m for help): n
First cylinder (1387-2610, default 1387):
Using default value 1387
Last cylinder or +size or +sizeM or +sizeK (1387-2610, default 2610): +2g
Command (m for help): w
The partition table has been altered!
Calling ioctl() to re-read partition table.
WARNING: Re-reading the partition table failed with error 16: 设备或资源忙.
The kernel still uses the old table.
The new table will be used at the next reboot.
Syncing disks.
[root@node2 ~]# partprobe /dev/sda
[root@node2 ~]# cat /proc/partitions
major minor #blocks name
8 0 20971520 sda
8 1 104391 sda1
8 2 10241437 sda2
8 3 787185 sda3
8 4 0 sda4
8 5 1959898 sda5
在节点1上做同样配置。
安装drbd,用来构建分布式存储
[root@node1 ~]# yum localinstall -y drbd83-8.3.8-1.el5.centos.i386.rpm --nogpgcheck
[root@node1 ~]# yum localinstall -y kmod-drbd83-8.3.8-1.el5.centos.i686.rpm --nogpgcheck
在节点2上做同样操作
[root@node1 ~]# cp /usr/share/doc/drbd83-8.3.8/drbd.conf /etc/
cp: overwrite `/etc/drbd.conf'? Y # 这里要选择覆盖
[root@node1 ~]# scp /etc/drbd.conf node2:/etc/
[root@node1 ~]# vim /etc/drbd.d/global_common.conf
1 global {
2 usage-count no;
3 # minor-count dialog-refresh disable-ip-verification
4 }
5
6 common {
7 protocol C;
8
9 startup {
10 wfc-timeout 120;
11 degr-wfc-timeout 120;
12 }
13 disk {
14 on-io-error detach;
15 fencing resource-only;
16
17 }
18 net {
19 cram-hmac-alg "sha1";
20 shared-secret "mydrbdlab";
21 } 22 syncer {
23 rate 100M;
24 }
25 }
[root@node1 ~]# vim /etc/drbd.d/web.res
1 resource web {
2 on node1.a.com {
3 device /dev/drbd0;
4 disk /dev/sda5;
5 address 192.168.145.10:7789;
6 meta-disk internal;
7 }
8
9 on node2.a.com {
10 device /dev/drbd0;
11 disk /dev/sda5;
12 address 192.168.145.20:7789;
13 meta-disk internal;
14 }
15 }
[root@node1 ~]# scp /etc/drbd.d/* node2:/etc/drbd.d/
初始化已定义的资源并启动服务:
[root@node1 ~]# drbdadm create-md web
[root@node2 ~]# drbdadm create-md web
[root@node1 ~]# service drbd start
[root@node2 ~]#service drbd start
设在主机点上执行
drbdadm -- --overwrite-data-of-peer primary web
创建文件系统(在主节点上实现)
mkfs -t ext3 -L drbdweb /dev/drbd0
[root@node1 ~]# mkdir /web
[root@node1 ~]# mount /dev/drbd0 /web/
echo "hello" >index.html
测试
把node1变成从的,node2 变成主的
root@node1 ~]# umount /web
[root@node1 ~]# drbdadm secondary web
[root@node1 ~]# drbdadm role web
Secondary/Secondary
在node2 节点上,
[root@node2 ~]# mkdir /web
[root@node2 ~]# drbdadm primary web
[root@node2 ~]# drbd-overview
0:web Connected Primary/Secondary UpToDate/UpToDate C r----
[root@node2 ~]# drbdadm role web
Primary/Secondary
[root@node2 ~]# mount /dev/drbd0 /web
[root@node2 ~]# ll /web
total 20
-rw-r--r-- 1 root root 6 May 7 00:46 index.html
drwx------ 2 root root 16384 May 7 00:45 lost+found
root@node2 ~]# cd /web
[root@node2 web]# vim test.html
[root@node2 ~]# umount /web
[root@node2 ~]# drbdadm secondary web
切换到node1上
[root@node1 ~]# drbdadm primary web
[root@node1 ~]# mount /dev/drbd0 /web
[root@node1 ~]# ll /web
total 24
-rw-r--r-- 1 root root 6 May 7 00:46 index.html
drwx------ 2 root root 16384 May 7 00:45 lost+found
-rw-r--r-- 1 root root 13 May 7 00:58 test.html
置其中一个节点为主节点。
本文出自 “曹瑞军” 博客,请务必保留此出处http://caoruijun.blog.51cto.com/5544226/1036620

相关文章推荐
- SQL之-建库、建表、建约束、关系、部分T-sql语句
- 完整性约束的SQL定义
- DBCC大全集之(适用版本MS SQLServer 2008 R2)----DBCC CHECKCONSTRAINTS检查当前数据库中指定表上的指定约束或所有约束的完整性
- SQL之-建库、建表、建约束、关系、部分T-sql语句
- PD 15.1 安装 破解 , 简单使用 (一对多,多对多关系生成sql脚本) , CDM 和 PDM 的区别;PD15.1 生成sql2008 无FK外键约束的解决方法
- 实体完整性约束 参照完整性约束 左外连接 右外连接 关系表达式的优化 SQL
- sql中表达完整性约束的机制主要有哪几种
- 完整性约束的SQL定义
- Oracle PL/SQL语言初级教程之完整性约束
- 教学思路SQL之预备课程学习 建库、建表、建约束、关系、部分T-sql语句
- VC++ 表格、完整性约束、视图、触发器、存储过程的创建SQL语句
- SQl -维护数据的完整性--约束 -
- 教学思路SQL之预备课程学习 建库、建表、建约束、关系、部分T-sql语句
- QL之-建库、建表、建约束、关系SQL基本语句
- 关系的三类完整性约束
- SQL之-建库、建表、建约束、关系、部分T-sql语句
- 教学思路SQL之预备课程学习 建库、建表、建约束、关系、部分T-sql语句
- sql中表达完整性约束的机制主要有哪几种?
- SQL之-建库、建表、建约束、关系、部分T-sql语句
- SQL存储原理及聚集索引、非聚集索引、唯一索引、主键约束的关系