Oracle 10G install for Redhat 6.2 x86
2012-04-19 14:58
323 查看
安装前的准备工作
1.检测安装环境
2.修改系统核心参数
3 创建有权限的操作系统用户和组
4.设置环境变量
5.创建安装需要的目录
6.执行安装文件开始安装
1、检测安装环境
需要安装的软件包
binutils-2.17.50.0.6 compat-libstdc++-33-3.2.3 elfutils-libelf-0.125
elfutils-libelf-devel-0.125 elfutils-libelf-devel-static-0.125
gcc-4.1.2 gcc-c++-4.1.2 glibc-2.5-24 glibc-common-2.5
glibc-devel-2.5 glibc-headers-2.5 kernel-headers-2.6.18
ksh-20060214 libaio-0.3.106 libaio-devel-0.3.106
libgcc-4.1.2 libgomp-4.1.2 libstdc++-4.1.2 libstdc++-devel-4.1.2
make-3.81 numactl-devel-0.9.8.i386 sysstat-7.0.2 unixODBC-2.2.11
unixODBC-devel-2.2.11
在centos下面还需要装一个pdksh的包
2、修改系统核心参数

需要调整的内核参数:
a.kernel.sem
[root@fenghong ~]# sysctl -a|grep sem
kernel.sem = 250 32000 32 128
[root@fenghong ~]# sysctl -a|grep sem|sed 's/32/100/2'
kernel.sem = 250 32000 100 128 (sed ‘/2’是第二次出现的32)
[root@fenghong ~]# sysctl -a|grep sem|sed 's/32/100/2'>>/etc/sysctl.conf
b.net.ipv4.ip_local_port_range
[root@fenghong ~]# sysctl -a|grep ip_local_port
net.ipv4.ip_local_port_range = 32768 61000
[root@fenghong ~]# sysctl -a|grep ip_local_port|sed -e 's/32768/1024/' -e 's/61/65/'
net.ipv4.ip_local_port_range = 1024 65000(sed当接多个命令-e,默认一个不用加-e)
[root@fenghong ~]# sysctl -a|grep ip_local_port|sed -e 's/32768/1024/' -e 's/61/65/'>>/etc/sysctl.conf
c.net.core.rmem_max
[root@fenghong ~]# sysctl -a|grep rmem_max
net.core.rmem_max = 131071
[root@fenghong ~]# sysctl -a|grep rmem_max|sed 's/131071/262411/'>>/etc/sysctl.conf
d.net.core.rmem_default
[root@fenghong ~]# sysctl -a|grep rmem_d
net.core.rmem_default = 112640
[root@fenghong ~]# sysctl -a|grep rmem_d|sed 's/112640/262144/'
net.core.rmem_default = 262144
[root@fenghong ~]# sysctl -a|grep rmem_d|sed 's/112640/262144/'>>/etc/sysctl.conf
e.net.core.wmem_max
[root@fenghong ~]# sysctl -a|grep wmem_ma
net.core.wmem_max = 131071
[root@fenghong ~]# sysctl -a|grep wmem_ma|sed 's/131071/262144/'>>/etc/sysctl.conf
f.net.core.wmem_default
[root@fenghong ~]# sysctl -a|grep wmem_d
net.core.wmem_default = 112640
[root@fenghong ~]# sysctl -a|grep wmem_d|sed 's/112640/262144/'>>/etc/sysctl.conf
g.fs.file-max
[root@fenghong ~]# sysctl -a|grep file-m
fs.file-max = 100901
[root@fenghong ~]# sysctl -a|grep file-m|sed 's/100901/65526/'>>/etc/sysctl.conf
h.使修改生效
[root@fenghong ~]# sysctl -p
PS:
fs.aio-max-nr = 1048576
fs.file-max = 6815744
net.ipv4.ip_local_port_range = 9000 65500
net.core.rmem_default = 262144
net.core.rmem_max = 4194304
net.core.wmem_max = 1048576
net.core.wmem_default = 262144
kernel.sem = 250 32000 100 128
3 、创建有权限的操作系统用户和组

4、设置环境变量
[root@fenghong ~]# vim /home/oracle/.bash_profile

5、创建安装需要的目录
[root@fenghong ~]# mkdir -p /feng/oracle
[root@fenghong ~]# chown -R oracle:oinstall /feng/oracle/
6、执行安装文件开始安装
[root@fenghong ~]# export DISPLAY=192.168.0.247:0.0
[root@fenghong ~]# xhost +
[root@fenghong ~]# su - oracle
执行安装文件进行安装
[root@fenghong database]# ./runInstaller
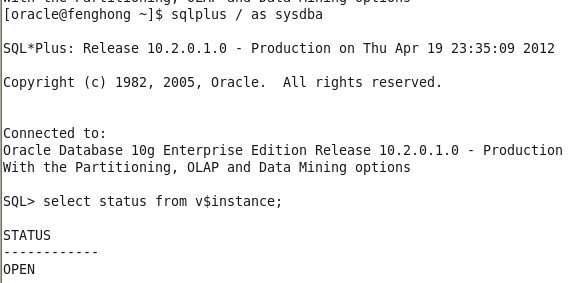
6、验证是否安装成功

建议:
一、[root@fenghong ~]# cat /etc/redhat-release
Red Hat Enterprise Linux Server release 6.2 (Santiago)
[root@fenghong ~]# sed 's/6/4/' -i /etc/redhat-release (-i 修改源文件)
有些情况下,有些软件包没装,判断的时候版本太高了,检查就会失败...因为oracle 10g的时候rhel6还没有出来.. 所以10g中的产品没包括rhel6系列
二、修改/etc/hosts文件, 添加主机IP和主机名的解析
本文出自 “King`feng” 博客,请务必保留此出处http://feng416.blog.51cto.com/3829093/838511
1.检测安装环境
2.修改系统核心参数
3 创建有权限的操作系统用户和组
4.设置环境变量
5.创建安装需要的目录
6.执行安装文件开始安装
1、检测安装环境
需要安装的软件包
binutils-2.17.50.0.6 compat-libstdc++-33-3.2.3 elfutils-libelf-0.125
elfutils-libelf-devel-0.125 elfutils-libelf-devel-static-0.125
gcc-4.1.2 gcc-c++-4.1.2 glibc-2.5-24 glibc-common-2.5
glibc-devel-2.5 glibc-headers-2.5 kernel-headers-2.6.18
ksh-20060214 libaio-0.3.106 libaio-devel-0.3.106
libgcc-4.1.2 libgomp-4.1.2 libstdc++-4.1.2 libstdc++-devel-4.1.2
make-3.81 numactl-devel-0.9.8.i386 sysstat-7.0.2 unixODBC-2.2.11
unixODBC-devel-2.2.11
在centos下面还需要装一个pdksh的包
2、修改系统核心参数

需要调整的内核参数:
a.kernel.sem
[root@fenghong ~]# sysctl -a|grep sem
kernel.sem = 250 32000 32 128
[root@fenghong ~]# sysctl -a|grep sem|sed 's/32/100/2'
kernel.sem = 250 32000 100 128 (sed ‘/2’是第二次出现的32)
[root@fenghong ~]# sysctl -a|grep sem|sed 's/32/100/2'>>/etc/sysctl.conf
b.net.ipv4.ip_local_port_range
[root@fenghong ~]# sysctl -a|grep ip_local_port
net.ipv4.ip_local_port_range = 32768 61000
[root@fenghong ~]# sysctl -a|grep ip_local_port|sed -e 's/32768/1024/' -e 's/61/65/'
net.ipv4.ip_local_port_range = 1024 65000(sed当接多个命令-e,默认一个不用加-e)
[root@fenghong ~]# sysctl -a|grep ip_local_port|sed -e 's/32768/1024/' -e 's/61/65/'>>/etc/sysctl.conf
c.net.core.rmem_max
[root@fenghong ~]# sysctl -a|grep rmem_max
net.core.rmem_max = 131071
[root@fenghong ~]# sysctl -a|grep rmem_max|sed 's/131071/262411/'>>/etc/sysctl.conf
d.net.core.rmem_default
[root@fenghong ~]# sysctl -a|grep rmem_d
net.core.rmem_default = 112640
[root@fenghong ~]# sysctl -a|grep rmem_d|sed 's/112640/262144/'
net.core.rmem_default = 262144
[root@fenghong ~]# sysctl -a|grep rmem_d|sed 's/112640/262144/'>>/etc/sysctl.conf
e.net.core.wmem_max
[root@fenghong ~]# sysctl -a|grep wmem_ma
net.core.wmem_max = 131071
[root@fenghong ~]# sysctl -a|grep wmem_ma|sed 's/131071/262144/'>>/etc/sysctl.conf
f.net.core.wmem_default
[root@fenghong ~]# sysctl -a|grep wmem_d
net.core.wmem_default = 112640
[root@fenghong ~]# sysctl -a|grep wmem_d|sed 's/112640/262144/'>>/etc/sysctl.conf
g.fs.file-max
[root@fenghong ~]# sysctl -a|grep file-m
fs.file-max = 100901
[root@fenghong ~]# sysctl -a|grep file-m|sed 's/100901/65526/'>>/etc/sysctl.conf
h.使修改生效
[root@fenghong ~]# sysctl -p
PS:
fs.aio-max-nr = 1048576
fs.file-max = 6815744
net.ipv4.ip_local_port_range = 9000 65500
net.core.rmem_default = 262144
net.core.rmem_max = 4194304
net.core.wmem_max = 1048576
net.core.wmem_default = 262144
kernel.sem = 250 32000 100 128
3 、创建有权限的操作系统用户和组

4、设置环境变量
[root@fenghong ~]# vim /home/oracle/.bash_profile

5、创建安装需要的目录
[root@fenghong ~]# mkdir -p /feng/oracle
[root@fenghong ~]# chown -R oracle:oinstall /feng/oracle/
6、执行安装文件开始安装
[root@fenghong ~]# export DISPLAY=192.168.0.247:0.0
[root@fenghong ~]# xhost +
[root@fenghong ~]# su - oracle
执行安装文件进行安装
[root@fenghong database]# ./runInstaller
6、验证是否安装成功

建议:
一、[root@fenghong ~]# cat /etc/redhat-release
Red Hat Enterprise Linux Server release 6.2 (Santiago)
[root@fenghong ~]# sed 's/6/4/' -i /etc/redhat-release (-i 修改源文件)
有些情况下,有些软件包没装,判断的时候版本太高了,检查就会失败...因为oracle 10g的时候rhel6还没有出来.. 所以10g中的产品没包括rhel6系列
二、修改/etc/hosts文件, 添加主机IP和主机名的解析
本文出自 “King`feng” 博客,请务必保留此出处http://feng416.blog.51cto.com/3829093/838511
相关文章推荐
- Install Oracle 10g for Solaris-10-u5-ga-X86
- Install Oracle 10g for Solaris-10-u5-ga-X86
- Vmware server Oracle 10g for redhat 4.7 安装
- RedHat Enterprice Linux 5.2(x86_64) 安装 oracle 10g(x86_64)
- RedHat 5.6_x86_64 + ASM + RAW+ Oracle 10g RAC (一)
- Oracle install for redhat Linux
- ORACLE 10G安装文档for RedHat 5.4
- 图文并茂――Oracle 10g for Windows install
- Oracle 10g For RedHat5.4 64b 安装概要
- CentOS 6.2(x86_32)下安装Oracle 10g R2
- RedHat 5.6_x86_64 + ASM + RAW+ Oracle 10g RAC (七) 添加节点—初始化环境
- RedHat 5.6_x86_64 + ASM + RAW+ Oracle 10g RAC (十) 添加节点—创建监听
- Oracle 10g R2 RAC for Redhat Linux AS 4
- RedHat 5.6_x86_64 + ASM + RAW+ Oracle 10g RAC (八) 添加节点—安装clusterware
- ORACLE Install (10g r2) FOR Red Hat Enterprise Linux Server release 5.5 (64 bit) (转)
- RedHat 5.6_x86_64 + ASM + RAW+ Oracle 10g RAC (四)
- RedHat 5.6_x86_64 + ASM + RAW+ Oracle 10g RAC (二)
- Solaris 9 x86 u7 for vmware 安装Oracle 10g Release 1 (10.1.0.3)指南
- RedHat 5.6_x86_64 + ASM + RAW+ Oracle 10g RAC (三)
- 图文并茂——Oracle 10g for Windows install
