Silverlight中使用MVVM(5):Command II
2012-04-06 11:19
260 查看
转自/article/5021452.html
Silverlight中使用MVVM(1)--基础
Silverlight中使用MVVM(2)—提高
Silverlight中使用MVVM(3)—进阶
Silverlight中使用MVVM(4)—演练
大约半年前,我接触了MVVM这个概念,经过一段时间的运用后,对MVVM已经有了更为深刻的了解,这篇文章将重新回头来看Command,因为Command是
实现MVVM中非常重要的一个环节。
在SL4中,只提供了对Button与Hyperlink的内置Command,简单的来讲,在SL中使用内置的Command有3个步骤:
1,实现ICommand接口的类
2,在ViewModel中创建一个ICommand属性
3,将第2步中创建的属性绑定到Button或Hyperlink中
我下面首先通过“点击Button增加数据”这样一个简单的例子说明一下这个流程,因为本意是给刚接触MVVM的朋友看的,如果不是太熟悉MVVM,可以先看下
博客中前面几篇相关文章。
在实际项目中,对每个Command都实现相应的类是不现实的,所以这里直接以泛型类的方式实现ICommand接口,
在实现ViewModel部分前,先定义一个实体类Employee
首先在Blend中打开该解决方案
打开Assets选项卡:

选中InvokeCommandAction,将其拖动到listBox1后,选中listBox1下的InvokeCommandAction


打开属性选项卡,修改EventName为MouseLeftButtonUp

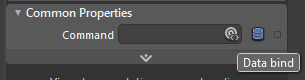
现在开始绑定到Command,点击Data bind会弹出对话框

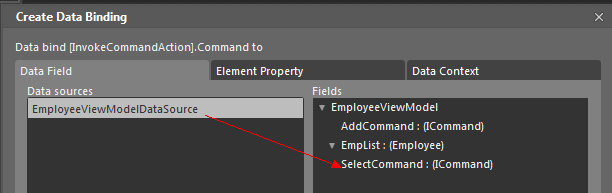
选中+CLR Object创建数据源

选中创建好的EmployeeViewModel,

这几步都做好后,你可以看看生成的Xaml,关键的Xaml代码是这样的:
这里需要将ListBox的SelectItem作为SelectCommand关联的SelectMethod(Employee employee)的参数:
这样就完成了使用InvokeCommandAction实现了对SL4中不内置支持Command的控件,对于InvokeCommandAction还有其它的一些应用,可以自己去看
相关文章。
通过这一系列步骤,可以看到MVVM模式可以将UI与逻辑很好的分开维护,使用MVVM的这半年来,我在工作中越来越倾向于应用这种模式,希望这篇文章
能给大家有所帮助。
代码下载:SLCommandInMVVM.rar
Silverlight中使用MVVM(1)--基础
Silverlight中使用MVVM(2)—提高
Silverlight中使用MVVM(3)—进阶
Silverlight中使用MVVM(4)—演练
大约半年前,我接触了MVVM这个概念,经过一段时间的运用后,对MVVM已经有了更为深刻的了解,这篇文章将重新回头来看Command,因为Command是
实现MVVM中非常重要的一个环节。
在SL4中,只提供了对Button与Hyperlink的内置Command,简单的来讲,在SL中使用内置的Command有3个步骤:
1,实现ICommand接口的类
2,在ViewModel中创建一个ICommand属性
3,将第2步中创建的属性绑定到Button或Hyperlink中
我下面首先通过“点击Button增加数据”这样一个简单的例子说明一下这个流程,因为本意是给刚接触MVVM的朋友看的,如果不是太熟悉MVVM,可以先看下
博客中前面几篇相关文章。
在实际项目中,对每个Command都实现相应的类是不现实的,所以这里直接以泛型类的方式实现ICommand接口,
public class DelegateCommand<T> : ICommand{ [/code]
private readonly Action<T> executeAction;
private readonly Func<T, bool> canExecuteAction;
public event EventHandler CanExecuteChanged;
public DelegateCommand(Action<T> executeAction)
: this(executeAction, null)
{}
public DelegateCommand(Action<T> executeAction,
Func<T, bool> canExecuteAction)
{this.executeAction = executeAction;
this.canExecuteAction = canExecuteAction;
}
public bool CanExecute(object parameter)
{if (canExecuteAction != null)
{return canExecuteAction((T)parameter);
}
return true;
}
public void Execute(object parameter)
{if (CanExecute(parameter))
{executeAction((T)parameter);
}
}
}这个部分主要是参考的Prism框架的,在网上搜DelegateCommand会看到一大堆这方面的讲解,就不对代码细说了。
在实现ViewModel部分前,先定义一个实体类Employee
public class Employee{ [/code]
public string EmpName { get; set; }public int Age { get; set; }public override string ToString()
{return EmpName + ":" + Age;
}
}ViewModel部分主要是声明一个AddCommand属性,并给其指派方法
public class EmployeeViewModel{ [/code]
public ICommand AddCommand { get; set; }public ObservableCollection<Employee> EmpList { get; set; }public EmployeeViewModel()
{EmpList = new ObservableCollection<Employee>
{new Employee {Age = 23, EmpName = "Ringgo"},new Employee {Age = 23, EmpName = "Jim"}};
AddCommand = new DelegateCommand<Employee>(AddMethod);
}
private void AddMethod(Employee employee)
{ EmpList.Add(new Employee { Age = 24, EmpName = "White" }); }
}View的只有2行XAML:
<Button Content="点击" Command="{Binding AddCommand}"/> <ListBox ItemsSource="{Binding EmpList,Mode=OneWay}" /> 这时点击Button时,你会发现AddCommand已经起作用了,新增的记录出现在了ListBox。 上面的例子是对内置支持Comand控件的做法(开头提到内置的Command只能对继承于ButtonBase的控件有效),private void SelectMethod(Employee employee) [/code]
对于其它的控件,则需要用到Blend4中的InvokeCommandAction。
下面在前面例子的基础上进行修改,
实现的效果很简单
即显示ListBox的选中项信息
下面实现这个部分的功能,首先在ViewModel里面添加相关的ICommand属性
[code] public ICommand SelectCommand { get; set; }
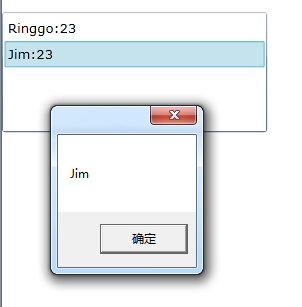
{MessageBox.Show(employee.EmpName);
}
public EmployeeViewModel()
{ //... SelectCommand = new DelegateCommand<Employee>(SelectMethod);
}因为这篇文章不是讲Blend的,所以我不会太多关注Blend在这个部分的应用,我简单的演示下步骤
首先在Blend中打开该解决方案
打开Assets选项卡:
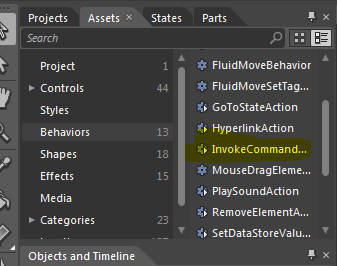
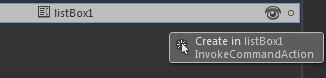
选中InvokeCommandAction,将其拖动到listBox1后,选中listBox1下的InvokeCommandAction

打开属性选项卡,修改EventName为MouseLeftButtonUp
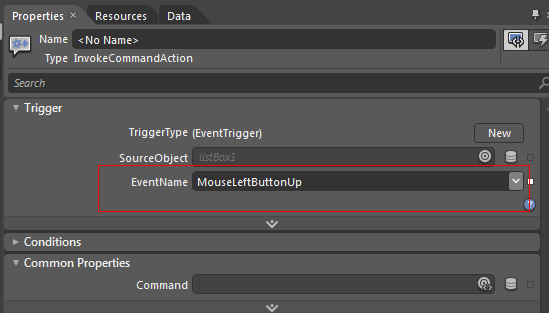
现在开始绑定到Command,点击Data bind会弹出对话框
选中+CLR Object创建数据源

选中创建好的EmployeeViewModel,
这几步都做好后,你可以看看生成的Xaml,关键的Xaml代码是这样的:
<i:Interaction.Triggers><i:EventTrigger EventName="MouseLeftButtonUp"> [/code]
<i:InvokeCommandAction Command="{Binding SelectCommand}"/></i:EventTrigger>
</i:Interaction.Triggers>
这里需要将ListBox的SelectItem作为SelectCommand关联的SelectMethod(Employee employee)的参数:
<i:InvokeCommandActionCommandParameter="{Binding SelectedItem, ElementName=listBox1}" [/code]
Command="{Binding SelectCommand}"/>这样就完成了使用InvokeCommandAction实现了对SL4中不内置支持Command的控件,对于InvokeCommandAction还有其它的一些应用,可以自己去看
相关文章。
通过这一系列步骤,可以看到MVVM模式可以将UI与逻辑很好的分开维护,使用MVVM的这半年来,我在工作中越来越倾向于应用这种模式,希望这篇文章
能给大家有所帮助。
代码下载:SLCommandInMVVM.rar

相关文章推荐
- Silverlight中使用MVVM(5):Command II
- [Silverlight入门系列]使用MVVM模式(1):MVVM核心概念
- Silverlight中使用MVVM(7):DataGrid中触发Button的Click事件
- Silverlight中使用MVVM方式进行datagrid的内嵌combobox方法
- Silverlight中使用MVVM(1)--基础
- 稳扎稳打Silverlight(52) - 4.0绑定之 ICommand 命令和 MVVM 模式
- 稳扎稳打Silverlight(52) - 4.0绑定之 ICommand 命令和 MVVM 模式
- 稳扎稳打Silverlight(52) - 4.0绑定之 ICommand 命令和 MVVM 模式
- 稳扎稳打Silverlight(52) - 4.0绑定之 ICommand 命令和 MVVM 模式
- [Silverlight入门系列]使用MVVM模式(9): 想在ViewModel中控制Storyboard动画?
- [Silverlight入门系列]使用MVVM模式(1):MVVM核心概念
- Silverlight 在MVVM模式下使用TreeView
- [Silverlight入门系列]使用MVVM模式(2):集合Model /ObservableCollection/ICollectionView
- [Silverlight入门系列]使用MVVM模式(4):Prism的
- Silverlight中使用MVVM(1)—基础
- 稳扎稳打Silverlight(52) - 4.0绑定之 ICommand 命令和 MVVM 模式
- 稳扎稳打Silverlight(52) - 4.0绑定之 ICommand 命令和 MVVM 模式
- 稳扎稳打Silverlight(52) - 4.0绑定之 ICommand 命令和 MVVM 模式
- Silverlight中使用MvvM(1)--基础
- Silverlight中如何使用MVVM架构