CentOS6.2下源码安装openStack glance
2012-03-31 14:07
549 查看
参考文档:
http://glance.openstack.org/controllingservers.html
http://glance.openstack.org/configuring.html
http://glance.openstack.org/glance.html
http://glance.openstack.org/authentication.html
http://docs.openstack.org/trunk/openstack-compute/install/content/install-glance.html
注意:该安装是在前面已经安装好keystone的基础上进行的,请先查看CentOS6.2下源码安装openStack的keystone再进行以下操作!
1.获取最新的glance代码:
cd
git clone https://github.com/openstack/glance.git
2.卸裁python-crypto
CentOS通过yum安装的该软件版本太低,会导致glance无法启动,将在下一步安装依赖时自动安装最新版本
sudo yum remove python-crypto
3.安装依赖:
sudo yum install python-devel
修改glance/tools/pip-requires注释掉以下两行(暂时使用默认的file作为镜像存储,且已经安装好keystone,故不需要安装):
swift
-e git://github.com/openstack/keystone.git@ab6be05068068b0902db44b1d60f56eea4fe1215#egg=keystone
sudo pip install -r glance/tools/pip-requires
4.安装glance:
cd glance && sudo python setup.py install
5.配置glance:
拷贝默认配置文件:sudo cp -R etc /etc/glance
配置glance使用keystone认证:
更新/etc/glance/glance-api-paste.ini的以下选项为keystone中的设置值:
[filter:authtoken]
admin_tenant_name = service
admin_user = glance
admin_password = yourservicepassword
在/etc/glance/glance-api.conf尾添加:
[paste_deploy]
flavor = keystone
更新/etc/glance/glance-registry-paste.ini的以下选项为keystone中的设置值
[filter:authtoken]
admin_tenant_name = service
admin_user = glance
admin_password = yourservicepassword
在/etc/glance/glance-registry.conf尾添加:
[paste_deploy]
flavor = keystone
设置glance的mysql连接:
修改/etc/glance/glance-registry.conf下的sql_connection = mysql://glance:glance@10.10.10.138/glance
登录mysql创建所需数据库及用户:
create database glance;
grant all privileges on glance.* to 'glance'@'%' identified by 'glance';
配置glance的通信服务器、存储:
查看/etc/glance/glance-api.conf进行配置
6.创建log目录:
sudo mkdir /var/log/glance
7.启动glance:
sudo glance-control registry start
sudo glance-control api start
8.验证glance是否启动:
sudo ps aux | grep glance
应有如下类似的输出:
[ugyn@cc ~]$ sudo ps aux | grep glance
root 4286 0.4 1.4 264060 30548 ? Ss 13:23 0:00 /usr/bin/python /usr/bin/glance-api
root 4297 0.3 1.5 352432 31736 ? Ss 13:24 0:00 /usr/bin/python /usr/bin/glance-registry
ugyn 4345 0.0 0.0 103236 840 pts/3 S+ 13:25 0:00 grep glance
9.境像上传:
下载境像:http://smoser.brickies.net/ubuntu/ttylinux-uec/ttylinux-uec-amd64-12.1_2.6.35-22_1.tar.gz
解压:tar xzvf ttylinux-uec-amd64-12.1_2.6.35-22_1.tar.gz
上传kernel:
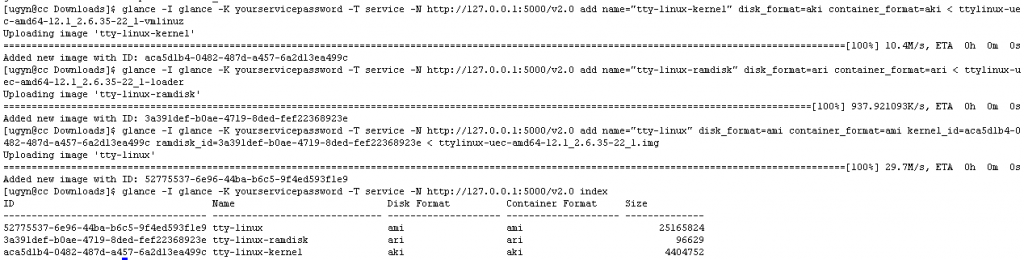
glance -I glance -K yourservicepassword -T service -N http://127.0.0.1:5000/v2.0 add name="tty-linux-kernel" disk_format=aki container_format=aki < ttylinux-uec-amd64-12.1_2.6.35-22_1-vmlinuz
输出见最后图片
上传initrd:
glance -I glance -K yourservicepassword -T service -N http://127.0.0.1:5000/v2.0 add name="tty-linux-ramdisk" disk_format=ari container_format=ari < ttylinux-uec-amd64-12.1_2.6.35-22_1-loader
输出见最后图片
上传image:
注意:这里要用到前面输出的两个id值!
glance -I glance -K yourservicepassword -T service -N http://127.0.0.1:5000/v2.0 add name="tty-linux" disk_format=ami container_format=ami kernel_id=aca5d1b4-0482-487d-a457-6a2d13ea499c ramdisk_id=3a391def-b0ae-4719-8ded-fef22368923e < ttylinux-uec-amd64-12.1_2.6.35-22_1.img
输出见最后图片
10.验证:
glance -I glance -K yourservicepassword -T service -N http://127.0.0.1:5000/v2.0 index
输出:
http://glance.openstack.org/controllingservers.html
http://glance.openstack.org/configuring.html
http://glance.openstack.org/glance.html
http://glance.openstack.org/authentication.html
http://docs.openstack.org/trunk/openstack-compute/install/content/install-glance.html
注意:该安装是在前面已经安装好keystone的基础上进行的,请先查看CentOS6.2下源码安装openStack的keystone再进行以下操作!
1.获取最新的glance代码:
cd
git clone https://github.com/openstack/glance.git
2.卸裁python-crypto
CentOS通过yum安装的该软件版本太低,会导致glance无法启动,将在下一步安装依赖时自动安装最新版本
sudo yum remove python-crypto
3.安装依赖:
sudo yum install python-devel
修改glance/tools/pip-requires注释掉以下两行(暂时使用默认的file作为镜像存储,且已经安装好keystone,故不需要安装):
swift
-e git://github.com/openstack/keystone.git@ab6be05068068b0902db44b1d60f56eea4fe1215#egg=keystone
sudo pip install -r glance/tools/pip-requires
4.安装glance:
cd glance && sudo python setup.py install
5.配置glance:
拷贝默认配置文件:sudo cp -R etc /etc/glance
配置glance使用keystone认证:
更新/etc/glance/glance-api-paste.ini的以下选项为keystone中的设置值:
[filter:authtoken]
admin_tenant_name = service
admin_user = glance
admin_password = yourservicepassword
在/etc/glance/glance-api.conf尾添加:
[paste_deploy]
flavor = keystone
更新/etc/glance/glance-registry-paste.ini的以下选项为keystone中的设置值
[filter:authtoken]
admin_tenant_name = service
admin_user = glance
admin_password = yourservicepassword
在/etc/glance/glance-registry.conf尾添加:
[paste_deploy]
flavor = keystone
设置glance的mysql连接:
修改/etc/glance/glance-registry.conf下的sql_connection = mysql://glance:glance@10.10.10.138/glance
登录mysql创建所需数据库及用户:
create database glance;
grant all privileges on glance.* to 'glance'@'%' identified by 'glance';
配置glance的通信服务器、存储:
查看/etc/glance/glance-api.conf进行配置
6.创建log目录:
sudo mkdir /var/log/glance
7.启动glance:
sudo glance-control registry start
sudo glance-control api start
8.验证glance是否启动:
sudo ps aux | grep glance
应有如下类似的输出:
[ugyn@cc ~]$ sudo ps aux | grep glance
root 4286 0.4 1.4 264060 30548 ? Ss 13:23 0:00 /usr/bin/python /usr/bin/glance-api
root 4297 0.3 1.5 352432 31736 ? Ss 13:24 0:00 /usr/bin/python /usr/bin/glance-registry
ugyn 4345 0.0 0.0 103236 840 pts/3 S+ 13:25 0:00 grep glance
9.境像上传:
下载境像:http://smoser.brickies.net/ubuntu/ttylinux-uec/ttylinux-uec-amd64-12.1_2.6.35-22_1.tar.gz
解压:tar xzvf ttylinux-uec-amd64-12.1_2.6.35-22_1.tar.gz
上传kernel:
glance -I glance -K yourservicepassword -T service -N http://127.0.0.1:5000/v2.0 add name="tty-linux-kernel" disk_format=aki container_format=aki < ttylinux-uec-amd64-12.1_2.6.35-22_1-vmlinuz
输出见最后图片
上传initrd:
glance -I glance -K yourservicepassword -T service -N http://127.0.0.1:5000/v2.0 add name="tty-linux-ramdisk" disk_format=ari container_format=ari < ttylinux-uec-amd64-12.1_2.6.35-22_1-loader
输出见最后图片
上传image:
注意:这里要用到前面输出的两个id值!
glance -I glance -K yourservicepassword -T service -N http://127.0.0.1:5000/v2.0 add name="tty-linux" disk_format=ami container_format=ami kernel_id=aca5d1b4-0482-487d-a457-6a2d13ea499c ramdisk_id=3a391def-b0ae-4719-8ded-fef22368923e < ttylinux-uec-amd64-12.1_2.6.35-22_1.img
输出见最后图片
10.验证:
glance -I glance -K yourservicepassword -T service -N http://127.0.0.1:5000/v2.0 index
输出:

相关文章推荐
- CentOS6.2下源码安装openStack glance
- CentOS6.2下源码安装openStack keystone
- CentOS6.2下源码安装openStack keystone
- CentOS6.2下一步一步源代码安装OpenStack(四)glance配置、运行、测试
- Centos7手动部署Openstack Mitaka版安装配置--(四)安装镜像服务glance
- CentOS6.2下一步一步源代码安装OpenStack(四)glance配置、运行、测试
- [连载教程二]CentOS 6.3上通过源码安装Openstack Folsom之Keystone安装
- centos 6.2下 源码安装mysql 5.5.22
- CentOS下多节点Openstack安装(三)—— glance安装
- X86单网卡Desktop源码安装Openstack 组件之Keystone、Glance、Nova
- CentOS6.2下一步一步源代码安装OpenStack(四)glance配置、运行、测试
- X86单网卡Desktop源码安装Openstack 组件之Keystone、Glance、Nova
- 解决在CentOS6.5下安装OpenStack(Icehouse版本 )出现的glance服务无法正常工作的问题
- CentOS 6.5 Openstack Icehouse 安装指南 -5 镜像glance
- [连载教程一]CentOS 6.3上通过源码安装Openstack Folsom之前提工作
- CentOS6.3下源码安装redis
- 在linux(centos)上从源码安装tensorflow
- Centos 6.0 源码编译安装 bochs -2.5.1 成功
- CentOS7源码安装Redis及配置系统服务