如何为ESXi4&5主机安装驱动
2012-03-27 14:46
274 查看
这里以之前碰到过的“HP NC365T PCIe 四通道千兆网卡 (铜介质)”为例
一、下载驱动
1,首先要确认该硬件和vmware的兼容性。到vmware官网,“支持和下载”,选择“兼容性指南”,再选择“Product Interoperability Matrixes”。

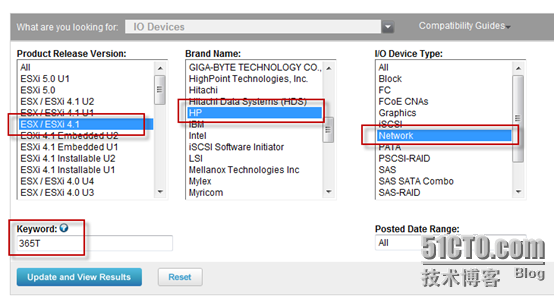
2,因为我们要找的是网卡驱动,所以选择I/O Compatibility Guide ,并输入所需网卡的一些必要条件,如图

3,点击Update and View Results即可查看搜索结果,如图,我们找到了该款4口网

4,点击名字可以进入对应详细版本的下载页面(至此我们确认了该网卡的兼容性)

5,这里我们下载一个ESXi4.1版本的驱动。但是我们发现只给我们一个链接,如图:

6,最终我们还是回归到了产品下载页面,选择VMware vSphere

7,之后选择相应的ESXi版本,并进入“Drivers&Tools”选项卡,选择Driver CDs一项

8,但是我们发现这里大部分驱动都是Brocade,intel,Qlogic等厂商的板卡驱动,并没有我们所需的HP NC365T四口网卡。
9,问题出在哪呢?经过仔细查看了NC365T网卡的参数发现,该网卡实际上使用的Intel 82580芯片。因此,我们直接找Intel 82580即可。如图:

10,点击下载即可。用同样的方式下载对应ESXi4.1和ESXi5的驱动。下载后发现用于4.1的驱动是个ISO镜像,而用于ESXi5的驱动是个ZIP包。这是因为4.x和5打补丁的方式是不同的。具体安装我们下面会演示。
二、安装驱动
1,为ESXi4.x安装驱动
(1) 将驱动ISO光盘插入ESXi光驱。注:ESXi主机使用CDROM方式比较特殊
~ # vmkload_mod iso9660
Module iso9660 loaded successfully
~ # /sbin/vsish -e set /vmkModules/iso9660/mount mpx.vmhba32:C0:T0:L0
~ # ls /vmfs/volumes/CDROM #此时该到该目录即可看到光盘内容
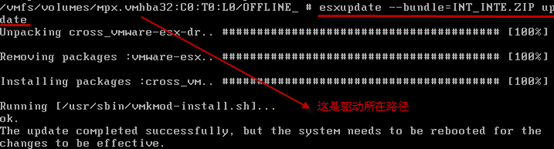
(2) 主机进入维护模式并使用命令升级

(3) 之后重启主机并退出维护模式即可。
(4) 另外,下载的补丁ISO里有官方的Readme文件,里面介绍了给ESX/ESXi 4.x打补丁的其他方式(如通过vCli,或者在ESX安装过程中添加),请见本文备注<1>
二、 为ESXi5.0打补丁
(1) 将下载的驱动包里的vib文件解压出来,用vSphere Clinet将该文件上传至本地存储
(2)SSH或ALT+F1进入命令行模式,将该驱动copy到tmp文件夹,否则提示无权限。

(3)主机进入维护模式并执行命令打驱动

(4) 重启主机并退出维护模式即可。
(5) 官方Readme请见备注<2>
备注<1>
VMware ESX 4.0 Driver CD
Use the VMware ESX driver CD to install drivers on ESX or ESXi installations.
You can use the driver CD in several ways:
A) To install drivers for devices as part of a new ESX installation
B) To update existing drivers or install new drivers for an existing ESX
installation with esxupdate
C) To update existing drivers or install new drivers for an existing ESX or
ESXi installation with vihostupdate
A) To install drivers for devices as part of a new ESX installation:
(for ESX only)
Note: This procedure has changed since the 3.5 version of driver CD. You will
need the ESX installation DVD to begin.
1. Place the ESX installation DVD in the DVD drive of the host.
2. Restart the host.
3. Accept the terms of the license agreement.
4. Select a keyboard type.
5. When prompted for Custom Drivers, select Yes to install custom drivers.
6. Click Add to eject the ESX installation DVD.
7. Place the driver CD in the DVD drive of the ESX host.
8. Select driver module to import drivers to the ESX host.
9. Click Next to continue. A dialog box displays the following message:
Load the system drivers.
10. Click Yes. After loading the driver module, continue installing ESX. After
the drivers are installed you are prompted to swap the driver CD with the
ESX installation DVD.
B) To update or add drivers on existing ESX installations using esxupdate:
(for ESX only)
1. Power on the ESX host and log into an account with administrator capability.
2. Place the driver CD in the CD-ROM drive of the ESX host.
3. Mount the driver CD.
4. Navigate to <cd mount point>/offline-bundle/ and locate the
<offline-bundle>.zip file.
5. Run the esxupdate command to install drivers using the offline bundle.
esxupdate --bundle=<offline-bundle>.zip update
C) To update or add drivers on existing ESX and ESXi installations using
vihostupdate: (for both ESX and ESXi)
1. Power on the ESX or ESXi host.
2. Place the driver CD in the CD-ROM drive of the host where either the vSphere
CLI package is installed or vMA is hosted.
3. Mount the driver CD.
4. Navigate to <cd mount point>/offline-bundle/ and locate the
<offline-bundle>.zip file.
5. Run the vihostupdate command to install drivers using the offline bundle.
vihostupdate <conn_options> --install --bundle <offline-bundle>.zip
(For more details on vihostupdate, see the vSphere Command-Line Interface
Installation and Reference Guide.)
备注<2>
VMware ESX 5.0 VIB Installation Instructions
VMware uses a file package called a VIB (VMware Installation Bundle) as the
mechanism for installing or upgrading software packages on an ESX server.
The file may be installed directly on an ESX server from the command line, or
through the VMware Update Manager (VUM).
COMMAND LINE INSTALLATION
New Installation
----------------
For new installs, you should perform the following steps:
1. Copy the VIB to the ESX server. Technically, you can
place the file anywhere that is accessible to the ESX console shell,
but for these instructions, we'll assume the location is in '/tmp'.
Here's an example of using the Linux 'scp' utility to copy the file
from a local system to an ESX server located at 10.10.10.10:
scp VMware_bootbank_net-driver.1.1.0-1vmw.0.0.372183.vib root@10.10.10.10:/tmp
2. Issue the following command (full path to the VIB must be specified):
esxcli software vib install -v {VIBFILE}
In the example above, this would be:
esxcli software vib install -v /tmp/VMware_bootbank_net-driver.1.1.0-1vmw.0.0.372183.vib
Note: Depending on the certificate used to sign the VIB, you may need to
change the host acceptance level. To do this, use the following command:
esxcli software acceptance set --level=<level>
Also, depending on the type of VIB being installed, you may have to put
ESX into maintenance mode. This can be done through the VI Client, or by
adding the '--maintenance-mode' option to the above esxcli command.
Upgrade Installation
--------------------
The upgrade process is similar to a new install, except the command that should
be issued is the following:
esxcli software vib upgrade -v {VIBFILE}
VUM INSTALLATION
The VMware Update Manager (VUM) is a plugin for the Virtual Center Server
(vCenter Server). You can use the VUM UI to install a VIB by importing
the associated offline bundle package (a ZIP file that contains the VIB and
metadata). You can then create an add-on baseline and remediate the
host(s) with this baseline. Please see the vCenter Server documentation for
more details on VUM.
一、下载驱动
1,首先要确认该硬件和vmware的兼容性。到vmware官网,“支持和下载”,选择“兼容性指南”,再选择“Product Interoperability Matrixes”。

2,因为我们要找的是网卡驱动,所以选择I/O Compatibility Guide ,并输入所需网卡的一些必要条件,如图
3,点击Update and View Results即可查看搜索结果,如图,我们找到了该款4口网

4,点击名字可以进入对应详细版本的下载页面(至此我们确认了该网卡的兼容性)

5,这里我们下载一个ESXi4.1版本的驱动。但是我们发现只给我们一个链接,如图:

6,最终我们还是回归到了产品下载页面,选择VMware vSphere

7,之后选择相应的ESXi版本,并进入“Drivers&Tools”选项卡,选择Driver CDs一项

8,但是我们发现这里大部分驱动都是Brocade,intel,Qlogic等厂商的板卡驱动,并没有我们所需的HP NC365T四口网卡。
9,问题出在哪呢?经过仔细查看了NC365T网卡的参数发现,该网卡实际上使用的Intel 82580芯片。因此,我们直接找Intel 82580即可。如图:

10,点击下载即可。用同样的方式下载对应ESXi4.1和ESXi5的驱动。下载后发现用于4.1的驱动是个ISO镜像,而用于ESXi5的驱动是个ZIP包。这是因为4.x和5打补丁的方式是不同的。具体安装我们下面会演示。
二、安装驱动
1,为ESXi4.x安装驱动
(1) 将驱动ISO光盘插入ESXi光驱。注:ESXi主机使用CDROM方式比较特殊
~ # vmkload_mod iso9660
Module iso9660 loaded successfully
~ # /sbin/vsish -e set /vmkModules/iso9660/mount mpx.vmhba32:C0:T0:L0
~ # ls /vmfs/volumes/CDROM #此时该到该目录即可看到光盘内容
(2) 主机进入维护模式并使用命令升级
(3) 之后重启主机并退出维护模式即可。
(4) 另外,下载的补丁ISO里有官方的Readme文件,里面介绍了给ESX/ESXi 4.x打补丁的其他方式(如通过vCli,或者在ESX安装过程中添加),请见本文备注<1>
二、 为ESXi5.0打补丁
(1) 将下载的驱动包里的vib文件解压出来,用vSphere Clinet将该文件上传至本地存储
(2)SSH或ALT+F1进入命令行模式,将该驱动copy到tmp文件夹,否则提示无权限。

(3)主机进入维护模式并执行命令打驱动

(4) 重启主机并退出维护模式即可。
(5) 官方Readme请见备注<2>
备注<1>
VMware ESX 4.0 Driver CD
Use the VMware ESX driver CD to install drivers on ESX or ESXi installations.
You can use the driver CD in several ways:
A) To install drivers for devices as part of a new ESX installation
B) To update existing drivers or install new drivers for an existing ESX
installation with esxupdate
C) To update existing drivers or install new drivers for an existing ESX or
ESXi installation with vihostupdate
A) To install drivers for devices as part of a new ESX installation:
(for ESX only)
Note: This procedure has changed since the 3.5 version of driver CD. You will
need the ESX installation DVD to begin.
1. Place the ESX installation DVD in the DVD drive of the host.
2. Restart the host.
3. Accept the terms of the license agreement.
4. Select a keyboard type.
5. When prompted for Custom Drivers, select Yes to install custom drivers.
6. Click Add to eject the ESX installation DVD.
7. Place the driver CD in the DVD drive of the ESX host.
8. Select driver module to import drivers to the ESX host.
9. Click Next to continue. A dialog box displays the following message:
Load the system drivers.
10. Click Yes. After loading the driver module, continue installing ESX. After
the drivers are installed you are prompted to swap the driver CD with the
ESX installation DVD.
B) To update or add drivers on existing ESX installations using esxupdate:
(for ESX only)
1. Power on the ESX host and log into an account with administrator capability.
2. Place the driver CD in the CD-ROM drive of the ESX host.
3. Mount the driver CD.
4. Navigate to <cd mount point>/offline-bundle/ and locate the
<offline-bundle>.zip file.
5. Run the esxupdate command to install drivers using the offline bundle.
esxupdate --bundle=<offline-bundle>.zip update
C) To update or add drivers on existing ESX and ESXi installations using
vihostupdate: (for both ESX and ESXi)
1. Power on the ESX or ESXi host.
2. Place the driver CD in the CD-ROM drive of the host where either the vSphere
CLI package is installed or vMA is hosted.
3. Mount the driver CD.
4. Navigate to <cd mount point>/offline-bundle/ and locate the
<offline-bundle>.zip file.
5. Run the vihostupdate command to install drivers using the offline bundle.
vihostupdate <conn_options> --install --bundle <offline-bundle>.zip
(For more details on vihostupdate, see the vSphere Command-Line Interface
Installation and Reference Guide.)
备注<2>
VMware ESX 5.0 VIB Installation Instructions
VMware uses a file package called a VIB (VMware Installation Bundle) as the
mechanism for installing or upgrading software packages on an ESX server.
The file may be installed directly on an ESX server from the command line, or
through the VMware Update Manager (VUM).
COMMAND LINE INSTALLATION
New Installation
----------------
For new installs, you should perform the following steps:
1. Copy the VIB to the ESX server. Technically, you can
place the file anywhere that is accessible to the ESX console shell,
but for these instructions, we'll assume the location is in '/tmp'.
Here's an example of using the Linux 'scp' utility to copy the file
from a local system to an ESX server located at 10.10.10.10:
scp VMware_bootbank_net-driver.1.1.0-1vmw.0.0.372183.vib root@10.10.10.10:/tmp
2. Issue the following command (full path to the VIB must be specified):
esxcli software vib install -v {VIBFILE}
In the example above, this would be:
esxcli software vib install -v /tmp/VMware_bootbank_net-driver.1.1.0-1vmw.0.0.372183.vib
Note: Depending on the certificate used to sign the VIB, you may need to
change the host acceptance level. To do this, use the following command:
esxcli software acceptance set --level=<level>
Also, depending on the type of VIB being installed, you may have to put
ESX into maintenance mode. This can be done through the VI Client, or by
adding the '--maintenance-mode' option to the above esxcli command.
Upgrade Installation
--------------------
The upgrade process is similar to a new install, except the command that should
be issued is the following:
esxcli software vib upgrade -v {VIBFILE}
VUM INSTALLATION
The VMware Update Manager (VUM) is a plugin for the Virtual Center Server
(vCenter Server). You can use the VUM UI to install a VIB by importing
the associated offline bundle package (a ZIP file that contains the VIB and
metadata). You can then create an add-on baseline and remediate the
host(s) with this baseline. Please see the vCenter Server documentation for
more details on VUM.

相关文章推荐
- 如何为ESXI安装网卡驱动
- 如何在ESXi 5.5主机上安装ESXi 5.5客户机 推荐
- 【wordpress】使用HostGator主机如何快速安装WordPress
- win10如何安装ST-Link驱动
- 自动安装的打印驱动不兼容Windows8如何卸载打印机驱动
- Windows Server应用之32位系统如何安装64位打印机驱动 推荐
- Windows7上如何安装RNDIS驱动
- Windows Server应用之32位系统如何安装64位打印机驱动
- 如何在windows 10 x64安装佳能 CP900 驱动
- 如何安装 FTDI 驱动
- 【在苹果电脑上如何安装win 7驱动】
- WES 7 下如何处理蓝牙模块驱动安装失败的问题
- 【如何在linux系统里安装无线网卡驱动】
- volcanol_Linux_ 问题汇总系列_4_Thinkpad_E40_0578MDC_在Fedora 13 Linux(FC13)中如何安装无线网卡驱动
- redhat enterprise Linux 5.0如何识别网卡和安装驱动r8169!
- Windows Server应用之32位系统如何安装64位打印机驱动
- Win10 如何连接Android 手机平板--驱动安装数字签名失败解决方案
- Linux下如何安装Run文件格式NVIDIA显卡驱动
- win7系统下如何安装mysql的ODBC驱动
- 【原创达人】如何手动安装联想电脑管家下载的驱动