Windows Azure AppFabric 入门教学系列 (五):初探Access Control Service
2012-03-09 00:00
656 查看
公告:本博客为微软云计算中文博客的镜像博客。部分文章因为博客兼容性问题,会影响阅读体验。如遇此情况,请访问原博客。
本文是Windows Azure AppFabric入门教学的第五篇文章。本文会对AppFabric中的Access Control Service(ACS ZH-CN">)做初步的讲解。为了使后续的学习顺利进行请确保已浏览本教程的第一篇文章,并以按照该文完成了AppFabric项目和命名空间的创建。我们知道,AppFabirc由Service Bus 和 Access Control Service组成,在前一篇教程中我们已介绍过Service Bus,所以本文将简略的介绍如何使用ACS服务来确保安全性。 同时,因为本文会使用到SWT和OAuth协议,读者可以浏览本教程第四篇文章,以快速了解该协议。前置条件
为了使后续的教程能够顺利进行,请确保如下软件或组件已被安装:
· Microsoft .NET Framework 3.5 SP1
· Microsoft Visual Studio 2008 SP1 (or above)
· AppFabric SDK
· Windows Azure Platform Training Kit - December Update(示例代码)
请确保您已拥有一定的WCF编程经验,若没有,请浏览这里以快速的初步了解WCF。
最后请确保已创建了一个AppFabric项目和一个服务命名空间。请参考这里。
原理:
我们首先了解一下ACS的一般应用场景:

客户端请求 (1)并获得 (2)一个 SWT 令牌 。之后客户端使用该 SWT来调用服务(3),一旦被ACSAuthorizationManager成功验证, (4),便能访问到所需的服务方法。
代码:
在了解了通信原理之后,我们来看看具体代码是如何编写的。
1. 在Windows Azure Platform Training Kit - December Update (示例代码) 安装目录下,Labs/IntroAppFabricAccessControl/Source/Ex01-UsingACWithSymmetricKey/Begin目录下,打开SymmetricKey.sln工程。
该工程已能正常运行,我们会在其基础上修改代码来让其与ACS集成。首先我们调试,查看一下在没有ACS时的运行情况。
右击Service项目,Debug->Start new instance,启动一个Service实例。
以同样方式启动一个Client实例,最终结果如下。

打开Service项目的Program.cs,我们看到程序代码只是简单的将IWeatherForecast服务挂载到http://localhost/weatherforecast之上。
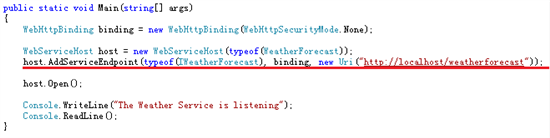
而Client项目也只是简单通过该URI来访问所需服务。如下图。
注意:我们从最终结果看到Get3DaysForecast与Get10DaysForecast方法都能被访问到。
2. 修改服务以接受和验证AppFabric AC 令牌。
必须确保代码调用被检验的请求内容时,检查SWT令牌。一旦验证存在SWT,您必须检查其是否用合法的密钥签名过。在本例中,我们提供了ServiceAuthorizationManager类来实现验证逻辑。
2.1右击Service项目,Add->Existing item,进入Source/Ex01-UsingACWithSymmetricKey/Assets,添加ACSAuthorizationManager.cs和TokenValidator.cs
2.2在Service项目Program.cs中加入如下粗体代码:
C#
public class Program
{
private const string ServiceNamespace = "{insert service namespace here}";
private const string TokenPolicyKey = "{insert token policy key
here}";
private const string Audience = "http://localhost/weatherforecast";
private const string RequiredClaimType = "action";
private const string IssuerName = "https://{0}.accesscontrol.windows.net/";
public static void Main(string[] args)
将ServiceNamespace改为您在本教程第一篇文章中创建的服务命名空间。
2.3在Main函数中加入如下粗体代码,以使ACS验证流程植入到程序调用服务的流程中。一旦我们定制的ServiceAuthorizationManager 类被插入到WCF 管道中(pipeline),它在每次服务调用时自动执行。
host.AddServiceEndpoint(typeof(IWeatherForecast), binding, new Uri("http://localhost/weatherforecast"));
host.Authorization.ServiceAuthorizationManager = new ACSAuthorizationManager(
string.Format(IssuerName, ServiceNamespace),
Audience,
Convert.FromBase64String(TokenPolicyKey),
RequiredClaimType);
host.Open()
3.配置客户端使用 AppFabric Access Control来访问服务
3.1在Client项目,Program.cs中,加入如下粗体代码:
namespace Client
{
using System;
using System.Collections.Specialized;
using System.Linq;
using System.Net;
using System.ServiceModel;
using System.ServiceModel.Security;
using System.ServiceModel.Web;
using System.Text;
using System.Web;
using System.IO;
public class Program
以及如下粗体代码:
public class Program
{
private const string ServiceNamespace = "{insert service namespace here}";
private const string IssuerName = "weatherforecastclient";
private const string IssuerKey = "{insert issuer key here}";
private const string AcsHostName = "accesscontrol.windows.net";
public static void Main(string[] args)
{
3.2在Program类中加入如下方法:
...
private static string GetACSToken()
{
// request a token from AppFabric AC
WebClient client = new WebClient();
client.BaseAddress = string.Format("https://{0}.{1}", ServiceNamespace, AcsHostName);
NameValueCollection values = new NameValueCollection();
values.Add("wrap_name", IssuerName);
values.Add("wrap_password", IssuerKey);
values.Add("wrap_scope", "http://localhost/weatherforecast");
byte[] responseBytes = client.UploadValues("WRAPv0.9", "POST", values);
string response = Encoding.UTF8.GetString(responseBytes);
return response
.Split('&')
.Single(value => value.StartsWith("wrap_access_token=", StringComparison.OrdinalIgnoreCase))
.Split('=')[1];
}
}
}
3.3在Main函数开头加入如下代码:
string acsToken;
try
{
acsToken = GetACSToken();
}
catch (WebException ex)
{
Console.ForegroundColor = ConsoleColor.Red;
if (ex.Response != null)
{
Stream exception = ex.Response.GetResponseStream();
StreamReader reader = new StreamReader(exception);
Console.WriteLine(reader.ReadToEnd());
}
else
{
Console.WriteLine(ex.Message);
}
Console.ReadLine();
return;
}
同样在Main函数中对应位置加入如下代码 :
using (new OperationContextScope(proxy as IContextChannel))
{
string authHeaderValue = string.Format("WRAP access_token=/"{0}/"", HttpUtility.UrlDecode(acsToken));
WebOperationContext.Current.OutgoingRequest.Headers.Add("authorization", authHeaderValue);
// call the service and get a response
4.配置AppFabric ACS命名空间以为特定调用者实现访问逻辑。
4.1点击“开始”->“运行”,输入cmd,回车。将当前工作路径切换到WindowsAzurePlatformKit/Labs/IntroAppFabricAccessControl/Source/Assets
4.2创建TokenPolicy,输入如下代码并执行:(注意:以下所有黄色框内内容皆需替换为读者自己的信息,service指service namespace,mgmtkey指management key)
acm create tokenpolicy -name:weatherforecast -timeout:28800 -autogeneratekey -service:{your service namespace} -host:accesscontrol.windows.net -mgmtkey:{your management key}
返回TikenPolicy ID = tp_18d47a547b0f40648fdabfe753885dd4
4.3创建Scope,输入如下代码并执行:(tokenpolicyid为上步返回的TikenPolicy ID)
acm create scope -name:weatherforecast -tokenpolicyid:tp_18d47a547b0f40648fdabfe753885dd4 -appliesto:http://localhost/weatherforecast -service:{your service namespace} -host:accesscontrol.windows.net -mgmtkey:{your management key}
返回Scope ID = scp_3c9c465f2be54bed809080f210914f70dab58dee
4.4 创建Issuer,输入如下代码并执行:
acm create issuer -name:weatherforecastclient -issuername:weatherforecastclient -autogeneratekey -algorithm:Symmetric256BitKey -service:{your service namespace} -host:accesscontrol.windows.net -mgmtkey:{your management key}
返回Issuer ID = iss_8c389a6764e8a26bf5133a7ab9c830f8bea33a82
4.5 创建Rule,输入如下代码并执行:(scopeid为步骤4.3返回的Scope ID,inclaimissuerid为上步返回的Issuer ID)
acm create rule -name:client3days -scopeid:scp_3c9c465f2be54bed809080f210914f70dab58dee -inclaimissuerid:iss_8c389a6764e8a26bf5133a7ab9c830f8bea33a82 -inclaimtype:Issuer -inclaimvalue:weatherforecastclient -outclaimtype:action -outclaimvalue:Get3DaysForecast -service:{your service namespace} -host:accesscontrol.windows.net -mgmtkey:{your management key}
(这里我们看到打开了对于Get3DaysForecast服务的访问)
返会Rule ID = rul_462d5abd1326c40993f9ec2e766c0ab3b69c11093404db2736d81f5e6018caf141d2e4cdd2164335
4.6 输入如下代码,并执行,以获得TokenPolicyKey
acm get tokenpolicy -id:tp_18d47a547b0f40648fdabfe753885dd4 -service:{your service namespace} -host:accesscontrol.windows.net -mgmtkey:{your management key}
在Service项目,program.cs中,以如上结果中的TokenPolicyKey填入下处:
private const string TokenPolicyKey = "{insert token policy key here}";
4.7 输入如下代码,并执行,以获得IssuerKey。
acm get issuer -id:iss_8c389a6764e8a26bf5133a7ab9c830f8bea33a82 -service:{your service namespace} -host:accesscontrol.windows.net -mgmtkey:{your management key}
在Client项目,program.cs中,以如上结果中的IssuerKey填入下处:
private const string IssuerKey = "{insert issuer key here}";
并将ServiceNamespace改为您在本教程第一篇文章中创建的服务命名空间。
验证:
至此,代码已经创建完毕,我们已经可以进行调试了。
1.右击Service项目,Debug->Start new Instance
2.右击Client项目,Debug->Start new Instance启动另一调试实例。最终效果如图:

我们看到对于Get10DaysForecast方法的调用被服务拒绝了。因为对于访问规则设定时我们只开放了对于Get3DaysForecast的访问。参看步骤3.8
探析:
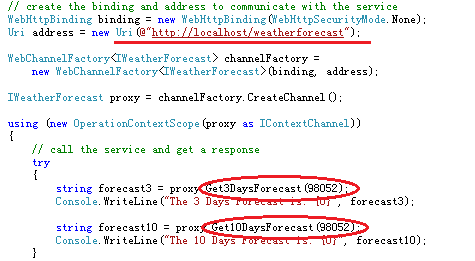
让我们打开Client项目,Program.cs,如下图:

我们看到上图Client启动时,GetACSToken首先会向ACS请求SWT令牌,细节如下图:

1. 构造WRAP协议的键值对。
2. 发送请求
3. 将ACS返回的字符串中抽离出SWT,并返回。
成功返回后acsToken变量值为类似如下白框内字符串(实为SWT):

在调用服务之前,在请求头部加入WRAP访问令牌。

在每次调用服务,Get3DaysForecast和Get10DaysForecast时,ACSAuthorizationManager每次都会被自动执行验证过程。如下图:
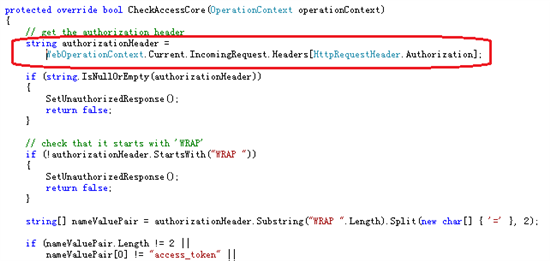
CheckAccessCore会将刚刚放入请求头部的访问令牌取出,并验证令牌合法性,一旦通过验证,便会返回Client所请求的调用。
如果我们开放Get10DaysForecast的访问,那么SWT的值会有哪些变化呢?
参考步骤4.5 我们将Get10DaysForecast的访问打开。
调试程序后,查看acsToken的值,如下:
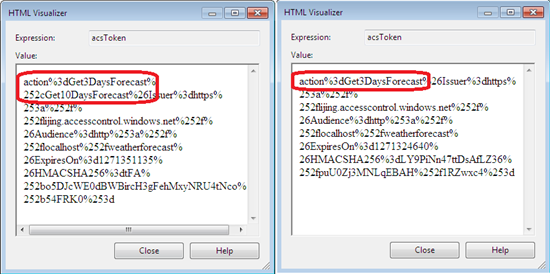
我们看到SWT令牌中action的值多了Get10DaysForecast一项。
$(document).ready(function(){dp.SyntaxHighlighter.HighlightAll('code');});
原文链接:
http://blog.csdn.net/azurechina/article/details/5606941

相关文章推荐
- Windows Azure AppFabric 入门教学系列 (六):Message Buffer之初体验
- Windows Azure AppFabric 入门教学系列 (五):初探Access Control Service
- Windows Azure AppFabric 入门教学系列 (五):初探Access Control Service
- Windows Azure AppFabric 入门教学系列 (六):Message Buffer之初体验
- Windows Azure AppFabric 入门教学系列 (三):LABS环境
- Windows Azure AppFabric 入门教学系列 (五):初探Access Control Service
- Windows Azure AppFabric 入门教学系列 (六):Message Buffer之初体验
- Windows Azure AppFabric 入门教学系列 (四):SWT 和OAuth WRAP介绍
- Windows Azure AppFabric 入门教学系列 (五):初探Access Control Service
- Windows Azure AppFabric 入门教学系列 (五):初探Access Control Service
- Windows Azure AppFabric 入门教学系列 (六):Message Buffer之初体验
- Windows Azure AppFabric 入门教学系列 (六):Message Buffer之初体验
- Windows Azure AppFabric 入门教学系列 (六):Message Buffer之初体验
- Windows Azure AppFabric 入门教学系列 (六):Message Buffer之初体验
- Windows Azure AppFabric 入门教学系列 (一):创建 AppFabric 项目与命名空间
- Windows Azure AppFabric 入门教学系列 (二):一个简单的Service Bus例子
- Windows Azure AppFabric 入门教学系列 (三):LABS环境
- Windows Azure AppFabric 入门教学系列 (四):SWT 和OAuth WRAP介绍
- Windows Azure AppFabric 入门教学系列 (一):创建 AppFabric 项目与命名空间
- Windows Azure AppFabric 入门教学系列 (五):初探Access Control Service