[IPhone] 如何将制作图片放大缩小的动作
2012-02-24 11:52
429 查看
在IPhone SDK开发范例大全中,有很多的范例码
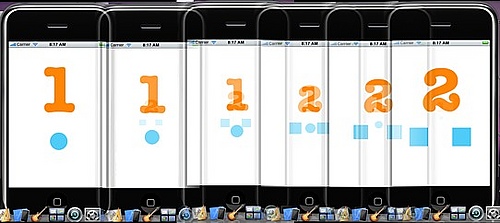
下面这段范例码,示范了两张图片的交换,以及放大缩小的动画
动画效果请参照下图
[cpp] view
plaincopy
#import <UIKit/UIKit.h>
#define IMAGE_VIEW_1 100
#define IMAGE_VIEW_2 101
#define BIGRECT CGRectMake(0.0f, 0.0f, 320.0f, 435.0f)
#define SMALLRECT CGRectMake(130.0f, 187.0f, 60.0f, 60.0f)
@interface ToggleView: UIView
{
BOOL isOne;
}
@end
@implementation ToggleView
- (id) initWithFrame: (CGRect) aFrame;
{
self = [super initWithFrame:aFrame];
// Load both views, make them non-interactive
UIImageView *imgView1 = [[UIImageView alloc] initWithFrame:BIGRECT];
imgView1.image = [UIImage imageNamed:@"one.png"];
imgView1.userInteractionEnabled = NO;
imgView1.tag = IMAGE_VIEW_1;
UIImageView *imgView2 = [[UIImageView alloc] initWithFrame:SMALLRECT];
imgView2.image = [UIImage imageNamed:@"two.png"];
imgView2.userInteractionEnabled = NO;
imgView2.tag = IMAGE_VIEW_2;
// image 1 is in front of image 2 to begin
[self addSubview:imgView2];
[self addSubview:imgView1];
isOne = YES;
[imgView1 release];
[imgView2 release];
return self;
}
- (void) touchesBegan:(NSSet*)touches withEvent:(UIEvent*)event
{
// Determine which view occupies which role
UIImageView *big = (UIImageView *)[self viewWithTag: (isOne ? IMAGE_VIEW_1 : IMAGE_VIEW_2)];
UIImageView *little = (UIImageView *)[self viewWithTag: (isOne ? IMAGE_VIEW_2 : IMAGE_VIEW_1)];
isOne = !isOne;
// Pack all the changes into the animation block
CGContextRef context = UIGraphicsGetCurrentContext();
[UIView beginAnimations:nil context:context];
[UIView setAnimationCurve:UIViewAnimationCurveEaseInOut];
[UIView setAnimationDuration:1.0];
[big setFrame:SMALLRECT];
[big setAlpha:0.5];
[little setFrame:BIGRECT];
[little setAlpha:1.0];
[UIView commitAnimations];
// Hide the shrunken "big" image.
[big setAlpha:0.0f];
[[big superview] bringSubviewToFront:big];
}
@end
@interface HelloController : UIViewController
@end
@implementation HelloController
- (void)loadView
{
ToggleView *contentView = [[ToggleView alloc] initWithFrame:[[UIScreen mainScreen] applicationFrame]];
contentView.backgroundColor = [UIColor whiteColor];
self.view = contentView;
[contentView release];
}
@end
@interface SampleAppDelegate : NSObject <UIApplicationDelegate>
@end
@implementation SampleAppDelegate
- (void)applicationDidFinishLaunching:(UIApplication *)application {
UIWindow *window = [[UIWindow alloc] initWithFrame:[[UIScreen mainScreen] bounds]];
HelloController *hello = [[HelloController alloc] init];
[window addSubview:hello.view];
[window makeKeyAndVisible];
}
@end
int main(int argc, char *argv[])
{
NSAutoreleasePool * pool = [[NSAutoreleasePool alloc] init];
int retVal = UIApplicationMain(argc, argv, nil, @"SampleAppDelegate");
[pool release];
return retVal;
}
最重要的动画代码
[cpp] view
plaincopy
- (void) touchesBegan:(NSSet*)touches withEvent:(UIEvent*)event
{
// 這一段代碼,設定目前哪一張圖是大圖,哪一張是小圖
UIImageView *big = (UIImageView *)[self viewWithTag: (isOne ? IMAGE_VIEW_1 : IMAGE_VIEW_2)];
UIImageView *little = (UIImageView *)[self viewWithTag: (isOne ? IMAGE_VIEW_2 : IMAGE_VIEW_1)];
isOne = !isOne;
// 這是使用動畫的一些基本設定
CGContextRef context = UIGraphicsGetCurrentContext();
[UIView beginAnimations:nil context:context];
[UIView setAnimationCurve:UIViewAnimationCurveEaseInOut]; // 設定為IN OUT的動畫
[UIView setAnimationDuration:1.0]; // 動畫時間為一秒
[big setFrame:SMALLRECT];
[big setAlpha:0.5];
[little setFrame:BIGRECT];
[little setAlpha:1.0];
[UIView commitAnimations];
// Hide the shrunken "big" image.
[big setAlpha:0.0f];
[[big superview] bringSubviewToFront:big];
}
@end
代码中设定透明度的目的,为了就是小图放大的时候,才不会被原本在上面的大图盖到,导致看不到图
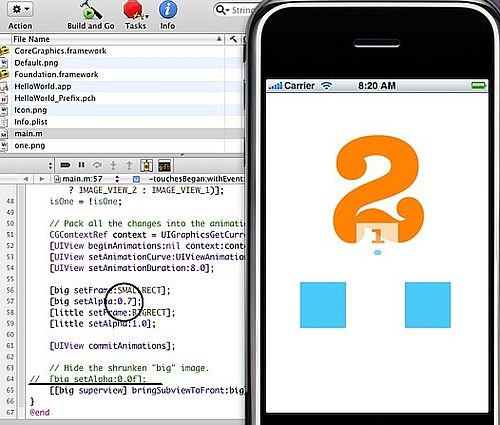

相关文章推荐
- [IPhone] 如何将制作图片放大缩小的动作
- iPhone 开发中如何将制作图片放大缩小代码实现案例
- iphone iPhone开发中如何将制作图片放大缩小代码实现案例
- iPhone 上图片放大缩小的代码例子
- [jQuery]地图浏览:如何实现图片的放大缩小和点击之后的位置居中
- PS 在PS中如何等比例放大缩小图片
- 如何提取ipa中的图片; iphone ios 如何制作越狱ipa安装文件
- 如何让网页背景图片固定不变 不会随着网页的放大缩小而改变
- iOS做一个iPhone相册,每个图片都能放大缩小并且翻到第⼆张图时,再翻回来就变成原来的大 ⼩.使⽤UIPageControl与UIScrollView结合.
- 关于canvas制作图片放大缩小效果
- js如何制作放大效果的图片
- 关于iPad+iPhone上,图片放大缩小时都能点击此区域
- 实例讲解如何利用jQuery设置图片居中放大或者缩小
- WPF如何把图片Image控件设置成,当窗口的放大和缩小,跟随着一起变化
- iPhone开发--改变图片的尺寸,放大或缩小
- 如何使用Ubuntu手机中的手势来放大或缩小图片
- android 触摸手指动作放大和缩小图片
- android 如何利用手势放大和缩小一个图片?
- [jQuery]地图浏览:如何实现图片的放大缩小和点击之后的位置居中
- iPhone相册,(UIScrollView,UIPageControl的综合应用)捏合放大缩小, 左右滑动切换图片