Apache Camel框架之事务控制
2012-02-10 17:30
405 查看
本文简单介绍一下Apache Camel如何对route进行事务控制,首先介绍整个route只涉及到一个事务参与者的情况,然后再介绍route中涉及到多个事务参与者的情况.Camel是通过和Spring的框架集成进行事务控制的.
1,整个route只有一个事务参与者,"局部事务",这里用JMS的例子,后台的MQ为ActiveMQ,示例图如下:(图片来源于Camel in Action)

route的代码如下:public class JMSTransaction extends RouteBuilder {
public void configure() throws Exception {
TProcessor0 p0 = new TProcessor0();
TProcessor1 p1 = new TProcessor1();
from("jms:queue:TOOL.DEFAULT").process(p0).process(p1).to("file:d:/temp/outbox");
}
}
Spring配置如下:<beans xmlns="http://www.springframework.org/schema/beans"
xmlns:xsi="http://www.w3.org/2001/XMLSchema-instance"
xmlns:broker="http://activemq.apache.org/schema/core"
xsi:schemaLocation=" http://www.springframework.org/schema/beans http://www.springframework.org/schema/beans/spring-beans-2.5.xsd http://camel.apache.org/schema/spring http://camel.apache.org/schema/spring/camel-spring.xsd http://activemq.apache.org/schema/core http://activemq.apache.org/schema/core/activemq-core-5.2.0.xsd">
<camelContext id="camel" xmlns="http://camel.apache.org/schema/spring">
<package>
com.test.camel.transaction.jms
</package>
</camelContext>
<bean id="jms" class="org.apache.activemq.camel.component.ActiveMQComponent">
<property name="transacted" value="true"/>
<property name="transactionManager" ref="txManager"/>
</bean>
<bean id="txManager" class="org.springframework.jms.connection.JmsTransactionManager">
<property name="connectionFactory" ref="jmsConnectionFactory"/>
</bean>
<bean id="jmsConnectionFactory" class="org.apache.activemq.ActiveMQConnectionFactory">
<property name="brokerURL" value="tcp://localhost:61616"/>
</bean>
</beans>
route定义的逻辑为从queue里取消息,然后进行一系列的处理(process(p0).process(p1)),<property name="transacted" value="true"/>的意思是通过这个jms进行的消息存取是有事务控制的.上面的route在process(p1)里抛出异常,txManager会进行rollback处理.(在activeMQ里,消息默认会redelivery到客户端6次,如果继续异常,消息会放到deadletter queue里(ActiveMQ.DLQ)),需要在AciveMQ的配置文件activemq.xml里配置如下:(non-persistent的queue的消息出错也转到dead
letter queue)
<policyEntry queue=">">
<deadLetterStrategy>
<sharedDeadLetterStrategy processNonPersistent="true" />
</deadLetterStrategy>
如果<property name="transacted" value="false"/>的话,消息在重发了6次后会丢失.
如果上面例子中的事务参与者是数据库的话,道理与之类似,只是配置的transaction manager不同,如:
<bean id="txManager" class="org.springframework.jdbc.datasource.DataSourceTransactionManager"/>
Camel里使用ActiveMQ JMS的例子可以参照 http://blog.csdn.net/kkdelta/article/details/7237096
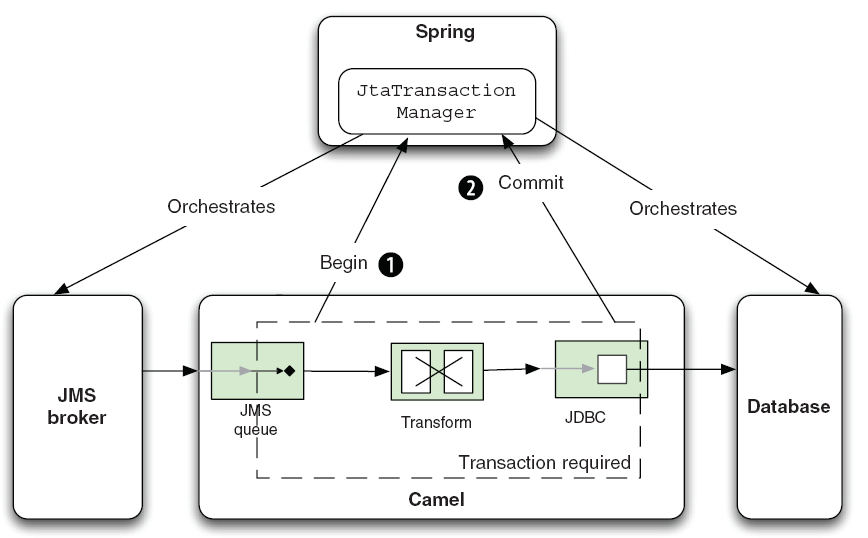
2,Camel里的全局事务,一个route里有多个事务参与者,示例图如下:(图片来源于Camel in Action)

route的定义如下:public class XaTransaction extends RouteBuilder {
public void configure() throws Exception {
TProcessor1 p1 = new TProcessor1();
from("jms:queue:TOOL.DEFAULT")
.transacted()
.log("+++ before database +++")
.bean(SQLBean.class, "toSql")
.to("jdbc:myDataSource")
.process(p1)
.log("+++ after database +++");
}
}
public class SQLBean {
public String toSql(String str) {
//create table CamelTEST(msg varchar2(2000));
StringBuilder sb = new StringBuilder();
sb.append("INSERT INTO CamelTEST VALUES ('camel test')");
return sb.toString();
}
}
route的逻辑是从queue里取消息,然后操作数据库,然后做后续其他操作(process(p1)),这里的process(p1)如果抛出异常的话,取消息和数据库操作都回滚,
如果整个route都成功完成的话,取消息和数据库操作提交.
这里用到JTA transaction manager是atomikos,相应的jar包可以从这里下载:http://download.csdn.net/detail/kkdelta/4056226
atomikos的主页 http://www.atomikos.com/Main/ProductsOverview
Spring的配置如下:<beans xmlns="http://www.springframework.org/schema/beans"
xmlns:xsi="http://www.w3.org/2001/XMLSchema-instance"
xmlns:broker="http://activemq.apache.org/schema/core"
xsi:schemaLocation=" http://www.springframework.org/schema/beans http://www.springframework.org/schema/beans/spring-beans-2.5.xsd http://camel.apache.org/schema/spring http://camel.apache.org/schema/spring/camel-spring.xsd http://activemq.apache.org/schema/core http://activemq.apache.org/schema/core/activemq-core-5.2.0.xsd">
<camelContext id="camel" xmlns="http://camel.apache.org/schema/spring">
<package>
com.test.camel.transaction.xa
</package>
</camelContext>
<bean id="atomikosTransactionManager"
class="com.atomikos.icatch.jta.UserTransactionManager"
init-method="init" destroy-method="close" >
<!-- when close is called, should we force transactions to terminate or not? -->
<property name="forceShutdown" value="false"/>
</bean>
<!-- this is some atomikos setup you must do -->
<bean id="atomikosUserTransaction" class="com.atomikos.icatch.jta.UserTransactionImp" >
<property name="transactionTimeout" value="300"/>
</bean>
<!-- this is some atomikos setup you must do -->
<bean id="connectionFactory"
class="com.atomikos.jms.AtomikosConnectionFactoryBean" >
<property name="uniqueResourceName" value="amq1"/>
<property name="xaConnectionFactory" ref="jmsXaConnectionFactory"/>
</bean>
<!-- this is the Spring JtaTransactionManager which under the hood uses Atomikos -->
<bean id="jtaTransactionManager"
class="org.springframework.transaction.jta.JtaTransactionManager" >
<property name="transactionManager" ref="atomikosTransactionManager"/>
<property name="userTransaction" ref="atomikosUserTransaction"/>
</bean>
<!-- Is the ConnectionFactory to connect to the JMS broker -->
<!-- notice how we must use the XA connection factory -->
<bean id="jmsXaConnectionFactory" class="org.apache.activemq.ActiveMQXAConnectionFactory" >
<property name="brokerURL" value="tcp://localhost:61616"/>
</bean>
<!-- define the activemq Camel component so we can integrate with the AMQ broker below -->
<bean id="jms" class="org.apache.activemq.camel.component.ActiveMQComponent" >
<property name="transacted" value="true"/>
<property name="transactionManager" ref="jtaTransactionManager"/>
</bean>
<bean id="myDataSource"
class="com.atomikos.jdbc.AtomikosDataSourceBean"
init-method="init" destroy-method="close">
<!-- set an arbitrary but unique name for the datasource -->
<property name="uniqueResourceName"><value>XADBMS</value></property>
<property name="xaDataSourceClassName">
<value>oracle.jdbc.xa.client.OracleXADataSource</value>
</property>
<property name="xaProperties">
<props>
<prop key="user">xxx</prop>
<prop key="password">xxx</prop>
<prop key="URL">jdbc:oracle:thin:@147.151.240.xxx:1521:orcl</prop>
</props>
</property>
<property name="poolSize" value="1"/>
</bean>
</beans>
1,整个route只有一个事务参与者,"局部事务",这里用JMS的例子,后台的MQ为ActiveMQ,示例图如下:(图片来源于Camel in Action)

route的代码如下:public class JMSTransaction extends RouteBuilder {
public void configure() throws Exception {
TProcessor0 p0 = new TProcessor0();
TProcessor1 p1 = new TProcessor1();
from("jms:queue:TOOL.DEFAULT").process(p0).process(p1).to("file:d:/temp/outbox");
}
}
Spring配置如下:<beans xmlns="http://www.springframework.org/schema/beans"
xmlns:xsi="http://www.w3.org/2001/XMLSchema-instance"
xmlns:broker="http://activemq.apache.org/schema/core"
xsi:schemaLocation=" http://www.springframework.org/schema/beans http://www.springframework.org/schema/beans/spring-beans-2.5.xsd http://camel.apache.org/schema/spring http://camel.apache.org/schema/spring/camel-spring.xsd http://activemq.apache.org/schema/core http://activemq.apache.org/schema/core/activemq-core-5.2.0.xsd">
<camelContext id="camel" xmlns="http://camel.apache.org/schema/spring">
<package>
com.test.camel.transaction.jms
</package>
</camelContext>
<bean id="jms" class="org.apache.activemq.camel.component.ActiveMQComponent">
<property name="transacted" value="true"/>
<property name="transactionManager" ref="txManager"/>
</bean>
<bean id="txManager" class="org.springframework.jms.connection.JmsTransactionManager">
<property name="connectionFactory" ref="jmsConnectionFactory"/>
</bean>
<bean id="jmsConnectionFactory" class="org.apache.activemq.ActiveMQConnectionFactory">
<property name="brokerURL" value="tcp://localhost:61616"/>
</bean>
</beans>
route定义的逻辑为从queue里取消息,然后进行一系列的处理(process(p0).process(p1)),<property name="transacted" value="true"/>的意思是通过这个jms进行的消息存取是有事务控制的.上面的route在process(p1)里抛出异常,txManager会进行rollback处理.(在activeMQ里,消息默认会redelivery到客户端6次,如果继续异常,消息会放到deadletter queue里(ActiveMQ.DLQ)),需要在AciveMQ的配置文件activemq.xml里配置如下:(non-persistent的queue的消息出错也转到dead
letter queue)
<policyEntry queue=">">
<deadLetterStrategy>
<sharedDeadLetterStrategy processNonPersistent="true" />
</deadLetterStrategy>
如果<property name="transacted" value="false"/>的话,消息在重发了6次后会丢失.
如果上面例子中的事务参与者是数据库的话,道理与之类似,只是配置的transaction manager不同,如:
<bean id="txManager" class="org.springframework.jdbc.datasource.DataSourceTransactionManager"/>
Camel里使用ActiveMQ JMS的例子可以参照 http://blog.csdn.net/kkdelta/article/details/7237096
2,Camel里的全局事务,一个route里有多个事务参与者,示例图如下:(图片来源于Camel in Action)

route的定义如下:public class XaTransaction extends RouteBuilder {
public void configure() throws Exception {
TProcessor1 p1 = new TProcessor1();
from("jms:queue:TOOL.DEFAULT")
.transacted()
.log("+++ before database +++")
.bean(SQLBean.class, "toSql")
.to("jdbc:myDataSource")
.process(p1)
.log("+++ after database +++");
}
}
public class SQLBean {
public String toSql(String str) {
//create table CamelTEST(msg varchar2(2000));
StringBuilder sb = new StringBuilder();
sb.append("INSERT INTO CamelTEST VALUES ('camel test')");
return sb.toString();
}
}
route的逻辑是从queue里取消息,然后操作数据库,然后做后续其他操作(process(p1)),这里的process(p1)如果抛出异常的话,取消息和数据库操作都回滚,
如果整个route都成功完成的话,取消息和数据库操作提交.
这里用到JTA transaction manager是atomikos,相应的jar包可以从这里下载:http://download.csdn.net/detail/kkdelta/4056226
atomikos的主页 http://www.atomikos.com/Main/ProductsOverview
Spring的配置如下:<beans xmlns="http://www.springframework.org/schema/beans"
xmlns:xsi="http://www.w3.org/2001/XMLSchema-instance"
xmlns:broker="http://activemq.apache.org/schema/core"
xsi:schemaLocation=" http://www.springframework.org/schema/beans http://www.springframework.org/schema/beans/spring-beans-2.5.xsd http://camel.apache.org/schema/spring http://camel.apache.org/schema/spring/camel-spring.xsd http://activemq.apache.org/schema/core http://activemq.apache.org/schema/core/activemq-core-5.2.0.xsd">
<camelContext id="camel" xmlns="http://camel.apache.org/schema/spring">
<package>
com.test.camel.transaction.xa
</package>
</camelContext>
<bean id="atomikosTransactionManager"
class="com.atomikos.icatch.jta.UserTransactionManager"
init-method="init" destroy-method="close" >
<!-- when close is called, should we force transactions to terminate or not? -->
<property name="forceShutdown" value="false"/>
</bean>
<!-- this is some atomikos setup you must do -->
<bean id="atomikosUserTransaction" class="com.atomikos.icatch.jta.UserTransactionImp" >
<property name="transactionTimeout" value="300"/>
</bean>
<!-- this is some atomikos setup you must do -->
<bean id="connectionFactory"
class="com.atomikos.jms.AtomikosConnectionFactoryBean" >
<property name="uniqueResourceName" value="amq1"/>
<property name="xaConnectionFactory" ref="jmsXaConnectionFactory"/>
</bean>
<!-- this is the Spring JtaTransactionManager which under the hood uses Atomikos -->
<bean id="jtaTransactionManager"
class="org.springframework.transaction.jta.JtaTransactionManager" >
<property name="transactionManager" ref="atomikosTransactionManager"/>
<property name="userTransaction" ref="atomikosUserTransaction"/>
</bean>
<!-- Is the ConnectionFactory to connect to the JMS broker -->
<!-- notice how we must use the XA connection factory -->
<bean id="jmsXaConnectionFactory" class="org.apache.activemq.ActiveMQXAConnectionFactory" >
<property name="brokerURL" value="tcp://localhost:61616"/>
</bean>
<!-- define the activemq Camel component so we can integrate with the AMQ broker below -->
<bean id="jms" class="org.apache.activemq.camel.component.ActiveMQComponent" >
<property name="transacted" value="true"/>
<property name="transactionManager" ref="jtaTransactionManager"/>
</bean>
<bean id="myDataSource"
class="com.atomikos.jdbc.AtomikosDataSourceBean"
init-method="init" destroy-method="close">
<!-- set an arbitrary but unique name for the datasource -->
<property name="uniqueResourceName"><value>XADBMS</value></property>
<property name="xaDataSourceClassName">
<value>oracle.jdbc.xa.client.OracleXADataSource</value>
</property>
<property name="xaProperties">
<props>
<prop key="user">xxx</prop>
<prop key="password">xxx</prop>
<prop key="URL">jdbc:oracle:thin:@147.151.240.xxx:1521:orcl</prop>
</props>
</property>
<property name="poolSize" value="1"/>
</bean>
</beans>
相关文章推荐
- Apache Camel框架之事务控制
- Apache Camel框架之事务控制
- 开源框架DBUtil的使用以及使用Threadlocal类控制事务案例
- SSM框架 +MYSQL数据库 配置事务控制的方法和注意点
- SSM框架 +MYSQL数据库 配置事务控制的方法和注意点
- (6)理解事务处理、事务处理的隔离级别,和使用JDBC进行事务处理||抛弃框架,如何实现分层架构下JDBC事务的控制
- 从零开始写javaweb框架笔记23-使框架具备AOP特性-实现事务控制特性
- SSM框架 +MYSQL数据库 配置事务控制的方法和注意点
- 抛弃框架,如何实现分层架构下JDBC事务的控制
- 抛弃框架,如何实现分层架构下JDBC事务的控制
- Apache Camel框架之事务控制
- 框架页面尽可以这么用(后置代码中控制框架)
- Spring 框架学习—控制反转(IOC)
- 深入探索spring技术内幕(八): Spring +JDBC组合开发和事务控制
- Spring事务处理及其AOP框架的内幕
- jdbc事务控制
- 一个可以精确控制FPS的程序框架
- 实现 Java 多线程并发控制框架
- Oracle Class2. SQL查询和SQL函数(Oracle数据类型,ddl,dml,dcl,事务控制语言tcl,sql操作符,sql函数,select语句,运算符,分析函数,临时表)
- 在ASP中事务控制的方法
