Android之定义各种样式的标题栏
2012-01-18 10:07
316 查看
最近在网上看到一篇介绍Android window的requestWindowFeature()的使用方法,共享出来大家学习学习
requestWindowFeature(Window.FEATURE_LEFT_ICON);
setContentView(R.layout.dialog_activity);
getWindow().setFeatureDrawableResource(Window.FEATURE_LEFT_ICON, android.R.drawable.ic_dialog_alert);
Android 应用程序窗体显示状态操作(requestWindowFeature()的应用)
我们在开发程序是经常会需要软件全屏显示、自定义标题(使用按钮等控件)和其他的需求,今天这一讲就是如何控制Android应用程序的窗体显示.
首先介绍一个重要方法那就是requestWindowFeature(featrueId),它的功能是启用窗体的扩展特性。参数是Window类中定义的常量。
一、枚举常量
1.DEFAULT_FEATURES:系统默认状态,一般不需要指定
2.FEATURE_CONTEXT_MENU:启用ContextMenu,默认该项已启用,一般无需指定
3.FEATURE_CUSTOM_TITLE:自定义标题。当需要自定义标题时必须指定。如:标题是一个按钮时
4.FEATURE_INDETERMINATE_PROGRESS:不确定的进度
5.FEATURE_LEFT_ICON:标题栏左侧的图标
6.FEATURE_NO_TITLE:无标题
7.FEATURE_OPTIONS_PANEL:启用“选项面板”功能,默认已启用。
8.FEATURE_PROGRESS:进度指示器功能
9.FEATURE_RIGHT_ICON:标题栏右侧的图标
二、详解
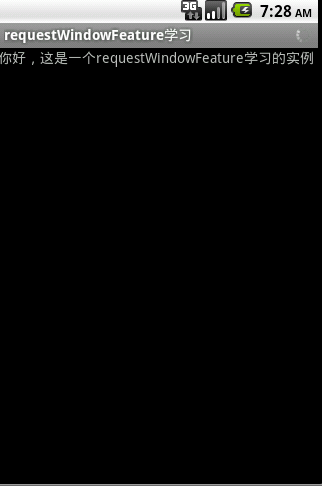
1.默认显示状态

2.FEATURE_CUSTOM_TITLE详解
this.requestWindowFeature(Window.FEATURE_CUSTOM_TITLE);
setContentView(R.layout.main);

这是因为没设置Featrue
在上面代码后加:getWindow().setFeatureInt(Window.FEATURE_CUSTOM_TITLE, R.layout.title);

自定义标题完成,它是一个xml文件布局
title.xml
3.FEATURE_INDETERMINATE_PROGRESS详解
表示一个进程正在运行

实现代码
1.progress.xml
4.FEATURE_LEFT_ICON详解
左侧显示图标

实现代码
5.FEATURE_NO_TITLE详解
可用于全屏显示
实现代码

虽然上面这样可以在标题栏加入一些控件,但是仍然不能改变标题栏的高度、背景色,要想达到这个目的,只能使用theme(主题)。因此往project里先添加一个style。改变背景色修改android:windowTitleBackgroundStyle的值,改变标题栏高度则修改android:windowTitleSize的值。下面是一个示例:
接着再修改AndroidManifest.xml文件,找到要自定义标题栏的Activity,添加上android:theme值,比如:
<activity android:name=".MainActivity" android:theme="@style/activityTitlebar">
android:theme值就是上面那个style.xml文件里定义的一个style的name值。
按照以上的步骤,修改标题栏布局、高度、背景色的功能就实现了。
requestWindowFeature(Window.FEATURE_LEFT_ICON);
setContentView(R.layout.dialog_activity);
getWindow().setFeatureDrawableResource(Window.FEATURE_LEFT_ICON, android.R.drawable.ic_dialog_alert);
Android 应用程序窗体显示状态操作(requestWindowFeature()的应用)
我们在开发程序是经常会需要软件全屏显示、自定义标题(使用按钮等控件)和其他的需求,今天这一讲就是如何控制Android应用程序的窗体显示.
首先介绍一个重要方法那就是requestWindowFeature(featrueId),它的功能是启用窗体的扩展特性。参数是Window类中定义的常量。
一、枚举常量
1.DEFAULT_FEATURES:系统默认状态,一般不需要指定
2.FEATURE_CONTEXT_MENU:启用ContextMenu,默认该项已启用,一般无需指定
3.FEATURE_CUSTOM_TITLE:自定义标题。当需要自定义标题时必须指定。如:标题是一个按钮时
4.FEATURE_INDETERMINATE_PROGRESS:不确定的进度
5.FEATURE_LEFT_ICON:标题栏左侧的图标
6.FEATURE_NO_TITLE:无标题
7.FEATURE_OPTIONS_PANEL:启用“选项面板”功能,默认已启用。
8.FEATURE_PROGRESS:进度指示器功能
9.FEATURE_RIGHT_ICON:标题栏右侧的图标
二、详解
1.默认显示状态

2.FEATURE_CUSTOM_TITLE详解
this.requestWindowFeature(Window.FEATURE_CUSTOM_TITLE);
setContentView(R.layout.main);

这是因为没设置Featrue
在上面代码后加:getWindow().setFeatureInt(Window.FEATURE_CUSTOM_TITLE, R.layout.title);

自定义标题完成,它是一个xml文件布局
title.xml
<?xml version="1.0" encoding="utf-8"?>
<LinearLayout
  xmlns:android="http://schemas.android.com/apk/res/android"
  android:layout_width="wrap_content"
  android:layout_height="wrap_content" >
  <ImageView android:layout_width="wrap_content"
        android:layout_height="wrap_content"
        android:src="@drawable/icon"/>
   <TextView android:id="@+id/text"
        android:layout_width="wrap_content"
        android:layout_height="wrap_content"
        android:layout_alignParentLeft="true"
        android:text="文本" />
</LinearLayout>
3.FEATURE_INDETERMINATE_PROGRESS详解
表示一个进程正在运行

实现代码
1.progress.xml
<?xml version="1.0" encoding="utf-8"?>
<LinearLayout
  xmlns:android="http://schemas.android.com/apk/res/android"
  android:layout_width="wrap_content"
  android:layout_height="wrap_content">
  <ProgressBar android:id="@+id/progress"
      android:layout_width="wrap_content" android:layout_height="wrap_content"
      android:layout_gravity="center_vertical"
      style="?android:attr/progressBarStyleSmallTitle">
</ProgressBar>
</LinearLayout>2.Java代码this.requestWindowFeature(Window.FEATURE_INDETERMINATE_PROGRESS); setContentView(R.layout.main); getWindow().setFeatureInt(Window.FEATURE_INDETERMINATE_PROGRESS, R.layout.progress); setProgressBarIndeterminateVisibility(true);
4.FEATURE_LEFT_ICON详解
左侧显示图标

实现代码
this.requestWindowFeature(Window.FEATURE_LEFT_ICON);
  setContentView(R.layout.main);
  getWindow().setFeatureDrawableResource(Window.FEATURE_LEFT_ICON, R.drawable.icon);
5.FEATURE_NO_TITLE详解
可用于全屏显示
实现代码
this.requestWindowFeature(Window.FEATURE_NO_TITLE);
setContentView(R.layout.main);
getWindow().setFlags(WindowManager.LayoutParams.FLAG_FULLSCREEN, WindowManager.LayoutParams.FLAG_FULLSCREEN);

虽然上面这样可以在标题栏加入一些控件,但是仍然不能改变标题栏的高度、背景色,要想达到这个目的,只能使用theme(主题)。因此往project里先添加一个style。改变背景色修改android:windowTitleBackgroundStyle的值,改变标题栏高度则修改android:windowTitleSize的值。下面是一个示例:
<?xml version="1.0" encoding="utf-8"?>
<resources>
    <style name="CustomWindowTitleBackground">
        <item name="android:background">#778899</item>
    </style>
    <style name="activityTitlebar" parent="android:Theme">
        <item name="android:windowTitleSize">32dp</item>
        <item name="android:windowTitleBackgroundStyle">@style/CustomWindowTitleBackground</item>
    </style>
</resources>
接着再修改AndroidManifest.xml文件,找到要自定义标题栏的Activity,添加上android:theme值,比如:
<activity android:name=".MainActivity" android:theme="@style/activityTitlebar">
android:theme值就是上面那个style.xml文件里定义的一个style的name值。
按照以上的步骤,修改标题栏布局、高度、背景色的功能就实现了。
相关文章推荐
- Android之定义各种样式的标题栏
- 对Android APP的各种样式统一修改方法(这里列举了通知状态栏StatueBar,标题栏ActionBar,ToolBar和按钮Button的样式修改)
- Android 圆图,正方形图等各种样式的xml的定义
- android listview item定义不同的样式布局
- Android CustomShapeImageView对图片进行各种样式裁剪:圆形、星形、心形、花瓣形等
- android 预定义样式简述
- 善用Android预定义样式
- Android:自己定义PopupMenu的样式(显示图标/设置RadioButton图标)
- Android 弹无虚发之第四弹:你应该掌握的Notification(Notification的通知栏常驻、Notification的各种样式、Notification点击无效)
- Android 封装实现各种样式对话框
- Android预定义样式
- 善用Android预定义样式
- Android CircleProgress:可自由定制实现各种样式圆形加载进度
- Android 系统当中各种尺寸单位的定义及使用
- Android 系统当中各种尺寸单位的定义及使用
- Android 弹无虚发之第四弹:你应该掌握的Notification(Notification的通知栏常驻、Notification的各种样式、Notification点击无效)
- 自定义绘制android EditText的背景,定义EditText文字的显示样式
- Android预定义样式
- Android 封装实现各种样式对话框
- 【Android UI设计与开发】第13期:顶部标题栏(四)自定义ActionBar风格和样式
