CustomAction Basics in SharePoint
2011-12-31 11:34
363 查看
CustomActions allow you to provide an easy way for an end user to perform some sort of action on or with a specific list item that is not available in a standard SharePoint installation.
Let’s go through a simple demo of using a CustomAction. In this demo, we will create a CustomAction which will redirect to a custom ASPX page and display some information about the list item. To start, let’s create a new WSPBuilder project named “CustomActionsDemo”
and add a new Blank Feature called “DemoCustomAction”. (If you have never used WSPBuilder before, please check out myIntro to WSPBuilder post.) Use the following
in the feature settings dialog:

Next, we’ll need to add a LAYOUTS folder to the folder that represents the 12 hive in our project. Beneath that, add a “DemoCustomAction” folder. Once we have these folders added, WSPBuilder will automatically knows how to push these files out to the 12
hive. At this point, your project folder structure should look like this:

Now we can go ahead and add a new web form without code behind to the LAYOUTS/DemoCustomAction folder. Name it ViewListItem.aspx and put the following code into it:
The code above uses two parameters which are generated and passed in via the URL from our CustomAction. It then uses these two parameters, ListId and ItemId, to find the specific SPListItem and display it’s Title field.
Now all that is left to do is write the CustomAction specification for our feature. The following code should be placed into the elements.xml file that was generated for you when you added the blank feature to the project:
This is the XML that specifies your CustomAction. Here is a quick run-through of the attributes used (Note that there is a full page on MSDN explaining all of the attributes here:http://msdn.microsoft.com/en-us/library/ms460194.aspx):
Id – This is an optional field to identify this CustomAction. You can make it whatever you would like.
RegistrationType – How we will specify what items get this CustomAction. In our case, we have stated that a specific content type will get it.
RegistrationId – The identifier of what will get this CustomAction attached to it. Since we have chosen to attach by content type and our RegistrationId is 0×01, we are attaching this CustomAction to the Item content type and all that
inherit from it.
Title – This is the text to display for this CustomAction.
Description – This is a description of the CustomAction. It will be displayed as a tooltip when the user hovers over the link for the CustomAction.
Location – The location attribute specifies where to place the CustomAction. In our case, we have chosen DisplayFormToolbar which will display on the details page of the item.
UrlAction Url – This is the URL that we will send the user to when the CustomAction is clicked. The items in curly braces are variables provided by SharePoint that contain the current List ID and the current Item ID.
Now that our coding is complete, we can deploy this feature out to SharePoint using WSPBuilder. After deploying the feature, we should see the feature available in Site Collection Features.

Go ahead and activate the feature. After activation, create a custom list and add a new list item to it:

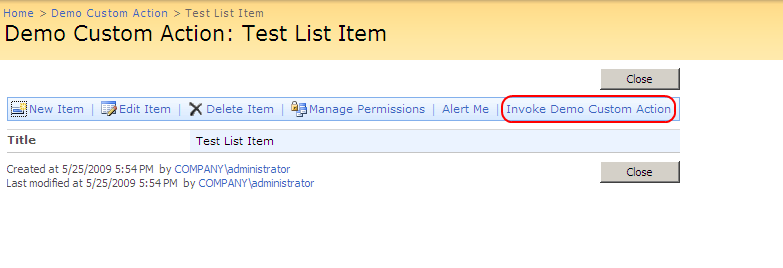
Now if you view the item, you should see a new item in the top of the toolbar called “Invoke Demo Custom Action”.

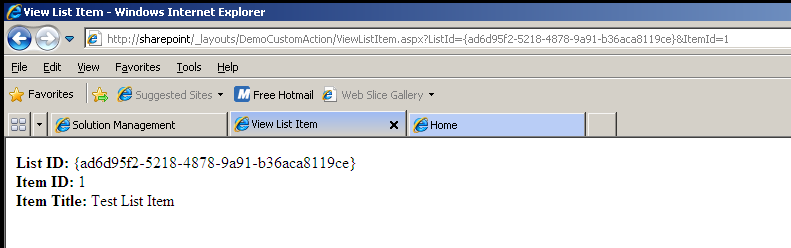
Go ahead and click it. This will invoke the CustomAction we just wrote and re-direct you to the custom page that we wrote earlier. If all went well, you should see something like this:

That’s about it for CustomAction basics. Obviously you can use this technique to link to a page that does much more than just display some information about the list item. Stay tuned for more on CustomActions in the future.
Let’s go through a simple demo of using a CustomAction. In this demo, we will create a CustomAction which will redirect to a custom ASPX page and display some information about the list item. To start, let’s create a new WSPBuilder project named “CustomActionsDemo”
and add a new Blank Feature called “DemoCustomAction”. (If you have never used WSPBuilder before, please check out myIntro to WSPBuilder post.) Use the following
in the feature settings dialog:
Next, we’ll need to add a LAYOUTS folder to the folder that represents the 12 hive in our project. Beneath that, add a “DemoCustomAction” folder. Once we have these folders added, WSPBuilder will automatically knows how to push these files out to the 12
hive. At this point, your project folder structure should look like this:
Now we can go ahead and add a new web form without code behind to the LAYOUTS/DemoCustomAction folder. Name it ViewListItem.aspx and put the following code into it:
<!--

Code highlighting produced by Actipro CodeHighlighter (freeware) http://www.CodeHighlighter.com/
--><%@ Page Language="C#" %>
<%@ Import Namespace="Microsoft.SharePoint" %>

<!DOCTYPE html PUBLIC "-//W3C//DTD XHTML 1.0 Transitional//EN" "http://www.w3.org/TR/xhtml1/DTD/xhtml1-transitional.dtd">
<html xmlns="http://www.w3.org/1999/xhtml">
<head runat="server">
<title>View List Item</title>
<script runat="server">
protected void Page_Load(object sender, EventArgs e)
{
string ListId = Request.Params["ListId"];
string ItemId = Request.Params["ItemId"];
Response.Write("<strong>List ID:</strong> " + ListId + "<br />");
Response.Write("<strong>Item ID:</strong> " + ItemId + "<br />");
SPSite thisSite = SPContext.Current.Site;
SPList thisList = thisSite.RootWeb.Lists[new Guid(ListId)];
SPListItem thisItem = thisList.GetItemById(Convert.ToInt32(ItemId));
Response.Write("<strong>Item Title:</strong> " + thisItem["Title"].ToString());
}
</script>
</head>
<body>
<form id="formMain" runat="server">
</form>
</body>
</html>
The code above uses two parameters which are generated and passed in via the URL from our CustomAction. It then uses these two parameters, ListId and ItemId, to find the specific SPListItem and display it’s Title field.
Now all that is left to do is write the CustomAction specification for our feature. The following code should be placed into the elements.xml file that was generated for you when you added the blank feature to the project:
<!-- Code highlighting produced by Actipro CodeHighlighter (freeware) http://www.CodeHighlighter.com/ --><?xml version="1.0" encoding="utf-8" ?> <Elements xmlns="http://schemas.microsoft.com/sharepoint/"> <CustomAction Id="Demo Custom Action" Title="Invoke Demo Custom Action" Location="DisplayFormToolbar" Description="Our Demo Custom Action" RegistrationId="0x01" RegistrationType="ContentType"> <UrlAction Url="/_layouts/DemoCustomAction/ViewListItem.aspx?ListId={ListId}&ItemId={ItemId}" /> </CustomAction> </Elements>
This is the XML that specifies your CustomAction. Here is a quick run-through of the attributes used (Note that there is a full page on MSDN explaining all of the attributes here:http://msdn.microsoft.com/en-us/library/ms460194.aspx):
Id – This is an optional field to identify this CustomAction. You can make it whatever you would like.
RegistrationType – How we will specify what items get this CustomAction. In our case, we have stated that a specific content type will get it.
RegistrationId – The identifier of what will get this CustomAction attached to it. Since we have chosen to attach by content type and our RegistrationId is 0×01, we are attaching this CustomAction to the Item content type and all that
inherit from it.
Title – This is the text to display for this CustomAction.
Description – This is a description of the CustomAction. It will be displayed as a tooltip when the user hovers over the link for the CustomAction.
Location – The location attribute specifies where to place the CustomAction. In our case, we have chosen DisplayFormToolbar which will display on the details page of the item.
UrlAction Url – This is the URL that we will send the user to when the CustomAction is clicked. The items in curly braces are variables provided by SharePoint that contain the current List ID and the current Item ID.
Now that our coding is complete, we can deploy this feature out to SharePoint using WSPBuilder. After deploying the feature, we should see the feature available in Site Collection Features.

Go ahead and activate the feature. After activation, create a custom list and add a new list item to it:

Now if you view the item, you should see a new item in the top of the toolbar called “Invoke Demo Custom Action”.
Go ahead and click it. This will invoke the CustomAction we just wrote and re-direct you to the custom page that we wrote earlier. If all went well, you should see something like this:
That’s about it for CustomAction basics. Obviously you can use this technique to link to a page that does much more than just display some information about the list item. Stay tuned for more on CustomActions in the future.

相关文章推荐
- CustomAction Basics in SharePoint
- Custom Managed Navigation in SharePoint 2013
- Using the string repalce action in SharePoint workflow designer to send mail from mail template
- All Users in SharePoint Site Custom Webpart
- Building Custom Field Types in Windows SharePoint Services 3.0
- Deploying a custom master page in SharePoint 2010
- How to custom search results in SharePoint Server 2013
- 转:How to create your own custom 404 error page and handle redirect in SharePoint 2007 (MOSS)?
- How to create your own custom 404 error page and handle redirect in SharePoint
- add a custom action to a SharePoint list actions menu for a specific list or content type
- Custom Search Center in SharePoint 2013
- sharepoint ECMA using a custom contentType to creating a list in SubSite
- Custom SharePoint Web Template define element in onet.xml
- Building Custom Field Types in Windows SharePoint Services 3.0
- [Forum FAQ] Show Attachments in SharePoint 2013 Custom List View
- 在Sharepoint Designer中设置CustomAction
- Defining Custom Columns in SharePoint – Field Types and Options
- Creating Custom Timer Jobs in Sharepoint
- Custom Membership Provider under Minimal Trust in SharePoint 2007