android基础页面跳转
2011-12-14 22:15
232 查看
今天学习了UI组件,CheckBox、Radio、ListView、Spinner
接下来通过实例来了解这几个组件的具体应用:
首先是Radio,也即是添加互斥选项(即单选)组件,
先在radio_layout.xml布局文件中,定义两个Radio组件:
<?xml version="1.0" encoding="utf-8"?>
<LinearLayout xmlns:android="http://schemas.android.com/apk/res/android"
android:layout_width="match_parent"
android:layout_height="match_parent"
android:orientation="vertical" >
<ScrollView
android:layout_width="fill_parent"
android:layout_height="wrap_content"
>
<LinearLayout
android:layout_width="fill_parent"
android:layout_height="wrap_content"
android:orientation="vertical"
>
<TextView
android:layout_width="fill_parent"
android:layout_height="wrap_content"
android:text="Radio Demo"
/>
<RadioGroup
android:id="@+id/sexRg"
android:layout_width="fill_parent"
android:layout_height="wrap_content"
android:orientation="vertical"
android:checkedButton="@+id/female"
>
<RadioButton
android:id="@id/female"
android:text="女"
/>
<RadioButton
android:id="@+id/male"
android:text="男"
/>
</RadioGroup>
<Button
android:layout_width="fill_parent"
android:layout_height="wrap_content"
android:text="addRadioButton"
android:id="@+id/appendRadio"
/>
</LinearLayout>
</ScrollView>
</LinearLayout>
这里<ScrollView>为下拉滚动条,其子件只能有一个,所以其中的各个标签用<LinearLayout>标签所包裹。
然后在UITest3Activity.java中调用其布局文件,同时实现监听:
package cn.class3g.activity;
import android.app.Activity;
import android.os.Bundle;
import android.util.Log;
import android.view.View;
import android.view.View.OnClickListener;
import android.widget.Button;
import android.widget.CompoundButton;
import android.widget.CompoundButton.OnCheckedChangeListener;
import android.widget.RadioButton;
import android.widget.RadioGroup;
public class UITest3Activity extends Activity implements android.widget.RadioGroup.OnCheckedChangeListener{
RadioGroup rg=null;
Button addBtn=null;
private static final String TAG="TAG";
public void onCreate(Bundle savedInstanceState) {
super.onCreate(savedInstanceState);
setContentView(R.layout.radio_layout);
findVews();
rg.check(R.id.male);
int checkedId = rg.getCheckedRadioButtonId();
RadioButton rb = (RadioButton) this.findViewById(checkedId);
Log.i(TAG, rb.getText().toString());
}
private void findVews() {
rg=(RadioGroup) this.findViewById(R.id.sexRg);
//注册监听器
rg.setOnCheckedChangeListener(this);
addBtn=(Button) this.findViewById(R.id.appendRadio);
addBtn.setOnClickListener(new OnClickListener() {
public void onClick(View v){
//创建RadioButton对象
RadioButton newRb=new RadioButton(UITest3Activity.this);
newRb.append("不明");
newRb.setId(100);
//添加到RadioGroup中
rg.addView(newRb);
}
});
}
//覆盖OnCheckedChangeListener接口的抽象方法
public void onCheckedChanged(RadioGroup group, int checkedId) {
if(group.getId()==R.id.sexRg){
RadioButton rb=(RadioButton) this.findViewById(checkedId);
Log.i(TAG, rb.getText().toString());
}
}
}
启动虚拟机:
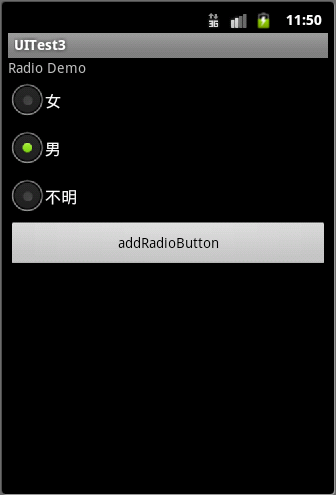
这里添加了一个button,用于添加Radio组件。
接下来来了解CheckBox,也即添加复选项组件
多选框(CheckBox)
CheckBox.getChecked(true);将CheckBox设置成选中状态。
CheckBox.getText();获取多选框的值。
CheckBox.isCheckBox();判断该选项是否被选中。
调用 setOnCheckedChangeListener ()
方法 , 处 理 多 选 框 被 选 择 事 件 , 把
CompoundButton.OnCheckedChangeListener 实例作为参数传入
首先,建立checkbox_layout.xml布局文件:
<?xml version="1.0" encoding="utf-8"?>
<LinearLayout xmlns:android="http://schemas.android.com/apk/res/android"
android:layout_width="match_parent"
android:layout_height="match_parent"
android:orientation="vertical" >
<TextView
android:layout_width="fill_parent"
android:layout_height="wrap_content"
android:text="爱好"
android:textSize="20dp"
/>
<TableLayout
android:layout_width="fill_parent"
android:layout_height="wrap_content"
android:stretchColumns="*"
android:id="@+id/tableLayout"
>
<TableRow >
<CheckBox
android:id="@+id/cb1"
android:layout_width="match_parent"
android:layout_height="wrap_content"
android:text="足球"
/>
<CheckBox
android:id="@+id/cb2"
android:layout_width="match_parent"
android:layout_height="wrap_content"
android:text="篮球"
/>
</TableRow>
<TableRow >
<CheckBox
android:id="@+id/cb3"
android:layout_width="match_parent"
android:layout_height="wrap_content"
android:text="游泳"
/>
<CheckBox
android:id="@+id/cb4"
android:layout_width="match_parent"
android:layout_height="wrap_content"
android:text="武术"
/>
</TableRow>
</TableLayout>
<Button
android:id="@+id/submit"
android:layout_width="match_parent"
android:layout_height="wrap_content"
android:text="提交"
/>
</LinearLayout>
然后在CheckBoxDemo.java中调用其布局,实现监听:
package cn.class3g.activity;
import java.util.ArrayList;
import android.app.Activity;
import android.os.Bundle;
import android.util.Log;
import android.view.View;
import android.view.View.OnClickListener;
import android.widget.Button;
import android.widget.CheckBox;
import android.widget.CompoundButton;
import android.widget.CompoundButton.OnCheckedChangeListener;
public class CheckBoxDemo extends Activity implements OnCheckedChangeListener{
private CheckBox cb1,cb2,cb3,cb4;
Button submitBtn=null;
private ArrayList<CheckBox> list=new ArrayList<CheckBox>();
@Override
protected void onCreate(Bundle savedInstanceState) {
// TODO Auto-generated method stub
super.onCreate(savedInstanceState);
setContentView(R.layout.checkbox_layout);
findViews();
}
private void findViews() {
cb1=(CheckBox) this.findViewById(R.id.cb1);
cb2=(CheckBox) this.findViewById(R.id.cb2);
cb3=(CheckBox) this.findViewById(R.id.cb3);
cb4=(CheckBox) this.findViewById(R.id.cb4);
list.add(cb1);
list.add(cb2);
list.add(cb3);
list.add(cb4);
for(CheckBox cb:list){
//为什么参数的this?
//当前类实现了监听器接口,所以当前类的实例this可以当做一个监听器
//对象放入setOnCheckedChangeListener()方法之中做参数
cb.setOnCheckedChangeListener(this);
}
submitBtn=(Button) this.findViewById(R.id.submit);
submitBtn.setOnClickListener(new OnClickListener(){
public void onClick(View v){
String fav="";
for(CheckBox cb:list){
if(cb.isChecked()){
fav+=cb.getText()+" , ";
}
}
}
});
}
//覆盖接口的抽象方法
public void onCheckedChanged(CompoundButton buttonView, boolean isChecked) {
Log.i("TAG", buttonView.getText().toString());
}}
启动虚拟机:

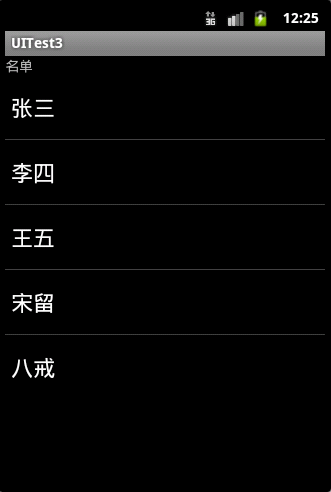
ListView列表组件
先建立list_layout.xml布局文件:
<?xml version="1.0" encoding="utf-8"?>
<LinearLayout xmlns:android="http://schemas.android.com/apk/res/android"
android:layout_width="match_parent"
android:layout_height="match_parent"
android:orientation="vertical" >
<TextView
android:layout_width="fill_parent"
android:layout_height="wrap_content"
android:text="名单:"
/>
<LinearLayout
android:layout_width="fill_parent"
android:layout_height="wrap_content"
android:id="@+id/nameList"
>
</LinearLayout>
</LinearLayout>
ListViewDemo.java中添加显示内容:
package cn.class3g.activity;
import android.app.Activity;
import android.os.Bundle;
import android.util.Log;
import android.view.View;
import android.widget.AdapterView;
import android.widget.AdapterView.OnItemClickListener;
import android.widget.ArrayAdapter;
import android.widget.ListView;
public class ListViewDemo extends Activity implements OnItemClickListener{
ListView nameList=null;
String[] names={"张三","李四","王五","宋六","猪八"};
protected void onCreate(Bundle savedInstanceState) {
super.onCreate(savedInstanceState);
this.setContentView(R.layout.list_layout);
findViews();
}
private void findViews() {
nameList=(ListView) this.findViewById(R.id.nameList);
ArrayAdapter adapter=new ArrayAdapter(this,android.R.layout.simple_expandable_list_item_1,names);
nameList.setAdapter(adapter);
nameList.setOnItemClickListener(this);
}
//覆盖监听器接口OnItemClickListener的抽象方法
public void onItemClick(AdapterView<?> arg0, View arg1, int arg2, long arg3) {
Log.i("Tag", names[arg2]+"position="+String.valueOf(arg2)
+" row_id=" + String.valueOf(arg3));
}
}
启动虚拟机:
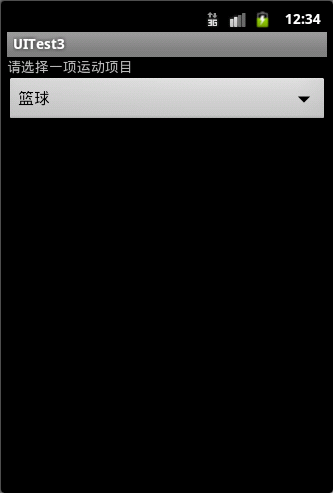
最后了解Spinner下拉选项组件
创建spinner_layout.xml布局文件:
<?xml version="1.0" encoding="utf-8"?>
<LinearLayout xmlns:android="http://schemas.android.com/apk/res/android"
android:layout_width="match_parent"
android:layout_height="match_parent"
android:orientation="vertical" >
<TextView
android:layout_width="fill_parent"
android:layout_height="wrap_content"
android:text="请选择一项运动项目"
/>
<Spinner
android:id="@+id/sportsSp"
android:layout_width="match_parent"
android:layout_height="wrap_content"
android:prompt="@string/sprinner_prompt"
android:entries="@+array/sports"
/>
</LinearLayout>
在SpinnerDemo.java文件中实现如下代码:
package cn.class3g.activity;
import android.app.Activity;
import android.os.Bundle;
import android.util.Log;
import android.view.View;
import android.widget.AdapterView;
import android.widget.AdapterView.OnItemSelectedListener;
import android.widget.Spinner;
import android.widget.TextView;
public class SpinnerDemo extends Activity implements OnItemSelectedListener{
Spinner sportSp=null;
protected void onCreate(Bundle savedInstanceState) {
super.onCreate(savedInstanceState);
setContentView(R.layout.spinner_layout);
findViews();
}
private void findViews() {
sportSp=(Spinner)this.findViewById(R.id.sportsSp);
sportSp.setOnItemSelectedListener(this);
}
@Override
public void onItemSelected(AdapterView<?> arg0, View arg1, int arg2,
long arg3) {
TextView tv=(TextView)arg1;
Log.i("TAG", tv.getText().toString());
}
@Override
public void onNothingSelected(AdapterView<?> arg0) {
// TODO Auto-generated method stub
}
}
启动虚拟机:
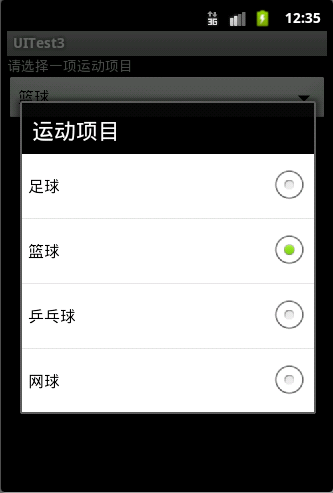
点击出现下拉选项:
接下来通过实例来了解这几个组件的具体应用:
首先是Radio,也即是添加互斥选项(即单选)组件,
先在radio_layout.xml布局文件中,定义两个Radio组件:
<?xml version="1.0" encoding="utf-8"?>
<LinearLayout xmlns:android="http://schemas.android.com/apk/res/android"
android:layout_width="match_parent"
android:layout_height="match_parent"
android:orientation="vertical" >
<ScrollView
android:layout_width="fill_parent"
android:layout_height="wrap_content"
>
<LinearLayout
android:layout_width="fill_parent"
android:layout_height="wrap_content"
android:orientation="vertical"
>
<TextView
android:layout_width="fill_parent"
android:layout_height="wrap_content"
android:text="Radio Demo"
/>
<RadioGroup
android:id="@+id/sexRg"
android:layout_width="fill_parent"
android:layout_height="wrap_content"
android:orientation="vertical"
android:checkedButton="@+id/female"
>
<RadioButton
android:id="@id/female"
android:text="女"
/>
<RadioButton
android:id="@+id/male"
android:text="男"
/>
</RadioGroup>
<Button
android:layout_width="fill_parent"
android:layout_height="wrap_content"
android:text="addRadioButton"
android:id="@+id/appendRadio"
/>
</LinearLayout>
</ScrollView>
</LinearLayout>
这里<ScrollView>为下拉滚动条,其子件只能有一个,所以其中的各个标签用<LinearLayout>标签所包裹。
然后在UITest3Activity.java中调用其布局文件,同时实现监听:
package cn.class3g.activity;
import android.app.Activity;
import android.os.Bundle;
import android.util.Log;
import android.view.View;
import android.view.View.OnClickListener;
import android.widget.Button;
import android.widget.CompoundButton;
import android.widget.CompoundButton.OnCheckedChangeListener;
import android.widget.RadioButton;
import android.widget.RadioGroup;
public class UITest3Activity extends Activity implements android.widget.RadioGroup.OnCheckedChangeListener{
RadioGroup rg=null;
Button addBtn=null;
private static final String TAG="TAG";
public void onCreate(Bundle savedInstanceState) {
super.onCreate(savedInstanceState);
setContentView(R.layout.radio_layout);
findVews();
rg.check(R.id.male);
int checkedId = rg.getCheckedRadioButtonId();
RadioButton rb = (RadioButton) this.findViewById(checkedId);
Log.i(TAG, rb.getText().toString());
}
private void findVews() {
rg=(RadioGroup) this.findViewById(R.id.sexRg);
//注册监听器
rg.setOnCheckedChangeListener(this);
addBtn=(Button) this.findViewById(R.id.appendRadio);
addBtn.setOnClickListener(new OnClickListener() {
public void onClick(View v){
//创建RadioButton对象
RadioButton newRb=new RadioButton(UITest3Activity.this);
newRb.append("不明");
newRb.setId(100);
//添加到RadioGroup中
rg.addView(newRb);
}
});
}
//覆盖OnCheckedChangeListener接口的抽象方法
public void onCheckedChanged(RadioGroup group, int checkedId) {
if(group.getId()==R.id.sexRg){
RadioButton rb=(RadioButton) this.findViewById(checkedId);
Log.i(TAG, rb.getText().toString());
}
}
}
启动虚拟机:
这里添加了一个button,用于添加Radio组件。
接下来来了解CheckBox,也即添加复选项组件
多选框(CheckBox)
CheckBox.getChecked(true);将CheckBox设置成选中状态。
CheckBox.getText();获取多选框的值。
CheckBox.isCheckBox();判断该选项是否被选中。
调用 setOnCheckedChangeListener ()
方法 , 处 理 多 选 框 被 选 择 事 件 , 把
CompoundButton.OnCheckedChangeListener 实例作为参数传入
首先,建立checkbox_layout.xml布局文件:
<?xml version="1.0" encoding="utf-8"?>
<LinearLayout xmlns:android="http://schemas.android.com/apk/res/android"
android:layout_width="match_parent"
android:layout_height="match_parent"
android:orientation="vertical" >
<TextView
android:layout_width="fill_parent"
android:layout_height="wrap_content"
android:text="爱好"
android:textSize="20dp"
/>
<TableLayout
android:layout_width="fill_parent"
android:layout_height="wrap_content"
android:stretchColumns="*"
android:id="@+id/tableLayout"
>
<TableRow >
<CheckBox
android:id="@+id/cb1"
android:layout_width="match_parent"
android:layout_height="wrap_content"
android:text="足球"
/>
<CheckBox
android:id="@+id/cb2"
android:layout_width="match_parent"
android:layout_height="wrap_content"
android:text="篮球"
/>
</TableRow>
<TableRow >
<CheckBox
android:id="@+id/cb3"
android:layout_width="match_parent"
android:layout_height="wrap_content"
android:text="游泳"
/>
<CheckBox
android:id="@+id/cb4"
android:layout_width="match_parent"
android:layout_height="wrap_content"
android:text="武术"
/>
</TableRow>
</TableLayout>
<Button
android:id="@+id/submit"
android:layout_width="match_parent"
android:layout_height="wrap_content"
android:text="提交"
/>
</LinearLayout>
然后在CheckBoxDemo.java中调用其布局,实现监听:
package cn.class3g.activity;
import java.util.ArrayList;
import android.app.Activity;
import android.os.Bundle;
import android.util.Log;
import android.view.View;
import android.view.View.OnClickListener;
import android.widget.Button;
import android.widget.CheckBox;
import android.widget.CompoundButton;
import android.widget.CompoundButton.OnCheckedChangeListener;
public class CheckBoxDemo extends Activity implements OnCheckedChangeListener{
private CheckBox cb1,cb2,cb3,cb4;
Button submitBtn=null;
private ArrayList<CheckBox> list=new ArrayList<CheckBox>();
@Override
protected void onCreate(Bundle savedInstanceState) {
// TODO Auto-generated method stub
super.onCreate(savedInstanceState);
setContentView(R.layout.checkbox_layout);
findViews();
}
private void findViews() {
cb1=(CheckBox) this.findViewById(R.id.cb1);
cb2=(CheckBox) this.findViewById(R.id.cb2);
cb3=(CheckBox) this.findViewById(R.id.cb3);
cb4=(CheckBox) this.findViewById(R.id.cb4);
list.add(cb1);
list.add(cb2);
list.add(cb3);
list.add(cb4);
for(CheckBox cb:list){
//为什么参数的this?
//当前类实现了监听器接口,所以当前类的实例this可以当做一个监听器
//对象放入setOnCheckedChangeListener()方法之中做参数
cb.setOnCheckedChangeListener(this);
}
submitBtn=(Button) this.findViewById(R.id.submit);
submitBtn.setOnClickListener(new OnClickListener(){
public void onClick(View v){
String fav="";
for(CheckBox cb:list){
if(cb.isChecked()){
fav+=cb.getText()+" , ";
}
}
}
});
}
//覆盖接口的抽象方法
public void onCheckedChanged(CompoundButton buttonView, boolean isChecked) {
Log.i("TAG", buttonView.getText().toString());
}}
启动虚拟机:
ListView列表组件
先建立list_layout.xml布局文件:
<?xml version="1.0" encoding="utf-8"?>
<LinearLayout xmlns:android="http://schemas.android.com/apk/res/android"
android:layout_width="match_parent"
android:layout_height="match_parent"
android:orientation="vertical" >
<TextView
android:layout_width="fill_parent"
android:layout_height="wrap_content"
android:text="名单:"
/>
<LinearLayout
android:layout_width="fill_parent"
android:layout_height="wrap_content"
android:id="@+id/nameList"
>
</LinearLayout>
</LinearLayout>
ListViewDemo.java中添加显示内容:
package cn.class3g.activity;
import android.app.Activity;
import android.os.Bundle;
import android.util.Log;
import android.view.View;
import android.widget.AdapterView;
import android.widget.AdapterView.OnItemClickListener;
import android.widget.ArrayAdapter;
import android.widget.ListView;
public class ListViewDemo extends Activity implements OnItemClickListener{
ListView nameList=null;
String[] names={"张三","李四","王五","宋六","猪八"};
protected void onCreate(Bundle savedInstanceState) {
super.onCreate(savedInstanceState);
this.setContentView(R.layout.list_layout);
findViews();
}
private void findViews() {
nameList=(ListView) this.findViewById(R.id.nameList);
ArrayAdapter adapter=new ArrayAdapter(this,android.R.layout.simple_expandable_list_item_1,names);
nameList.setAdapter(adapter);
nameList.setOnItemClickListener(this);
}
//覆盖监听器接口OnItemClickListener的抽象方法
public void onItemClick(AdapterView<?> arg0, View arg1, int arg2, long arg3) {
Log.i("Tag", names[arg2]+"position="+String.valueOf(arg2)
+" row_id=" + String.valueOf(arg3));
}
}
启动虚拟机:
最后了解Spinner下拉选项组件
创建spinner_layout.xml布局文件:
<?xml version="1.0" encoding="utf-8"?>
<LinearLayout xmlns:android="http://schemas.android.com/apk/res/android"
android:layout_width="match_parent"
android:layout_height="match_parent"
android:orientation="vertical" >
<TextView
android:layout_width="fill_parent"
android:layout_height="wrap_content"
android:text="请选择一项运动项目"
/>
<Spinner
android:id="@+id/sportsSp"
android:layout_width="match_parent"
android:layout_height="wrap_content"
android:prompt="@string/sprinner_prompt"
android:entries="@+array/sports"
/>
</LinearLayout>
在SpinnerDemo.java文件中实现如下代码:
package cn.class3g.activity;
import android.app.Activity;
import android.os.Bundle;
import android.util.Log;
import android.view.View;
import android.widget.AdapterView;
import android.widget.AdapterView.OnItemSelectedListener;
import android.widget.Spinner;
import android.widget.TextView;
public class SpinnerDemo extends Activity implements OnItemSelectedListener{
Spinner sportSp=null;
protected void onCreate(Bundle savedInstanceState) {
super.onCreate(savedInstanceState);
setContentView(R.layout.spinner_layout);
findViews();
}
private void findViews() {
sportSp=(Spinner)this.findViewById(R.id.sportsSp);
sportSp.setOnItemSelectedListener(this);
}
@Override
public void onItemSelected(AdapterView<?> arg0, View arg1, int arg2,
long arg3) {
TextView tv=(TextView)arg1;
Log.i("TAG", tv.getText().toString());
}
@Override
public void onNothingSelected(AdapterView<?> arg0) {
// TODO Auto-generated method stub
}
}
启动虚拟机:
点击出现下拉选项:

相关文章推荐
- 【Android基础】页面跳转与传值(Activity跳转与传值)
- android 页面跳转(基础知识)
- 【Android基础】页面跳转与传值(Activity跳转与传值)
- Android基础之初探activity(页面跳转,数据传输)
- Android基础笔记(七)-页面跳转和数据传递
- 【Android基础】页面跳转与传值(Activity跳转与传值)
- 【Android基础】页面跳转与传值(Activity跳转与传值)
- 【Android基础】页面跳转与传值(Activity跳转与传值)
- Android应用开发基础之六:页面跳转和数据传递
- 【Android基础】页面跳转与传值(Activity跳转与传值)
- android基础之页面间跳转传值,用Bundle+Intent
- 【Android基础】页面跳转与传值(Activity跳转与传值)
- 【Android基础】页面跳转与传值(Activity跳转与传值)
- Android基础笔记(七)-页面跳转和数据传递
- 【Android基础】页面跳转与传值(Activity跳转与传值)
- android基础页面跳转
- Android基础】页面跳转与传值(Activity跳转与传值)
- 【Android基础】页面跳转与传值(Activity跳转与传值)
- 【Android基础】页面跳转与传值(Activity跳转与传值) .
- Android基础】页面跳转与传值(Activity跳转与传值)