Android WebView的缓存!!! .(z)
2011-10-31 12:07
375 查看
我们在项目中也时常会用到WebView这个控件,当我们加载html时候,会在我们data/应用package下生成database与cache两个文件夹如下图如示:
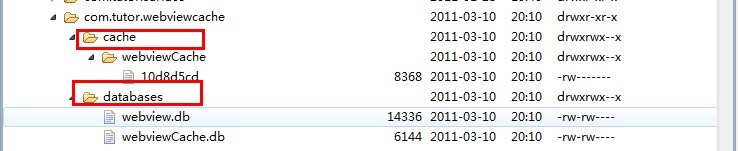
我们请求的url记录是保存在webviewCache.db里,而url的内容是保存在webviewCache文件夹下.
为了让大家更容易理解,我做一个简单的例子,我定义一个html文件,在里面加载了一个淘宝的衣服图片的url,用WebView加载出来,然后再试着从缓存里把这张图片读取出来。
下面大家可以按照我的步骤一步一步来实践:
第一步:新建一个Android工程命名为WebViewCacheDemo.目录结构如下:
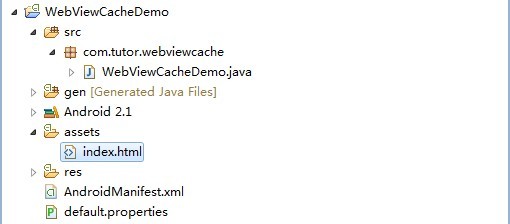
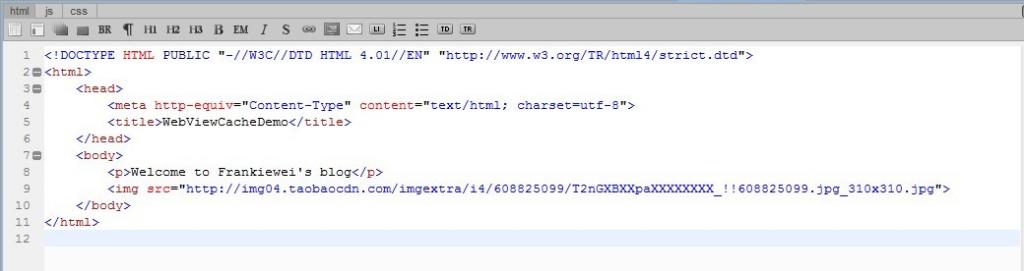
第二步:在assets目录下新建一个html文件,命名为index.html,(这里加载了一个淘宝的图片):
http://img04.taobaocdn.com/imgextra/i4/608825099/T2nGXBXXpaXXXXXXXX_!!608825099.jpg_310x310.jpg
第三步:修改main.xml布局文件一个WebView控件一个Button(点击加载缓存图片用),代码如下:
view plaincopy to clipboardprint?
<?xml version="1.0" encoding="utf-8"?>
<LinearLayout xmlns:android="http://schemas.android.com/apk/res/android"
android:orientation="vertical"
android:layout_width="fill_parent"
android:layout_height="fill_parent"
>
<WebView
android:id="@+id/webview"
android:layout_width="fill_parent"
android:layout_height="wrap_content"
/>
<Button
android:id="@+id/button"
android:layout_width="fill_parent"
android:layout_height="wrap_content"
android:text="从缓存里读取图片"
/>
</LinearLayout>
第五步:在AndroidMainifest.xml文件中加访问网络的权限:
view plaincopy to clipboardprint?
<uses-permission android:name="android.permission.INTERNET" />
第六步:再次运行工程,点击button按钮,效果如下图所示:
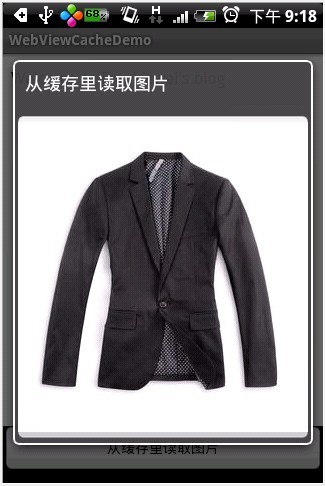
OK,验证成功,呵呵,今天只是一个简单的小例子加深大家理解,实际应用肯定比这个复杂的多,希望对大家有所帮助,谢谢!
我们请求的url记录是保存在webviewCache.db里,而url的内容是保存在webviewCache文件夹下.
为了让大家更容易理解,我做一个简单的例子,我定义一个html文件,在里面加载了一个淘宝的衣服图片的url,用WebView加载出来,然后再试着从缓存里把这张图片读取出来。
下面大家可以按照我的步骤一步一步来实践:
第一步:新建一个Android工程命名为WebViewCacheDemo.目录结构如下:
第二步:在assets目录下新建一个html文件,命名为index.html,(这里加载了一个淘宝的图片):
http://img04.taobaocdn.com/imgextra/i4/608825099/T2nGXBXXpaXXXXXXXX_!!608825099.jpg_310x310.jpg
第三步:修改main.xml布局文件一个WebView控件一个Button(点击加载缓存图片用),代码如下:
view plaincopy to clipboardprint?
<?xml version="1.0" encoding="utf-8"?>
<LinearLayout xmlns:android="http://schemas.android.com/apk/res/android"
android:orientation="vertical"
android:layout_width="fill_parent"
android:layout_height="fill_parent"
>
<WebView
android:id="@+id/webview"
android:layout_width="fill_parent"
android:layout_height="wrap_content"
/>
<Button
android:id="@+id/button"
android:layout_width="fill_parent"
android:layout_height="wrap_content"
android:text="从缓存里读取图片"
/>
</LinearLayout>
view plaincopy to clipboardprint?

package com.tutor.webviewcache;

import android.app.Activity;

import android.os.Bundle;

import android.view.View;

import android.view.View.OnClickListener;

import android.webkit.WebView;

import android.widget.Button;

public class WebViewCacheDemo extends Activity {

private WebView mWebView;

//private Button mButton;

private static final String url = "file:///android_asset/index.html";

@Override

public void onCreate(Bundle savedInstanceState) {

super.onCreate(savedInstanceState);

setContentView(R.layout.main);

mWebView = (WebView)findViewById(R.id.webview);

mWebView.loadUrl(url);

//        mButton = (Button)findViewById(R.id.button);

//        mButton.setOnClickListener(listener);

}

}

package com.tutor.webviewcache;
import android.app.Activity;
import android.os.Bundle;
import android.view.View;
import android.view.View.OnClickListener;
import android.webkit.WebView;
import android.widget.Button;
public class WebViewCacheDemo extends Activity {

private WebView mWebView;
//private Button mButton;
private static final String url = "file:///android_asset/index.html";
@Override
public void onCreate(Bundle savedInstanceState) {
super.onCreate(savedInstanceState);
setContentView(R.layout.main);

mWebView = (WebView)findViewById(R.id.webview);
mWebView.loadUrl(url);

//        mButton = (Button)findViewById(R.id.button);
//        mButton.setOnClickListener(listener);
}
}
第五步:在AndroidMainifest.xml文件中加访问网络的权限:
view plaincopy to clipboardprint?
<uses-permission android:name="android.permission.INTERNET" />
view plaincopy to clipboardprint?

package com.tutor.webviewcache;

import java.io.File;

import java.io.FileInputStream;

import java.io.FileNotFoundException;

import android.app.Activity;

import android.app.Dialog;

import android.graphics.Bitmap;

import android.graphics.BitmapFactory;

import android.os.Bundle;

import android.view.View;

import android.view.View.OnClickListener;

import android.view.ViewGroup.LayoutParams;

import android.webkit.WebView;

import android.widget.Button;

import android.widget.ImageButton;

import android.widget.ImageView;

public class WebViewCacheDemo extends Activity {

private WebView mWebView;

private Button mButton;

private static final String url = "file:///android_asset/index.html";

@Override

public void onCreate(Bundle savedInstanceState) {

super.onCreate(savedInstanceState);

setContentView(R.layout.main);

mWebView = (WebView)findViewById(R.id.webview);

mWebView.loadUrl(url);

mButton = (Button)findViewById(R.id.button);

mButton.setOnClickListener(listener);

}

//button点击事件

OnClickListener listener = new Button.OnClickListener(){

@Override

public void onClick(View v) {

ImageView mImageView = new ImageButton(WebViewCacheDemo.this);

mImageView.setImageBitmap(getPictureFromCache());

Dialog d = new Dialog(WebViewCacheDemo.this);

d.setTitle("从缓存里读取图片");

d.setContentView(mImageView,

new LayoutParams(LayoutParams.WRAP_CONTENT, LayoutParams.WRAP_CONTENT));

d.show();

}

};

//从缓存里读取图片,实际实用中会比这个灵活多,我这里写死了

private Bitmap getPictureFromCache(){

Bitmap bitmap = null;

File file = new File(getCacheDir()+"/webviewCache/10d8d5cd");

try {

FileInputStream is = new FileInputStream(file);

bitmap = BitmapFactory.decodeStream(is);

} catch (FileNotFoundException e) {

e.printStackTrace();

}

return bitmap;

}

}

package com.tutor.webviewcache;
import java.io.File;
import java.io.FileInputStream;
import java.io.FileNotFoundException;
import android.app.Activity;
import android.app.Dialog;
import android.graphics.Bitmap;
import android.graphics.BitmapFactory;
import android.os.Bundle;
import android.view.View;
import android.view.View.OnClickListener;
import android.view.ViewGroup.LayoutParams;
import android.webkit.WebView;
import android.widget.Button;
import android.widget.ImageButton;
import android.widget.ImageView;
public class WebViewCacheDemo extends Activity {

private WebView mWebView;
private Button mButton;
private static final String url = "file:///android_asset/index.html";
@Override
public void onCreate(Bundle savedInstanceState) {
super.onCreate(savedInstanceState);
setContentView(R.layout.main);

mWebView = (WebView)findViewById(R.id.webview);
mWebView.loadUrl(url);

mButton = (Button)findViewById(R.id.button);
mButton.setOnClickListener(listener);
}

//button点击事件
OnClickListener listener = new Button.OnClickListener(){
@Override
public void onClick(View v) {
ImageView mImageView = new ImageButton(WebViewCacheDemo.this);
mImageView.setImageBitmap(getPictureFromCache());
Dialog d = new Dialog(WebViewCacheDemo.this);
d.setTitle("从缓存里读取图片");
d.setContentView(mImageView,
new LayoutParams(LayoutParams.WRAP_CONTENT, LayoutParams.WRAP_CONTENT));
d.show();
}

};
//从缓存里读取图片,实际实用中会比这个灵活多,我这里写死了
private Bitmap getPictureFromCache(){
Bitmap bitmap = null;
File file = new File(getCacheDir()+"/webviewCache/10d8d5cd");
try {
FileInputStream is = new FileInputStream(file);
bitmap = BitmapFactory.decodeStream(is);
} catch (FileNotFoundException e) {
e.printStackTrace();
}
return bitmap;
}
}
第六步:再次运行工程,点击button按钮,效果如下图所示:
OK,验证成功,呵呵,今天只是一个简单的小例子加深大家理解,实际应用肯定比这个复杂的多,希望对大家有所帮助,谢谢!

相关文章推荐
- Android中WebView的缓存
- android webview & ios uiwebview和wkwebview的交互以及本地缓存
- Android WebView缓存
- Android webView 缓存 Cache + HTML5离线功能 解决
- android webview缓存处理与缓存模式
- Android WebView 缓存处理
- Android webView 缓存 Cache + HTML5离线功能 解决
- Android WebView缓存策略详解
- android WebView(六)下载和缓存
- android webview 设置缓存的相关操作
- Android WebView缓存分析
- Android WebView 缓存
- Android webView 缓存 Cache + HTML5离线功能 解决
- Android WebView 缓存
- Android webview删除缓存问题
- Android开发——webView的缓存清除和将缓存存储到sd卡
- Android webView 缓存 Cache + HTML5离线功能解决
- android webview删除缓存
- Android----- WebView 缓存处理
- android webview缓存机制