Silverlight 2.5D RPG游戏技巧与特效处理:(九)粒子系统
2011-09-07 17:42
549 查看
粒子系统通常用于三维场景中进行真实环境模拟,比如第四节的天气系统。天气的实现是粒子系统最重要的应用领域之一,所有的一切无论是云、雨、雾,还是落叶、陨石及闪电,都可视作基础粒子;除此之外,游戏中常常还会用到粒子系统来渲染像发光、轨迹等抽象效果。当然,有时简单并不意味着就不能缔造奇迹,比如本节大家将要看到的就是基于简单粒子系统所创建的当下主流2.5D
RPG中极其拉风之装备粒子发散动画特效。
一提到Silverlight中的粒子,首先想到的肯定是WriteableBitmap。没错,今天的主角就是它,让人又爱又恨的WriteableBitmap。爱,因为它可以对Silverlight中任意UI对象进行基于像素级别的处理,这意味着只要想得出的效果肯定能实现;正因如此,对其恨之入骨则因为WriteableBitmap在目前的版本中还暂时无法得到GPU硬件加速的支持,其功能偏少,性能也有待进一步提高。
仅当为了Silverlight 5 的登场打基础,借鉴《降龙之剑》中的装备粒子系统,我们同样可以通过非常简单的代码编写出极度拉风的粒子发射动画特效。
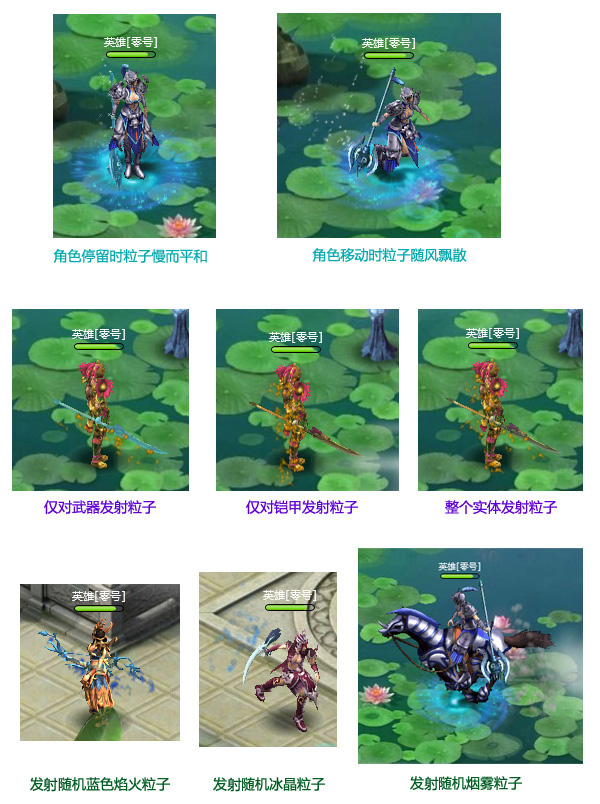
于是我们得首先准备基础粒子素材,比如希望武器会冒着火光,亦或者你希望铠甲能寒冰四散等,那么我们每样准备3张或更多的图片,通过随即的方式呈现便可达到相当逼真的效果:

接下来的问题是这些粒子该如何以精确的装备部件实体区域为起点进行发射?

用WriteableBitmap对每帧图片进行宽*高数量像素的逐个扫描?试想如果角色的尺寸是500*500=250000,那么每间隔几百毫秒都要遍历几十万的像素,UI线程不卡死才怪(顺便提一下,UI卡死的罪魁祸首就是循环,在UI线程中应尽量减少循环次数或巧妙的进行分解与规避)。其实我们完全可以采用随机抽样的方案,比如每次对其中的1000个像素进行抽样检查,当其A值(透明度)不为0时则表示该像素正处于装备部件的实体区域中。接下来便可仿造流光追影的类似效果,通过WriteableBitmap对目标装备部件首先进行复制,然后按照如上方式随机抽取部分装备实体上的粒子进行发射飘散:

显示风中粒子
/// <summary>
/// 显示风中粒子
/// </summary>
/// <param name="role">所修饰角色</param>
/// <param name="equipType">所参照的装备</param>
/// <param name="particleType">粒子类型</param>
/// <param name="color">颜色</param>
/// <param name="amount">量</param>
public void ShowWindParticles(Hero role, EquipTypes equipType, ParticleTypes particleType, Color color, double amount) {
int distance = 0;
double speed = 0;
if (role.Action == Actions.Stop) {
distance = 40;
speed = RandomSeed.Next(2000, 3000) * 0.01;
} else {
distance = 40;
speed = RandomSeed.Next(1000, 1500) * 0.01;
}
int halfDistance = distance / 2;
int obliqueDistance = distance * 2 / 3;
string particleName = string.Empty;
switch (particleType) {
case ParticleTypes.Normal:
particleName = "Particle";
break;
case ParticleTypes.Smoke:
particleName = "Smoke";
break;
case ParticleTypes.Ice:
particleName = "Ice";
break;
case ParticleTypes.Spark:
particleName = "Spark";
break;
}
Dispatcher.BeginInvoke(delegate {
ObjectBase equip = role.EquipEntity(equipType);
WriteableBitmap writeableBitmap = new WriteableBitmap(equip, null);
lock (writeableBitmap) {
writeableBitmap.Invalidate();
int z = 0;
if (equipType == EquipTypes.Weapon) {
z = role.Z + equip.Z;
} else {
z = (role.Direction == Directions.North || role.Direction == Directions.NorthEast || role.Direction == Directions.NorthWest) ? role.Z : role.Z - 20;
}
Point position = equipType == EquipTypes.Overall ? role.Center : equip.Position;
Point2D destination = new Point2D();
MonoChrome monoChrome = new MonoChrome() { FilterColor = color };
switch (role.Direction) {
case Directions.North:
destination.X = 0; destination.Y = RandomSeed.Next(halfDistance, distance);
break;
case Directions.NorthEast:
destination.X = -RandomSeed.Next(halfDistance, obliqueDistance); destination.Y = RandomSeed.Next(halfDistance, obliqueDistance);
break;
case Directions.East:
destination.X = -RandomSeed.Next(halfDistance, distance); destination.Y = 0;
break;
case Directions.SouthEast:
destination.X = -RandomSeed.Next(halfDistance, obliqueDistance); destination.Y = -RandomSeed.Next(halfDistance, obliqueDistance);
break;
case Directions.South:
destination.X = 0; destination.Y = -RandomSeed.Next(halfDistance, distance);
break;
case Directions.SouthWest:
destination.X = RandomSeed.Next(halfDistance, obliqueDistance); destination.Y = -RandomSeed.Next(halfDistance, obliqueDistance);
break;
case Directions.West:
destination.X = RandomSeed.Next(halfDistance, distance); destination.Y = 0;
break;
case Directions.NorthWest:
destination.X = RandomSeed.Next(halfDistance, obliqueDistance); destination.Y = RandomSeed.Next(halfDistance, obliqueDistance);
break;
}
for (int i = 0; i < amount; i++) {
int x = RandomSeed.Next(0, writeableBitmap.PixelWidth);
int y = RandomSeed.Next(0, writeableBitmap.PixelHeight);
byte[] bytes = BitConverter.GetBytes(writeableBitmap.Pixels[writeableBitmap.PixelWidth * y + x]);
if (bytes[3] != 0) {
Particle particle = new Particle() { Effect = monoChrome, Z = z, Source = GlobalMethod.GetProjectImage(string.Format("UI/{0}{1}.png", particleName, RandomSeed.Next(0, 3))) };
space.Children.Add(particle);
EventHandler handler = null;
particle.Disposed += handler = (s, e) => {
Particle p = s as Particle;
p.Disposed -= handler;
space.Children.Remove(p);
};
particle.Move(new Point(role.Position.X - position.X + x, role.Position.Y - position.Y + y), new Point(role.Position.X - position.X + x + destination.X, role.Position.Y - position.Y + y + destination.Y), speed, MoveModes.Opacity);
}
}
}
});
}
其中,根据角色的动作状态以及当前的朝向,粒子在场景中的层次关系、移动速度,发散面积以及路径等均应体现出差异;比如站立时粒子流动稍微慢些、贴身些,而当角色移动时模拟迎风的效果,粒子飘散则呈加速趋势;另外,骑马奔驰时因地面的凹凸跌宕也应塑造出粒子群散呈现起伏波动之势等等:
WriteableBitmap与HLSL是Silverlight中的两把神器,特别是在制作动画及特效方面尤显突出,只要你的算法够强,无论是采用C#还是HLSL,均可实现一切想要的特效动画。虽然两者目前的共同问题都出在性能上,如此这些华丽而炫酷的动画特效使我更饥渴的期待Silverlight 5降临的那天,当新的传奇上演之刻起,历史将被彻底的改写!
本节源码下载地址见目录
在线演示地址:http://silverfuture.cn
RPG中极其拉风之装备粒子发散动画特效。
一提到Silverlight中的粒子,首先想到的肯定是WriteableBitmap。没错,今天的主角就是它,让人又爱又恨的WriteableBitmap。爱,因为它可以对Silverlight中任意UI对象进行基于像素级别的处理,这意味着只要想得出的效果肯定能实现;正因如此,对其恨之入骨则因为WriteableBitmap在目前的版本中还暂时无法得到GPU硬件加速的支持,其功能偏少,性能也有待进一步提高。
仅当为了Silverlight 5 的登场打基础,借鉴《降龙之剑》中的装备粒子系统,我们同样可以通过非常简单的代码编写出极度拉风的粒子发射动画特效。
于是我们得首先准备基础粒子素材,比如希望武器会冒着火光,亦或者你希望铠甲能寒冰四散等,那么我们每样准备3张或更多的图片,通过随即的方式呈现便可达到相当逼真的效果:
接下来的问题是这些粒子该如何以精确的装备部件实体区域为起点进行发射?
用WriteableBitmap对每帧图片进行宽*高数量像素的逐个扫描?试想如果角色的尺寸是500*500=250000,那么每间隔几百毫秒都要遍历几十万的像素,UI线程不卡死才怪(顺便提一下,UI卡死的罪魁祸首就是循环,在UI线程中应尽量减少循环次数或巧妙的进行分解与规避)。其实我们完全可以采用随机抽样的方案,比如每次对其中的1000个像素进行抽样检查,当其A值(透明度)不为0时则表示该像素正处于装备部件的实体区域中。接下来便可仿造流光追影的类似效果,通过WriteableBitmap对目标装备部件首先进行复制,然后按照如上方式随机抽取部分装备实体上的粒子进行发射飘散:
显示风中粒子
/// <summary>
/// 显示风中粒子
/// </summary>
/// <param name="role">所修饰角色</param>
/// <param name="equipType">所参照的装备</param>
/// <param name="particleType">粒子类型</param>
/// <param name="color">颜色</param>
/// <param name="amount">量</param>
public void ShowWindParticles(Hero role, EquipTypes equipType, ParticleTypes particleType, Color color, double amount) {
int distance = 0;
double speed = 0;
if (role.Action == Actions.Stop) {
distance = 40;
speed = RandomSeed.Next(2000, 3000) * 0.01;
} else {
distance = 40;
speed = RandomSeed.Next(1000, 1500) * 0.01;
}
int halfDistance = distance / 2;
int obliqueDistance = distance * 2 / 3;
string particleName = string.Empty;
switch (particleType) {
case ParticleTypes.Normal:
particleName = "Particle";
break;
case ParticleTypes.Smoke:
particleName = "Smoke";
break;
case ParticleTypes.Ice:
particleName = "Ice";
break;
case ParticleTypes.Spark:
particleName = "Spark";
break;
}
Dispatcher.BeginInvoke(delegate {
ObjectBase equip = role.EquipEntity(equipType);
WriteableBitmap writeableBitmap = new WriteableBitmap(equip, null);
lock (writeableBitmap) {
writeableBitmap.Invalidate();
int z = 0;
if (equipType == EquipTypes.Weapon) {
z = role.Z + equip.Z;
} else {
z = (role.Direction == Directions.North || role.Direction == Directions.NorthEast || role.Direction == Directions.NorthWest) ? role.Z : role.Z - 20;
}
Point position = equipType == EquipTypes.Overall ? role.Center : equip.Position;
Point2D destination = new Point2D();
MonoChrome monoChrome = new MonoChrome() { FilterColor = color };
switch (role.Direction) {
case Directions.North:
destination.X = 0; destination.Y = RandomSeed.Next(halfDistance, distance);
break;
case Directions.NorthEast:
destination.X = -RandomSeed.Next(halfDistance, obliqueDistance); destination.Y = RandomSeed.Next(halfDistance, obliqueDistance);
break;
case Directions.East:
destination.X = -RandomSeed.Next(halfDistance, distance); destination.Y = 0;
break;
case Directions.SouthEast:
destination.X = -RandomSeed.Next(halfDistance, obliqueDistance); destination.Y = -RandomSeed.Next(halfDistance, obliqueDistance);
break;
case Directions.South:
destination.X = 0; destination.Y = -RandomSeed.Next(halfDistance, distance);
break;
case Directions.SouthWest:
destination.X = RandomSeed.Next(halfDistance, obliqueDistance); destination.Y = -RandomSeed.Next(halfDistance, obliqueDistance);
break;
case Directions.West:
destination.X = RandomSeed.Next(halfDistance, distance); destination.Y = 0;
break;
case Directions.NorthWest:
destination.X = RandomSeed.Next(halfDistance, obliqueDistance); destination.Y = RandomSeed.Next(halfDistance, obliqueDistance);
break;
}
for (int i = 0; i < amount; i++) {
int x = RandomSeed.Next(0, writeableBitmap.PixelWidth);
int y = RandomSeed.Next(0, writeableBitmap.PixelHeight);
byte[] bytes = BitConverter.GetBytes(writeableBitmap.Pixels[writeableBitmap.PixelWidth * y + x]);
if (bytes[3] != 0) {
Particle particle = new Particle() { Effect = monoChrome, Z = z, Source = GlobalMethod.GetProjectImage(string.Format("UI/{0}{1}.png", particleName, RandomSeed.Next(0, 3))) };
space.Children.Add(particle);
EventHandler handler = null;
particle.Disposed += handler = (s, e) => {
Particle p = s as Particle;
p.Disposed -= handler;
space.Children.Remove(p);
};
particle.Move(new Point(role.Position.X - position.X + x, role.Position.Y - position.Y + y), new Point(role.Position.X - position.X + x + destination.X, role.Position.Y - position.Y + y + destination.Y), speed, MoveModes.Opacity);
}
}
}
});
}
其中,根据角色的动作状态以及当前的朝向,粒子在场景中的层次关系、移动速度,发散面积以及路径等均应体现出差异;比如站立时粒子流动稍微慢些、贴身些,而当角色移动时模拟迎风的效果,粒子飘散则呈加速趋势;另外,骑马奔驰时因地面的凹凸跌宕也应塑造出粒子群散呈现起伏波动之势等等:
WriteableBitmap与HLSL是Silverlight中的两把神器,特别是在制作动画及特效方面尤显突出,只要你的算法够强,无论是采用C#还是HLSL,均可实现一切想要的特效动画。虽然两者目前的共同问题都出在性能上,如此这些华丽而炫酷的动画特效使我更饥渴的期待Silverlight 5降临的那天,当新的传奇上演之刻起,历史将被彻底的改写!
本节源码下载地址见目录
在线演示地址:http://silverfuture.cn

相关文章推荐
- 一起谈.NET技术,Silverlight 2.5D RPG游戏技巧与特效处理:(九)粒子系统
- Silverlight 2.5D RPG游戏技巧与特效处理:粒子系统
- Silverlight 2.5D RPG游戏技巧与特效处理:(九)粒子系统
- Silverlight 2.5D RPG游戏技巧与特效处理:(九)粒子系统
- Silverlight 2.5D RPG游戏技巧与特效处理:(九)粒子系统
- Silverlight 2.5D RPG游戏技巧与特效处理:(九)粒子系统
- Silverlight 2.5D RPG游戏技巧与特效处理:(十一)AI系统
- Silverlight 2.5D RPG游戏技巧与特效处理:(十四)体感系统
- Silverlight 2.5D RPG游戏技巧与特效处理:(二)纸娃娃系统
- Silverlight 2.5D RPG游戏技巧与特效处理:(四)天气系统
- Silverlight 2.5D RPG游戏技巧与特效处理:(十二)魔法系统
- Silverlight 2.5D RPG游戏技巧与特效处理:天气系统
- Silverlight 2.5D RPG游戏技巧与特效处理:(二)纸娃娃系统
- Silverlight 2.5D RPG游戏技巧与特效处理:纸娃娃系统
- Silverlight 2.5D RPG游戏技巧与特效处理:(二)纸娃娃系统
- Silverlight 2.5D RPG游戏技巧与特效处理:(八)无限缩放空间系统
- Silverlight 2.5D RPG游戏技巧与特效处理:(二)纸娃娃系统
- Silverlight 2.5D RPG游戏技巧与特效处理:(四)天气系统
- Silverlight 2.5D RPG游戏技巧与特效处理:(八)无限缩放空间系统
- Silverlight 2.5D RPG游戏“.NET技术”技巧与特效处理:(十二)魔法系统