如何构建Android+Sync+Provider:Part1
2011-08-30 19:43
771 查看
如何构建Android Sync Provider:Part1
原英文:http://www.c99.org/2010/01/23/writing-an-android-sync-provider-part-1/
翻译能力有限,如有错误,敬请指出。ThankYou!
翻译人: CJT
个人博客地址:http://blog.csdn.net/nndtdx
Android2.0 SDK带来的一个好东西就是你可以写一个普通的同步供应商程序,并将其与系统的联系薄,日历等集成。唯一的问题是相关的文档十分的少。还有一个糟糕的问题在于,如果你在某一个地方出了错,Android系统就会崩溃重启。面临如此挑战,我依靠这稀少的文档,以及很少的帖子,还有Android地带的一些代码去建立了一个同步程序----Last.fm 。你想要知道怎么去建立你自己的同步程序么?读下去吧
这里定义了该账户如何在“账号&同步”设置中出现的。一个账号的的验证需要3部分来实现:1. 一个从onBind方法返回AbstractAccountAuthenticator 子类的一个服务2. 一个Activityt提供用户输入他们的凭据(账号秘密信息),一个xml文件去描述账号信息展示给用户时( an xml file describing how your account should look when displayed to the user.)同时,你也需要在android.mainfest.xml中添加android.permission.AUTHENTICATE_ACCOUNTS权限
对象传出,我们可以用来将其回传给系统。
[/code]
该验证服务需要在Android.Mainfest.xml中使用元数据标签定义一下。如下
[/code]
[/code]
[/code]
集成(putting it all together)
现在我们可以准备开始测试了。Android 账号的设置部分并不能完好的捕捉异常。如果有地方出错了,设备会重启。最好的测试方式是运行模拟器后,运行DevTools,点击AcountsTester
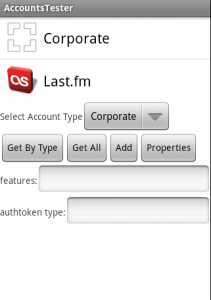
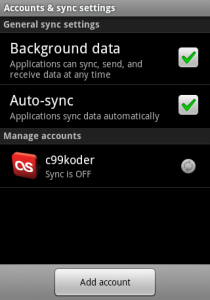
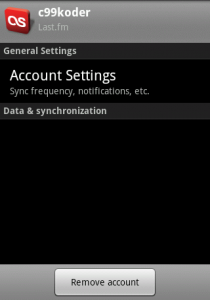
你会看到一个新的账号类型将会同系统内置的“Corporate”类型的账号一样,被添加到列表中。尽管从下拉列表中选择你的账号,然后点击增加按钮,那么,将会呈现一个你所做的登录框。经过验证后 ,你的账号将会出现在按钮下边的列表中。在这一点,使用系统的“Account&sync”设置去移除和修改账户应该是安全的。
准备好“Data & synchronization”的章节了么?让我们开始第二个章节吧。
可供参考的实现源代码你可以从这里下载https://github.com/c99koder/lastfm-android/。(在GNUGeneralPublicLicense主题下边)另外一个单独的实例程序你可以从Apache License 2.0主题下得到https://github.com/c99koder/AndroidSyncProviderDemo。Google同样也有一个他们的示例的同步程序在Androiddeveloperportalhttp://developer.android.com/resources/samples/SampleSyncAdapter/index.html。该应用程序比我(原作者)的会稍微完整一些。
原英文:http://www.c99.org/2010/01/23/writing-an-android-sync-provider-part-1/
翻译能力有限,如有错误,敬请指出。ThankYou!
翻译人: CJT
个人博客地址:http://blog.csdn.net/nndtdx
Android2.0 SDK带来的一个好东西就是你可以写一个普通的同步供应商程序,并将其与系统的联系薄,日历等集成。唯一的问题是相关的文档十分的少。还有一个糟糕的问题在于,如果你在某一个地方出了错,Android系统就会崩溃重启。面临如此挑战,我依靠这稀少的文档,以及很少的帖子,还有Android地带的一些代码去建立了一个同步程序----Last.fm 。你想要知道怎么去建立你自己的同步程序么?读下去吧
账户验证
第一个令人疑惑的问题就是账户验证问题,你可以从这个地方了解到更多的信息。http://developer.android.com/reference/android/accounts/AbstractAccountAuthenticator.html这里定义了该账户如何在“账号&同步”设置中出现的。一个账号的的验证需要3部分来实现:1. 一个从onBind方法返回AbstractAccountAuthenticator 子类的一个服务2. 一个Activityt提供用户输入他们的凭据(账号秘密信息),一个xml文件去描述账号信息展示给用户时( an xml file describing how your account should look when displayed to the user.)同时,你也需要在android.mainfest.xml中添加android.permission.AUTHENTICATE_ACCOUNTS权限
服务
验证服务程序期望从一个onBind方法中返回一个AbstractAccountAuthenticator的子类。如果你坚持不这么做的话,带来的后果就是当你向系统添加一个账号时,android会将会崩溃并且重启。所幸实现AbstractAccountAuthenticator 并不是一件困难的事情,我们只需要实现其中的addAccount方法即可。该方法返回一个Intent,系统将会用他来为用户展示一个登陆框。该如下的实现将会运行我们的service“fm.last.android.sync.LOGIN”.用户等登录完毕后,,会有一个AccountAuthenticatorResponse对象传出,我们可以用来将其回传给系统。
AccountAuthenticatorService.java
1: import fm.last.android.LastFm;2:
[/code]
3: import android.accounts.AbstractAccountAuthenticator;
4:
5: import android.accounts.Account;
6:
7: import android.accounts.AccountAuthenticatorResponse;
8:
9: import android.accounts.AccountManager;
10:
11: import android.accounts.NetworkErrorException;
12:
13: import android.app.Service;
14:
15: import android.content.Context;
16:
17: import android.content.Intent;
18:
19: import android.os.Bundle;
20:
21: import android.os.IBinder;
22:
23: import android.util.Log;
24:
25: /**
26:
27: * Authenticator service that returns a subclass of AbstractAccountAuthenticator in onBind()
28:
29: */
30:
31: public class AccountAuthenticatorService extends Service {32:
33: private static final String TAG = "AccountAuthenticatorService";
34:
35: private static AccountAuthenticatorImpl sAccountAuthenticator = null;
36:
37: public AccountAuthenticatorService() {38:
39: super();
40:
41: }
42:
43: public IBinder onBind(Intent intent) {44:
45: IBinder ret = null;
46:
47: if (intent.getAction().equals(android.accounts.AccountManager.ACTION_AUTHENTICATOR_INTENT))
48:
49: ret = getAuthenticator().getIBinder();
50:
51: return ret;
52:
53: }
54:
55: private AccountAuthenticatorImpl getAuthenticator() {56:
57: if (sAccountAuthenticator == null)
58:
59: sAccountAuthenticator = new AccountAuthenticatorImpl(this);
60:
61: return sAccountAuthenticator;
62:
63: }
64:
65: private static class AccountAuthenticatorImpl extends AbstractAccountAuthenticator {66:
67: private Context mContext;
68:
69: public AccountAuthenticatorImpl(Context context) {70:
71: super(context);
72:
73: mContext = context;
74:
75: }
76:
77: /*
78:
79: * The user has requested to add a new account to the system. We return an intent that will launch our login screen if the user has not logged in yet,
80:
81: * otherwise our activity will just pass the user's credentials on to the account manager.
82:
83: */
84:
85: @Override
86:
87: public Bundle addAccount(AccountAuthenticatorResponse response, String accountType, String authTokenType, String[] requiredFeatures, Bundle options)
88:
89: throws NetworkErrorException {90:
91: Bundle reply = new Bundle();
92:
93: Intent i = new Intent(mContext, LastFm.class);
94:
95: i.setAction("fm.last.android.sync.LOGIN");96:
97: i.putExtra(AccountManager.KEY_ACCOUNT_AUTHENTICATOR_RESPONSE, response);
98:
99: reply.putParcelable(AccountManager.KEY_INTENT, i);
100:
101: return reply;
102:
103: }
104:
105: @Override
106:
107: public Bundle confirmCredentials(AccountAuthenticatorResponse response, Account account, Bundle options) {108:
109: return null;
110:
111: }
112:
113: @Override
114:
115: public Bundle editProperties(AccountAuthenticatorResponse response, String accountType) {116:
117: return null;
118:
119: }
120:
121: @Override
122:
123: public Bundle getAuthToken(AccountAuthenticatorResponse response, Account account, String authTokenType, Bundle options) throws NetworkErrorException {124:
125: return null;
126:
127: }
128:
129: @Override
130:
131: public String getAuthTokenLabel(String authTokenType) {132:
133: return null;
134:
135: }
136:
137: @Override
138:
139: public Bundle hasFeatures(AccountAuthenticatorResponse response, Account account, String[] features) throws NetworkErrorException {140:
141: return null;
142:
143: }
144:
145: @Override
146:
147: public Bundle updateCredentials(AccountAuthenticatorResponse response, Account account, String authTokenType, Bundle options) {148:
149: return null;
150:
151: }
152:
153: }
154:
155: }
156:
157:
该验证服务需要在Android.Mainfest.xml中使用元数据标签定义一下。如下
Snippet from AndroidManifest.xml
1: <service android:name="AccountAuthenticatorService"2:
[/code]
3: android:exported="true" android:process=":auth">
4:
5: <intent-filter>
6:
7: <action android:name="android.accounts.AccountAuthenticator" />
8:
9: </intent-filter>
10:
11: <meta-data android:name="android.accounts.AccountAuthenticator"
12:
13: android:resource="@xml/authenticator" />
14:
15: </service>
16:
Xml文件
账号的xml文件中定义了当应用程序与你的账号互动的时候,应用程序将会看到的东西(是不是向国内其他应用程序使用QQ一些应用一样,首先会有一个授权,询问用户当前的应用程序可以访问你的用户的哪些信息?------我的理解)其中包含了用户可读的名字,你所定义的系统账号类型,图标,对一个包含当用户修改账号时可以看到的PreferenceScreens 的xml文件。authenticator.xml
1: <account-authenticator xmlns:android="http://schemas.android.com/apk/res/android"2:
[/code]
3: android:accountType="fm.last.android.account"
4:
5: android:icon="@drawable/icon"
6:
7: android:smallIcon="@drawable/icon"
8:
9: android:label="@string/app_name"
10:
11: android:accountPreferences="@xml/account_preferences"/>
12:
13:
account_preferences.xml
1: <PreferenceScreen2:
[/code]
3: xmlns:android="http://schemas.android.com/apk/res/android">
4:
5: <PreferenceCategory
6:
7: android:title="General Settings" />
8:
9: <PreferenceScreen
10:
11: android:key="account_settings"
12:
13: android:title="Account Settings"
14:
15: android:summary="Sync frequency, notifications, etc.">
16:
17: <intent
18:
19: android:action="fm.last.android.activity.Preferences.ACCOUNT_SETUP"
20:
21: android:targetPackage="fm.last.android"
22:
23: android:targetClass="fm.last.android.activity.Preferences" />
24:
25: </PreferenceScreen>
26:
27: </PreferenceScreen>
28:
29:
集成(putting it all together)
现在我们可以准备开始测试了。Android 账号的设置部分并不能完好的捕捉异常。如果有地方出错了,设备会重启。最好的测试方式是运行模拟器后,运行DevTools,点击AcountsTester
你会看到一个新的账号类型将会同系统内置的“Corporate”类型的账号一样,被添加到列表中。尽管从下拉列表中选择你的账号,然后点击增加按钮,那么,将会呈现一个你所做的登录框。经过验证后 ,你的账号将会出现在按钮下边的列表中。在这一点,使用系统的“Account&sync”设置去移除和修改账户应该是安全的。
准备好“Data & synchronization”的章节了么?让我们开始第二个章节吧。
可供参考的实现源代码你可以从这里下载https://github.com/c99koder/lastfm-android/。(在GNUGeneralPublicLicense主题下边)另外一个单独的实例程序你可以从Apache License 2.0主题下得到https://github.com/c99koder/AndroidSyncProviderDemo。Google同样也有一个他们的示例的同步程序在Androiddeveloperportalhttp://developer.android.com/resources/samples/SampleSyncAdapter/index.html。该应用程序比我(原作者)的会稍微完整一些。

相关文章推荐
- 如何构建Android+Sync+Provider:Part1
- Writing an Android Sync Provider: Part 1
- Writing an Android Sync Provider: Part 2
- 如何构建Android Sync Provider :Part1
- Writing an Android Sync Provider: Part 1
- Writing an Android Sync Provider: Part 2
- 如何利用 Docker 环境加速 Android 应用的构建
- 如何使用Ant自动构建Android版本
- 如何构建Android 1.5系统映像
- 如何使用Ant自动构建Android版本
- 如何构建Android MVVM 应用框架
- 【Android】如何快速构建Android Demo
- LGame(Android及J2SE游戏引擎)入门示例——如何构建一个游戏
- eclipse中如何用gradle构建android项目
- Android如何通过content provider构建媒体文件数据库
- 我是如何从0开始,在23天里完成一款Android游戏开发的 – Part6– 第15至第17天
- 如何使用Ant自动构建Android版本
- LGame(Android及J2SE游戏引擎)入门示例——如何构建一个游戏
- 构建自己的Android账户与内容同步机制,例程SampleSyncAdapter的分析
- 我是如何从0开始,在23天里完成一款Android游戏开发的 – Part7– 第18至第20天