艾伟:Silverlight 3 Beta 新特性解析(2)-Graphics篇
2011-08-29 00:00
821 查看
前提条件:
阅读本文之前请确认你已经安装了如下软件Visual Studio 2008 (Express) SP1
Silverlight 3 Tools For Visual Studio
Microsoft Expression Blend 3 MIX 09 Preview
本篇主要内容:
如何利用新的Bitmap API来创建我们自己的图像透视3D图像(Perspective 3D Graphic)
像素模糊和投影效果
Element-To-Element Binding
Bitmap API的写图像功能:
新版的Bitmap API支持从写每个像素的值来创建自己的图像这个用来支持生成Bitmap的类叫做WriteableBitmap,继承自BitmapSource类
这个类位于System.Windows.Media.Imaging名字空间中,其函数成员包括
1: public sealed class WriteableBitmap : BitmapSource
2: {3: public WriteableBitmap(BitmapSource source);
4: public WriteableBitmap(int pixelWidth, int pixelHeight, PixelFormat format);
5: public int this[int index] { get; set; }6: public void Invalidate();
7: public void Lock();
8: public void Render(UIElement element, Transform transform);
9: public void Unlock();
10: }
从上图可以看出我们可以通过两种形式来实例化这个WriteableBitmap
一个是通过传入已经初始化了的BitmapSource
另外一个是通过输入图像高度和宽度以及像素类型(有Bgr32和Pbgra32两种,后面一种可以创建半透明图像)
第5行的索引this[int index]可以用来读或取像素点
写一个WriteableBitmap的流程是这样的
实例化WriteableBitmap
调用Lock方法
写像素点
调用Invalidate方法
最后是调用Unlock方式来释放所有的Buffer并准备显示
如下文所示以描点的方式构建了整个Bgr32图像
1: private WriteableBitmap BuildTheImage(int width, int height)
2: {3: WriteableBitmap wBitmap=new WriteableBitmap(width,height,PixelFormats.Bgr32);
4: wBitmap.Lock();
5:
6: for (int x = 0; x < width; x++)
7: {8: for (int y = 0; y < height; y++)
9: {10: byte[] brg = new byte[4];
11: brg[0]=(byte)(Math.Pow(x,2) % 255); //Blue, B
12: brg[1] = (byte)(Math.Pow(y,2) % 255); //Green, G
13: brg[2] = (byte)((Math.Pow(x, 2) + Math.Pow(y, 2)) % 255); //Red, R
14: brg[3] = 0;
15:
16: int pixel = BitConverter.ToInt32(brg, 0);
17:
18: wBitmap[y * height + x] = pixel;
19: }
20: }
21:
22: wBitmap.Invalidate();
23: wBitmap.Unlock();
24:
25: return wBitmap;
26: }
画出来的图像如下图所示
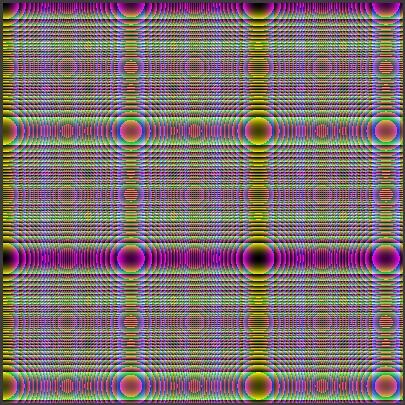
很神奇的一个改进。有了这个类,我们就可以操纵像素点了
在微软上对图像处理做些应用,比如去红点等功能
透视3D效果
所有继承自System.Windows.UIElement的类都将含有Projection这个属性也就是说我们看到的所有控件都将具有3D功能
你可以通过沿X轴,Y轴或者Z轴旋转任意角度来获得3D效果

如将上面生成的图片沿X轴旋转-20度,我们可以得到

其默认的旋转轴心是CenterOfRotationX=0.5,CenterOfRotationY=0.5,CenterOfRotationZ=0
上面的旋转代码如下:
1: "Img">
2:
3: "ImageProjection" RotationX="-20"/>
4:
5:
其他空间的3D平面投影与此类似
像素模糊和投影效果
与Projection一样,Effect属性也是在System.Windows.UIElement所以所有的Toolbar中的控件都支持像素模糊和投影效果
模糊和投影效果(BlurEffect and DropShadowEffect)都在System.Windows.Media.Effects这个名字空间中
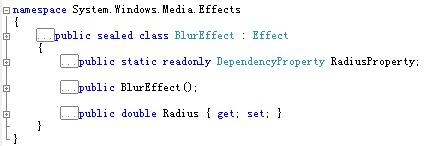

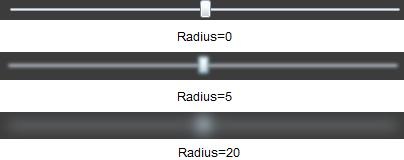
整个控件模糊效果的程度由Radius来控制,其默认值为5,Radius越大,应用了BlurEffect的控件越模糊
代码如下:
1:
2:
3: "20"/>
4:
5:
投影效果的参数比模糊效果复杂些
共有5个属性来控制投影效果
BlurRadius用来控制控件边缘的模糊度,值越大边缘越模糊,默认值仍然是5
Color属性用来设置投影的颜色,默认颜色是黑色
Direction属性用来控制投影方向,值为0时代表投影到控件的正右方,以逆时针的形式来增大投影角度
默认值为315,值的范围只能在0~360之间
Opacity属性用来控制边缘的透明度,其使用而控件的Opacity属性一样
ShadowDepth属性用来设置投影平面和控件平面的垂直距离,默认值为5,其值范围为0~300

其代码如下:
1:
2:
3: "5" Color="White" Opacity="0.7" ShadowDepth="7"/>
4:
5:
Element-To-Element Binding:
元素和元素之间的属性绑定是首先在WPF中实现的现在Silverlight 3终于把这个实用的功能引入了
绑定的格式如:{Binding 属性名,Mode=绑定模式,ElementName=绑定元素}
其中绑定元素就是你先绑定的元素的名字,属性名是你想绑定的元素的属性名(这样将把被绑定的元素的绑定属性的值绑定给新元素的属性)
最后绑定模式有两种:OneWay和TwoWay,TwoWay表示有一方的绑定属性的值改变了,两边的值都同步更新
而OneWay表现只在被绑定元素的属性值改变后,绑定元素的属性值才改变,而反之不成立
如下代码:
1:"400" Height="400" x:Name="Img">
2:
3: "ImageProjection"/>
4:
5:
6: "PlotX" Minimum="-90" Maximum="90" Value="{Binding RotationX, Mode=TwoWay, ElementName=ImageProjection}"/>7: "PlotY" Minimum="-90" Maximum="90" Value="{Binding RotationY, Mode=TwoWay, ElementName=ImageProjection}"/>8: "PlotZ" Minimum="-90" Maximum="90" Value="{Binding RotationZ, Mode=TwoWay, ElementName=ImageProjection}"/>是用了三个Slider来绑定控制Image的3D效果,效果图如下

代码下载:
作者:ibillguo出处:http://ibillguo.cnblogs.com/
本文版权由作者和博客园共同所有,转载请注明出处

相关文章推荐
- Silverlight 3 Beta 新特性解析(2)-Graphics篇
- Silverlight 3 Beta 新特性解析(6) - Navigation和Deep Linking篇
- Silverlight 3 Beta 新特性解析(4) - 离线功能篇
- Silverlight 3 Beta 新特性解析(7)- Child Window和Shader Effect篇
- Silverlight 3 Beta 新特性解析(1) - 概论
- Silverlight 3 Beta 新特性解析(5) - Data篇
- 【转】Silverlight 3 Beta 新特性解析(7)- Child Window和Shader Effect篇
- Silverlight 3 Beta 新特性解析(3) - Media篇
- Silverlight 5 beta新特性系列:6.Silverlight 5新增低延迟声音效果类SoundEffect.支持wav音乐格式
- Silverlight 5 beta新特性探索系列:8.Silverlight 5中自定义扩展标记
- Silverlight 5 Beta新特性[6]低延迟对WAV格式声音效果支持
- Silverlight 5 beta新特性探索系列:8.Silverlight 5中自定义扩展标记
- Silverlight 5 Beta新特性[6]低延迟对WAV格式声音效果支持
- Silverlight 5 Beta新特性[3]多窗口支持
- 基于Silverlight的快速开发框架RapidSL新特性解析
- Silverlight 5 Beta新特性[3]多窗口支持
- Silverlight 5 beta新特性探索系列:7.结合上层元素属性绑定和Style Setter上的绑定
- Silverlight 5 beta新特性探索系列:3.Silverlight5中的文字增进控制【附带实例源码】
- Silverlight 5 beta新特性探索系列:7.结合上层元素属性绑定和Style Setter上的绑定
- Silverlight 4 Beta新特性