Cocoa Programming for Mac OS X 第七章(Key-Value Coding; Key-Value Observing)摘录
2011-08-20 17:10
579 查看
Key-value coding (KVC) is a mechanism that allows you to set and get the value of a variable by its name. The name is simply a string, but we refer to that name as a key.
So, for example, imagine that you have a class called Student that
has an instance variable called firstName of type NSString:
If you had an instance of Student,
you could set its firstName like this:
You could read the value of its firstName like this:
The methods setValue:forKey: and valueForKey: are
defined in NSObject. Even though
this doesn't look like rocket science, the ability to read and set a variable by its name is really powerful. The rest of this chapter will be a simple example that should illustrate some of that power.
In Xcode, create a new project of type Cocoa Application. Name the project KVCFun.
In the project, create a new file of typeObjective-C Class. Name the class AppController.
At this point in our exploration of key-value coding, you simply need an instance of AppController to
be created with theMainMenu.nib file read in. Drag out a custom object and set its
class to be AppController (Figure
7.1).
Figure 7.1. Create AppController
[View full size image]

Save the nib file.
Back in Xcode, open AppController.h, and add an instance variable called fido of
type int:
In AppController.m, you are going to create an init method
that sets and reads fido by using key-value coding. This is a bit silly because it is going
to be a long-winded way to get a simple result. This is designed to be illustrative rather than practical.
What makes the method so long-winded is that the key-value coding methods work with objects, so instead of passing an int,
you will need to create an NSNumber. Add this method to AppController.m:
The
key-value coding mechanism will automatically convert the NSNumber to an int before
using it to set the value of fido. Build and run the application, but don't expect
much. When the blank window appears, "fido = 5" will be logged to the console.
If you have accessor methods for getting and setting fido, they will be used. You must,
however, give them the correct names. The getter must be called fido,
and the setter must be called setFido:.
Note that this is more than simply a convention; if you give your accessors nonstandard names, they will not get called by the key-value coding methods. Add fido and setFido: toAppController.m:
Declare these methods in AppController.h:
Build and run the application. Note that your accessor methods are being called.
Many graphical objects in Cocoa have bindings. When
you bind a key, such as fido, to an attribute of the graphical object (like its
value or its font color), the view will automatically keep those in sync. You are going to add a slider, bind its value to fido,
and see how it uses key-value coding to them in sync.
Open MainMenu.nib.
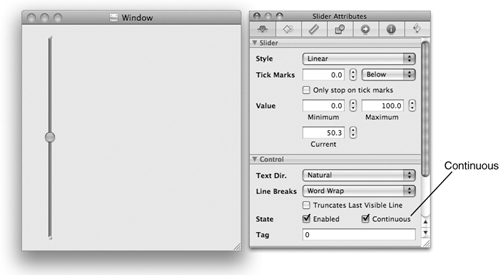
Drop a slider on the window. In the Attributes Inspector, make the slider Continuous (Figure
7.2).
Figure 7.2. Make Slider Continuous
[View full size image]
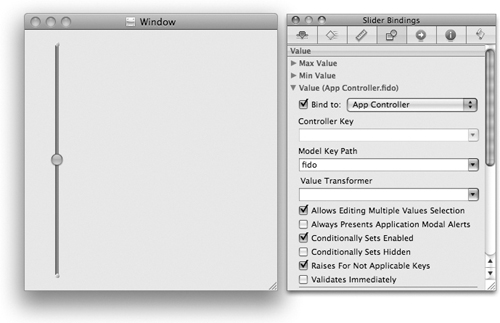
In the Bindings Inspector, bind the value of the slider to the fido key
of the instance of AppController (Figure
7.3).
Figure 7.3. Bind Value of Slider to fido
[View full size image]
Build and run the application. Note that the slider uses valueForKey: to
get its initial value, which triggers your fido method. As you move the slider, it calls setValue:forKey: to
update the fido variable, which triggers your setFido: method.
In
the previous section, I mentioned that when you use accessors or key-value coding to change the value for a key, the observers are automatically notified of the change. What happens if you change the variable directly?
Open AppController.h and declare a new action method:
In AppController.m, implement the method:
Open MainMenu.nib. Add a button to the window, label the button Increment
Fido, and Control-drag from the button to the instance AppController.
The button should trigger the incrementFido: action (Figure
7.5).
Figure 7.5. Set target/action of Button
[View full size image]

You
would hope that when the button is clicked, the slider would move and the text field would update itself. Sadly, neither happens. Try building and running the application.
If you are going to change the variable directly, you will need to explicitly trigger the notification of the observers. Change theincrementFido: method:
Build and run the application now; the Increment Fido button should work correctly.
Two other solutions would work. First, you could use key-value coding:
Or, you could use the accessor method to change fido:
Type this version in. Then build and run it.
Figure 7.6 is an object diagram of what you have done. Note the use of half-arrows to represent bindings.
Figure 7.6. Object Diagram
As
you can guess, we spend a lot of time calling accessor methods. In Objective-C 2.0, Apple gives programmers the option of calling accessors by using dot notation. If you have a pointer rover to
an object with a getter method rex, you can call it like this:
To call setRex:, you could do this:
Overall, I think that this is a rather silly addition to the language since we already had a syntax for sending messages. So I won't be using it in this book.
What about writing the accessor methods? If your object has 12 instance variables, do you need to write 12 setters and 12 getters?
With Objective-C 2.0, Apple introduced a very elegant way to eliminate a lot of this code. In the AppController.h file,
replace the declaration of the fido and setFido: methods
with the declaration of a property:
This
one line is equivalent to declaring setFido: and fido methods.
In AppController.m, you can use @synthesize to implement the accessor
methods. Delete your fido and setFido: methods,
and replace them with this line:
Note that everything still works. (Naturally, you won't see the log statements anymore.)
In general, the declaration of a property looks like this:
The attributes can include readwrite (the default) or readonly.
A property marked readonly gets no setter method.
To describe how the setter method should work, the attributes can also include one of the following: assign, retain, copy.
Let's look at each in turn:
assign (the default) makes a simple assignment happen. assign does
not retain the new value. If you are dealing with an object type and you are not using the garbage collector, you probably don't want assign.
retain releases the old value and retains the new value. This attribute is used only for
Objective-C object types. If you are using the garbage collector, assign and retain are
equivalent.
copy makes a copy of the new value and assigns the variable to the copy. This attribute
is often used for properties that are strings.
Finally, the attributes can also include nonatomic. If your application is multithreaded,
it is sometimes important that your setter methods be atomic. That is, the execution of the setter method from one thread will
not conflict with the execution of the same setter method on another thread. By default, the @synthesize call
will generate accessors with this property. On an application that is not using the garbage collector, this involves using a lock to ensure that only one thread at a time is executing the setter. Creating and using the locks introduces some overhead. If you
know that the accessors for a property don't need to be atomic, you can eliminate the overhead by adding nonatomic to the attributes.
Objects
are often arranged in a network. For example, a person might have a spouse who has a scooter that has a model name (Figure 7.7).
Figure 7.7. Objects Are a Directed Graph
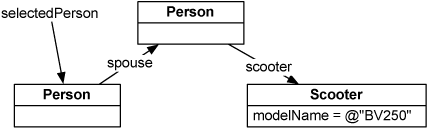
To get the model name of the selected person's spouse's scooter, you can use a key path:
We'd say that spouse and scooter are
relationships of the Person class and that modelName is
an attribute of the Scooter class.
There are also operators that you can include in key paths. For example, if you have an array of Person objects,
you could get their average expectedRaise by using key paths:
Here are some commonly used operators:
Now that you know about key paths, you can create bindings programmatically. If you had a text field in which you wanted to show the average expected raise of the arranged objects of
an array controller, you could create a binding, like this:
Of
course, it is usually easier to create a binding in Interface Builder.
Use the unbind: method to remove the binding:
How did the text field become an observer of the fido key
in the AppController object?
When it wakes up from being in the nib, the text field adds itself as an observer. If you wanted to become an observer of this key, your line of code might look something like this:
This method is defined in NSObject.
It is how you say, "Hey! Send me a message whenever fido changes." The options and context
determine what extra data is sent along with that message when fido changes. The method
that is triggered looks like this:
The keyPath, in this case, would be @"fido", and the object would
be the AppController. The context would
be the pointersomePointer supplied as the context when you became an observer. The dictionary change is
a collection of key-value pairs that can hold the old value of fido and/or the new value.
So, for example, imagine that you have a class called Student that
has an instance variable called firstName of type NSString:
@interface Student : NSObject
{
NSString *firstName;
}
...
@ends
If you had an instance of Student,
you could set its firstName like this:
Student *s = [[Student alloc] init];
[s setValue:@"Larry" forKey:@"firstName"];
You could read the value of its firstName like this:
NSString *x = [s valueForKey:@"firstName"];
The methods setValue:forKey: and valueForKey: are
defined in NSObject. Even though
this doesn't look like rocket science, the ability to read and set a variable by its name is really powerful. The rest of this chapter will be a simple example that should illustrate some of that power.
一、Key-Value Coding
In Xcode, create a new project of type Cocoa Application. Name the project KVCFun.In the project, create a new file of typeObjective-C Class. Name the class AppController.
At this point in our exploration of key-value coding, you simply need an instance of AppController to
be created with theMainMenu.nib file read in. Drag out a custom object and set its
class to be AppController (Figure
7.1).
Figure 7.1. Create AppController
[View full size image]
Save the nib file.
Back in Xcode, open AppController.h, and add an instance variable called fido of
type int:
@interface AppController : NSObject
{
int fido;
}
@end
In AppController.m, you are going to create an init method
that sets and reads fido by using key-value coding. This is a bit silly because it is going
to be a long-winded way to get a simple result. This is designed to be illustrative rather than practical.
What makes the method so long-winded is that the key-value coding methods work with objects, so instead of passing an int,
you will need to create an NSNumber. Add this method to AppController.m:
- (id)init
{
[super init];
[self setValue:[NSNumber numberWithInt:5]
forKey:@"fido"];
NSNumber *n = [self valueForKey:@"fido"];
NSLog(@"fido = %@", n);
return self;
}
The
key-value coding mechanism will automatically convert the NSNumber to an int before
using it to set the value of fido. Build and run the application, but don't expect
much. When the blank window appears, "fido = 5" will be logged to the console.
If you have accessor methods for getting and setting fido, they will be used. You must,
however, give them the correct names. The getter must be called fido,
and the setter must be called setFido:.
Note that this is more than simply a convention; if you give your accessors nonstandard names, they will not get called by the key-value coding methods. Add fido and setFido: toAppController.m:
- (int)fido
{
NSLog(@"-fido is returning %d", fido);
return fido;
}

- (void)setFido:(int)x
{
NSLog(@"-setFido: is called with %d", x);
fido = x;
}
Declare these methods in AppController.h:
- (int)fido;
- (void)setFido:(int)x;
Build and run the application. Note that your accessor methods are being called.
二、Bindings
Many graphical objects in Cocoa have bindings. Whenyou bind a key, such as fido, to an attribute of the graphical object (like its
value or its font color), the view will automatically keep those in sync. You are going to add a slider, bind its value to fido,
and see how it uses key-value coding to them in sync.
Open MainMenu.nib.
Drop a slider on the window. In the Attributes Inspector, make the slider Continuous (Figure
7.2).
Figure 7.2. Make Slider Continuous
[View full size image]
In the Bindings Inspector, bind the value of the slider to the fido key
of the instance of AppController (Figure
7.3).
Figure 7.3. Bind Value of Slider to fido
[View full size image]
Build and run the application. Note that the slider uses valueForKey: to
get its initial value, which triggers your fido method. As you move the slider, it calls setValue:forKey: to
update the fido variable, which triggers your setFido: method.
三、Making Keys Observable
Inthe previous section, I mentioned that when you use accessors or key-value coding to change the value for a key, the observers are automatically notified of the change. What happens if you change the variable directly?
Open AppController.h and declare a new action method:
- (IBAction)incrementFido:(id)sender;
In AppController.m, implement the method:
- (IBAction)incrementFido:(id)sender
{
fido++;
NSLog(@"fido is now %d", fido);
}
Open MainMenu.nib. Add a button to the window, label the button Increment
Fido, and Control-drag from the button to the instance AppController.
The button should trigger the incrementFido: action (Figure
7.5).
Figure 7.5. Set target/action of Button
[View full size image]
You
would hope that when the button is clicked, the slider would move and the text field would update itself. Sadly, neither happens. Try building and running the application.
If you are going to change the variable directly, you will need to explicitly trigger the notification of the observers. Change theincrementFido: method:
- (IBAction)incrementFido:(id)sender
{
[self willChangeValueForKey:@"fido"];
fido++;
NSLog(@"fido is now %d", fido);
[self didChangeValueForKey:@"fido"];
}
Build and run the application now; the Increment Fido button should work correctly.
Two other solutions would work. First, you could use key-value coding:
- (IBAction)incrementFido:(id)sender
{
NSNumber *n = [self valueForKey:@"fido"];
NSNumber *npp = [NSNumber numberWithInt:[n intValue] + 1];
[self setValue:npp forKey:@"fido"];
}
Or, you could use the accessor method to change fido:
- (IBAction)incrementFido:(id)sender
{
[self setFido:[self fido] + 1];
}
Type this version in. Then build and run it.
Figure 7.6 is an object diagram of what you have done. Note the use of half-arrows to represent bindings.
Figure 7.6. Object Diagram
Properties and Their Attributes
Asyou can guess, we spend a lot of time calling accessor methods. In Objective-C 2.0, Apple gives programmers the option of calling accessors by using dot notation. If you have a pointer rover to
an object with a getter method rex, you can call it like this:
NSLog(@"Rover's rex is %@", rover.rex);
To call setRex:, you could do this:
rover.rex = [NSDate date];
Overall, I think that this is a rather silly addition to the language since we already had a syntax for sending messages. So I won't be using it in this book.
What about writing the accessor methods? If your object has 12 instance variables, do you need to write 12 setters and 12 getters?
@property and @synthesize
With Objective-C 2.0, Apple introduced a very elegant way to eliminate a lot of this code. In the AppController.h file,replace the declaration of the fido and setFido: methods
with the declaration of a property:
@interface AppController : NSObject {
int fido;
}
@property(readwrite, assign) int fido;
@end
This
one line is equivalent to declaring setFido: and fido methods.
In AppController.m, you can use @synthesize to implement the accessor
methods. Delete your fido and setFido: methods,
and replace them with this line:
@synthesize fido;
Note that everything still works. (Naturally, you won't see the log statements anymore.)
Attributes of a Property
In general, the declaration of a property looks like this:@property (attributes) type name;
The attributes can include readwrite (the default) or readonly.
A property marked readonly gets no setter method.
To describe how the setter method should work, the attributes can also include one of the following: assign, retain, copy.
Let's look at each in turn:
assign (the default) makes a simple assignment happen. assign does
not retain the new value. If you are dealing with an object type and you are not using the garbage collector, you probably don't want assign.
retain releases the old value and retains the new value. This attribute is used only for
Objective-C object types. If you are using the garbage collector, assign and retain are
equivalent.
copy makes a copy of the new value and assigns the variable to the copy. This attribute
is often used for properties that are strings.
Finally, the attributes can also include nonatomic. If your application is multithreaded,
it is sometimes important that your setter methods be atomic. That is, the execution of the setter method from one thread will
not conflict with the execution of the same setter method on another thread. By default, the @synthesize call
will generate accessors with this property. On an application that is not using the garbage collector, this involves using a lock to ensure that only one thread at a time is executing the setter. Creating and using the locks introduces some overhead. If you
know that the accessors for a property don't need to be atomic, you can eliminate the overhead by adding nonatomic to the attributes.
五、For the More Curious: Key Paths
Objectsare often arranged in a network. For example, a person might have a spouse who has a scooter that has a model name (Figure 7.7).
Figure 7.7. Objects Are a Directed Graph
To get the model name of the selected person's spouse's scooter, you can use a key path:
NSString *mn;
mn = [selectedPerson valueForKeyPath:@"spouse.scooter.modelName"];
We'd say that spouse and scooter are
relationships of the Person class and that modelName is
an attribute of the Scooter class.
There are also operators that you can include in key paths. For example, if you have an array of Person objects,
you could get their average expectedRaise by using key paths:
NSNumber *theAverage;
theAverage = [employees valueForKeyPath:@"@avg.expectedRaise"];
Here are some commonly used operators:
@avg
@count
@max
@min
@sum
Now that you know about key paths, you can create bindings programmatically. If you had a text field in which you wanted to show the average expected raise of the arranged objects of
an array controller, you could create a binding, like this:
[textField bind:@"value"
toObject:employeeController
withKeyPath:@"arrangedObjects.@avg.expectedRaise"
options:nil];
Of
course, it is usually easier to create a binding in Interface Builder.
Use the unbind: method to remove the binding:
[textField unbind:@"value"];
六、For the More Curious: Key-Value Observing
How did the text field become an observer of the fido keyin the AppController object?
When it wakes up from being in the nib, the text field adds itself as an observer. If you wanted to become an observer of this key, your line of code might look something like this:
[theAppController addObserver:self
forKeyPath:@"fido"
options:NSKeyValueObservingOld
context:somePointer];
This method is defined in NSObject.
It is how you say, "Hey! Send me a message whenever fido changes." The options and context
determine what extra data is sent along with that message when fido changes. The method
that is triggered looks like this:
- (void)observeValueForKeyPath:(NSString *)keyPath
ofObject:(id)object
change:(NSDictionary *)change
context:(void *)context
{
...
}
The keyPath, in this case, would be @"fido", and the object would
be the AppController. The context would
be the pointersomePointer supplied as the context when you became an observer. The dictionary change is
a collection of key-value pairs that can hold the old value of fido and/or the new value.

相关文章推荐
- Key-Value Coding, Key-Value observing(Chapter 7 of Cocoa Programming for Mac OS X)
- Cocoa Programming for Mac OS X 第十五章(Using Alert Panels)摘录
- Cocoa Programming for Mac OS X 第十六章(Localization)摘录
- Cocoa Programming for Mac OS X 第一章(What Is It?)摘录
- Cocoa Programming for Mac OS X 第二章(Let's Get Started)摘录
- Key-Value Coding(KVC),Key-Value Observing(KVO)和Cocoa Bindings for MonoMac
- Cocoa Programming for Mac OS X 第四章(Memory Management)摘录
- Cocoa Programming for Mac OS X 第十八章(Images and Mouse Events)摘录
- Cocoa Programming for Mac OS X 第三章(Objective-C)摘录
- Cocoa Programming for Mac OS X 第十三章(User Defaults)摘录
- Memory Management(Chapter 4 of Cocoa Programming for Mac OS X)
- Using Notifications(Chapter 14 of Cocoa Programming for Mac OS X)
- Using Alert Panels(Chapter 15 of Cocoa Programming for Mac OS X)
- Keyboard Events(Chapter 19 of Cocoa Programming for Mac OS X)
- Printing(Chapter 27 of Cocoa Programming for Mac OS X)
- Helper Objects (Chapter 6 of Cocoa Programming for Mac OS X)
- NSArrayController(Chapter 8 of Cocoa Programming for Mac OS X)
- Objective-C(Chapter 3 of Cocoa Programming for Mac OS X)
- Target/Action(Chapter 5 of Cocoa Programming for Mac OS X)
- Archiving(Chapter 10 of Cocoa Programming for Mac OS X)