Objective-C 基础语法log打印那些事儿(一)
2011-07-04 20:47
381 查看
Objective-C 基础语法详解
雨松MOMO原创文章如转载,请注明:转载至我的独立域名博客雨松MOMO程序研究院,原文地址:http://www.xuanyusong.com/archives/368
如果想从事iphone开发的话 Objective-C 这门语言就不得不学会 我们都知道C语言是没有面向对象的 而Object-C 则是ANSI C 的一个严格超集 它是具有面向对象的特性的 由于IPHONE 的成功 让这门语言现在非常的火热 今天笔者为大家介绍一下在xcode中 使用Objective-C 的基本语法。
1.打开mac系统中强大的Xcode软件 单击Create a new Xcode project 创建一个Xcode项目。

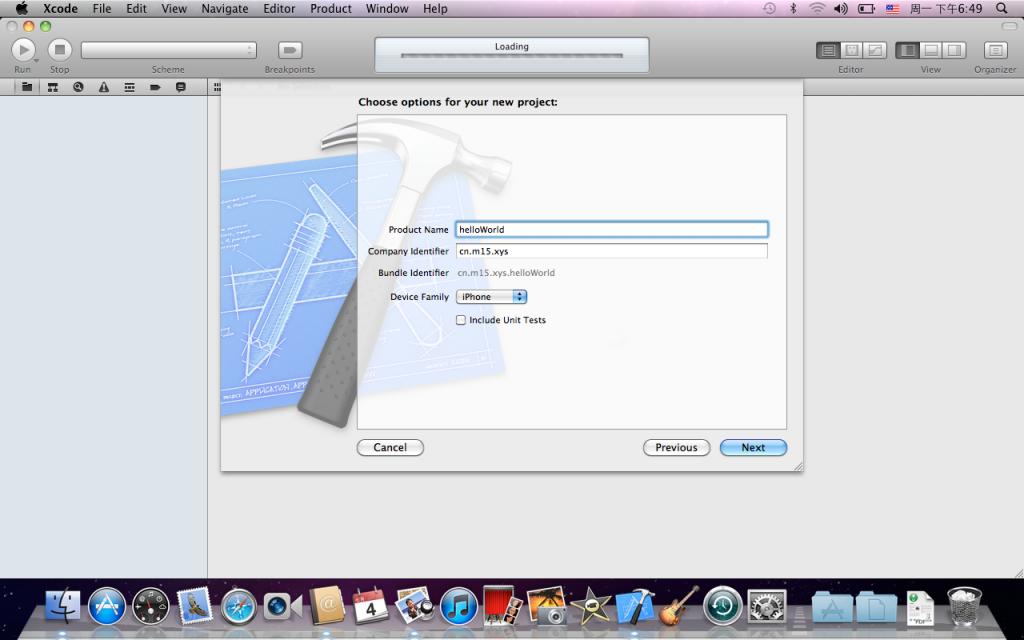
2. 选择“View-based Application” 因为只是介绍基本语法 所以 “View-based Application” 已经够用了 。 选择完后 点击Next 。

3.输入相应的信息后点击Next。
Product Name: 指产品名称 ,可以随意命名。
Company Identifier: 公司标识符,一般命名规则为 “com.公司名”
Bundle Identifier: 指包标识符,用于唯一标识应用程序,默认会根据公司标识符和产品名来组合生成
Device Family: 指该应用支持的设备类型,共三个选项:iPhone、iPad、Universal(即iPhone、iPad通用)
Include Unite Tests: 是否包含单元测试代码模板,如果勾选,Xcode会帮助生成单元测试代码模板
这样 我们的第一个项目就创建好了,接下来开始为大家介绍 Objective-C 的语法
在项目视图中 打开 helloWorldViewController.m文件 找到 - (void)viewDidLoad 方法 (这个方法每次启动程序都会调用 )
学过C++的朋友应该都知道 新写一个类会有 一个.h 声明类的变量 方法等 .cpp 用来实现方法 Objective-C 则也类似C++ .h 声明类的变量 方法 .m 用来实现方法
在c语言中 我们在控制台输出信息是用printf() Java语言则是 System.out.println() 而Objective-C 则是用 NSLog();
打开控制台的快捷键为 command + shift + R

//
// helloWorldViewController.m
// helloWorld
//
// Created by 宣雨松 on 11-7-4.
// Copyright 2011年 __MyCompanyName__. All rights reserved.
//
#import "helloWorldViewController.h"
#import "MyClass.h"//导入新写的类
@implementation helloWorldViewController
- (void)dealloc
{
[super dealloc];
}
- (void)didReceiveMemoryWarning
{
// Releases the view if it doesn't have a superview.
[super didReceiveMemoryWarning];
// Release any cached data, images, etc that aren't in use.
}
#pragma mark - View lifecycle
// Implement viewDidLoad to do additional setup after loading the view, typically from a
nib.
- (void)viewDidLoad
{
[super viewDidLoad];
//打印一个字符串
NSLog(@"only log hello world");
//字符串相加
NSString *str;
NSString *str1 = @"plusA ";
NSString *str2 = @"+";
NSString *str3 = @"plusB";
// 把str1 str2 str3 相加后赋值给str %@ 表示是一个对象 这里也可以用 %d %s 在这里就不一一举例了。
str = [NSString stringWithFormat:@"%@ %@ %@",str1,str2,str3];
//打印出str
NSLog(@"string plus %@",str);
//self 好比C++ 或者 java 语言中的 this 指针 指向本类 这里调用了本类的 putString方法 将字符串"pass string"作为参数传递了进去
[self putString:@"pass string"];
//在内存中new了一个MyClass的对象 alloc是在内存中 分配内存 init 则是初始化 这样写 属于规定写法
MyClass * myclass = [[MyClass alloc] init];
// 用myclass指针调用 类中putclass方法 将字符串 "pass class string"作为参数传递进去
[myclass putclass:@"pass class string"];
//调用类中静态方法 将字符串"static pass class string "作为参数传递进去
[MyClass staticPutClass:@"static pass class string"];
}
- (void)viewDidUnload
{
[super viewDidUnload];
// Release any retained subviews of the main view.
// e.g. self.myOutlet = nil;
}
- (BOOL)shouldAutorotateToInterfaceOrientation:(UIInterfaceOrientation)interfaceOrientation
{
// Return YES for supported orientations
return (interfaceOrientation == UIInterfaceOrientationPortrait);
}
//自己写的类方法输出字符串
-(void)putString:(NSString *)str
{
NSLog(@"%@",str);
}
@end
//这个类的声明
#import <UIKit/UIKit.h>
@interface helloWorldViewController : UIViewController {
}
-(void) putString:(NSString*)str;
@end
MyClass类的实现
#import "MyClass.h"
@implementation MyClass
//方法前是-号的说明这是一个实力方法 必需本类new过才能调用
-(void)putclass:(NSString *)str
{
NSLog(@"%@",str);
}
//方法前是+号的说明这是一个类方法 这种方法无权访问实例变量
//这里声明了一个静态方法 无需本类new过也可以调用
+(void)staticPutClass:(NSString *)str{
NSLog(@"%@",str);
}
@end
MyClass类的声明
#import <Foundation/Foundation.h>
@interface MyClass :NSObject{
}
-(void) putclass : (NSString *) str;
+(void) staticPutClass :(NSString *) str;
@end
这样Objective-C 基本的语法就给大家介绍完了, 希望有兴趣的朋友可以和我一起讨论 我们可以一起进步。
雨松MOMO原创文章如转载,请注明:转载至我的独立域名博客雨松MOMO程序研究院,原文地址:http://www.xuanyusong.com/archives/368
如果想从事iphone开发的话 Objective-C 这门语言就不得不学会 我们都知道C语言是没有面向对象的 而Object-C 则是ANSI C 的一个严格超集 它是具有面向对象的特性的 由于IPHONE 的成功 让这门语言现在非常的火热 今天笔者为大家介绍一下在xcode中 使用Objective-C 的基本语法。
1.打开mac系统中强大的Xcode软件 单击Create a new Xcode project 创建一个Xcode项目。
2. 选择“View-based Application” 因为只是介绍基本语法 所以 “View-based Application” 已经够用了 。 选择完后 点击Next 。
3.输入相应的信息后点击Next。
Product Name: 指产品名称 ,可以随意命名。
Company Identifier: 公司标识符,一般命名规则为 “com.公司名”
Bundle Identifier: 指包标识符,用于唯一标识应用程序,默认会根据公司标识符和产品名来组合生成
Device Family: 指该应用支持的设备类型,共三个选项:iPhone、iPad、Universal(即iPhone、iPad通用)
Include Unite Tests: 是否包含单元测试代码模板,如果勾选,Xcode会帮助生成单元测试代码模板
这样 我们的第一个项目就创建好了,接下来开始为大家介绍 Objective-C 的语法
在项目视图中 打开 helloWorldViewController.m文件 找到 - (void)viewDidLoad 方法 (这个方法每次启动程序都会调用 )
学过C++的朋友应该都知道 新写一个类会有 一个.h 声明类的变量 方法等 .cpp 用来实现方法 Objective-C 则也类似C++ .h 声明类的变量 方法 .m 用来实现方法
在c语言中 我们在控制台输出信息是用printf() Java语言则是 System.out.println() 而Objective-C 则是用 NSLog();
打开控制台的快捷键为 command + shift + R
//
// helloWorldViewController.m
// helloWorld
//
// Created by 宣雨松 on 11-7-4.
// Copyright 2011年 __MyCompanyName__. All rights reserved.
//
#import "helloWorldViewController.h"
#import "MyClass.h"//导入新写的类
@implementation helloWorldViewController
- (void)dealloc
{
[super dealloc];
}
- (void)didReceiveMemoryWarning
{
// Releases the view if it doesn't have a superview.
[super didReceiveMemoryWarning];
// Release any cached data, images, etc that aren't in use.
}
#pragma mark - View lifecycle
// Implement viewDidLoad to do additional setup after loading the view, typically from a
nib.
- (void)viewDidLoad
{
[super viewDidLoad];
//打印一个字符串
NSLog(@"only log hello world");
//字符串相加
NSString *str;
NSString *str1 = @"plusA ";
NSString *str2 = @"+";
NSString *str3 = @"plusB";
// 把str1 str2 str3 相加后赋值给str %@ 表示是一个对象 这里也可以用 %d %s 在这里就不一一举例了。
str = [NSString stringWithFormat:@"%@ %@ %@",str1,str2,str3];
//打印出str
NSLog(@"string plus %@",str);
//self 好比C++ 或者 java 语言中的 this 指针 指向本类 这里调用了本类的 putString方法 将字符串"pass string"作为参数传递了进去
[self putString:@"pass string"];
//在内存中new了一个MyClass的对象 alloc是在内存中 分配内存 init 则是初始化 这样写 属于规定写法
MyClass * myclass = [[MyClass alloc] init];
// 用myclass指针调用 类中putclass方法 将字符串 "pass class string"作为参数传递进去
[myclass putclass:@"pass class string"];
//调用类中静态方法 将字符串"static pass class string "作为参数传递进去
[MyClass staticPutClass:@"static pass class string"];
}
- (void)viewDidUnload
{
[super viewDidUnload];
// Release any retained subviews of the main view.
// e.g. self.myOutlet = nil;
}
- (BOOL)shouldAutorotateToInterfaceOrientation:(UIInterfaceOrientation)interfaceOrientation
{
// Return YES for supported orientations
return (interfaceOrientation == UIInterfaceOrientationPortrait);
}
//自己写的类方法输出字符串
-(void)putString:(NSString *)str
{
NSLog(@"%@",str);
}
@end
//这个类的声明
#import <UIKit/UIKit.h>
@interface helloWorldViewController : UIViewController {
}
-(void) putString:(NSString*)str;
@end
MyClass类的实现
#import "MyClass.h"
@implementation MyClass
//方法前是-号的说明这是一个实力方法 必需本类new过才能调用
-(void)putclass:(NSString *)str
{
NSLog(@"%@",str);
}
//方法前是+号的说明这是一个类方法 这种方法无权访问实例变量
//这里声明了一个静态方法 无需本类new过也可以调用
+(void)staticPutClass:(NSString *)str{
NSLog(@"%@",str);
}
@end
MyClass类的声明
#import <Foundation/Foundation.h>
@interface MyClass :NSObject{
}
-(void) putclass : (NSString *) str;
+(void) staticPutClass :(NSString *) str;
@end
这样Objective-C 基本的语法就给大家介绍完了, 希望有兴趣的朋友可以和我一起讨论 我们可以一起进步。

相关文章推荐
- Objective-C 基础语法log打印那些事儿(一)
- Objective-C 基础语法log打印那些事儿(一)
- Objective-C 基础语法log打印那些事儿(一)
- Objective-C 基础语法log打印那些事儿(一)
- Objective-C 基础语法log打印那些事儿(一)
- OC基础—语法概述(初步了解Objective-C)
- Objective-C最基础语法之基础类型
- 语法分析——在之前基础上增加定义语句打印,定义语句判断,增加对if-else-then的条件语句的判断
- Objective-C语法之数组对象的那些事儿(七)
- IOS入门2--Objective-C基础语法和关键字
- Objective-C语法之NSMutableString字符串的那些事儿(四)
- Objective-C语法之数组对象的那些事儿
- Objective-C 语法的那些事儿
- Objective-C基础语法快速入门
- Objective - C基础: 第三天 - 2.点语法的基本认识
- Objective-C语法之Object对象的那些事儿(五)
- Objective-C语法之NSString字符串的那些事儿(三)
- Objective-C语法之static关键字的那些事儿
- Objective-C语法之词典对象的那些事儿(八)
- Objective-c基础学习2 之点语法