如何设置图片四个方向圆角属性
2011-06-16 15:55
357 查看
一般图片圆角显示都是四个角都显示圆角,如果只有这个功能需求,采用常用的方法就可以了,也不用费那么多事情。但是在有些情况下需要只显示图片的2个圆角,就不太好实现了。
先看效果图 ,未做圆角转换的图片

做了4个角的圆角转换的图片

只做了下面2个圆角转换的图片

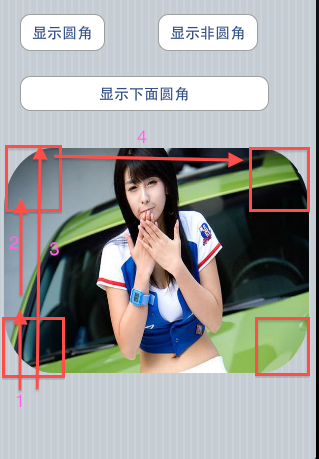
如何实现画四个方向的弧线呢?
先看看示意图
头文件
#import <Foundation/Foundation.h>
typedef enum {
UIImageRoundedCornerTopLeft = 1,
UIImageRoundedCornerTopRight = 1 << 1,
UIImageRoundedCornerBottomRight = 1 << 2,
UIImageRoundedCornerBottomLeft = 1 << 3
} UIImageRoundedCorner;
@interface UIImage (Utility)
//+ (void)addRoundedRectToPath(CGContextRef context, CGRect rect, float radius, UIImageRoundedCorner cornerMask);
- (UIImage *)roundedRectWith:(float)radius cornerMask:(UIImageRoundedCorner)cornerMask;
@end
实现文件
#import "UIImage+Utility.h"
//UIKit坐标系统原点在左上角,y方向向下的(坐标系A),但在Quartz中坐标系原点在左下角,y方向向上的(坐标系B)。图片绘制也是颠倒的。
static void addRoundedRectToPath(CGContextRef context, CGRect rect, float radius, UIImageRoundedCorner cornerMask)
{
//原点在左下方,y方向向上。移动到线条2的起点。
CGContextMoveToPoint(context, rect.origin.x, rect.origin.y + radius);
//画出线条2, 目前画线的起始点已经移动到线条2的结束地方了。
CGContextAddLineToPoint(context, rect.origin.x, rect.origin.y + rect.size.height - radius);
//如果左上角需要画圆角,画出一个弧线出来。
if (cornerMask & UIImageRoundedCornerTopLeft) {
//已左上的正方形的右下脚为圆心,半径为radius, 180度到90度画一个弧线,
CGContextAddArc(context, rect.origin.x + radius, rect.origin.y + rect.size.height - radius,
radius, M_PI, M_PI / 2, 1);
}
else {
//如果不需要画左上角的弧度。从线2终点,画到线3的终点,
CGContextAddLineToPoint(context, rect.origin.x, rect.origin.y + rect.size.height);
//线3终点,画到线4的起点
CGContextAddLineToPoint(context, rect.origin.x + radius, rect.origin.y + rect.size.height);
}
//画线4的起始,到线4的终点
CGContextAddLineToPoint(context, rect.origin.x + rect.size.width - radius,
rect.origin.y + rect.size.height);
//画右上角
if (cornerMask & UIImageRoundedCornerTopRight) {
CGContextAddArc(context, rect.origin.x + rect.size.width - radius,
rect.origin.y + rect.size.height - radius, radius, M_PI / 2, 0.0f, 1);
}
else {
CGContextAddLineToPoint(context, rect.origin.x + rect.size.width, rect.origin.y + rect.size.height);
CGContextAddLineToPoint(context, rect.origin.x + rect.size.width, rect.origin.y + rect.size.height - radius);
}
CGContextAddLineToPoint(context, rect.origin.x + rect.size.width, rect.origin.y + radius);
//画右下角弧线
if (cornerMask & UIImageRoundedCornerBottomRight) {
CGContextAddArc(context, rect.origin.x + rect.size.width - radius, rect.origin.y + radius,
radius, 0.0f, -M_PI / 2, 1);
}
else {
CGContextAddLineToPoint(context, rect.origin.x + rect.size.width, rect.origin.y);
CGContextAddLineToPoint(context, rect.origin.x + rect.size.width - radius, rect.origin.y);
}
CGContextAddLineToPoint(context, rect.origin.x + radius, rect.origin.y);
//画左下角弧线
if (cornerMask & UIImageRoundedCornerBottomLeft) {
CGContextAddArc(context, rect.origin.x + radius, rect.origin.y + radius, radius,
-M_PI / 2, M_PI, 1);
}
else {
CGContextAddLineToPoint(context, rect.origin.x, rect.origin.y);
CGContextAddLineToPoint(context, rect.origin.x, rect.origin.y + radius);
}
CGContextClosePath(context);
}
@implementation UIImage (Utility)
- (UIImage *)roundedRectWith:(float)radius cornerMask:(UIImageRoundedCorner)cornerMask
{
UIImageView *bkImageViewTmp = [[[UIImageView alloc] initWithImage:self] autorelease];
int w = self.size.width;
int h = self.size.height;
CGColorSpaceRef colorSpace = CGColorSpaceCreateDeviceRGB();
CGContextRef context = CGBitmapContextCreate(NULL, w, h, 8, 4 * w, colorSpace, kCGImageAlphaPremultipliedFirst);
CGContextBeginPath(context);
addRoundedRectToPath(context,bkImageViewTmp.frame, radius, cornerMask);
CGContextClosePath(context);
CGContextClip(context);
CGContextDrawImage(context, CGRectMake(0, 0, w, h), self.CGImage);
CGImageRef imageMasked = CGBitmapContextCreateImage(context);
CGContextRelease(context);
CGColorSpaceRelease(colorSpace);
UIImage *newImage = [UIImage imageWithCGImage:imageMasked];
CGImageRelease(imageMasked);
return newImage;
}
@end
实现方法如下:
- (IBAction)showRectImage
{
UIImage *rectImage = [UIImage imageNamed:@"test.jpg"];
self.imageView.image = rectImage;
}
- (IBAction)showRoundImage
{
UIImage *rectImage = [UIImage imageNamed:@"test.jpg"];
UIImage *roundImage = [rectImage roundedRectWith:100
cornerMask:UIImageRoundedCornerBottomLeft|UIImageRoundedCornerBottomRight|UIImageRoundedCornerTopLeft|UIImageRoundedCornerTopRight];
self.imageView.image = roundImage;
}
- (IBAction)show2RoundImage
{
UIImage *rectImage = [UIImage imageNamed:@"test.jpg"];
UIImage *round2Image = [rectImage roundedRectWith:100
cornerMask:UIImageRoundedCornerBottomLeft|UIImageRoundedCornerBottomRight];
self.imageView.image = round2Image;
}
对于四个角,用下面的角进行逻辑或的方法。
UIImageRoundedCornerTopRight
UIImageRoundedCornerTopLeft
UIImageRoundedCornerBottomRight
UIImageRoundedCornerBottomLeft
项目文件下载
参考URL
http://stackoverflow.com/questions/4847163/round-two-corners-in-uiview http://stackoverflow.com/questions/4845211/just-two-rounded-corners http://blog.sallarp.com/iphone-uiimage-round-corners/
先看效果图 ,未做圆角转换的图片
做了4个角的圆角转换的图片
只做了下面2个圆角转换的图片
如何实现画四个方向的弧线呢?
先看看示意图
头文件
#import <Foundation/Foundation.h>
typedef enum {
UIImageRoundedCornerTopLeft = 1,
UIImageRoundedCornerTopRight = 1 << 1,
UIImageRoundedCornerBottomRight = 1 << 2,
UIImageRoundedCornerBottomLeft = 1 << 3
} UIImageRoundedCorner;
@interface UIImage (Utility)
//+ (void)addRoundedRectToPath(CGContextRef context, CGRect rect, float radius, UIImageRoundedCorner cornerMask);
- (UIImage *)roundedRectWith:(float)radius cornerMask:(UIImageRoundedCorner)cornerMask;
@end
实现文件
#import "UIImage+Utility.h"
//UIKit坐标系统原点在左上角,y方向向下的(坐标系A),但在Quartz中坐标系原点在左下角,y方向向上的(坐标系B)。图片绘制也是颠倒的。
static void addRoundedRectToPath(CGContextRef context, CGRect rect, float radius, UIImageRoundedCorner cornerMask)
{
//原点在左下方,y方向向上。移动到线条2的起点。
CGContextMoveToPoint(context, rect.origin.x, rect.origin.y + radius);
//画出线条2, 目前画线的起始点已经移动到线条2的结束地方了。
CGContextAddLineToPoint(context, rect.origin.x, rect.origin.y + rect.size.height - radius);
//如果左上角需要画圆角,画出一个弧线出来。
if (cornerMask & UIImageRoundedCornerTopLeft) {
//已左上的正方形的右下脚为圆心,半径为radius, 180度到90度画一个弧线,
CGContextAddArc(context, rect.origin.x + radius, rect.origin.y + rect.size.height - radius,
radius, M_PI, M_PI / 2, 1);
}
else {
//如果不需要画左上角的弧度。从线2终点,画到线3的终点,
CGContextAddLineToPoint(context, rect.origin.x, rect.origin.y + rect.size.height);
//线3终点,画到线4的起点
CGContextAddLineToPoint(context, rect.origin.x + radius, rect.origin.y + rect.size.height);
}
//画线4的起始,到线4的终点
CGContextAddLineToPoint(context, rect.origin.x + rect.size.width - radius,
rect.origin.y + rect.size.height);
//画右上角
if (cornerMask & UIImageRoundedCornerTopRight) {
CGContextAddArc(context, rect.origin.x + rect.size.width - radius,
rect.origin.y + rect.size.height - radius, radius, M_PI / 2, 0.0f, 1);
}
else {
CGContextAddLineToPoint(context, rect.origin.x + rect.size.width, rect.origin.y + rect.size.height);
CGContextAddLineToPoint(context, rect.origin.x + rect.size.width, rect.origin.y + rect.size.height - radius);
}
CGContextAddLineToPoint(context, rect.origin.x + rect.size.width, rect.origin.y + radius);
//画右下角弧线
if (cornerMask & UIImageRoundedCornerBottomRight) {
CGContextAddArc(context, rect.origin.x + rect.size.width - radius, rect.origin.y + radius,
radius, 0.0f, -M_PI / 2, 1);
}
else {
CGContextAddLineToPoint(context, rect.origin.x + rect.size.width, rect.origin.y);
CGContextAddLineToPoint(context, rect.origin.x + rect.size.width - radius, rect.origin.y);
}
CGContextAddLineToPoint(context, rect.origin.x + radius, rect.origin.y);
//画左下角弧线
if (cornerMask & UIImageRoundedCornerBottomLeft) {
CGContextAddArc(context, rect.origin.x + radius, rect.origin.y + radius, radius,
-M_PI / 2, M_PI, 1);
}
else {
CGContextAddLineToPoint(context, rect.origin.x, rect.origin.y);
CGContextAddLineToPoint(context, rect.origin.x, rect.origin.y + radius);
}
CGContextClosePath(context);
}
@implementation UIImage (Utility)
- (UIImage *)roundedRectWith:(float)radius cornerMask:(UIImageRoundedCorner)cornerMask
{
UIImageView *bkImageViewTmp = [[[UIImageView alloc] initWithImage:self] autorelease];
int w = self.size.width;
int h = self.size.height;
CGColorSpaceRef colorSpace = CGColorSpaceCreateDeviceRGB();
CGContextRef context = CGBitmapContextCreate(NULL, w, h, 8, 4 * w, colorSpace, kCGImageAlphaPremultipliedFirst);
CGContextBeginPath(context);
addRoundedRectToPath(context,bkImageViewTmp.frame, radius, cornerMask);
CGContextClosePath(context);
CGContextClip(context);
CGContextDrawImage(context, CGRectMake(0, 0, w, h), self.CGImage);
CGImageRef imageMasked = CGBitmapContextCreateImage(context);
CGContextRelease(context);
CGColorSpaceRelease(colorSpace);
UIImage *newImage = [UIImage imageWithCGImage:imageMasked];
CGImageRelease(imageMasked);
return newImage;
}
@end
实现方法如下:
- (IBAction)showRectImage
{
UIImage *rectImage = [UIImage imageNamed:@"test.jpg"];
self.imageView.image = rectImage;
}
- (IBAction)showRoundImage
{
UIImage *rectImage = [UIImage imageNamed:@"test.jpg"];
UIImage *roundImage = [rectImage roundedRectWith:100
cornerMask:UIImageRoundedCornerBottomLeft|UIImageRoundedCornerBottomRight|UIImageRoundedCornerTopLeft|UIImageRoundedCornerTopRight];
self.imageView.image = roundImage;
}
- (IBAction)show2RoundImage
{
UIImage *rectImage = [UIImage imageNamed:@"test.jpg"];
UIImage *round2Image = [rectImage roundedRectWith:100
cornerMask:UIImageRoundedCornerBottomLeft|UIImageRoundedCornerBottomRight];
self.imageView.image = round2Image;
}
对于四个角,用下面的角进行逻辑或的方法。
UIImageRoundedCornerTopRight
UIImageRoundedCornerTopLeft
UIImageRoundedCornerBottomRight
UIImageRoundedCornerBottomLeft
项目文件下载
参考URL
http://stackoverflow.com/questions/4847163/round-two-corners-in-uiview http://stackoverflow.com/questions/4845211/just-two-rounded-corners http://blog.sallarp.com/iphone-uiimage-round-corners/

相关文章推荐
- 如何设置图片四个方向圆角属性
- 如何设置图片四个方向圆角属性
- 百度ueditor组件上传图片后如何设置img标签里的src、title、alt等属性
- 如何在xib/storyboard中设置视图的属性,如圆角?
- Android如何设置圆角图片
- 【UnityShader】设置Image组件图片透明四个方向透明渐变(Sprite原理相同)
- 如何给图片设置圆角效果,模仿iPhone图标
- 如何在Xib中设置Button的属性(圆角以及背景颜色)
- 如何在Xib中设置Button的属性(圆角以及背景颜色)
- 百度ueditor组件上传图片后如何设置img里的alt属性
- 使用CALayer的mask属性来设置图片圆角
- 如何给UIView等控件用xib设置圆角属性
- 如何在xib或SB中可视化设置圆角等属性
- Flex中如何通过backgroundImage, backgroundColor和backgroundAlpha样式,设置VBox的背景图片和背景颜色以及改变透明度
- Flex中如何利用getTabAt函数遍历TabNavigator容器的各个Tab,并且通过labelPlacement属性设置标签位置
- 图片圆角属性
- QT中窗口如何隐藏最大话按钮 和设置背景图片
- Css设置img属性让图片水平居中,居左,居右
- SQLite 引用属性 文件属性如何设置!?