(转)Prism安装、MVVM基础概念及一个简单的样例
2011-06-01 22:41
741 查看
原文地址:/article/4723340.html
一:Prism的下载和安装
1:在http://compositewpf.codeplex.com/上下载最新的包。
下载完毕后,运行之,选择解压目录解压之。解压完毕的根目录下有chm帮助文档。
2:运行RegisterPrismBinaries.bat注册Prism组件,注册完毕才能在VS的引用中直接找到Prism组件,否则需要手动添加这些组件。
3:运行Silverlight Only - Basic MVVM QuickStart.bat可以打开一个MVVM的简单事例。
二:MVVM理解
1:现在,我们自己创建一个普通的SilverLight样例,并且将它逐步重构成为MVVM模式。
这个 普通的SL样例需求有:在界面上放置文本框用来显示Name和Button用来显示文本框中的Name的值。
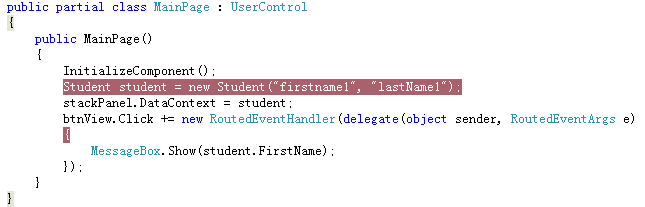
前台:

后台:

SL的目录结构:

2:问题来了
如果我们需要让页面的值和Student实例的值保持一致,则必须要让类型继承自INotifyPropertyChanged接口,并像下面这样编码:
view sourceprint?
如果应用程序中存在多个这样的类型,则每个类型都要实现自己的Notify方法,这显然是不合理的。所以,无论是Prism框架,还是轻量级的Mvvm light toolkit,都实现了一个超类来包装这种需求,在Prism里该超类是NotificationObject,而Mvvm light toolkit中是ObservableObject,当然,毫无例外滴,它们都继承自INotifyPropertyChanged。
3:现在,我们参照这两个类型,来实现自己的NotificationObject,以便加深印象
view sourceprint?
相应的,Student类型修改为:
view sourceprint?
4:问题再次出现,经过修改后的Student类型,是什么?
是实体Model,领域Model,还是别的什么?实际上,因为没有采用任何架构模式,当前的Student类型什么也不是,揉杂了很多功能。它既要负责提供属性,也要负责控制。
在MVVM架构模式中,和MVC称谓不同的地方,就是VM(ViewModel)部分。VM负责:接受View请求并决定调用哪个模型构件去处理请求,同时它还负责将数据返回给View进行显示。也就是说,VM完成的角色可以理解为MVC中的Control。(另外需要注意的一点是,在MVC中有一个概念叫做表现模型,所谓表现模型是领域模型的一个扁平化投影,不应和MVVM中的VIEW MODEL相混淆)。
所以,我们现在要明确这些概念。首先,将Student类型的功能细分化,VM的部分,我们跟页面名称对应起来应该叫做MainViewModel。实际项目中,功能页面会相应名为StudentView.xaml,则对应的VM名便称之为StudentViewModel.cs。我们继续重构上面的代码。
三:建立MVVM的各个部分
首先,建立View文件夹,然后,将MainPage.xmal修改为StudentView.xaml后放置到该目录下。
其次,简历ViewModels文件夹,新建一个类StudentViewModel.cs,放置到该目录下。
最后,原类型Student需要继续拆分,将作为领域模型部分的功能独立出来,放置到DomainModel文件夹下。最后的结果看起来如下:

1:领域模型DomainModel部分
view sourceprint?
2:视图View部分

3:ViewModel部分
view sourceprint?
4:若干解释
在这个简单的事例中,领域模型Student负责获取数据,而数据来源于何处不是我们关心的重点,所以,我们直接在Student中模拟了获取数据的过程,即Mock方法。
这相当于完成了一次OneWay的过程,即把后台数据推送到前台进行显示。这只能算是完成跟UI交互的一部分功能。UI交互还需要包括从UI中将数据持久化(如保存到数据库)。而UI跟后台的交互,就需要通过命令绑定的机制去实现了。
5:命令绑定
在本里中,我们演示两类命令,一类是属性类命令绑定,一类是事件类命令绑定。
首先,我们知道,VM负责UI和领域模型的联系,所以,绑定所支持的方法一定是在VM中,于是,我们在StudentViewModel中定义一个属性CanSubmit,及一个方法Submit:
view sourceprint?
view sourceprint?
注意,Submit方法中为了简单期间,使用了模拟方法。由于Mock方法中仍然可能设计到UI的变动(如随数据库的某些具体的值变动而变动),故领域模型Student可能也会需要继承NotificationObject,在本例中,Student改变为如下:
view sourceprint?
其次,需要改变VIEW,如下:

注意途中红线框起来的部分。
经过这一次的重构之后,基本满足了一个简单的MVVM模型的需要。代码下载在这里:http://files.cnblogs.com/luminji/SilverlightApplication2.rar
一:Prism的下载和安装
1:在http://compositewpf.codeplex.com/上下载最新的包。
下载完毕后,运行之,选择解压目录解压之。解压完毕的根目录下有chm帮助文档。
2:运行RegisterPrismBinaries.bat注册Prism组件,注册完毕才能在VS的引用中直接找到Prism组件,否则需要手动添加这些组件。
3:运行Silverlight Only - Basic MVVM QuickStart.bat可以打开一个MVVM的简单事例。
二:MVVM理解
1:现在,我们自己创建一个普通的SilverLight样例,并且将它逐步重构成为MVVM模式。
这个 普通的SL样例需求有:在界面上放置文本框用来显示Name和Button用来显示文本框中的Name的值。
前台:

后台:
SL的目录结构:

2:问题来了
如果我们需要让页面的值和Student实例的值保持一致,则必须要让类型继承自INotifyPropertyChanged接口,并像下面这样编码:
view sourceprint?
01 | public class Student: INotifyPropertyChanged |
02 | { |
03 | string firstName; |
04 | public string FirstName |
05 | { |
06 | get |
07 | { |
08 | return firstName; |
09 | } |
10 | set |
11 | { |
12 | firstName = value; |
13 | Notify( "FirstName" ); |
14 | } |
15 | } |
16 |
17 | string lastName; |
18 | public string LastName |
19 | { |
20 | get |
21 | { |
22 | return lastName; |
23 | } |
24 | set |
25 | { |
26 | lastName = value; |
27 | Notify( "LastName" ); |
28 | } |
29 | } |
30 |
31 | public Student( string firstName, string lastName) |
32 | { |
33 | this .firstName = firstName; |
34 | this .lastName = lastName; |
35 | } |
36 |
37 | void Notify( string propName) |
38 | { |
39 | if (PropertyChanged != null ) |
40 | { |
41 | PropertyChanged( this , new PropertyChangedEventArgs(propName)); |
42 | } |
43 | } |
44 |
45 | #region INotifyPropertyChanged Members |
46 | public event PropertyChangedEventHandler PropertyChanged; |
47 | #endregion |
48 | } |
3:现在,我们参照这两个类型,来实现自己的NotificationObject,以便加深印象
view sourceprint?
01 | public abstract class NotificationObject : INotifyPropertyChanged |
02 | { |
03 | public event PropertyChangedEventHandler PropertyChanged; |
04 |
05 | protected virtual void RaisePropertyChanged( string propertyName) |
06 | { |
07 | PropertyChangedEventHandler handler = this .PropertyChanged; |
08 | if (handler != null ) |
09 | { |
10 | handler( this , new PropertyChangedEventArgs(propertyName)); |
11 | } |
12 | } |
13 |
14 | protected void RaisePropertyChanged( params string [] propertyNames) |
15 | { |
16 | if (propertyNames == null ) throw new ArgumentNullException( "propertyNames" ); |
17 |
18 | foreach (var name in propertyNames) |
19 | { |
20 | this .RaisePropertyChanged(name); |
21 | } |
22 | } |
23 |
24 | protected void RaisePropertyChanged<T>(Expression<Func<T>> propertyExpression) |
25 | { |
26 | var propertyName = ExtractPropertyName(propertyExpression); |
27 | this .RaisePropertyChanged(propertyName); |
28 | } |
29 |
30 | public static string ExtractPropertyName<T>(Expression<Func<T>> propertyExpression) |
31 | { |
32 | if (propertyExpression == null ) |
33 | { |
34 | throw new ArgumentNullException( "propertyExpression" ); |
35 | } |
36 |
37 | var memberExpression = propertyExpression.Body as MemberExpression; |
38 | if (memberExpression == null ) |
39 | { |
40 | throw new ArgumentException( "PropertySupport_NotMemberAccessExpression_Exception" , "propertyExpression" ); |
41 | } |
42 |
43 | var property = memberExpression.Member as PropertyInfo; |
44 | if (property == null ) |
45 | { |
46 | throw new ArgumentException( "PropertySupport_ExpressionNotProperty_Exception" , "propertyExpression" ); |
47 | } |
48 |
49 | var getMethod = property.GetGetMethod( true ); |
50 | if (getMethod.IsStatic) |
51 | { |
52 | throw new ArgumentException( "PropertySupport_StaticExpression_Exception" , "propertyExpression" ); |
53 | } |
54 |
55 | return memberExpression.Member.Name; |
56 | } |
57 | } |
view sourceprint?
01 | public class Student: NotificationObject |
02 | { |
03 | string firstName; |
04 | public string FirstName |
05 | { |
06 | get |
07 | { |
08 | return firstName; |
09 | } |
10 | set |
11 | { |
12 | firstName = value; |
13 | //Notify("FirstName"); |
14 | this .RaisePropertyChanged( "FirstName" ); |
15 | } |
16 | } |
17 |
18 | string lastName; |
19 | public string LastName |
20 | { |
21 | get |
22 | { |
23 | return lastName; |
24 | } |
25 | set |
26 | { |
27 | lastName = value; |
28 | //Notify("LastName"); |
29 | this .RaisePropertyChanged( "LastName" ); |
30 | } |
31 | } |
32 |
33 | public Student( string firstName, string lastName) |
34 | { |
35 | this .firstName = firstName; |
36 | this .lastName = lastName; |
37 | } |
38 |
39 | } |
是实体Model,领域Model,还是别的什么?实际上,因为没有采用任何架构模式,当前的Student类型什么也不是,揉杂了很多功能。它既要负责提供属性,也要负责控制。
在MVVM架构模式中,和MVC称谓不同的地方,就是VM(ViewModel)部分。VM负责:接受View请求并决定调用哪个模型构件去处理请求,同时它还负责将数据返回给View进行显示。也就是说,VM完成的角色可以理解为MVC中的Control。(另外需要注意的一点是,在MVC中有一个概念叫做表现模型,所谓表现模型是领域模型的一个扁平化投影,不应和MVVM中的VIEW MODEL相混淆)。
所以,我们现在要明确这些概念。首先,将Student类型的功能细分化,VM的部分,我们跟页面名称对应起来应该叫做MainViewModel。实际项目中,功能页面会相应名为StudentView.xaml,则对应的VM名便称之为StudentViewModel.cs。我们继续重构上面的代码。
三:建立MVVM的各个部分
首先,建立View文件夹,然后,将MainPage.xmal修改为StudentView.xaml后放置到该目录下。
其次,简历ViewModels文件夹,新建一个类StudentViewModel.cs,放置到该目录下。
最后,原类型Student需要继续拆分,将作为领域模型部分的功能独立出来,放置到DomainModel文件夹下。最后的结果看起来如下:
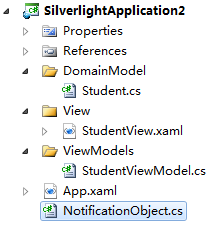
1:领域模型DomainModel部分
view sourceprint?
01 | public class Student |
02 | { |
03 | string firstName; |
04 | public string FirstName |
05 | { |
06 | get |
07 | { |
08 | return firstName; |
09 | } |
10 | set |
11 | { |
12 | firstName = value; |
13 | } |
14 | } |
15 |
16 | string lastName; |
17 | public string LastName |
18 | { |
19 | get |
20 | { |
21 | return lastName; |
22 | } |
23 | set |
24 | { |
25 | lastName = value; |
26 | } |
27 | } |
28 |
29 | public Student() |
30 | { |
31 | //模拟获取数据 |
32 | Mock(); |
33 | } |
34 |
35 | public void Mock() |
36 | { |
37 | FirstName= "firstName" + DateTime.Now.ToString(); |
38 | LastName= "lastName" + DateTime.Now.ToString(); |
39 | } |
40 |
41 | } |

3:ViewModel部分
view sourceprint?
01 | public class StudentViewModel : NotificationObject |
02 | { |
03 | public StudentViewModel() |
04 | { |
05 | student = new Student(); |
06 | } |
07 |
08 | Studentstudent; |
09 | public StudentStudent |
10 | { |
11 | get |
12 | { |
13 | return this .student; |
14 | } |
15 | private set |
16 | { |
17 | this .student =value; |
18 | this .RaisePropertyChanged(()=> this .student); |
19 | } |
20 | } |
21 | } |
在这个简单的事例中,领域模型Student负责获取数据,而数据来源于何处不是我们关心的重点,所以,我们直接在Student中模拟了获取数据的过程,即Mock方法。
这相当于完成了一次OneWay的过程,即把后台数据推送到前台进行显示。这只能算是完成跟UI交互的一部分功能。UI交互还需要包括从UI中将数据持久化(如保存到数据库)。而UI跟后台的交互,就需要通过命令绑定的机制去实现了。
5:命令绑定
在本里中,我们演示两类命令,一类是属性类命令绑定,一类是事件类命令绑定。
首先,我们知道,VM负责UI和领域模型的联系,所以,绑定所支持的方法一定是在VM中,于是,我们在StudentViewModel中定义一个属性CanSubmit,及一个方法Submit:
view sourceprint?
01 | public bool CanSubmit |
02 | { |
03 | get |
04 | { |
05 | return true ; |
06 | } |
07 | } |
08 |
09 | public void Submit() |
10 | { |
11 | student.Mock(); |
1 | } |
view sourceprint?
01 | public class Student: NotificationObject |
02 | { |
03 | string firstName; |
04 | public string FirstName |
05 | { |
06 | get |
07 | { |
08 | return firstName; |
09 | } |
10 | set |
11 | { |
12 | firstName = value; |
13 | this .RaisePropertyChanged( "FirstName" ); |
14 | } |
15 | } |
16 |
17 | string lastName; |
18 | public string LastName |
19 | { |
20 | get |
21 | { |
22 | return lastName; |
23 | } |
24 | set |
25 | { |
26 | lastName = value; |
27 | this .RaisePropertyChanged( "LastName" ); |
28 | } |
29 | } |
30 |
31 | public Student() |
32 | { |
33 | //模拟获取数据 |
34 | Mock(); |
35 | } |
36 |
37 | public void Mock() |
38 | { |
39 | FirstName= "firstName" + DateTime.Now.ToString(); |
40 | LastName= "lastName" + DateTime.Now.ToString(); |
41 | } |
42 |
43 | } |

注意途中红线框起来的部分。
经过这一次的重构之后,基本满足了一个简单的MVVM模型的需要。代码下载在这里:http://files.cnblogs.com/luminji/SilverlightApplication2.rar

相关文章推荐
- Prism安装、MVVM基础概念及一个简单的样例
- Prism安装、MVVM基础概念及一个简单的样例
- k8s技术预研1--通过一个简单实例认识k8s基础概念知识
- Apache Storm 的安装、配置及入门基础(三):一个简单的 topology
- WebService基础教程之一(概念,如何发布和调用一个简单的WebService)
- SQL SERVER BI 入门:(1)安装与基础概念
- 初学java--利用面向对象概念做一个简单的新闻系统
- 安装Thrift并写一个简单的测试程序
- 朋友是一个问题简单而又复杂的概念
- ubuntu 中安装memcache,并给出一个简单的实例·
- maven基础学习(二)-简单实例(编译-打包-安装)
- 【unity3d游戏开发之基础篇】unity3d射线的原理用法以及一个利用射线实现简单拾取的小例子
- 一个简单的C++样例(cpp1)
- 虚幻4Matinee功能 基本概念及简单演示样例(Sequence编辑器)
- 实时搜索引擎Elasticsearch(1)——基础概念、安装和运行
- 一步一个脚印学习WCF之二构建一个简单的WCF应用程序前必须掌握的WCF基础术语---地址(Addresses)
- 一个简单自定义屏幕,并调用word和excel的样例程序 1000弹出选择按钮
- 一步一个脚印学习WCF之二构建一个简单的WCF应用程序前必须掌握的WCF基础术语---契约(Contract)
- python---》客户端与服务端的基础(做一个简单的客户端与服务端)