WPF学习笔记1 WPF生命周期和参数配置
2011-05-13 22:01
501 查看
在WPF引擎中,一个WPF应用程序就是一个进程,由WPF中的Application类(System.Windows.Application)控制,就如同WF中的Runtime,负责WPF应用程序的生命周期,提供一些基本服务,先看个例子:
using System;
using System.Windows; // the home of the Application class
class Program
{
[STAThread]
static void Main()
{
Application app = new System.Windows.Application();
Window1 window = new Window1();
window.Show();
app.Run();
}
}
在一个控制台程序中,实例化了一个Application类,然后实例化了一个Window1窗体对象(假设已定义),显示这个窗体,然后run这个Application对象,一个WPF应用程序就开始了,WPF引擎便对这个应用程序提供消息传递和路由事件(后面会介绍)的服务响应事件和一些基本服务,直到run停止。我们看看有哪些服务:
Application的服务:
(1)当前Application实例的访问
当Application创建以后,可以通过Application.Current属性来访问当前的Application实例,如:
using System;
using System.Windows;
class Program
{
[STAThread]
static void Main()
{
// Fills in Application.Current
Application app = new System.Windows.Application();
Window1 window = new Window1();
window.Show();
Application.Current.Run(); // same as app.Run( )
}
}
这样,在不是创建Application类的其他模块代码中将会很方便的引用Application实例,以使用Application实例提供的其他服务。
(2)简化Application的创建:
上一个例子中,我们在static void Main( )入口函数中创建了Application类并运行了WPF程序,WPF引擎还提供了另外一种通用的方式,通过通用XAML文件创建:
<!-- App.xaml -->
<Application
x:Class="ImplicitAppSample.App"
xmlns="http://schemas.microsoft.com/winfx/2006/xaml/presentation"
xmlns:x="http://schemas.microsoft.com/winfx/2006/xaml" />
// App.xaml.cs
using System;
using System.Windows;
namespace ImplicitAppSample
{
public partial class App : System.Windows.Application
{
protected override void OnStartup(StartupEventArgs e)
{
// let the base class have a crack
base.OnStartup(e);
// WPF itself is providing the Main that creates an
// Application and calls the Run method; all we have
// to do is create a window and show it
Window1 window = new Window1();
window.Show();
}
}
}
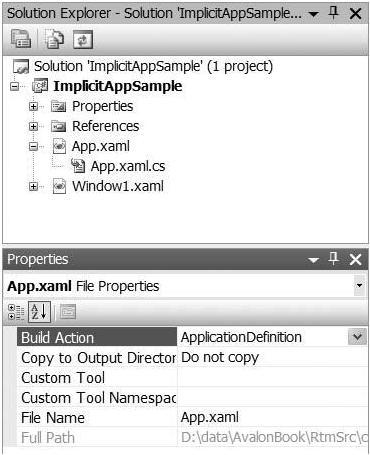
这是大部分WPF应用程序的创建方式,通过继承自System.Windows.Application的类App并在启动阶段实例化了一个窗体并显现,WPF就会为我们创建main函数并调用Application实例的run函数,从而启动Application进程。那main函数如何获得Application的实例呢,是通过ApplicationDefinition项来设置。
以上的配置等同于:
namespace ImplicitAppSample
{
public partial class App : Application
{
[System.STAThreadAttribute()]
[DebuggerNonUserCodeAttribute()]
public static void Main()
{
ImplicitAppSample.App app =
new ImplicitAppSample.App();
app.Run();
}
}
}
(3)进一步简化:
还可以在xaml文件中指定StartupUri属性以省略OnStartup的代码:
<Application
x:Class="ImplicitAppSample.App"
xmlns="http://schemas.microsoft.com/winfx/2006/xaml/presentation"
xmlns:x="http://schemas.microsoft.com/winfx/2006/xaml"
StartupUri="Window1.xaml" />
这段代码的作用如下:
l 创建一个Application类实例并将他设为Application.Current属性的值
l 创建一个由XAML文件中StartupUri属性指定的UI窗体
l 设定Application的MainWindow属性
l 调用Application的Run方法,保持应用程序运行直到“主窗体”被关闭。
(4)“主窗体”和top-level window:
Top-level 窗体是指没有父窗体的窗体,就是是指那些最上层的窗体不包含于某个窗体。
主窗体也是top-level窗体之一,它是指由MainWindow设定的,默认由Application创建后创建的第一个窗体,比如上面的例子,Window1就是主窗体,当然也可以在代码中设定更换。
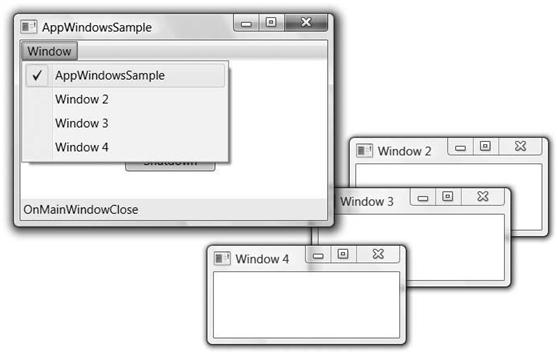
Application类还提供了一个Windows属性用于访问Application类的top-level窗体列表,在创建菜单项是尤为有用:
<Window ...>
<Grid>
<Grid.RowDefinitions>
<RowDefinition Height="auto" />
<RowDefinition />
<RowDefinition Height="auto" />
</Grid.RowDefinitions>
<Menu>
<MenuItem Header="Window" x:Name="windowMenu">
<MenuItem Header="dummy item" />
</MenuItem>
</Menu>
</Grid>
</Window>
MenuItem继承自HeaderedItemControl,包括一个header内容用于显示标题“window”和subcontent内容用于显示菜单项,我们先设定了一个菜单项。然后在代码中实现SubmenuOpened事件
public partial class Window1 : Window
{
。。。。。。
public Window1()
{
InitializeComponent();
windowMenu.SubmenuOpened += windowMenu_SubmenuOpened;
}
void windowMenu_SubmenuOpened(object sender, RoutedEventArgs e)
{
windowMenu.Items.Clear();
foreach (Window window in Application.Current.Windows)
{
MenuItem item = new MenuItem();
item.Header = window.Title;
item.Click += windowMenuItem_Click;
item.Tag = window;
item.IsChecked = window.IsActive;
windowMenu.Items.Add(item);
}
}
void windowMenuItem_Click(object sender, RoutedEventArgs e)
{
Window window = (Window)((MenuItem)sender).Tag;
window.Activate();
}
}
当菜单项被点击时,后台会获取Application类的所有top-level窗体然后绑定到菜单中
(5)Application关闭模式:
有些应用程序是单窗体的,如记事本,VS IDE等等,关闭窗体就关闭了整个应用程序,有些应用程序的多窗体的或是生命周期是独立于窗体的(如Office),这时候就根据ShutdownMode属性来觉得关闭应用程序的方式:
namespace System.Windows
{
public enum ShutdownMode
{
OnLastWindowClose = 0, // default
OnMainWindowClose = 1,
OnExplicitShutdown = 2,
}
}
OnMainWindowClose是单窗体应用程序的关闭模式,OnLastWindowClose是多窗体应用程序的关闭模式,另外,两种模式还可以调用Shutdown方法来关闭应用程序。在OnExplicitShutdown模式下,只能调用Shutdown方法来关闭应用程序。
public partial class Window1 : System.Windows.Window {
...
void shutdownButton_Click(object sender, RoutedEventArgs e) {
Application.Current.Shutdown();
}
}
你可以在代码中随时修改关闭模式属性,也可以通过xaml文件来配置:
<Application
x:Class="AppWindowsSample.App"
xmlns="http://schemas.microsoft.com/winfx/2006/xaml/presentation"
xmlns:x="http://schemas.microsoft.com/winfx/2006/xaml"
StartupUri="Window1.xaml"
ShutdownMode="OnExplicitShutdown" />
提示:虽然有很多中方式可以关闭应用程序,但是最好的方式还是调用Shutdown方法,在调用方法的过程中可以使窗体产生Closing和Closed的消息,从而在事件中停止关闭不应该关闭的情况。
(6)Application事件:
Application生命周期中提供的事件有:
• Startup
• Activated
• Deactivated
• DispatcherUnhandledException
• SessionEnding
• Exit
Startup事件:
当Application的run方法调用的时候引发的事件,这时候是适合做些全局初始化的操作,例如处理命令行参数
void App_Startup(object sender, StartupEventArgs e) {
for (int i = 0; i != e.Args.Length; ++i) {
// do something useful with each e.Args[i]
...
}
}
Activated和Deactivated事件:
当Application中的一个top level 窗体获得焦点时触发Activated事件,也就是应用程序被激活时。当用户从本应用程序切换到其他应用程序时触发Deactivated事件。这两个事件在恢复和暂停应用程序时非常有用:
void App_Activated(object sender, EventArgs e) {
ResumeGame( );
}
void App_Deactivated(object sender, EventArgs e) {
PauseGame( );
}
DispatcherUnhandledException事件
Dispatcher是将窗体事件路由到发生事件源的类,也包括对未处理异常的处理,在这个事件中可以做一些异常处理:
void App_DispatcherUnhandledException(
object sender, DispatcherUnhandledExceptionEventArgs e) {
string err = "Oops: " + e.Exception.Message);
MessageBox.Show(err, "Exception", MessageBoxButton.OK);
// Only useful if you've got some way of guaranteeing that
// your app can continue reliably in the face of an exception
// without leaving this AppDomain in an unreliable state...
//e.Handled = true; // stop exception from bringing down the app
}
SessionEnding事件:
当Windows的Session关闭时触发,如关机,注销或重启的时候:
void App_SessionEnding(object sender, SessionEndingCancelEventArgs e)
{
if (MessageBox.Show(
e.ReasonSessionEnding.ToString(),
"Session Ending",
MessageBoxButton.OKCancel) == MessageBoxResult.Cancel)
{
e.Cancel = true; // stop the session from ending
}
}
一共有两种类型:
namespace System.Windows
{
public enum ReasonSessionEnding
{
Logoff = 0,
Shutdown = 1,
}
}
Exit事件:
当Application退出时触发,无论最后一个窗体是否关闭,或是调用Shutdown方法,或是session关闭。
其中一个方法的重载返回int型数值,让你可以在喜欢的Win32APIs中调用,默认返回0,你也可以自己重新设定。
void App_Exit(object sender, ExitEventArgs e) {
e.ApplicationExitCode = 452; // keep 'em guessing...
}
(7)Application 实例化:
Window应用程序通常有单实例和多实例两种情况,比如Windows Media Player是单例的,不管打开多少次,只会有一个播放器进程,而记事本是多实例的,可以打开很多个记事本。在WPF中默认情况下是运行打开多个实例的,但是有时候我们可能需要限制这种情况,WPF提供了如下的方式:
public partial class App : System.Windows.Application
{
Mutex mutex;
protected override void OnStartup(StartupEventArgs e)
{
base.OnStartup(e);
// Check for existing instance
string mutexName = "MyCompanyName.MyAppName";
bool createdNew;
mutex = new Mutex(true, mutexName, out createdNew);
// If there is an existing instance, shut down this one
if (!createdNew) { Shutdown(); }
}
}
简单的在创建第一个Application实例的时候创建一个mutex实例并传入一个Application实例名,mutex实例就会和Application进程一起运行直到Application结束,这样当实例化第二Application实例的时候,就会判断是否已经存在同名的mutex,如果存在就关闭自身,从而保证只有第一个实例存在。
(8)其他服务:
Application还包括了资源服务,导航服务和ClickOnce部署服务,具体情况后面会介绍,其中ClickOnce类似于ASP.NET的ClickOnce服务,就不做讨论了。
配置文件的读和写
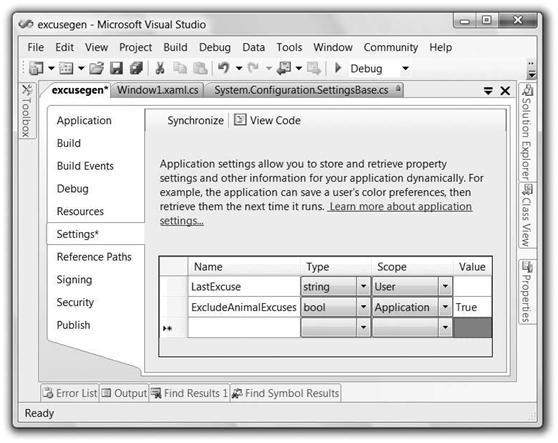
关于配置文件:.NET应用程序经常会使用配置文件的读取和修改,WPF中同样具有这个功能,右键点击资源管理器中的项目,然后选择属性选项,然后在属性选项卡中选择设置:我们先设定两个配置文件:
设置两个String类型的配置文件,点击保存,上面的操作就会生成一下的代码:
using namespace System.Configuration;
namespace excusegen.Properties
{
sealed partial class Settings : ApplicationSettingsBase
{
static Settings defaultInstance =
((Settings)(ApplicationSettingsBase.Synchronized(new Settings())));
public static Settings Default
{
get { return defaultInstance; }
}
[UserScopedSettingAttribute()]
[DefaultSettingValueAttribute("")]
public string LastExcuse
{
get { return ((string)(this["LastExcuse"])); }
set { this["LastExcuse"] = value; }
}
[ApplicationScopedSettingAttribute()]
[DefaultSettingValueAttribute("True")]
public bool ExcludeAnimalExcuses
{
get { return ((bool)(this["ExcludeAnimalExcuses"])); }
}
}
}
值得注意的是
1. defaultInstance是生成器为我们生成的用于同步化配置文件可以保证安全的多用户读取
2. defaultInstance通过static属性标识并且由Default属性返回可以很方便的引用
3. 用户类型的属性是可读可写的,而应用程序类型的属性是只读的
所有属性都是通过基类ApplicationSettingsBase以安全的方式调用的,包括读和写。
使用配置文件:通过我们定义的一个Settings实例的默认静态参数,我们可以像其他CLR的类一样访问配置属性:
public partial class Window1 : Window
{
string[] excuses = {...};
public Window1( )
{
InitializeComponent( );
this.newExcuseButton.Click += newExcuseButton_Click;
// If there is no "last excuse," show a random excuse
if( string.IsNullOrEmpty(Properties.Settings.Default.LastExcuse) )
{
ShowNextExcuse( );
}
// Show the excuse from the last session
else
{
excuseTextBlock.Text = Properties.Settings.Default.LastExcuse;
}
}
void newExcuseButton_Click(object sender, RoutedEventArgs e)
{
ShowNextExcuse( );
}
Random rnd = new Random( );
void ShowNextExcuse( )
{
// Pick a random excuse, saving it for the next session
// and checking for animals
do
{
Properties.Settings.Default.LastExcuse =
excuses[rnd.Next(excuses.Length - 1)];
}
while( Properties.Settings.Default.ExcludeAnimalExcuses &&HasAnimal(Properties.Settings.Default.LastExcuse) );
// Show the current excuse
excuseTextBlock.Text = Properties.Settings.Default.LastExcuse;
}
bool HasAnimal(string excuse) {...}
protected override void OnClosed(EventArgs e)
{
base.OnClosed(e);
// Save user settings between sessions
Properties.Settings.Default.Save();
}
}
我们通过Properties.Settings.Default.LastExcuse来获取LastExcuse的值,读取和修改,通过Properties.Settings.Default.Save();方法保存更新的数据。Setting是从ApplicationSettingsBase基类继承来的,他可以将配置数据保存在内存中,并且在需要的时候通知你数据的变化情况,他还在程序运行的时候自动读取配置数据并且在需要的时候保存修改。
整合配置文件到WPF中:因为ApplicationSettingsBase基类具备了更新通知的能力(他实现了INotifyPropertyChanged接口),我们可以像绑定其他数据一样去绑定配置文件(绑定的语法后面会详细提到),例如可以将LastExcuse绑定到TextBlock的Text属性,代替手动更新Text属性来显示LastExcuse的过程:
<window ... xmlns:local="clr-namespace:excusegen">
...
<TextBlock ...
Text="{Binding
Path=LastExcuse,
Source={x:Static local:Properties.Settings.Default}}" />
...
</window>
绑定完之后,当LastExcuse值变化后,TextBlock的Text属性就会跟着变化。例如:
Random rnd = new Random( );
void ShowNextExcuse( )
{
do
{
Properties.Settings.Default.LastExcuse =
excuses[rnd.Next(excuses.Length - 1)];
}
while( Properties.Settings.Default.ExcludeAnimalExcuses &&
HasAnimal(Properties.Settings.Default.LastExcuse) );
}
if ($ != jQuery) {
$ = jQuery.noConflict();
}
var isLogined = false;
var cb_blogId = 30686;
var cb_entryId = 1696122;
var cb_blogApp = "leochu2008";
var cb_blogUserGuid = "e4833d0b-63cf-dd11-9e4d-001cf0cd104b";
var cb_entryCreatedDate = '2010/3/25 20:24:00';
using System;
using System.Windows; // the home of the Application class
class Program
{
[STAThread]
static void Main()
{
Application app = new System.Windows.Application();
Window1 window = new Window1();
window.Show();
app.Run();
}
}
在一个控制台程序中,实例化了一个Application类,然后实例化了一个Window1窗体对象(假设已定义),显示这个窗体,然后run这个Application对象,一个WPF应用程序就开始了,WPF引擎便对这个应用程序提供消息传递和路由事件(后面会介绍)的服务响应事件和一些基本服务,直到run停止。我们看看有哪些服务:
Application的服务:
(1)当前Application实例的访问
当Application创建以后,可以通过Application.Current属性来访问当前的Application实例,如:
using System;
using System.Windows;
class Program
{
[STAThread]
static void Main()
{
// Fills in Application.Current
Application app = new System.Windows.Application();
Window1 window = new Window1();
window.Show();
Application.Current.Run(); // same as app.Run( )
}
}
这样,在不是创建Application类的其他模块代码中将会很方便的引用Application实例,以使用Application实例提供的其他服务。
(2)简化Application的创建:
上一个例子中,我们在static void Main( )入口函数中创建了Application类并运行了WPF程序,WPF引擎还提供了另外一种通用的方式,通过通用XAML文件创建:
<!-- App.xaml -->
<Application
x:Class="ImplicitAppSample.App"
xmlns="http://schemas.microsoft.com/winfx/2006/xaml/presentation"
xmlns:x="http://schemas.microsoft.com/winfx/2006/xaml" />
// App.xaml.cs
using System;
using System.Windows;
namespace ImplicitAppSample
{
public partial class App : System.Windows.Application
{
protected override void OnStartup(StartupEventArgs e)
{
// let the base class have a crack
base.OnStartup(e);
// WPF itself is providing the Main that creates an
// Application and calls the Run method; all we have
// to do is create a window and show it
Window1 window = new Window1();
window.Show();
}
}
}
这是大部分WPF应用程序的创建方式,通过继承自System.Windows.Application的类App并在启动阶段实例化了一个窗体并显现,WPF就会为我们创建main函数并调用Application实例的run函数,从而启动Application进程。那main函数如何获得Application的实例呢,是通过ApplicationDefinition项来设置。
以上的配置等同于:
namespace ImplicitAppSample
{
public partial class App : Application
{
[System.STAThreadAttribute()]
[DebuggerNonUserCodeAttribute()]
public static void Main()
{
ImplicitAppSample.App app =
new ImplicitAppSample.App();
app.Run();
}
}
}
(3)进一步简化:
还可以在xaml文件中指定StartupUri属性以省略OnStartup的代码:
<Application
x:Class="ImplicitAppSample.App"
xmlns="http://schemas.microsoft.com/winfx/2006/xaml/presentation"
xmlns:x="http://schemas.microsoft.com/winfx/2006/xaml"
StartupUri="Window1.xaml" />
这段代码的作用如下:
l 创建一个Application类实例并将他设为Application.Current属性的值
l 创建一个由XAML文件中StartupUri属性指定的UI窗体
l 设定Application的MainWindow属性
l 调用Application的Run方法,保持应用程序运行直到“主窗体”被关闭。
(4)“主窗体”和top-level window:
Top-level 窗体是指没有父窗体的窗体,就是是指那些最上层的窗体不包含于某个窗体。
主窗体也是top-level窗体之一,它是指由MainWindow设定的,默认由Application创建后创建的第一个窗体,比如上面的例子,Window1就是主窗体,当然也可以在代码中设定更换。
Application类还提供了一个Windows属性用于访问Application类的top-level窗体列表,在创建菜单项是尤为有用:
<Window ...>
<Grid>
<Grid.RowDefinitions>
<RowDefinition Height="auto" />
<RowDefinition />
<RowDefinition Height="auto" />
</Grid.RowDefinitions>
<Menu>
<MenuItem Header="Window" x:Name="windowMenu">
<MenuItem Header="dummy item" />
</MenuItem>
</Menu>
</Grid>
</Window>
MenuItem继承自HeaderedItemControl,包括一个header内容用于显示标题“window”和subcontent内容用于显示菜单项,我们先设定了一个菜单项。然后在代码中实现SubmenuOpened事件
public partial class Window1 : Window
{
。。。。。。
public Window1()
{
InitializeComponent();
windowMenu.SubmenuOpened += windowMenu_SubmenuOpened;
}
void windowMenu_SubmenuOpened(object sender, RoutedEventArgs e)
{
windowMenu.Items.Clear();
foreach (Window window in Application.Current.Windows)
{
MenuItem item = new MenuItem();
item.Header = window.Title;
item.Click += windowMenuItem_Click;
item.Tag = window;
item.IsChecked = window.IsActive;
windowMenu.Items.Add(item);
}
}
void windowMenuItem_Click(object sender, RoutedEventArgs e)
{
Window window = (Window)((MenuItem)sender).Tag;
window.Activate();
}
}
当菜单项被点击时,后台会获取Application类的所有top-level窗体然后绑定到菜单中
(5)Application关闭模式:
有些应用程序是单窗体的,如记事本,VS IDE等等,关闭窗体就关闭了整个应用程序,有些应用程序的多窗体的或是生命周期是独立于窗体的(如Office),这时候就根据ShutdownMode属性来觉得关闭应用程序的方式:
namespace System.Windows
{
public enum ShutdownMode
{
OnLastWindowClose = 0, // default
OnMainWindowClose = 1,
OnExplicitShutdown = 2,
}
}
OnMainWindowClose是单窗体应用程序的关闭模式,OnLastWindowClose是多窗体应用程序的关闭模式,另外,两种模式还可以调用Shutdown方法来关闭应用程序。在OnExplicitShutdown模式下,只能调用Shutdown方法来关闭应用程序。
public partial class Window1 : System.Windows.Window {
...
void shutdownButton_Click(object sender, RoutedEventArgs e) {
Application.Current.Shutdown();
}
}
你可以在代码中随时修改关闭模式属性,也可以通过xaml文件来配置:
<Application
x:Class="AppWindowsSample.App"
xmlns="http://schemas.microsoft.com/winfx/2006/xaml/presentation"
xmlns:x="http://schemas.microsoft.com/winfx/2006/xaml"
StartupUri="Window1.xaml"
ShutdownMode="OnExplicitShutdown" />
提示:虽然有很多中方式可以关闭应用程序,但是最好的方式还是调用Shutdown方法,在调用方法的过程中可以使窗体产生Closing和Closed的消息,从而在事件中停止关闭不应该关闭的情况。
(6)Application事件:
Application生命周期中提供的事件有:
• Startup
• Activated
• Deactivated
• DispatcherUnhandledException
• SessionEnding
• Exit
Startup事件:
当Application的run方法调用的时候引发的事件,这时候是适合做些全局初始化的操作,例如处理命令行参数
void App_Startup(object sender, StartupEventArgs e) {
for (int i = 0; i != e.Args.Length; ++i) {
// do something useful with each e.Args[i]
...
}
}
Activated和Deactivated事件:
当Application中的一个top level 窗体获得焦点时触发Activated事件,也就是应用程序被激活时。当用户从本应用程序切换到其他应用程序时触发Deactivated事件。这两个事件在恢复和暂停应用程序时非常有用:
void App_Activated(object sender, EventArgs e) {
ResumeGame( );
}
void App_Deactivated(object sender, EventArgs e) {
PauseGame( );
}
DispatcherUnhandledException事件
Dispatcher是将窗体事件路由到发生事件源的类,也包括对未处理异常的处理,在这个事件中可以做一些异常处理:
void App_DispatcherUnhandledException(
object sender, DispatcherUnhandledExceptionEventArgs e) {
string err = "Oops: " + e.Exception.Message);
MessageBox.Show(err, "Exception", MessageBoxButton.OK);
// Only useful if you've got some way of guaranteeing that
// your app can continue reliably in the face of an exception
// without leaving this AppDomain in an unreliable state...
//e.Handled = true; // stop exception from bringing down the app
}
SessionEnding事件:
当Windows的Session关闭时触发,如关机,注销或重启的时候:
void App_SessionEnding(object sender, SessionEndingCancelEventArgs e)
{
if (MessageBox.Show(
e.ReasonSessionEnding.ToString(),
"Session Ending",
MessageBoxButton.OKCancel) == MessageBoxResult.Cancel)
{
e.Cancel = true; // stop the session from ending
}
}
一共有两种类型:
namespace System.Windows
{
public enum ReasonSessionEnding
{
Logoff = 0,
Shutdown = 1,
}
}
Exit事件:
当Application退出时触发,无论最后一个窗体是否关闭,或是调用Shutdown方法,或是session关闭。
其中一个方法的重载返回int型数值,让你可以在喜欢的Win32APIs中调用,默认返回0,你也可以自己重新设定。
void App_Exit(object sender, ExitEventArgs e) {
e.ApplicationExitCode = 452; // keep 'em guessing...
}
(7)Application 实例化:
Window应用程序通常有单实例和多实例两种情况,比如Windows Media Player是单例的,不管打开多少次,只会有一个播放器进程,而记事本是多实例的,可以打开很多个记事本。在WPF中默认情况下是运行打开多个实例的,但是有时候我们可能需要限制这种情况,WPF提供了如下的方式:
public partial class App : System.Windows.Application
{
Mutex mutex;
protected override void OnStartup(StartupEventArgs e)
{
base.OnStartup(e);
// Check for existing instance
string mutexName = "MyCompanyName.MyAppName";
bool createdNew;
mutex = new Mutex(true, mutexName, out createdNew);
// If there is an existing instance, shut down this one
if (!createdNew) { Shutdown(); }
}
}
简单的在创建第一个Application实例的时候创建一个mutex实例并传入一个Application实例名,mutex实例就会和Application进程一起运行直到Application结束,这样当实例化第二Application实例的时候,就会判断是否已经存在同名的mutex,如果存在就关闭自身,从而保证只有第一个实例存在。
(8)其他服务:
Application还包括了资源服务,导航服务和ClickOnce部署服务,具体情况后面会介绍,其中ClickOnce类似于ASP.NET的ClickOnce服务,就不做讨论了。
配置文件的读和写
关于配置文件:.NET应用程序经常会使用配置文件的读取和修改,WPF中同样具有这个功能,右键点击资源管理器中的项目,然后选择属性选项,然后在属性选项卡中选择设置:我们先设定两个配置文件:
设置两个String类型的配置文件,点击保存,上面的操作就会生成一下的代码:
using namespace System.Configuration;
namespace excusegen.Properties
{
sealed partial class Settings : ApplicationSettingsBase
{
static Settings defaultInstance =
((Settings)(ApplicationSettingsBase.Synchronized(new Settings())));
public static Settings Default
{
get { return defaultInstance; }
}
[UserScopedSettingAttribute()]
[DefaultSettingValueAttribute("")]
public string LastExcuse
{
get { return ((string)(this["LastExcuse"])); }
set { this["LastExcuse"] = value; }
}
[ApplicationScopedSettingAttribute()]
[DefaultSettingValueAttribute("True")]
public bool ExcludeAnimalExcuses
{
get { return ((bool)(this["ExcludeAnimalExcuses"])); }
}
}
}
值得注意的是
1. defaultInstance是生成器为我们生成的用于同步化配置文件可以保证安全的多用户读取
2. defaultInstance通过static属性标识并且由Default属性返回可以很方便的引用
3. 用户类型的属性是可读可写的,而应用程序类型的属性是只读的
所有属性都是通过基类ApplicationSettingsBase以安全的方式调用的,包括读和写。
使用配置文件:通过我们定义的一个Settings实例的默认静态参数,我们可以像其他CLR的类一样访问配置属性:
public partial class Window1 : Window
{
string[] excuses = {...};
public Window1( )
{
InitializeComponent( );
this.newExcuseButton.Click += newExcuseButton_Click;
// If there is no "last excuse," show a random excuse
if( string.IsNullOrEmpty(Properties.Settings.Default.LastExcuse) )
{
ShowNextExcuse( );
}
// Show the excuse from the last session
else
{
excuseTextBlock.Text = Properties.Settings.Default.LastExcuse;
}
}
void newExcuseButton_Click(object sender, RoutedEventArgs e)
{
ShowNextExcuse( );
}
Random rnd = new Random( );
void ShowNextExcuse( )
{
// Pick a random excuse, saving it for the next session
// and checking for animals
do
{
Properties.Settings.Default.LastExcuse =
excuses[rnd.Next(excuses.Length - 1)];
}
while( Properties.Settings.Default.ExcludeAnimalExcuses &&HasAnimal(Properties.Settings.Default.LastExcuse) );
// Show the current excuse
excuseTextBlock.Text = Properties.Settings.Default.LastExcuse;
}
bool HasAnimal(string excuse) {...}
protected override void OnClosed(EventArgs e)
{
base.OnClosed(e);
// Save user settings between sessions
Properties.Settings.Default.Save();
}
}
我们通过Properties.Settings.Default.LastExcuse来获取LastExcuse的值,读取和修改,通过Properties.Settings.Default.Save();方法保存更新的数据。Setting是从ApplicationSettingsBase基类继承来的,他可以将配置数据保存在内存中,并且在需要的时候通知你数据的变化情况,他还在程序运行的时候自动读取配置数据并且在需要的时候保存修改。
整合配置文件到WPF中:因为ApplicationSettingsBase基类具备了更新通知的能力(他实现了INotifyPropertyChanged接口),我们可以像绑定其他数据一样去绑定配置文件(绑定的语法后面会详细提到),例如可以将LastExcuse绑定到TextBlock的Text属性,代替手动更新Text属性来显示LastExcuse的过程:
<window ... xmlns:local="clr-namespace:excusegen">
...
<TextBlock ...
Text="{Binding
Path=LastExcuse,
Source={x:Static local:Properties.Settings.Default}}" />
...
</window>
绑定完之后,当LastExcuse值变化后,TextBlock的Text属性就会跟着变化。例如:
Random rnd = new Random( );
void ShowNextExcuse( )
{
do
{
Properties.Settings.Default.LastExcuse =
excuses[rnd.Next(excuses.Length - 1)];
}
while( Properties.Settings.Default.ExcludeAnimalExcuses &&
HasAnimal(Properties.Settings.Default.LastExcuse) );
}
if ($ != jQuery) {
$ = jQuery.noConflict();
}
var isLogined = false;
var cb_blogId = 30686;
var cb_entryId = 1696122;
var cb_blogApp = "leochu2008";
var cb_blogUserGuid = "e4833d0b-63cf-dd11-9e4d-001cf0cd104b";
var cb_entryCreatedDate = '2010/3/25 20:24:00';

相关文章推荐
- WPF学习笔记1 WPF生命周期和参数配置
- Flume学习笔记及配置参数详解
- Flume学习笔记及配置参数详解
- 深度学习笔记——Solver超参数配置文件
- Flume学习笔记及配置参数详解
- Redis学习笔记--Redis配置文件redis.conf参数配置详解
- zookeeper3.3学习笔记2:配置参数介绍
- Flume学习笔记及配置参数详解
- 第二章--第一节:软件的生命周期和配置管理(软件构造学习笔记)
- Caffe实例开发学习笔记。——网络配置文件 Layer参数详解——
- Flume学习笔记及配置参数详解
- Flume学习笔记及配置参数详解
- Flume学习笔记及配置参数详解
- Flume学习笔记及配置参数详解
- spring学习笔记整理--04(配置Spring管理的bean的作用域、生命周期)
- Flume学习笔记及配置参数详解
- Springboot学习笔记之读取全局配置文件参数
- Flume学习笔记及配置参数详解
- YII2 学习笔记 --- Application 常用配置参数
- Java 学习笔记之读取jdbc.propertyes配置参数