WPF布局控件
2011-05-06 22:45
330 查看
一、 Grid
a. 单元格的宽度可以设置三类值
绝对值:double数值加单位后缀
比例值:double数值加一个星号*
自动值: auto,高度将有内部的控件的高度和宽度决定。
b. Grid可接受的宽度和高度的单位
1in=96px
1cm=(96/2.54)px
1pt=(96/72) px
c. 示例
view sourceprint?

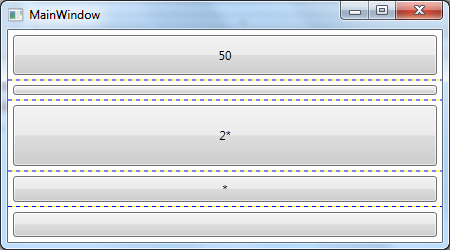
如果没有设置height,实际上这个height默认被设置为1*, 这里说一下星号(*),解析器会把左右比例值加起来作为分母,把每个比例值做为分子,乘以未被占用的像素数,这样就算出每一个具体的值。
我们假设总高为200,那么上面的2*=(2/(2+1+1))*(200-70)=(1/2)*130=65
另外可以像HTML表格一样使用RowSpan和ColumnSpan
2. StackPanel
控件从左向右或者从上向下排列控件,有一个Orientation枚举,还可以使用HorizontalAlignment和VerticalAlignment来进行对齐。
3. Canvas
使用横纵坐标绝对点定位,很好理解,使用Canvas.Left, Canvas.Top来定位
4. DockPanel
DockPanel使用Dock属性来定位,DockPanel.Dock枚举可取值Left, Top, Right, Bottom四个值,下一个元素会使用剩下方向的全部空间,所以控件摆放顺序会影响布局。Dock布局的一个好处是缩放不会改变相对位置。
view sourceprint?

5. WrapPanel
这个和StatckPanel类似,就是排不下的控件会新起一行或者一列
a. 单元格的宽度可以设置三类值
绝对值:double数值加单位后缀
比例值:double数值加一个星号*
自动值: auto,高度将有内部的控件的高度和宽度决定。
b. Grid可接受的宽度和高度的单位
1in=96px
1cm=(96/2.54)px
1pt=(96/72) px
c. 示例
view sourceprint?
01 | <Window x:Class= "DeepXAML.MainWindow" |
02 | xmlns= "http://schemas.microsoft.com/winfx/2006/xaml/presentation" |
03 | xmlns:x= "http://schemas.microsoft.com/winfx/2006/xaml" |
04 | xmlns:local= "clr-namespace:DeepXAML" |
05 | Title= "MainWindow" Height= "250" Width= "450" > |
06 | <Window.Resources> |
07 | <Style TargetType= "Button" > |
08 | <Setter Property= "Margin" Value= "5" ></Setter> |
09 | </Style> |
10 | </Window.Resources> |
11 | <Grid ShowGridLines= "True" > |
12 | <Grid.RowDefinitions> |
13 | <RowDefinition Height= "50" ></RowDefinition> |
14 | <RowDefinition Height= "20" ></RowDefinition> |
15 | <RowDefinition Height= "2*" ></RowDefinition> |
16 | <RowDefinition Height= "*" ></RowDefinition> |
17 | <RowDefinition></RowDefinition> |
18 | </Grid.RowDefinitions> |
19 | <Button Grid.Row= "0" >50</Button> |
20 | <Button Grid.Row= "1" >20</Button> |
21 | <Button Grid.Row= "2" >2*</Button> |
22 | <Button Grid.Row= "3" >*</Button> |
23 | <Button Grid.Row= "4" ></Button> |
24 | </Grid> |
25 | </Window> |
如果没有设置height,实际上这个height默认被设置为1*, 这里说一下星号(*),解析器会把左右比例值加起来作为分母,把每个比例值做为分子,乘以未被占用的像素数,这样就算出每一个具体的值。
我们假设总高为200,那么上面的2*=(2/(2+1+1))*(200-70)=(1/2)*130=65
另外可以像HTML表格一样使用RowSpan和ColumnSpan
2. StackPanel
控件从左向右或者从上向下排列控件,有一个Orientation枚举,还可以使用HorizontalAlignment和VerticalAlignment来进行对齐。
3. Canvas
使用横纵坐标绝对点定位,很好理解,使用Canvas.Left, Canvas.Top来定位
4. DockPanel
DockPanel使用Dock属性来定位,DockPanel.Dock枚举可取值Left, Top, Right, Bottom四个值,下一个元素会使用剩下方向的全部空间,所以控件摆放顺序会影响布局。Dock布局的一个好处是缩放不会改变相对位置。
view sourceprint?
01 | <Window x:Class= "DeepXAML.MainWindow" |
02 | xmlns= "http://schemas.microsoft.com/winfx/2006/xaml/presentation" |
03 | xmlns:x= "http://schemas.microsoft.com/winfx/2006/xaml" |
04 | xmlns:local= "clr-namespace:DeepXAML" |
05 | Title= "MainWindow" Height= "250" Width= "450" > |
06 | <Window.Resources> |
07 | <Style TargetType= "Button" > |
08 | <Setter Property= "Margin" Value= "5" ></Setter> |
09 | </Style> |
10 | </Window.Resources> |
11 | <Grid ShowGridLines= "True" > |
12 | <DockPanel > |
13 | <Button DockPanel.Dock= "Top" >Top</Button> |
14 | <Button DockPanel.Dock= "Left" Background= "Yellow" >Left</Button> |
15 | <Button DockPanel.Dock= "Left" Background= "LemonChiffon" >Left</Button> |
16 | <Button DockPanel.Dock= "Top" >Top</Button> |
17 | <Button DockPanel.Dock= "Right" >Right</Button> |
18 | <Button DockPanel.Dock= "Left" >Left</Button> |
19 | <Rectangle Fill= "Crimson" ></Rectangle> |
20 | </DockPanel> |
21 | </Grid> |
22 | </Window> |

5. WrapPanel
这个和StatckPanel类似,就是排不下的控件会新起一行或者一列

相关文章推荐
- 【C#/WPF】GridSplitter 分割布局,拖拽控件分隔栏以改变控件尺寸
- WPF 布局控件 之 StatickPanel
- WPF-Grid布局控件学习
- 一、WPF布局之让你的控件随着窗口等比放大缩小,适应多分辨率满屏填充应用
- WPF中的控件布局
- WPF 布局控件 之 Canvas
- 深入浅出WPF 之 控件与布局
- WPF小结(一&二) 布局和控件
- WPF基础知识、界面布局及控件Binding
- WPF布局控件常用属性介绍
- wpf之布局控件stackpanel、wrappanel、dockpanel的前世今生
- wpf中利用布局动态添加控件
- WPF布局(2)-控件拖动
- WPF自学入门(二)WPF-XAML布局控件
- WPF布局控件AvalonDock介绍以及应用中遇到的一个问题
- Qt和WPF比较---控件布局和消息响应
- WPF 控件与布局
- WPF 布局控件 之 WrapPanel
- 深入浅出WPF----第五章----控件与布局
- C#学习笔记-WPF前端布局和控件的使用