Linux Heartbeat实现高可用集群及在VirtualBox虚拟环境下的测试
2011-03-24 18:33
459 查看
【本文环境】VirtualBox 4.0.4,CentOS 5.5 x64
Heartbeat[1]是Linux下最常用的HA方案之一,主要为了解决集群前置服务器的单点失效问题。Heartbeat顾名思义可以在两台电脑间通过心跳信号来互相探测对方是否正常工作,因此,这两台电脑间需要有相应的物理介质连接起来。在这里,我并没有使用额外的网线(CAT-5双绞线[2])和网卡来实现,而是采用了串口线来建立心跳连接。
这样,在VirtualBox虚拟环境中,虚拟机间还需要使用一个虚拟的串口互相连接,这还需要一个软件的配合:Named Pipe TCP Proxy。如图 1,在本机上通过Named Pipe TCP Proxy可以新建一个命名管道,这样运行于本机上的虚拟机就可以将虚拟机串口的I/O重定向到这个管道上,如果两个虚拟机都定向到这个管道的时候,就相当于两个虚拟机通过一根串口线连接到了一起。


图 1 在Named Pipe TCP Proxy中新建管道连接
这样,在创建Linux虚拟机的时候,两个虚拟机就都使用“//./pipe/vbox”作为虚拟串口,唯一的区别是首先启动的虚拟机需要勾选“创建通道”选项,如图 2。

图 2 Linux虚拟机的串口设置
分别启动两个Linux虚拟机,首先验证一下两台虚拟机是否虚拟地通过串口连接到了一起。为了便于区分,我这里用这两台虚拟机的机器名分别代表它们:wuyfcentos1(IP:192.168.2.101)和wuyfcentos2(IP:192.168.2.102)。我们可以分别在两台虚拟机上打开终端,在wuyfcentos1上执行命令:
[root@wuyfcentos1 ~]# cat < /dev/ttyS0
这样,输入到这个虚拟机COM1串口的数据都会在控制台中打印出来,如果我们在wuyfcentos2虚拟机上执行echo命令:
[root@wuyfcentos2 ~]# echo 'test serial connection' > /dev/ttyS0
在wuyfcentos1上可以看到这段文本:
[root@wuyfcentos1 ~]# cat < /dev/ttyS0
test serial connection
这样表明,从wuyfcentos1串口发送的数据可以被wuyfcentos2串口接收到,两台虚拟机相当于通过串口线连接在了一起。
下面,就要使用Linux Heartbeat,在CentOS上可以通过yum的安装:
[root@wuyfcentos1 ~]# yum install heartbeat
Linux Heartbeat通过配置文件配置,配置文件均位于/etc/ha.d/目录下,一个Heartbeat集群节点需要3个配置文件:“ha.cf”、”authkeys”、“haresources”,这都需要手动创建,让我们分别来看这3个配置文件的内容:
“ha.cf”:
serial /dev/ttyS0 #使用串口,串口为/dev/ttyS0
baud 19200 #通讯使用的波特率
auto_failback on
autojoin none
warntime 5
deadtime 15
initdead 60
keepalive 1
node wuyfcentos1.localdomain #节点1
node wuyfcentos2.localdomain #节点2
这个文件详细怎么配置可以参考:
http://www.linux-ha.org/doc/users-guide/_creating_an_initial_heartbeat_configuration.html#_the_literal_ha_cf_literal_file
http://www.linux-ha.org/ha.cf
“authkeys”:
auth 1
1 crc
注意,这个文件必须是600权限,所以新建文件后需要运行命令:
[root@wuyfcentos1 ~]# chmod 600 authkeys
这个文件详细怎么配置可以参考:
http://www.linux-ha.org/doc/users-guide/_the_literal_authkeys_literal_file.html
http://www.linux-ha.org/authkeys
“haresources”:
wuyfcentos1.localdomain 192.168.2.100 httpd
这是wuyfcentos1这个虚拟机的配置,表明Heartbeat使用的集群IP为“192.168.2.100”,并且,Heartbeat管理的服务是httpd,因为我们希望将两台服务器的Apache进行一个互备。
最后我们还需要把Heartbeat注册为系统服务:
[root@wuyfcentos1 ~]# chkconfig --list heartbeat
[root@wuyfcentos1 ~]# chkconfig heartbeat on
修改完Heartbeat的配置文件后,通过reload命令重新加载:
[root@wuyfcentos1 ~]# service heartbeat reload
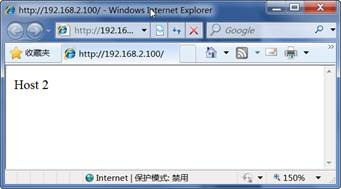
我在wuyfcentos1和wuyfcentos2下的/var/www/html下放置了不同的index.html文件,如果我直接访问Heartbeat集群IP:http://192.168.2.100,看到的页面是wuyfcentos2上的页面:

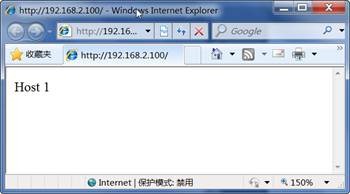
这时,强行杀死wuyfcentos2虚拟机进程,刷新页面马上变成了wuyfcentos1上的页面:

再把wuyfcentos2虚拟机启动起来后,刷新页面也会再切回到wuyfcentos2的页面,因为wuyfcentos1将资源重新交还到wuyfcentos2手中,这个时候在后台日志中可以看到这样的信息:
Mar 24 11:23:46 wuyfcentos1 heartbeat: [19364]: info: Heartbeat restart on node wuyfcentos2.localdomain
Mar 24 11:23:46 wuyfcentos1 heartbeat: [19364]: info: Link wuyfcentos2.localdomain:/dev/ttyS0 up.
Mar 24 11:23:46 wuyfcentos1 heartbeat: [19364]: info: Status update for node wuyfcentos2.localdomain: status up
Mar 24 11:23:46 wuyfcentos1 harc[20082]: [20088]: info: Running /etc/ha.d/rc.d/status status
Mar 24 11:23:48 wuyfcentos1 heartbeat: [19364]: info: Status update for node wuyfcentos2.localdomain: status active
Mar 24 11:23:48 wuyfcentos1 harc[20094]: [20100]: info: Running /etc/ha.d/rc.d/status status
Mar 24 11:23:48 wuyfcentos1 heartbeat: [19364]: info: remote resource transition completed.
Mar 24 11:23:48 wuyfcentos1 heartbeat: [19364]: info: wuyfcentos1.localdomain wants to go standby [foreign]
Mar 24 11:23:49 wuyfcentos1 heartbeat: [19364]: info: standby: wuyfcentos2.localdomain can take ourforeign resources
Mar 24 11:23:49 wuyfcentos1 heartbeat: [20106]: info: give up foreign HA resources (standby).
Mar 24 11:23:49 wuyfcentos1 heartbeat: [20106]: info: foreign HA resource release completed (standby).
Mar 24 11:23:49 wuyfcentos1 heartbeat: [19364]: info: Local standby process completed [foreign].
[1] http://www.linux-ha.org/wiki/Heartbeat
[2] http://zh.wikipedia.org/zh/CAT-5
Heartbeat[1]是Linux下最常用的HA方案之一,主要为了解决集群前置服务器的单点失效问题。Heartbeat顾名思义可以在两台电脑间通过心跳信号来互相探测对方是否正常工作,因此,这两台电脑间需要有相应的物理介质连接起来。在这里,我并没有使用额外的网线(CAT-5双绞线[2])和网卡来实现,而是采用了串口线来建立心跳连接。
这样,在VirtualBox虚拟环境中,虚拟机间还需要使用一个虚拟的串口互相连接,这还需要一个软件的配合:Named Pipe TCP Proxy。如图 1,在本机上通过Named Pipe TCP Proxy可以新建一个命名管道,这样运行于本机上的虚拟机就可以将虚拟机串口的I/O重定向到这个管道上,如果两个虚拟机都定向到这个管道的时候,就相当于两个虚拟机通过一根串口线连接到了一起。
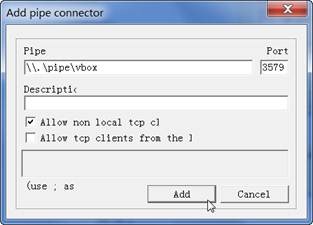
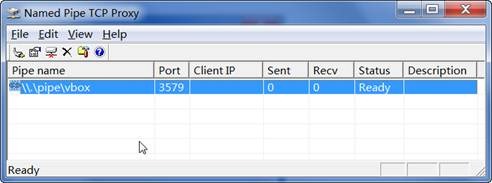
图 1 在Named Pipe TCP Proxy中新建管道连接
这样,在创建Linux虚拟机的时候,两个虚拟机就都使用“//./pipe/vbox”作为虚拟串口,唯一的区别是首先启动的虚拟机需要勾选“创建通道”选项,如图 2。

图 2 Linux虚拟机的串口设置
分别启动两个Linux虚拟机,首先验证一下两台虚拟机是否虚拟地通过串口连接到了一起。为了便于区分,我这里用这两台虚拟机的机器名分别代表它们:wuyfcentos1(IP:192.168.2.101)和wuyfcentos2(IP:192.168.2.102)。我们可以分别在两台虚拟机上打开终端,在wuyfcentos1上执行命令:
[root@wuyfcentos1 ~]# cat < /dev/ttyS0
这样,输入到这个虚拟机COM1串口的数据都会在控制台中打印出来,如果我们在wuyfcentos2虚拟机上执行echo命令:
[root@wuyfcentos2 ~]# echo 'test serial connection' > /dev/ttyS0
在wuyfcentos1上可以看到这段文本:
[root@wuyfcentos1 ~]# cat < /dev/ttyS0
test serial connection
这样表明,从wuyfcentos1串口发送的数据可以被wuyfcentos2串口接收到,两台虚拟机相当于通过串口线连接在了一起。
下面,就要使用Linux Heartbeat,在CentOS上可以通过yum的安装:
[root@wuyfcentos1 ~]# yum install heartbeat
Linux Heartbeat通过配置文件配置,配置文件均位于/etc/ha.d/目录下,一个Heartbeat集群节点需要3个配置文件:“ha.cf”、”authkeys”、“haresources”,这都需要手动创建,让我们分别来看这3个配置文件的内容:
“ha.cf”:
serial /dev/ttyS0 #使用串口,串口为/dev/ttyS0
baud 19200 #通讯使用的波特率
auto_failback on
autojoin none
warntime 5
deadtime 15
initdead 60
keepalive 1
node wuyfcentos1.localdomain #节点1
node wuyfcentos2.localdomain #节点2
这个文件详细怎么配置可以参考:
http://www.linux-ha.org/doc/users-guide/_creating_an_initial_heartbeat_configuration.html#_the_literal_ha_cf_literal_file
http://www.linux-ha.org/ha.cf
“authkeys”:
auth 1
1 crc
注意,这个文件必须是600权限,所以新建文件后需要运行命令:
[root@wuyfcentos1 ~]# chmod 600 authkeys
这个文件详细怎么配置可以参考:
http://www.linux-ha.org/doc/users-guide/_the_literal_authkeys_literal_file.html
http://www.linux-ha.org/authkeys
“haresources”:
wuyfcentos1.localdomain 192.168.2.100 httpd
这是wuyfcentos1这个虚拟机的配置,表明Heartbeat使用的集群IP为“192.168.2.100”,并且,Heartbeat管理的服务是httpd,因为我们希望将两台服务器的Apache进行一个互备。
最后我们还需要把Heartbeat注册为系统服务:
[root@wuyfcentos1 ~]# chkconfig --list heartbeat
[root@wuyfcentos1 ~]# chkconfig heartbeat on
修改完Heartbeat的配置文件后,通过reload命令重新加载:
[root@wuyfcentos1 ~]# service heartbeat reload
我在wuyfcentos1和wuyfcentos2下的/var/www/html下放置了不同的index.html文件,如果我直接访问Heartbeat集群IP:http://192.168.2.100,看到的页面是wuyfcentos2上的页面:
这时,强行杀死wuyfcentos2虚拟机进程,刷新页面马上变成了wuyfcentos1上的页面:
再把wuyfcentos2虚拟机启动起来后,刷新页面也会再切回到wuyfcentos2的页面,因为wuyfcentos1将资源重新交还到wuyfcentos2手中,这个时候在后台日志中可以看到这样的信息:
Mar 24 11:23:46 wuyfcentos1 heartbeat: [19364]: info: Heartbeat restart on node wuyfcentos2.localdomain
Mar 24 11:23:46 wuyfcentos1 heartbeat: [19364]: info: Link wuyfcentos2.localdomain:/dev/ttyS0 up.
Mar 24 11:23:46 wuyfcentos1 heartbeat: [19364]: info: Status update for node wuyfcentos2.localdomain: status up
Mar 24 11:23:46 wuyfcentos1 harc[20082]: [20088]: info: Running /etc/ha.d/rc.d/status status
Mar 24 11:23:48 wuyfcentos1 heartbeat: [19364]: info: Status update for node wuyfcentos2.localdomain: status active
Mar 24 11:23:48 wuyfcentos1 harc[20094]: [20100]: info: Running /etc/ha.d/rc.d/status status
Mar 24 11:23:48 wuyfcentos1 heartbeat: [19364]: info: remote resource transition completed.
Mar 24 11:23:48 wuyfcentos1 heartbeat: [19364]: info: wuyfcentos1.localdomain wants to go standby [foreign]
Mar 24 11:23:49 wuyfcentos1 heartbeat: [19364]: info: standby: wuyfcentos2.localdomain can take ourforeign resources
Mar 24 11:23:49 wuyfcentos1 heartbeat: [20106]: info: give up foreign HA resources (standby).
Mar 24 11:23:49 wuyfcentos1 heartbeat: [20106]: info: foreign HA resource release completed (standby).
Mar 24 11:23:49 wuyfcentos1 heartbeat: [19364]: info: Local standby process completed [foreign].
[1] http://www.linux-ha.org/wiki/Heartbeat
[2] http://zh.wikipedia.org/zh/CAT-5

相关文章推荐
- 迁移 linux系统,实现测试环境的快速部署
- wampserver配置本地测试环境_虚拟主机实现多站点
- VirtualBox双网卡搭建Linux虚拟实验环境
- wampserver配置本地测试环境_虚拟主机实现多站点
- linux环境下C语言实现非阻塞方式读取字符串数据的串口测试程序,即串口工具的编写
- Linux环境下如何实用ab命令实现接口的性能测试
- systemc-2-3.0的安装、配置和测试。(linux环境)附加window下的连接
- linux系统中利用vagrant创建虚拟开发环境
- jmeter 在linux服务器的安装和运行; linux环境下使用jmeter进行压力测试
- 实现项目本地,测试,生产3套环境
- 在linux环境下搭建java web测试环境(非常详细!!)
- Windows和Linux环境,网络异常模拟测试方法【转载自光荣之路微信公众号】
- Enterprise Solution 虚拟测试环境
- Linux环境下实现简单进度条
- Linux 查看系统硬件信息(实例详解) ubuntu的测试环境
- Python虚拟环境Virtualenv分别在Windows和Linux上的安装和使用
- Linux环境测试管道容量
- 实现Linux与Windows共享以及PC版开源Qt5.8的环境搭建
- CentOS linux 高可用集群之heartbeat
- 谈虚拟环境中设备访问的实现方法(上)