为您的.NET网站增加OpenID,Window Live,人人网等多种登录方式之一: 增加OpenID登录
2011-03-09 16:40
302 查看
OpenID在国外很流行. 在国内就不怎么样了.. 很多网站,论坛都不支持. 经常在网上逛的人,几乎都要注册很多帐号,记很多密码. 或者是帐号和密码都设定一样.呵. 我在想,如果国内大量的论坛都支持OpenID登录,那么,将会多爽!
不了解OpenID的朋友可以看中文
,或英文http://www.openid.net
的介绍.
本人最近做的一个网站( http://www.86e0.com
) 有用到OpenID的登录(当然还有其它的登录方式,慢慢会说到). 一开始我也是狂找资料,中文的,英文的都找过了.可惜的是,资料少得很. 下面总结一些经验和分享一些代码.
.NET下使用OpenID,首先要去下载一个第三方组件:dotnetopenauth. 网址为: http://www.dotnetopenauth.net/
压缩包里会有示例. 由于我的项目是用Asp.NET MVC2,所以我直接看OpenIdRelyingPartyMvc 这个示例. 示例是Asp.net MVC1.0版的.很快我们就可以找出他的关键代码:
HTML为:
view source
print
?
Action为:
view source
print
?
最后在HomeController 的Index Action(就是主页)增加 X-XRDS-Location 的Header. Xrds Action是输出上面的Xrds View.如下: 其中请注意xrds的地址. 代码如下.
view source
print
?
XRDS 的View为:
view source
print
?
这样就OK啰. 这只是简单的用法. 因为这个只返回很少信息.
一般只有两个,一个是:FriendlyIdentifierForDisplay ,就是用户名,一个是ClaimedIdentifier,
是用户的标识. 如果是这样用就OK,那我这文章也写得没什么意义了.呵.
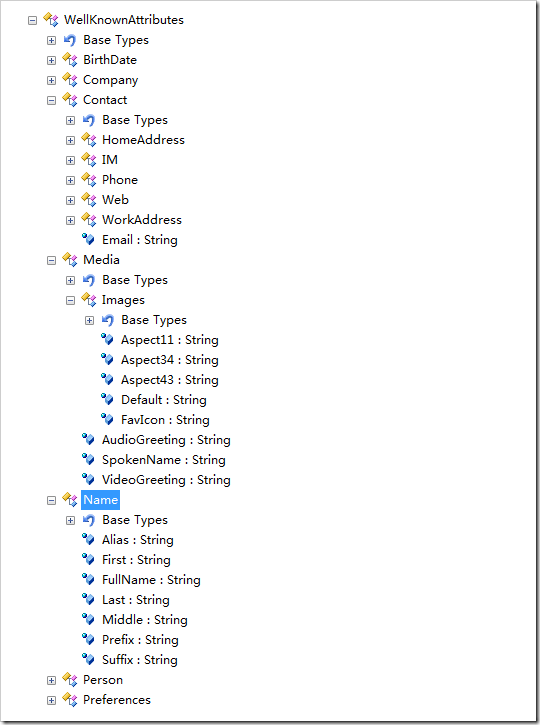
因为一般我们还要抓到用户的Email,和个性图标.等等一些有用的东西.但是默认的是不返回的.
先看看可以返回什么信息. DotNetOpenAuth中有一个WellKnownAttributes 类,这个类中定义了一系列可以返回的信息. 下面是这个类的抓图:
如何获取这些信息呢? 请看下面的示例代码 :
view source
print
?
这样创建请求就可以成功获取你想要的信息了,这里是请求获取 Email,姓名,个性图标.
注意我注释了的代码,一开始我也用这样,但是,这个无法获取个性图标.
最后,最后很关键喔.. 配置文件!! 对.. 一开始我因为没注意这个,花了不少时间.. ======
http://www.86e0.com
用的配置文件如下,基本是抄OpenIdRelyingPartyMvc 这个示例的.
view source
print
?
好了,现在基本没问题了.
剩下就是在登录成功后获取这些信息了. 相关的代码如下:
view source
print
?
http://kb.cnblogs.com/a/1724577/
不了解OpenID的朋友可以看中文
,或英文http://www.openid.net
的介绍.
本人最近做的一个网站( http://www.86e0.com
) 有用到OpenID的登录(当然还有其它的登录方式,慢慢会说到). 一开始我也是狂找资料,中文的,英文的都找过了.可惜的是,资料少得很. 下面总结一些经验和分享一些代码.
.NET下使用OpenID,首先要去下载一个第三方组件:dotnetopenauth. 网址为: http://www.dotnetopenauth.net/
压缩包里会有示例. 由于我的项目是用Asp.NET MVC2,所以我直接看OpenIdRelyingPartyMvc 这个示例. 示例是Asp.net MVC1.0版的.很快我们就可以找出他的关键代码:
HTML为:
view source
?
1 | < form action = "Authenticate?ReturnUrl=<%=HttpUtility.UrlEncode(Request.QueryString[" ReturnUrl"]) %>" method="post"> |
2 | < label for = "openid_identifier" >OpenID: </ label > |
3 | < input id = "openid_identifier" name = "openid_identifier" size = "40" /> |
4 | < input type = "submit" value = "Login" /> |
5 | </ form > |
view source
?
01 | [ValidateInput( false )] |
02 | public ActionResult Authenticate( string returnUrl) { |
03 | var response = openid.GetResponse(); |
04 | if (response == null ) { |
05 | // Stage 2: user submitting Identifier |
06 | Identifier id; |
07 | if (Identifier.TryParse(Request.Form[ "openid_identifier" ], out id)) { |
08 | try { |
09 | return openid.CreateRequest(Request.Form[ "openid_identifier" ]).RedirectingResponse.AsActionResult(); |
10 | } catch (ProtocolException ex) { |
11 | ViewData[ "Message" ] =ex.Message; |
12 | return View( "Login" ); |
13 | } |
14 | } else { |
15 | ViewData[ "Message" ] = "Invalid identifier" ; |
16 | return View( "Login" ); |
17 | } |
18 | } else { |
19 | // Stage 3: OpenID Provider sending assertion response |
20 | switch (response.Status) { |
21 | case AuthenticationStatus.Authenticated: |
22 | Session[ "FriendlyIdentifier" ] =response.FriendlyIdentifierForDisplay; |
23 | FormsAuthentication.SetAuthCookie(response.ClaimedIdentifier, false ); |
24 | if (! string .IsNullOrEmpty(returnUrl)) { |
25 | return Redirect(returnUrl); |
26 | } else { |
27 | return RedirectToAction( "Index" , "Home" ); |
28 | } |
29 | case AuthenticationStatus.Canceled: |
30 | ViewData[ "Message" ] = "Canceled at provider" ; |
31 | return View( "Login" ); |
32 | case AuthenticationStatus.Failed: |
33 | ViewData[ "Message" ] =response.Exception.Message; |
34 | return View( "Login" ); |
35 | } |
36 | } |
37 | return new EmptyResult(); |
38 | } |
39 | } |
最后在HomeController 的Index Action(就是主页)增加 X-XRDS-Location 的Header. Xrds Action是输出上面的Xrds View.如下: 其中请注意xrds的地址. 代码如下.
view source
?
01 | public class HomeController : Controller { |
02 | public ActionResult Index() { |
03 | Response.AppendHeader( |
04 | "X-XRDS-Location" , |
05 | new Uri(Request.Url,Response.ApplyAppPathModifier( "~/Home/xrds" )).AbsoluteUri); |
06 | return View( "Index" ); |
07 | } |
08 |
09 | public ActionResult Xrds() { |
10 | return View( "Xrds" ); |
11 | } |
12 | } |
XRDS 的View为:
view source
?
01 | <%@ Page Language= "C#" Inherits= "System.Web.Mvc.ViewPage" ContentType= "application/xrds+xml" %><?xml version= "1.0" encoding= "UTF-8" ?> |
02 | <%-- |
03 | This page is a required for relying party discovery per OpenID 2.0. |
04 | It allows Providers to call back to the relying party site to confirm the |
05 | identity that it is claiming in the realm and return_to URLs. |
06 | This pageshould be pointed to by the 'realm' home page,which in this sample |
07 | is default .aspx. |
08 | --%> |
09 | <xrds:XRDS |
10 | xmlns:xrds= "xri:// $xrds" |
11 | xmlns:openid= "http://openid.net/xmlns/1.0 " |
12 | xmlns= "xri:// $xrd*($v*2.0)" > |
13 | <XRD> |
14 | <Service priority= "1" > |
15 | <Type>http: //specs.openid.net/auth/2.0/return_to</Type> |
16 | <%-- Every page with an OpenID login should be listed here. --%> |
17 | <%-- We use the Authenticate action instead of Login because Authenticate |
18 | is the action that receives OpenId assertions. --%> |
19 | <URI><%= new Uri(Request.Url,Response.ApplyAppPathModifier( "~/user/authenticate" ))%></URI> |
20 | </Service> |
21 | </XRD> |
22 | </xrds:XRDS> |
这样就OK啰. 这只是简单的用法. 因为这个只返回很少信息.
一般只有两个,一个是:FriendlyIdentifierForDisplay ,就是用户名,一个是ClaimedIdentifier,
是用户的标识. 如果是这样用就OK,那我这文章也写得没什么意义了.呵.
因为一般我们还要抓到用户的Email,和个性图标.等等一些有用的东西.但是默认的是不返回的.
先看看可以返回什么信息. DotNetOpenAuth中有一个WellKnownAttributes 类,这个类中定义了一系列可以返回的信息. 下面是这个类的抓图:
如何获取这些信息呢? 请看下面的示例代码 :
view source
?
01 | [AcceptVerbs(HttpVerbs.Post)] |
02 | public ActionResult Login( string openid_identifier) |
03 | { |
04 | try |
05 | { |
06 | var openid = new OpenIdRelyingParty(); |
07 | IAuthenticationRequest request = openid.CreateRequest(Identifier.Parse(openid_identifier)); |
08 |
09 |
10 | var fetch = new FetchRequest(); |
11 | fetch.Attributes.AddRequired(WellKnownAttributes.Contact.Email); |
12 | fetch.Attributes.AddRequired(WellKnownAttributes.Name.Alias); |
13 | fetch.Attributes.AddRequired(WellKnownAttributes.Name.FullName); |
14 | fetch.Attributes.AddRequired(WellKnownAttributes.Media.Images.Default); |
15 | request.AddExtension(fetch); |
16 |
17 |
18 | /* |
19 | request.AddExtension(new ClaimsRequest |
20 | { |
21 | Email = DemandLevel.Require, |
22 | FullName = DemandLevel.Require, |
23 | Nickname = DemandLevel.Require |
24 | });*/ |
25 | return request.RedirectingResponse.AsActionResult(); |
26 | } |
27 | catch |
28 | { |
29 | ViewData[ "ErrorMessage" ] = "您输入的OpenID不正确或您的帐号的提供商不提供OpenID服务" ; |
30 |
31 | ViewData[ "OpenIDLoginURL" ] =openid_identifier; |
32 | return View(); |
33 | } |
34 | } |
注意我注释了的代码,一开始我也用这样,但是,这个无法获取个性图标.
最后,最后很关键喔.. 配置文件!! 对.. 一开始我因为没注意这个,花了不少时间.. ======
http://www.86e0.com
用的配置文件如下,基本是抄OpenIdRelyingPartyMvc 这个示例的.
view source
?
01 | < dotNetOpenAuth > |
02 | < openid > |
03 | < relyingParty > |
04 | < security requireSsl = "false" /> |
05 | < behaviors > |
06 | <!-- The following OPTIONAL behavior allows RPs to use SREG only,but be compatible |
07 | with OPs that use Attribute Exchange (in various formats). --> |
08 | < add type = "DotNetOpenAuth.OpenId.Behaviors.AXFetchAsSregTransform,DotNetOpenAuth" /> |
09 | </ behaviors > |
10 | </ relyingParty > |
11 | </ openid > |
12 | < messaging > |
13 | < untrustedWebRequest > |
14 | < whitelistHosts > |
15 | <!-- since this is a sample,and will often be used with localhost --> |
16 | < add name = "localhost" /> |
17 | </ whitelistHosts > |
18 | </ untrustedWebRequest > |
19 | </ messaging > |
20 | <!-- Allow DotNetOpenAuth to publish usage statistics to library authors to improve the library. --> |
21 | < reporting enabled = "false" /> |
22 | </ dotNetOpenAuth > |
好了,现在基本没问题了.
剩下就是在登录成功后获取这些信息了. 相关的代码如下:
view source
?
01 | switch (response.Status) { |
02 | case AuthenticationStatus.Authenticated: |
03 | string nickName = response.FriendlyIdentifierForDisplay; |
04 | if ( string .IsNullOrEmpty(nickName)) nickName = "匿名用户" ; |
05 | string email = string .Empty; |
06 | string picIcon = string .Empty; |
07 |
08 | if (nickName.Length > 50) { nickName = nickName.Substring(0,50); } |
09 |
10 | var claim = response.GetExtension<ClaimsResponse>(); |
11 | var fetch =response.GetExtension<FetchResponse>(); |
12 |
13 | string picKey = WellKnownAttributes.Media.Images.Default; |
14 |
15 | if (fetch != null && fetch.Attributes != null && fetch.Attributes.Contains(picKey)) |
16 | { |
17 | var picAttr = fetch.Attributes[picKey]; |
18 | if (picAttr != null && picAttr.Values.Count > 0) { picIcon =picAttr.Values[0]; } |
19 | } |
20 | if (claim != null ) |
21 | { |
22 | nickName = claim.Nickname; |
23 |
24 | if ( string .IsNullOrEmpty(nickName)) |
25 | { |
26 | int ttIndex = claim.Email.IndexOf( "@" ); |
27 | if (ttIndex > 0) |
28 | { |
29 | nickName = claim.Email.Substring(0,ttIndex); |
30 | } |
31 | else |
32 | { |
33 | nickName = claim.Email; |
34 | } |
35 | } |
36 | email =claim.Email; |
37 | } |
38 | // 最后授权,入库等. |
39 | case AuthenticationStatus.Canceled: |
40 | ViewData[ "Message" ] = "Canceled at provider" ; |
41 | return View( "Login" ); |
42 | case AuthenticationStatus.Failed: |
43 | ViewData[ "Message" ] =response.Exception.Message; |
44 | return View( "Login" ); |
45 | } |

相关文章推荐
- 在.NET环境下为网站增加IP过滤功能
- 通用权限管理系统组件 (GPM - General Permissions Manager) 中集成多个子系统的单点登录(网站入口方式)附源码
- CAS修改源码支持多种方式登录认证
- 在.NET环境下为网站增加IP过滤功能
- spring security form 表单提交 多种方式登录(如用户名,邮箱,+密码)登录)
- 网站防止非法用户登录的session方式实现
- 支持多种登录方式的数据库设计
- 手机端QQ登录openid与网站端QQ登录openid不一样
- 使用Windows Live ID登录网站
- Google迈向以OpenID为基础的网站单点登录
- 使用WinHttp实现POST方式用户模拟登录网站
- discuz !NT 3.5 论坛整合 .net 网站用户登录,退出
- react.js路由(4.x):模拟一个用户登录2(登录判断、路由的多种加载方式)
- 一般增加网站外部链接的方式有哪些
- .net 与java 做单点登录,表单提交冲突,解决方式
- discuz !NT 3.5 论坛整合 .net 网站用户登录,退出
- Video : 将使用AD认证的SharePoint网站配置为表单方式登录
- CAS修改源码支持多种方式登录认证
- 在.NET环境下为网站增加IP过滤功能
- .net实现网站用户登录认证