利用lvs+keepalived构建高可用MySQL-HA
2011-02-25 10:23
489 查看
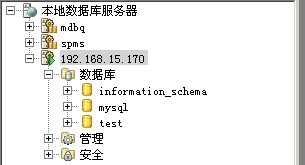
mysql-vip:192.168.15.170
mysql-master1:192.168.15.168
mysql-master2:192.168.15.169
OS版本:CentOS 5.5
mysql版本:mysql-5.1.53.tar.gz
keepalived版本:keepalived-1.2.1.tar.gz
ipvsadm版本:ipvsadm-1.24.tar.gz
在两台机器上分别安装ipvsadm keepalived mysql
安装ipvsadm
# uname -r
2.6.18-194.el5
# ln -sv /usr/src/kernels/2.6.18-194.el5-i686/ /usr/src/linux
# tar zxvf ipvsadm-1.24.tar.gz
# cd ipvsadm-1.24
# make && make install
# ipvsadm
IP Virtual Server version 1.2.1 (size=4096)
Prot LocalAddress:Port Scheduler Flags
-> RemoteAddress:Port Forward Weight ActiveConn InActConn
检查当前加载的内核模块,是否存在ip_vs模块
# lsmod | grep ip_vs
ip_vs 78081 0
安装mysql
useradd mysql -s /sbin/nologin
tar zxvf mysql-5.1.53.tar.gz
cd mysql-5.1.53
./configure --prefix=/usr/local/mysql --localstatedir=/opt/data --with-extra-charsets=utf8,gb2312,gbk --with-pthread --
enable-thread-safe-client
make && make install
cp support-files/my-large.cnf /etc/my.cnf
cp support-files/mysql.server /etc/rc.d/init.d/mysqld
chmod 755 /etc/rc.d/init.d/mysqld
chkconfig --add mysqld
chkconfig mysqld on
cd /usr/local/mysql/
chgrp -R mysql .
mkdir /opt/data
chown -R mysql:mysql /opt/data
/usr/local/mysql/bin/mysql_install_db --user=mysql
修改配置文件
vi /etc/my.cnf
不同的地方就是server-id,主服务器配置文件不用修改,从服务器的配置文件server-id=10.其他的内容基本相同.
/usr/local/mysql/bin/mysqld_safe --user=mysql&
设置root 密码
/usr/local/mysql/bin/mysqladmin -u root password "123456"
将192.168.15.168设为 192.168.15.169的主服务器,在192.168.15.168新建授权用户
#/usr/local/mysql/bin/mysql -uroot -p
mysql> grant replication slave on *.* to 'replication'@'%' identified by 'replication';
得到binlog日志文件名和偏移量
mysql> show master status;
+------------------+----------+--------------+------------------+
| File | Position | Binlog_Do_DB | Binlog_Ignore_DB |
+------------------+----------+--------------+------------------+
| mysql-bin.000003 | 244 | | |
+------------------+----------+--------------+------------------+
1 row in set (0.00 sec)
在192.168.15.169上将192.168.15.168设置为自己的主服务器
#/usr/local/mysql/bin/mysql -uroot –p
mysql> change master to
master_host='192.168.15.168',master_user='replication',master_password='replication',master_log_file='
mysql-bin.000003',master_log_pos=244;
将192.168.15.169设为 192.168.15.168的主服务器,在192.168.15.168新建授权用户
#/usr/local/mysql/bin/mysql -uroot –p
mysql> grant replication slave on *.* to 'replication'@'%' identified by 'replication';
得到binlog日志文件名和偏移量
mysql> show master status;
+------------------+----------+--------------+------------------+
| File | Position | Binlog_Do_DB | Binlog_Ignore_DB |
+------------------+----------+--------------+------------------+
| mysql-bin.000003 | 244 | | |
+------------------+----------+--------------+------------------+
1 row in set (0.00 sec)
在192.168.15.168上将192.168.15.169设置为自己的主服务器
#/usr/local/mysql/bin/mysql -uroot –p
mysql> change master to
master_host='192.168.15.169',master_user='replication',master_password='replication',master_log_file='
mysql-bin.000003',master_log_pos=244;
启用复制功能(两台机器)
mysql> start slave;
mysql> show slave status/G
*************************** 1. row ***************************
Slave_IO_State: Waiting for master to send event
Master_Host: 192.168.15.168
Master_User: replication
Master_Port: 3306
Connect_Retry: 60
Master_Log_File: mysql-bin.000003
Read_Master_Log_Pos: 398
Relay_Log_File: mysql2-relay-bin.000002
Relay_Log_Pos: 405
Relay_Master_Log_File: mysql-bin.000003
Slave_IO_Running: Yes
Slave_SQL_Running: Yes
Replicate_Do_DB:
Replicate_Ignore_DB:
Replicate_Do_Table:
Replicate_Ignore_Table:
Replicate_Wild_Do_Table:
Replicate_Wild_Ignore_Table:
Last_Errno: 0
Last_Error:
Skip_Counter: 0
Exec_Master_Log_Pos: 398
Relay_Log_Space: 561
Until_Condition: None
Until_Log_File:
Until_Log_Pos: 0
Master_SSL_Allowed: No
Master_SSL_CA_File:
Master_SSL_CA_Path:
Master_SSL_Cert:
Master_SSL_Cipher:
Master_SSL_Key:
Seconds_Behind_Master: 0
Master_SSL_Verify_Server_Cert: No
Last_IO_Errno: 0
Last_IO_Error:
Last_SQL_Errno: 0
Last_SQL_Error:
1 row in set (0.00 sec)
同步测试
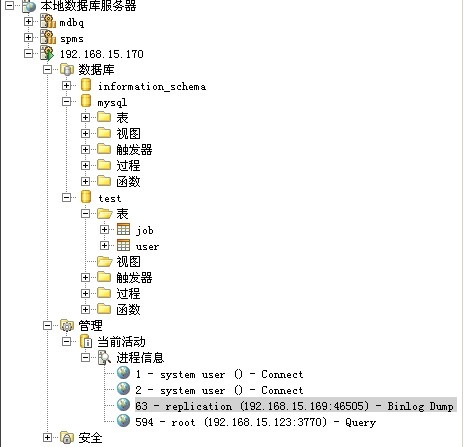
在168上的test数据库中创建user表
mysql> use test;
mysql> create table user(id int);
在169中查看user表
mysql> use test;
mysql> show tables;
+----------------+
| Tables_in_test |
+----------------+
| user |
+----------------+
1 row in set (0.00 sec)
在169上test数据库中常见job表
mysql> create table job(id int);
在168中查看user表
mysql> show tables;
+----------------+
| Tables_in_test |
+----------------+
| job |
| user |
+----------------+
2 rows in set (0.00 sec)
安装keepalived
# tar zxvf keepalived-1.2.1.tar.gz
# cd keepalived-1.2.1
# ./configure --prefix=/usr/local/keepalived --with-kernel-dir=/usr/src/kernels/2.6.18 -194.el5-i686/
# make && make install
192.168.15.168上配置keepalived
# mkdir /etc/keepalived
# vi /etc/keepalived/keepalived.conf
! Configuration File for keepalived
global_defs {
notification_email {
157704487@qq.com
}
notification_email_from 157704487@qq.com
smtp_server 127.0.0.1
smtp_connect_timeout 30
router_id MySQL-ha
}
vrrp_instance VI_1 {
state BACKUP #两台配置此处均是BACKUP
interface eth0
virtual_router_id 51
priority 100 #优先级,另一台改为90
advert_int 1
nopreempt #不抢占,只在优先级高的机器上设置即可,优先级低的机器不设置
authentication {
auth_type PASS
auth_pass 1111
}
virtual_ipaddress {
192.168.15.170
}
}
virtual_server 192.168.15.170 3306 {
delay_loop 2 #每个2秒检查一次real_server状态
lb_algo wrr #LVS算法
lb_kind DR #LVS模式
persistence_timeout 60 #会话保持时间
protocol TCP
real_server 192.168.15.168 3306 {
weight 3
notify_down /usr/local/MySQL/bin/MySQL.sh #检测到服务down后执行的脚本
TCP_CHECK {
connect_timeout 10 #连接超时时间
nb_get_retry 3 #重连次数
delay_before_retry 3 #重连间隔时间
connect_port 3306 #健康检查端口
}
}
编写检测服务down后所要执行的脚本
#vi /usr/local/MySQL/bin/MySQL.sh
#!/bin/sh
pkill keepalived
#chmod +x /usr/local/MySQL/bin/MySQL.sh
启动keepalived
#/usr/local/keepalived/sbin/keepalived –D
#ps -aux | grep keepalived
192.168.15.169上配置keepalived
# mkdir /etc/keepalived
# vi /etc/keepalived/keepalived.conf
! Configuration File for keepalived
global_defs {
notification_email {
157704487@qq.com
}
notification_email_from 157704487@qq.com
smtp_server 127.0.0.1
smtp_connect_timeout 30
router_id MySQL-ha
}
vrrp_instance VI_1 {
state BACKUP #两台配置此处均是BACKUP
interface eth0
virtual_router_id 51
priority 90 #优先级
advert_int 1
authentication {
auth_type PASS
auth_pass 1111
}
virtual_ipaddress {
192.168.15.170
}
}
virtual_server 192.168.15.170 3306 {
delay_loop 2 #每个2秒检查一次real_server状态
lb_algo wrr #LVS算法
lb_kind DR #LVS模式
persistence_timeout 60 #会话保持时间
protocol TCP
real_server 192.168.15.169 3306 {
weight 3
notify_down /usr/local/MySQL/bin/MySQL.sh #检测到服务down后执行的脚本
TCP_CHECK {
connect_timeout 10 #连接超时时间
nb_get_retry 3 #重连次数
delay_before_retry 3 #重连间隔时间
connect_port 3306 #健康检查端口
}
}
编写检测服务down后所要执行的脚本
#vi /usr/local/MySQL/bin/MySQL.sh
#!/bin/sh
pkill keepalived
#chmod +x /usr/local/MySQL/bin/MySQL.sh
启动keepalived
#/usr/local/keepalived/sbin/keepalived –D
#ps -aux | grep keepalived
keepalived故障转移测试
在windows 客户端一直ping 192.168.15.170 然后分别关闭192.168.15.168 192.168.15.169 上的keepalived 看是否自动切换
168上tail -n 100 /var/log/messages
Feb 24 16:50:30 tomcat2 Keepalived_vrrp: VRRP_Instance(VI_1) Transition to MASTER STATE
169上tail -n 100 /var/log/messages
Feb 24 16:32:07 mysql2 Keepalived_vrrp: VRRP_Instance(VI_1) Entering BACKUP STATE
关闭168上的keepalived
pkill keepalived
169上tail -n 100 /var/log/messages
Feb 24 16:41:36 mysql2 Keepalived_vrrp: VRRP_Instance(VI_1) Transition to MASTER STATE
Feb 24 16:41:37 mysql2 Keepalived_vrrp: VRRP_Instance(VI_1) Entering MASTER STATE
开启168上的keepalived
/usr/local/keepalived/sbin/keepalived -D
168上tail -n 100 /var/log/messages
Feb 24 17:02:08 tomcat2 Keepalived_vrrp: VRRP_Instance(VI_1) Entering BACKUP STATE
关闭169上的keepalived
/usr/local/keepalived/sbin/keepalived -D
168上tail -n 100 /var/log/messages
Feb 25 10:11:20 tomcat2 Keepalived_vrrp: VRRP_Instance(VI_1) Transition to MASTER STATE
Feb 25 10:11:21 tomcat2 Keepalived_vrrp: VRRP_Instance(VI_1) Entering MASTER STATE
开启169上的keepalived
/usr/local/keepalived/sbin/keepalived -D
169上tail -n 100 /var/log/messages
Feb 25 10:14:13 mysql2 Keepalived_vrrp: VRRP_Instance(VI_1) Entering BACKUP STATE
MySQL故障转移测试
在168上关闭mysql服务
/etc/init.d/mysqld stop
168上tail -n 100 /var/log/messages
Feb 25 10:15:26 tomcat2 Keepalived_healthcheckers: TCP connection to [192.168.15.168:3306] failed !!!
Feb 25 10:15:26 tomcat2 Keepalived_healthcheckers: Removing service [192.168.15.168:3306] from VS [192.168.15.170:3306]
在168上开启mysqlfuw
/etc/init.d/mysqld start
tail -n 100 /var/log/messages
Feb 25 10:18:16 tomcat2 Keepalived_healthcheckers: TCP connection to [192.168.15.168:3306] success.
Feb 25 10:18:16 tomcat2 Keepalived_healthcheckers: Adding service [192.168.15.168:3306] to VS [192.168.15.170:3306]
在169上测试也一样
/etc/init.d/mysqld stop
Feb 25 10:20:05 mysql2 Keepalived_healthcheckers: TCP connection to [192.168.15.169:3306] failed !!!
Feb 25 10:20:05 mysql2 Keepalived_healthcheckers: Removing service [192.168.15.169:3306] from VS [192.168.15.170:3306]
/etc/init.d/mysqld start
Feb 25 10:20:37 mysql2 Keepalived_healthcheckers: TCP connection to [192.168.15.169:3306] success.
Feb 25 10:20:37 mysql2 Keepalived_healthcheckers: Adding service [192.168.15.169:3306] to VS [192.168.15.170:3306]
mysql 远程登录测试
在两台服务器上分别执行,授予远程登录
1. MySQL> grant all privileges on *.* to 'root'@'%' identified by '123456';
2. Query OK, 0 rows affected (0.00 sec)
3.
4. MySQL> flush privileges;
5. Query OK, 0 rows affected (0.00 sec)

查看远程连接的实际服务是那个
168上ipvsadm –ln
IP Virtual Server version 1.2.1 (size=4096)
Prot LocalAddress:Port Scheduler Flags
-> RemoteAddress:Port Forward Weight ActiveConn InActConn
TCP 192.168.15.170:3306 wrr persistent 60
-> 192.168.15.168:3306 Local 3 1 0
169上ipvsadm –ln
[root@mysql2 ~]# ipvsadm -ln
IP Virtual Server version 1.2.1 (size=4096)
Prot LocalAddress:Port Scheduler Flags
-> RemoteAddress:Port Forward Weight ActiveConn InActConn
TCP 192.168.15.170:3306 wrr persistent 60
-> 192.168.15.169:3306 Local 3 0 0

相关链接 http://database.51cto.com/art/201012/237204.htm
mysql-master1:192.168.15.168
mysql-master2:192.168.15.169
OS版本:CentOS 5.5
mysql版本:mysql-5.1.53.tar.gz
keepalived版本:keepalived-1.2.1.tar.gz
ipvsadm版本:ipvsadm-1.24.tar.gz
在两台机器上分别安装ipvsadm keepalived mysql
安装ipvsadm
# uname -r
2.6.18-194.el5
# ln -sv /usr/src/kernels/2.6.18-194.el5-i686/ /usr/src/linux
# tar zxvf ipvsadm-1.24.tar.gz
# cd ipvsadm-1.24
# make && make install
# ipvsadm
IP Virtual Server version 1.2.1 (size=4096)
Prot LocalAddress:Port Scheduler Flags
-> RemoteAddress:Port Forward Weight ActiveConn InActConn
检查当前加载的内核模块,是否存在ip_vs模块
# lsmod | grep ip_vs
ip_vs 78081 0
安装mysql
useradd mysql -s /sbin/nologin
tar zxvf mysql-5.1.53.tar.gz
cd mysql-5.1.53
./configure --prefix=/usr/local/mysql --localstatedir=/opt/data --with-extra-charsets=utf8,gb2312,gbk --with-pthread --
enable-thread-safe-client
make && make install
cp support-files/my-large.cnf /etc/my.cnf
cp support-files/mysql.server /etc/rc.d/init.d/mysqld
chmod 755 /etc/rc.d/init.d/mysqld
chkconfig --add mysqld
chkconfig mysqld on
cd /usr/local/mysql/
chgrp -R mysql .
mkdir /opt/data
chown -R mysql:mysql /opt/data
/usr/local/mysql/bin/mysql_install_db --user=mysql
修改配置文件
vi /etc/my.cnf
不同的地方就是server-id,主服务器配置文件不用修改,从服务器的配置文件server-id=10.其他的内容基本相同.
/usr/local/mysql/bin/mysqld_safe --user=mysql&
设置root 密码
/usr/local/mysql/bin/mysqladmin -u root password "123456"
将192.168.15.168设为 192.168.15.169的主服务器,在192.168.15.168新建授权用户
#/usr/local/mysql/bin/mysql -uroot -p
mysql> grant replication slave on *.* to 'replication'@'%' identified by 'replication';
得到binlog日志文件名和偏移量
mysql> show master status;
+------------------+----------+--------------+------------------+
| File | Position | Binlog_Do_DB | Binlog_Ignore_DB |
+------------------+----------+--------------+------------------+
| mysql-bin.000003 | 244 | | |
+------------------+----------+--------------+------------------+
1 row in set (0.00 sec)
在192.168.15.169上将192.168.15.168设置为自己的主服务器
#/usr/local/mysql/bin/mysql -uroot –p
mysql> change master to
master_host='192.168.15.168',master_user='replication',master_password='replication',master_log_file='
mysql-bin.000003',master_log_pos=244;
将192.168.15.169设为 192.168.15.168的主服务器,在192.168.15.168新建授权用户
#/usr/local/mysql/bin/mysql -uroot –p
mysql> grant replication slave on *.* to 'replication'@'%' identified by 'replication';
得到binlog日志文件名和偏移量
mysql> show master status;
+------------------+----------+--------------+------------------+
| File | Position | Binlog_Do_DB | Binlog_Ignore_DB |
+------------------+----------+--------------+------------------+
| mysql-bin.000003 | 244 | | |
+------------------+----------+--------------+------------------+
1 row in set (0.00 sec)
在192.168.15.168上将192.168.15.169设置为自己的主服务器
#/usr/local/mysql/bin/mysql -uroot –p
mysql> change master to
master_host='192.168.15.169',master_user='replication',master_password='replication',master_log_file='
mysql-bin.000003',master_log_pos=244;
启用复制功能(两台机器)
mysql> start slave;
mysql> show slave status/G
*************************** 1. row ***************************
Slave_IO_State: Waiting for master to send event
Master_Host: 192.168.15.168
Master_User: replication
Master_Port: 3306
Connect_Retry: 60
Master_Log_File: mysql-bin.000003
Read_Master_Log_Pos: 398
Relay_Log_File: mysql2-relay-bin.000002
Relay_Log_Pos: 405
Relay_Master_Log_File: mysql-bin.000003
Slave_IO_Running: Yes
Slave_SQL_Running: Yes
Replicate_Do_DB:
Replicate_Ignore_DB:
Replicate_Do_Table:
Replicate_Ignore_Table:
Replicate_Wild_Do_Table:
Replicate_Wild_Ignore_Table:
Last_Errno: 0
Last_Error:
Skip_Counter: 0
Exec_Master_Log_Pos: 398
Relay_Log_Space: 561
Until_Condition: None
Until_Log_File:
Until_Log_Pos: 0
Master_SSL_Allowed: No
Master_SSL_CA_File:
Master_SSL_CA_Path:
Master_SSL_Cert:
Master_SSL_Cipher:
Master_SSL_Key:
Seconds_Behind_Master: 0
Master_SSL_Verify_Server_Cert: No
Last_IO_Errno: 0
Last_IO_Error:
Last_SQL_Errno: 0
Last_SQL_Error:
1 row in set (0.00 sec)
同步测试
在168上的test数据库中创建user表
mysql> use test;
mysql> create table user(id int);
在169中查看user表
mysql> use test;
mysql> show tables;
+----------------+
| Tables_in_test |
+----------------+
| user |
+----------------+
1 row in set (0.00 sec)
在169上test数据库中常见job表
mysql> create table job(id int);
在168中查看user表
mysql> show tables;
+----------------+
| Tables_in_test |
+----------------+
| job |
| user |
+----------------+
2 rows in set (0.00 sec)
安装keepalived
# tar zxvf keepalived-1.2.1.tar.gz
# cd keepalived-1.2.1
# ./configure --prefix=/usr/local/keepalived --with-kernel-dir=/usr/src/kernels/2.6.18 -194.el5-i686/
# make && make install
192.168.15.168上配置keepalived
# mkdir /etc/keepalived
# vi /etc/keepalived/keepalived.conf
! Configuration File for keepalived
global_defs {
notification_email {
157704487@qq.com
}
notification_email_from 157704487@qq.com
smtp_server 127.0.0.1
smtp_connect_timeout 30
router_id MySQL-ha
}
vrrp_instance VI_1 {
state BACKUP #两台配置此处均是BACKUP
interface eth0
virtual_router_id 51
priority 100 #优先级,另一台改为90
advert_int 1
nopreempt #不抢占,只在优先级高的机器上设置即可,优先级低的机器不设置
authentication {
auth_type PASS
auth_pass 1111
}
virtual_ipaddress {
192.168.15.170
}
}
virtual_server 192.168.15.170 3306 {
delay_loop 2 #每个2秒检查一次real_server状态
lb_algo wrr #LVS算法
lb_kind DR #LVS模式
persistence_timeout 60 #会话保持时间
protocol TCP
real_server 192.168.15.168 3306 {
weight 3
notify_down /usr/local/MySQL/bin/MySQL.sh #检测到服务down后执行的脚本
TCP_CHECK {
connect_timeout 10 #连接超时时间
nb_get_retry 3 #重连次数
delay_before_retry 3 #重连间隔时间
connect_port 3306 #健康检查端口
}
}
编写检测服务down后所要执行的脚本
#vi /usr/local/MySQL/bin/MySQL.sh
#!/bin/sh
pkill keepalived
#chmod +x /usr/local/MySQL/bin/MySQL.sh
启动keepalived
#/usr/local/keepalived/sbin/keepalived –D
#ps -aux | grep keepalived
192.168.15.169上配置keepalived
# mkdir /etc/keepalived
# vi /etc/keepalived/keepalived.conf
! Configuration File for keepalived
global_defs {
notification_email {
157704487@qq.com
}
notification_email_from 157704487@qq.com
smtp_server 127.0.0.1
smtp_connect_timeout 30
router_id MySQL-ha
}
vrrp_instance VI_1 {
state BACKUP #两台配置此处均是BACKUP
interface eth0
virtual_router_id 51
priority 90 #优先级
advert_int 1
authentication {
auth_type PASS
auth_pass 1111
}
virtual_ipaddress {
192.168.15.170
}
}
virtual_server 192.168.15.170 3306 {
delay_loop 2 #每个2秒检查一次real_server状态
lb_algo wrr #LVS算法
lb_kind DR #LVS模式
persistence_timeout 60 #会话保持时间
protocol TCP
real_server 192.168.15.169 3306 {
weight 3
notify_down /usr/local/MySQL/bin/MySQL.sh #检测到服务down后执行的脚本
TCP_CHECK {
connect_timeout 10 #连接超时时间
nb_get_retry 3 #重连次数
delay_before_retry 3 #重连间隔时间
connect_port 3306 #健康检查端口
}
}
编写检测服务down后所要执行的脚本
#vi /usr/local/MySQL/bin/MySQL.sh
#!/bin/sh
pkill keepalived
#chmod +x /usr/local/MySQL/bin/MySQL.sh
启动keepalived
#/usr/local/keepalived/sbin/keepalived –D
#ps -aux | grep keepalived
keepalived故障转移测试
在windows 客户端一直ping 192.168.15.170 然后分别关闭192.168.15.168 192.168.15.169 上的keepalived 看是否自动切换
168上tail -n 100 /var/log/messages
Feb 24 16:50:30 tomcat2 Keepalived_vrrp: VRRP_Instance(VI_1) Transition to MASTER STATE
169上tail -n 100 /var/log/messages
Feb 24 16:32:07 mysql2 Keepalived_vrrp: VRRP_Instance(VI_1) Entering BACKUP STATE
关闭168上的keepalived
pkill keepalived
169上tail -n 100 /var/log/messages
Feb 24 16:41:36 mysql2 Keepalived_vrrp: VRRP_Instance(VI_1) Transition to MASTER STATE
Feb 24 16:41:37 mysql2 Keepalived_vrrp: VRRP_Instance(VI_1) Entering MASTER STATE
开启168上的keepalived
/usr/local/keepalived/sbin/keepalived -D
168上tail -n 100 /var/log/messages
Feb 24 17:02:08 tomcat2 Keepalived_vrrp: VRRP_Instance(VI_1) Entering BACKUP STATE
关闭169上的keepalived
/usr/local/keepalived/sbin/keepalived -D
168上tail -n 100 /var/log/messages
Feb 25 10:11:20 tomcat2 Keepalived_vrrp: VRRP_Instance(VI_1) Transition to MASTER STATE
Feb 25 10:11:21 tomcat2 Keepalived_vrrp: VRRP_Instance(VI_1) Entering MASTER STATE
开启169上的keepalived
/usr/local/keepalived/sbin/keepalived -D
169上tail -n 100 /var/log/messages
Feb 25 10:14:13 mysql2 Keepalived_vrrp: VRRP_Instance(VI_1) Entering BACKUP STATE
MySQL故障转移测试
在168上关闭mysql服务
/etc/init.d/mysqld stop
168上tail -n 100 /var/log/messages
Feb 25 10:15:26 tomcat2 Keepalived_healthcheckers: TCP connection to [192.168.15.168:3306] failed !!!
Feb 25 10:15:26 tomcat2 Keepalived_healthcheckers: Removing service [192.168.15.168:3306] from VS [192.168.15.170:3306]
在168上开启mysqlfuw
/etc/init.d/mysqld start
tail -n 100 /var/log/messages
Feb 25 10:18:16 tomcat2 Keepalived_healthcheckers: TCP connection to [192.168.15.168:3306] success.
Feb 25 10:18:16 tomcat2 Keepalived_healthcheckers: Adding service [192.168.15.168:3306] to VS [192.168.15.170:3306]
在169上测试也一样
/etc/init.d/mysqld stop
Feb 25 10:20:05 mysql2 Keepalived_healthcheckers: TCP connection to [192.168.15.169:3306] failed !!!
Feb 25 10:20:05 mysql2 Keepalived_healthcheckers: Removing service [192.168.15.169:3306] from VS [192.168.15.170:3306]
/etc/init.d/mysqld start
Feb 25 10:20:37 mysql2 Keepalived_healthcheckers: TCP connection to [192.168.15.169:3306] success.
Feb 25 10:20:37 mysql2 Keepalived_healthcheckers: Adding service [192.168.15.169:3306] to VS [192.168.15.170:3306]
mysql 远程登录测试
在两台服务器上分别执行,授予远程登录
1. MySQL> grant all privileges on *.* to 'root'@'%' identified by '123456';
2. Query OK, 0 rows affected (0.00 sec)
3.
4. MySQL> flush privileges;
5. Query OK, 0 rows affected (0.00 sec)
查看远程连接的实际服务是那个
168上ipvsadm –ln
IP Virtual Server version 1.2.1 (size=4096)
Prot LocalAddress:Port Scheduler Flags
-> RemoteAddress:Port Forward Weight ActiveConn InActConn
TCP 192.168.15.170:3306 wrr persistent 60
-> 192.168.15.168:3306 Local 3 1 0
169上ipvsadm –ln
[root@mysql2 ~]# ipvsadm -ln
IP Virtual Server version 1.2.1 (size=4096)
Prot LocalAddress:Port Scheduler Flags
-> RemoteAddress:Port Forward Weight ActiveConn InActConn
TCP 192.168.15.170:3306 wrr persistent 60
-> 192.168.15.169:3306 Local 3 0 0
相关链接 http://database.51cto.com/art/201012/237204.htm

相关文章推荐
- 利用keepalived构建高可用MySQL-HA
- 利用keepalived构建高可用MySQL-HA
- 利用keepalived构建高可用MySQL-HA
- 利用keepalived构建高可用MySQL-HA
- 利用keepalived构建高可用MySQL-HA
- 利用keepalived构建高可用MySQL-HA
- 利用keepalived构建高可用MySQL-HA
- 利用keepalived构建高可用MySQL-HA
- 利用keepalived构建高可用MySQL-HA
- 利用lvs+keepalived构建高可用Apache-HA
- 利用keepalived构建高可用MySQL-HA
- 利用keepalived构建高可用MySQL-HA
- 利用keepalived构建高可用MySQL-HA
- MySql:利用keepalived构建高可用MySQL-HA
- 利用keepalived构建高可用MySQL-HA
- 利用keepalived构建高可用MySQL-HA
- 利用keepalived构建高可用MySQL-HA
- 利用LVS+Keepalived实现MySQL高可用1
- 利用LVS+Keepalived实现MySQL高可用
- 利用LVS+Keepalived实现MySQL高可用