[WPF] 自定义窗体样式
2011-02-25 10:08
651 查看
[WPF] 自定义窗体样式
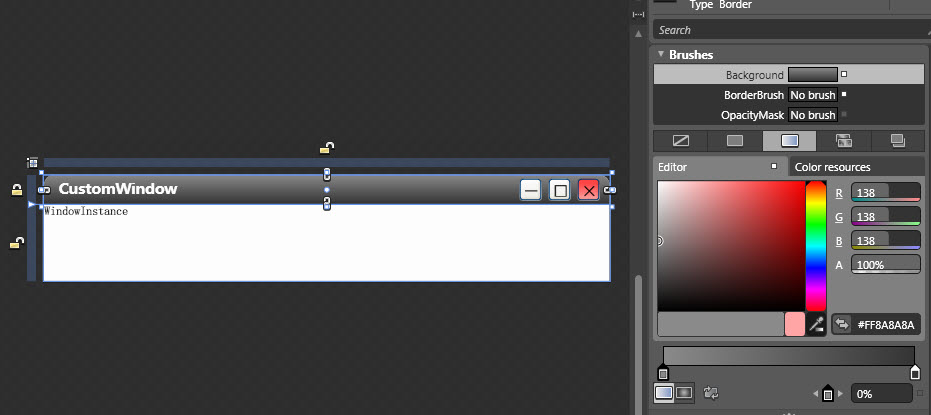
效果图如下:
Code: /Files/lovebread/CustomWindow.rar
实现思路:
1.继承Window类
2.为自定义的CustomWindow类设计窗体样式(使用Blend很方便!)
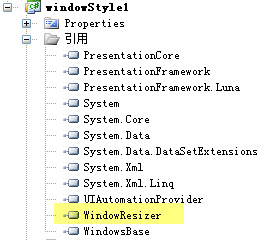
3.为窗体增加最大最小化和关闭按钮,并实现鼠标拖拽改变窗体大小(使用Derek Bartram的WindowResizer.dll库)
代码说明:
1.继承Window类
创建CustomWindow类,继承自System.Window


代码
public class CustomWindow : Window
{
public CustomWindow()
{
// 加载样式
InitializeStyle();
// 加载事件委托
this.Loaded += delegate { InitializeEvent(); };
// 解决最大化覆盖任务栏问题
this.SourceInitialized += new EventHandler(win_SourceInitialized);
}
}
代码
<src:CustomWindow
x:Class="windowStyle1.Window1"
xmlns="http://schemas.microsoft.com/winfx/2006/xaml/presentation"
xmlns:x="http://schemas.microsoft.com/winfx/2006/xaml"
xmlns:src="clr-namespace:windowStyle1"
Title="CustomWindow"
Height="358" Width="649" AllowsTransparency="True" WindowStyle="None">
2.为自定义的CustomWindow类设计窗体样式
窗体样式的设计可以使用Expression Blend来进行可视化开发,非常方便
Blend会自动生成样式的xmal文件:
代码
<ResourceDictionary xmlns="http://schemas.microsoft.com/winfx/2006/xaml/presentation"
xmlns:x="http://schemas.microsoft.com/winfx/2006/xaml" xmlns:d="http://schemas.microsoft.com/expression/blend/2008" xmlns:mc="http://schemas.openxmlformats.org/markup-compatibility/2006" mc:Ignorable="d" xmlns:Microsoft_Windows_Themes="clr-namespace:Microsoft.Windows.Themes;assembly=PresentationFramework.Luna">
<ControlTemplate x:Key="WindowTemplateKey" TargetType="{x:Type Window}">
<Border Background="{TemplateBinding Background}" BorderBrush="{TemplateBinding BorderBrush}" BorderThickness="{TemplateBinding BorderThickness}">
<Grid>
<AdornerDecorator>
<ContentPresenter/>
</AdornerDecorator>
<ResizeGrip x:Name="WindowResizeGrip" HorizontalAlignment="Right" VerticalAlignment="Bottom" IsTabStop="false" Visibility="Collapsed"/>
</Grid>
</Border>
<ControlTemplate.Triggers>
<MultiTrigger>
<MultiTrigger.Conditions>
<Condition Property="ResizeMode" Value="CanResizeWithGrip"/>
<Condition Property="WindowState" Value="Normal"/>
</MultiTrigger.Conditions>
<Setter Property="Visibility" TargetName="WindowResizeGrip" Value="Visible"/>
</MultiTrigger>
</ControlTemplate.Triggers>
</ControlTemplate>
3.为窗体增加最大最小化和关闭按钮,并实现鼠标拖拽改变窗体大小
按钮事件比较简单,通过分别为三个按钮添加Click事件即可
代码
/// <summary>
/// 加载按钮事件委托
/// </summary>
private void InitializeEvent()
{
ControlTemplate baseWindowTemplate = (ControlTemplate)App.Current.Resources["CustomWindowControlTemplate"];
Button minBtn = (Button)baseWindowTemplate.FindName("btnMin", this);
minBtn.Click += delegate
{
this.WindowState = WindowState.Minimized;
};
Button maxBtn = (Button)baseWindowTemplate.FindName("btnMax", this);
maxBtn.Click += delegate
{
this.WindowState = (this.WindowState == WindowState.Normal ? WindowState.Maximized : WindowState.Normal);
};
Button closeBtn = (Button)baseWindowTemplate.FindName("btnClose", this);
closeBtn.Click += delegate
{
this.Close();
};
Border tp = (Border)baseWindowTemplate.FindName("topborder", this);
tp.MouseLeftButtonDown += delegate
{
this.DragMove();
};
}
仅仅这样实现的话还不够,因为窗体最大化后会覆盖任务栏,这是我们不希望看到的,所以还必须通过WINDOW API的窗口句柄来定义最大化后的尺寸
代码
/// <summary>
/// 重绘窗体大小
/// </summary>
void win_SourceInitialized(object sender, EventArgs e)
{
System.IntPtr handle = (new WinInterop.WindowInteropHelper(this)).Handle;
WinInterop.HwndSource.FromHwnd(handle).AddHook(new WinInterop.HwndSourceHook(WindowProc));
}
...
[DllImport("user32")]
internal static extern bool GetMonitorInfo(IntPtr hMonitor, MONITORINFO lpmi);
[DllImport("User32")]
internal static extern IntPtr MonitorFromWindow(IntPtr handle, int flags);
...
private static System.IntPtr WindowProc(System.IntPtr hwnd, int msg, System.IntPtr wParam, System.IntPtr lParam, ref bool handled)
{
switch (msg)
{
case 0x0024:
WmGetMinMaxInfo(hwnd, lParam);
handled = true;
break;
}
return (System.IntPtr)0;
}
具体代码请看附件
这部分参考:http://blogs.msdn.com/llobo/archive/2006/08/01/Maximizing-window-_2800_with-WindowStyle_3D00_None_2900_-considering-Taskbar.aspx
最后是实现用鼠标拖拽改变窗体大小
这部分可以参考Derek Bartram的文章http://www.codeproject.com/KB/WPF/WPF_Window_Resizing.aspx
首先将封装好的WindowResizer.dll文件拷到工程目录下,并在工程中添加对它的引用
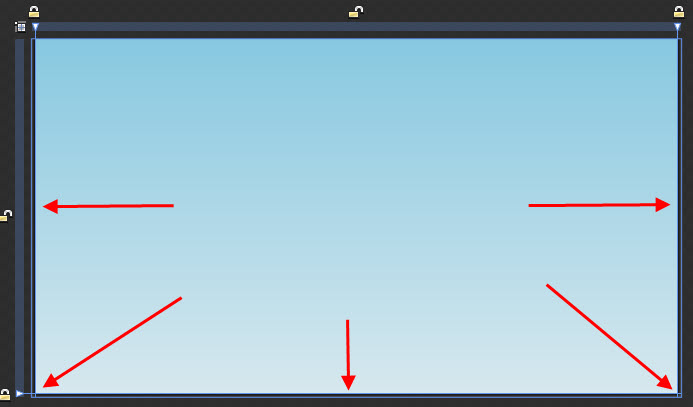
然后在Windows1这个CustomWindow类的实例中绘制左右及底部5个拖拽热区(矩形)
最后在Window1.xaml.cs中添加事件委托即可
代码
/// <summary>
/// 加载Resize委托
/// </summary>
public void InitializeResizeHandle()
{
WindowResizer wr = new WindowResizer(this);
wr.addResizerRight(right);
wr.addResizerLeft(left);
wr.addResizerDown(bottom);
wr.addResizerLeftDown(leftbottom);
wr.addResizerRightDown(rightbottom);
//wr.addResizerUp(topSizeGrip);
//wr.addResizerLeftUp(topLeftSizeGrip);
//wr.addResizerRightUp(topRightSizeGrip);
}
大功告成了!

相关文章推荐
- [WPF] 自定义窗体样式
- WPF自定义控件与样式(13)-自定义窗体Window & 自适应内容大小消息框MessageBox
- [WPF] 自定义窗体样式
- WPF自定义控件与样式(13)-自定义窗体Window & 自适应内容大小消息框MessageBox
- Wpf ScrollBar自定义样式
- WPF自定义控件与样式(2)-自定义按钮FButton
- 用WPF自定义CheckBox的样式
- WPF自定义漂亮的按钮样式
- WPF中自定义窗体标题栏
- WPF 窗体样式重写 界面优美-下载
- WPF 自定义窗体
- WPF自定义圆形按钮样式资源文件
- WPF窗体样式继承
- WPF TabItem Header 自定义样式
- WPF自定义控件与样式(4)-CheckBox/RadioButton自定义样式
- WPF窗体程序入口 自定义窗体启动页面
- WPF窗体自定义基类
- WPF自定义控件与样式(4)-CheckBox/RadioButton自定义样式
- WPF DataGrid自定义样式
- WPF中使窗体关闭按钮与自定义的退出按钮行为一致的做法