Android入门之Style与Theme
2011-01-17 10:30
597 查看
本文来自
http://blog.csdn.net/hellogv/
,引用必须注明出处!
越来越多互联网企业都在Android平台上部署其客户端,为了提升用户体验,这些客户端都做得布局合理而且美观.......Android的Style设计就是提升用户体验的关键之一。Android上的Style分为了两个方面:
Theme是针对窗体级别的,改变窗体样式;
Style是针对窗体元素级别的,改变指定控件或者Layout的样式。
Android
系统的themes.xml和style.xml(位于/base/core/res/res/values/)包含了很多系统定义好的style,建议
在里面挑个合适的,然后再继承修改。以下属性是在Themes中比较常见的,源自Android系统本身的themes.xml:
view plain
copy to clipboard
print
?
<!-- Window attributes -->
<
item
name
=
"windowBackground"
>
@android:drawable/screen_background_dark
</
item
>
<
item
name
=
"windowFrame"
>
@null
</
item
>
<
item
name
=
"windowNoTitle"
>
false
</
item
>
<
item
name
=
"windowFullscreen"
>
false
</
item
>
<
item
name
=
"windowIsFloating"
>
false
</
item
>
<
item
name
=
"windowContentOverlay"
>
@android:drawable/title_bar_shadow
</
item
>
<
item
name
=
"windowTitleStyle"
>
@android:style/WindowTitle
</
item
>
<
item
name
=
"windowTitleSize"
>
25dip
</
item
>
<
item
name
=
"windowTitleBackgroundStyle"
>
@android:style/WindowTitleBackground
</
item
>
<
item
name
=
"android:windowAnimationStyle"
>
@android:style/Animation.Activity
</
item
>
至于控件的Style设计就范围大多了,看看Eclipse的Android控件属性编辑器[Properties]就大概知道有哪些条目
,
而Android内置的style.xml也只是定义每个控件的默认样式而已....不过控件的style不建议大改,耐看的style更能让用户长时间
使用软件。另外,控件的Style在很多情况下都用到9.png,学习9.png就必须到/base/core/res/res/drawable-
hdpi里面看看,里面有很多系统内置的9.png。
PS:为了研究Android的Style和Theme,强烈建议下载Android的base.git!
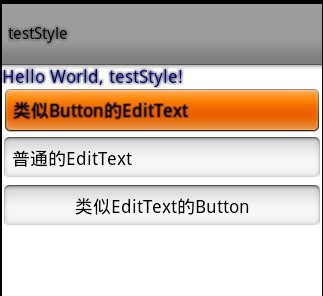
接下来看看本文程序的效果图:
本文程序的themes.xml代码如下,自定义了WindowTitle,:
<?xml version="1.0" encoding="UTF-8"?>
<resources>
<!--继承Android内置的Theme.Light,位于/base/core/res/res/values/themes.xml -->
<style name="Theme" parent="android:Theme.Light">
<item name="android:windowFullscreen">true</item>
<item name="android:windowTitleSize">60dip</item>
<item name="android:windowTitleStyle">@style/WindowTitle</item>
</style>
<style name="WindowTitle" parent="android:WindowTitle">
<item name="android:singleLine">true</item>
<item name="android:shadowColor">#BB000000</item>
<item name="android:shadowRadius">2.75</item>
</style>
</resources>
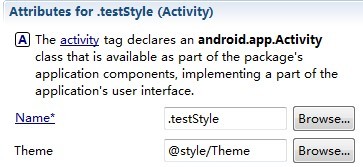
要为Activity使用theme,要么使用代码 setTheme(R.style.Theme),要么在Application Manifest里面设置
。
本文程序的styles.xml代码如下,background默认使用的是9.png,xml定义在/base/core/res/res/drawable/之下:
<?xml version="1.0" encoding="UTF-8"?>
<resources>
<style name="TextView">
<item name="android:textSize">18sp</item>
<item name="android:textColor">#008</item>
<item name="android:shadowColor">@android:color/black</item>
<item name="android:shadowRadius">2.0</item>
</style>
<style name="EditText">
<item name="android:shadowColor">@android:color/black</item>
<item name="android:shadowRadius">1.0</item>
<item name="android:background">@android:drawable/btn_default</item>
<item name="android:textAppearance">?android:attr/textAppearanceMedium</item>
</style>
<style name="Button">
<item name="android:background">@android:drawable/edit_text</item>
<item name="android:textAppearance">?android:attr/textAppearanceMedium</item>
</style>
</resources>
main.xml代码如下:
view plain
copy to clipboard
print
?
<?
xml
version
=
"1.0"
encoding
=
"utf-8"
?>
<
LinearLayout
xmlns:android
=
"http://schemas.android.com/apk/res/android"
android:orientation
=
"vertical"
android:layout_width
=
"fill_parent"
android:layout_height
=
"fill_parent"
>
<
TextView
android:layout_width
=
"fill_parent"
android:layout_height
=
"wrap_content"
android:text
=
"@string/hello"
style
=
"@style/TextView"
/>
<
EditText
android:id
=
"@+id/EditText01"
android:layout_height
=
"wrap_content"
style
=
"@style/EditText"
android:layout_width
=
"fill_parent"
android:text
=
"类似Button的EditText"
>
</
EditText
>
<
EditText
android:id
=
"@+id/EditText02"
android:layout_height
=
"wrap_content"
android:layout_width
=
"fill_parent"
android:text
=
"普通的EditText"
>
</
EditText
>
<
Button
android:id
=
"@+id/Button01"
android:layout_height
=
"wrap_content"
style
=
"@style/Button"
android:layout_width
=
"fill_parent"
android:text
=
"类似EditText的Button"
>
</
Button
>
</
LinearLayout
>
http://blog.csdn.net/hellogv/
,引用必须注明出处!
越来越多互联网企业都在Android平台上部署其客户端,为了提升用户体验,这些客户端都做得布局合理而且美观.......Android的Style设计就是提升用户体验的关键之一。Android上的Style分为了两个方面:
Theme是针对窗体级别的,改变窗体样式;
Style是针对窗体元素级别的,改变指定控件或者Layout的样式。
Android
系统的themes.xml和style.xml(位于/base/core/res/res/values/)包含了很多系统定义好的style,建议
在里面挑个合适的,然后再继承修改。以下属性是在Themes中比较常见的,源自Android系统本身的themes.xml:
view plain
copy to clipboard
?
<!-- Window attributes -->
<
item
name
=
"windowBackground"
>
@android:drawable/screen_background_dark
</
item
>
<
item
name
=
"windowFrame"
>
@null
</
item
>
<
item
name
=
"windowNoTitle"
>
false
</
item
>
<
item
name
=
"windowFullscreen"
>
false
</
item
>
<
item
name
=
"windowIsFloating"
>
false
</
item
>
<
item
name
=
"windowContentOverlay"
>
@android:drawable/title_bar_shadow
</
item
>
<
item
name
=
"windowTitleStyle"
>
@android:style/WindowTitle
</
item
>
<
item
name
=
"windowTitleSize"
>
25dip
</
item
>
<
item
name
=
"windowTitleBackgroundStyle"
>
@android:style/WindowTitleBackground
</
item
>
<
item
name
=
"android:windowAnimationStyle"
>
@android:style/Animation.Activity
</
item
>
<!-- Window attributes -->
<item name="windowBackground">@android:drawable/screen_background_dark</item>
<item name="windowFrame">@null</item>
<item name="windowNoTitle">false</item>
<item name="windowFullscreen">false</item>
<item name="windowIsFloating">false</item>
<item name="windowContentOverlay">@android:drawable/title_bar_shadow</item>
<item name="windowTitleStyle">@android:style/WindowTitle</item>
<item name="windowTitleSize">25dip</item>
<item name="windowTitleBackgroundStyle">@android:style/WindowTitleBackground</item>
<item name="android:windowAnimationStyle">@android:style/Animation.Activity</item>
至于控件的Style设计就范围大多了,看看Eclipse的Android控件属性编辑器[Properties]就大概知道有哪些条目
,
而Android内置的style.xml也只是定义每个控件的默认样式而已....不过控件的style不建议大改,耐看的style更能让用户长时间
使用软件。另外,控件的Style在很多情况下都用到9.png,学习9.png就必须到/base/core/res/res/drawable-
hdpi里面看看,里面有很多系统内置的9.png。
PS:为了研究Android的Style和Theme,强烈建议下载Android的base.git!
接下来看看本文程序的效果图:
本文程序的themes.xml代码如下,自定义了WindowTitle,:
<?xml version="1.0" encoding="UTF-8"?>
<resources>
<!--继承Android内置的Theme.Light,位于/base/core/res/res/values/themes.xml -->
<style name="Theme" parent="android:Theme.Light">
<item name="android:windowFullscreen">true</item>
<item name="android:windowTitleSize">60dip</item>
<item name="android:windowTitleStyle">@style/WindowTitle</item>
</style>
<style name="WindowTitle" parent="android:WindowTitle">
<item name="android:singleLine">true</item>
<item name="android:shadowColor">#BB000000</item>
<item name="android:shadowRadius">2.75</item>
</style>
</resources>
要为Activity使用theme,要么使用代码 setTheme(R.style.Theme),要么在Application Manifest里面设置
。
本文程序的styles.xml代码如下,background默认使用的是9.png,xml定义在/base/core/res/res/drawable/之下:
<?xml version="1.0" encoding="UTF-8"?>
<resources>
<style name="TextView">
<item name="android:textSize">18sp</item>
<item name="android:textColor">#008</item>
<item name="android:shadowColor">@android:color/black</item>
<item name="android:shadowRadius">2.0</item>
</style>
<style name="EditText">
<item name="android:shadowColor">@android:color/black</item>
<item name="android:shadowRadius">1.0</item>
<item name="android:background">@android:drawable/btn_default</item>
<item name="android:textAppearance">?android:attr/textAppearanceMedium</item>
</style>
<style name="Button">
<item name="android:background">@android:drawable/edit_text</item>
<item name="android:textAppearance">?android:attr/textAppearanceMedium</item>
</style>
</resources>
main.xml代码如下:
view plain
copy to clipboard
?
<?
xml
version
=
"1.0"
encoding
=
"utf-8"
?>
<
LinearLayout
xmlns:android
=
"http://schemas.android.com/apk/res/android"
android:orientation
=
"vertical"
android:layout_width
=
"fill_parent"
android:layout_height
=
"fill_parent"
>
<
TextView
android:layout_width
=
"fill_parent"
android:layout_height
=
"wrap_content"
android:text
=
"@string/hello"
style
=
"@style/TextView"
/>
<
EditText
android:id
=
"@+id/EditText01"
android:layout_height
=
"wrap_content"
style
=
"@style/EditText"
android:layout_width
=
"fill_parent"
android:text
=
"类似Button的EditText"
>
</
EditText
>
<
EditText
android:id
=
"@+id/EditText02"
android:layout_height
=
"wrap_content"
android:layout_width
=
"fill_parent"
android:text
=
"普通的EditText"
>
</
EditText
>
<
Button
android:id
=
"@+id/Button01"
android:layout_height
=
"wrap_content"
style
=
"@style/Button"
android:layout_width
=
"fill_parent"
android:text
=
"类似EditText的Button"
>
</
Button
>
</
LinearLayout
>

相关文章推荐
- Android入门第十六篇之Style与Theme
- Android入门第十六篇之Style与Theme
- Android入门第十六篇之Style与Theme
- Android入门第十六篇之Style与Theme
- Android入门第十六篇之Style与Theme
- Android入门第十六篇之Style与Theme
- Android入门第十六篇之Style与Theme
- Android入门之Style与Theme用法实例解析
- Android入门第十六篇之Style与Theme
- Android入门第十六篇之Style与Theme
- Android笔记之Theme和Style
- android之theme和style
- 安卓(android)的样式(style)和主题(theme)
- android (style&theme)
- Android 避免APP启动闪黑屏的解决办法(Theme和Style)
- Android Style和Theme
- Android样式(style)和主题(theme)资源介绍-android学习之旅(五十六)
- android -详谈Style和Theme
- Android UI–Style 和 Theme
- android的样式(style)与主题(theme)