linux输入子系统(8)--input core
2011-01-13 17:34
453 查看
============================================
作者:yuanlulu
http://blog.csdn.net/yuanlulu
版权没有,但是转载请保留此段声明
============================================
<![endif]-->程序清单 3.1<!--[if gte="" mso="" 9=""><![endif]--><!--[if supportfields=""><![endif]-->所示。
程序清单 <!--[if supportfields=""> STYLEREF 1 /s
<![endif]-->3<!--[if supportfields=""><![endif]-->.<!--[if supportfields="">
SEQ 程序清单 /* ARABIC /s 1
<![endif]-->1<!--[if supportfields=""><![endif]-->
input core初始化
/* driver/input/input.c */
static const struct file_operations input_fops = {
.owner =THIS_MODULE,
.open = input_open_file,
};
static int __init input_init(void)
{
int err;
err =class_register(&input_class);
<!--[if supportfields=""> = 1 /* GB2
<![endif]-->⑴<!--[if supportfields=""><![endif]-->
if (err){
printk(KERN_ERR"input: unable to register input_dev class/n");
returnerr;
}
err =input_proc_init();
<!--[if supportfields=""> = 2 /* GB2
<![endif]-->⑵<!--[if supportfields=""><![endif]-->
if (err)
gotofail1;
err =register_chrdev(INPUT_MAJOR, "input", &input_fops);
<!--[if supportfields=""> = 3 /* GB2
<![endif]-->⑶<!--[if supportfields=""><![endif]-->
if (err){
printk(KERN_ERR"input: unable to register char major %d", INPUT_MAJOR);
gotofail2;
}
return0;
fail2: input_proc_exit();
fail1: class_unregister(&input_class);
returnerr;
}
这个函数主要做了三件事:
<!--[if supportfields=""> =1 /* GB2
<![endif]-->⑴<!--[if supportfields=""><![endif]-->注册一个input_class类。
<!--[if supportfields=""> =2 /* GB2
<![endif]-->⑵<!--[if supportfields=""><![endif]-->在/proc/bus/input下面创建两个节点devices和handlers,通过打印这两个节点的内容可以查看输入子系统的设备驱动层信息和处理层信息。
<!--[if supportfields=""> =3 /* GB2
<![endif]-->⑶<!--[if supportfields=""><![endif]-->申请注册输入子系统的主设备号13,并注册文件结构体input_fops。
input core申请了主设备号,那么所有打开输入设备的处理请求都会传给input_fops的打开函数处理input_open_file,这个函数的实现如<!--[if supportfields="">
REF _Ref282608598 /h <![endif]-->程序清单
3.2<!--[if gte="" mso="" 9=""><![endif]--><!--[if supportfields=""><![endif]-->所示。
程序清单
<!--[if supportfields=""> STYLEREF 1 /s
<![endif]-->3<!--[if supportfields=""><![endif]-->.<!--[if
supportfields=""> SEQ
程序清单/* ARABIC /s 1
<![endif]-->2<!--[if supportfields=""><![endif]-->
input_open_file
/* driver/input/input.c */
static int input_open_file(struct inode *inode, structfile *file)
{
structinput_handler *handler;
conststruct file_operations *old_fops, *new_fops = NULL;
int err;
lock_kernel();
/* Noload-on-demand here? */
handler= input_table[iminor(inode) >> 5];
<!--[if supportfields=""> = 1 /* GB2
<![endif]-->⑴<!--[if supportfields=""><![endif]-->
if(!handler || !(new_fops = fops_get(handler->fops))) {
err= -ENODEV;
gotoout;
}
if(!new_fops->open) {
fops_put(new_fops);
err= -ENODEV;
gotoout;
}
old_fops= file->f_op;
file->f_op= new_fops;
<!--[if supportfields=""> = 2 /* GB2
<![endif]-->⑵<!--[if supportfields=""><![endif]-->
err =new_fops->open(inode, file);
<!--[if supportfields=""> = 3 /* GB2
<![endif]-->⑶<!--[if supportfields=""><![endif]-->
if (err){
fops_put(file->f_op);
file->f_op= fops_get(old_fops);
}
fops_put(old_fops);
out:
unlock_kernel();
returnerr;
}
这个函数做了以下工作:
<!--[if supportfields=""> =1 /* GB2
<![endif]-->⑴<!--[if supportfields=""><![endif]-->根据次设备号从input_table取出handler。
<!--[if supportfields=""> =2 /* GB2
<![endif]-->⑵<!--[if supportfields=""><![endif]-->将handler对应的文件结构体赋给struct file *file。
<!--[if supportfields=""> =3 /* GB2
<![endif]-->⑶<!--[if supportfields=""><![endif]-->调用文件结构体的open函数。
另外从1.4<!--[if gte="" mso="" 9=""><![endif]-->和2.2<!--[if gte="" mso="" 9=""><![endif]-->两节中可以看出input_dev和input_handler注册的时候都是将自己注册进input
core的链表,然后从对方的链表中寻找可以匹配的节点建立连接。并且可以建立一对多的连接。连接后的结构图如<!--[if supportfields="">REF _Ref282529523 /h
<![endif]-->图 3.1<!--[if gte="" mso="" 9=""><![endif]--><!--[if supportfields=""><![endif]-->所示。
图中有两个输入设备,key_dev代表一个按键设备,mice_dev代表一个鼠标设备。根据<!--[if supportfields="">REF _Ref282529849 /r /h
<![endif]-->2.3.1<!--[if gte="" mso="" 9=""><![endif]--><!--[if supportfields=""><![endif]-->节的分析我们知道,mice_dev和key_dev都可以和evdev_handler匹配连接,而只有mice_dev可以和mousedev_handler匹配连接。
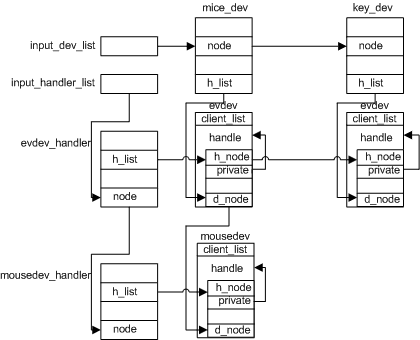
图 <!--[if supportfields=""> STYLEREF 1 /s
<![endif]-->3<!--[if supportfields=""><![endif]-->.<!--[if supportfields="">
SEQ 图 /* ARABIC /s 1
<![endif]-->1<!--[if supportfields=""><![endif]-->
input core结构
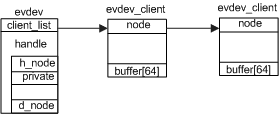
图 <!--[if supportfields=""> STYLEREF 1 /s
<![endif]-->3<!--[if supportfields=""><![endif]-->.<!--[if supportfields="">
SEQ 图 /* ARABIC /s 1
<![endif]-->2<!--[if supportfields=""><![endif]-->
evdev和evdev_client的关系
连接input_dev和input_handler的结构体input_handle往往作为一个更大结构体的成员。对evdev_handler来说这个大结构体是struct
evdev。这个结构体负责管理打开该设备节点的所有线程。每个打开设备的线程用一个struct evdev_client结构体表示。它们的关系如<!--[if supportfields=""> REF_Ref282534100 /h
<![endif]-->图 3.2<!--[if gte="" mso="" 9=""><![endif]--><!--[if supportfields=""><![endif]-->所示。
<![endif]-->3.1<!--[if gte="" mso="" 9=""><![endif]--><!--[if supportfields=""><![endif]-->节已经分析过,input core会在/proc/bus/input下建立两个文件,devices和handlers,读取它们的内容可以得到设备的信息。
在开发板上运行“cat /proc/bus/input/devices”命令,得到以下输出:
[root@zlg /]# cat /proc/bus/input/devices
I: Bus=0019 Vendor=0001 Product=0002Version=0100
<!--[if supportfields="">= 1 /* GB2
<![endif]-->⑴<!--[if supportfields=""><![endif]-->
N: Name="LPC32xxTouchscreen"
<!--[if supportfields="">= 2 /* GB2
<![endif]-->⑵<!--[if supportfields=""><![endif]-->
P: Phys=lpc32xx/input0
<!--[if supportfields="">= 3 /* GB2
<![endif]-->⑶<!--[if supportfields=""><![endif]-->
S:Sysfs=/class/input/input0
<!--[if supportfields="">= 4 /* GB2
<![endif]-->⑷<!--[if supportfields=""><![endif]-->
U: Uniq=
H: Handlers=mouse0 event0
<!--[if supportfields="">= 5 /* GB2
<![endif]-->⑸<!--[if supportfields=""><![endif]-->
B: EV=b
<!--[if supportfields="">= 6 /* GB2
<![endif]-->⑹<!--[if supportfields=""><![endif]-->
B: KEY=400 0 0 0 0 0 0 00 0 0
<!--[if supportfields="">= 7 /* GB2
<![endif]-->⑺<!--[if supportfields=""><![endif]-->
B: ABS=1000003
<!--[if supportfields="">= 8 /* GB2
<![endif]-->⑻<!--[if supportfields=""><![endif]-->
可以看出开发板上只有一个输入设备“LPC32xx Touchscreen”,这是一个触摸屏。各行的含义如下:
<!--[if supportfields=""> =1 /* GB2
<![endif]-->⑴<!--[if supportfields=""><![endif]-->这一行对应input_dev的struct input_id成员的内容,参考<!--[if
supportfields=""> REF _Ref282001696 /h
<![endif]-->程序清单 1.4<!--[if gte="" mso="" 9=""><![endif]--><!--[if supportfields=""><![endif]-->。
<!--[if supportfields=""> =2 /* GB2
<![endif]-->⑵<!--[if supportfields=""><![endif]-->这一行对应input_dev的名字。
<!--[if supportfields=""> =3 /* GB2
<![endif]-->⑶<!--[if supportfields=""><![endif]-->这一行对应input_dev的phys成员。
<!--[if supportfields=""> =4 /* GB2
<![endif]-->⑷<!--[if supportfields=""><![endif]-->这一行对应该设备在/sys下的路径。
<!--[if supportfields=""> =5 /* GB2
<![endif]-->⑸<!--[if supportfields=""><![endif]-->这一行对应和该设备建立连接的handler。可以看到有两个handler与设备建立了连接,这与我们上文的分析一致。对应的两个节点分别是mouse0和event0。
<!--[if supportfields=""> =6 /* GB2
<![endif]-->⑹<!--[if supportfields=""><![endif]-->这一行对应该设备支持的事件,和input_dev的evbit成员一致。由此看出该设备支持三类事件:按键、绝对坐标和同步事件。
<!--[if supportfields=""> =7 /* GB2
<![endif]-->⑺<!--[if supportfields=""><![endif]-->这一行对应该设备支持的按键,和input_dev的keybit成员一致。该设备只支持一个按键:BTN_TOUCH。
<!--[if supportfields=""> =8 /* GB2
<![endif]-->⑻<!--[if supportfields=""><![endif]-->这一行对应该设备支持的绝对值事件,和input_dev的absbit成员一致。该设备支持X轴绝对坐标、Y轴绝对坐标和压力(ABS_PRESSURE)。
下面看看handler的信息:
[root@zlg /]# cat /proc/bus/input/handlers
N: Number=0 Name=kbd
N: Number=1 Name=mousedevMinor=32
N: Number=2 Name=evdevMinor=64
可以看到有三个已经注册的handler,分别处理键盘事件、鼠标事件和一般事件。其中后两个占用设备号,起始的次设备号分别是32和64。这里与上面的分析相符。
用户程序一般不从触摸屏直接读取数据,使用触摸屏一般要通过tslib的接口。下面看一看qt界面的配置文件:
exportQWS_MOUSE_PROTO=Tslib:/dev/input/event0
‘’‘’‘’‘’‘’‘’‘’‘’‘’‘’‘’‘’‘’‘’‘’‘’‘’‘’‘’‘’‘’‘’‘’‘’‘’‘’‘
./hello -qws -fontwenquanyi
第一行的意思是配置鼠标的驱动程序是tslib,使用的设备节点是/dev/input/event0。
现在概括一下触摸屏在输入子系统中的使用方式:系统中有三个可用的handler,分别对应键盘、鼠标和一般事件,触摸屏设备的input_dev可以和后两个建立连接,对应event0和mouse0这两个设备节点,同时tslib使用event0读取触摸屏的事件消息。
可以看出触摸屏的事件是直接传给tslib的,不需要象鼠标一样建立一个专门的handler。
作者:yuanlulu
http://blog.csdn.net/yuanlulu
版权没有,但是转载请保留此段声明
============================================
第3章 输入子系统核心层
上面两章分别讲了Linux输入子系统的设备驱动层和事件处理层,这两层的实现都是建立在输入核心层的基础之上的。核心层负责管理所有的资源并连接驱动层和事件处理层。3.1 inputcore初始化
输入子系统的核心层的实现都在driver/input/input.c文件中,初始化函数如<!--[if supportfields="">REF _Ref282522496 /h<![endif]-->程序清单 3.1<!--[if gte="" mso="" 9=""><![endif]--><!--[if supportfields=""><![endif]-->所示。
程序清单 <!--[if supportfields=""> STYLEREF 1 /s
<![endif]-->3<!--[if supportfields=""><![endif]-->.<!--[if supportfields="">
SEQ 程序清单 /* ARABIC /s 1
<![endif]-->1<!--[if supportfields=""><![endif]-->
input core初始化
/* driver/input/input.c */
static const struct file_operations input_fops = {
.owner =THIS_MODULE,
.open = input_open_file,
};
static int __init input_init(void)
{
int err;
err =class_register(&input_class);
<!--[if supportfields=""> = 1 /* GB2
<![endif]-->⑴<!--[if supportfields=""><![endif]-->
if (err){
printk(KERN_ERR"input: unable to register input_dev class/n");
returnerr;
}
err =input_proc_init();
<!--[if supportfields=""> = 2 /* GB2
<![endif]-->⑵<!--[if supportfields=""><![endif]-->
if (err)
gotofail1;
err =register_chrdev(INPUT_MAJOR, "input", &input_fops);
<!--[if supportfields=""> = 3 /* GB2
<![endif]-->⑶<!--[if supportfields=""><![endif]-->
if (err){
printk(KERN_ERR"input: unable to register char major %d", INPUT_MAJOR);
gotofail2;
}
return0;
fail2: input_proc_exit();
fail1: class_unregister(&input_class);
returnerr;
}
这个函数主要做了三件事:
<!--[if supportfields=""> =1 /* GB2
<![endif]-->⑴<!--[if supportfields=""><![endif]-->注册一个input_class类。
<!--[if supportfields=""> =2 /* GB2
<![endif]-->⑵<!--[if supportfields=""><![endif]-->在/proc/bus/input下面创建两个节点devices和handlers,通过打印这两个节点的内容可以查看输入子系统的设备驱动层信息和处理层信息。
<!--[if supportfields=""> =3 /* GB2
<![endif]-->⑶<!--[if supportfields=""><![endif]-->申请注册输入子系统的主设备号13,并注册文件结构体input_fops。
input core申请了主设备号,那么所有打开输入设备的处理请求都会传给input_fops的打开函数处理input_open_file,这个函数的实现如<!--[if supportfields="">
REF _Ref282608598 /h <![endif]-->程序清单
3.2<!--[if gte="" mso="" 9=""><![endif]--><!--[if supportfields=""><![endif]-->所示。
程序清单
<!--[if supportfields=""> STYLEREF 1 /s
<![endif]-->3<!--[if supportfields=""><![endif]-->.<!--[if
supportfields=""> SEQ
程序清单/* ARABIC /s 1
<![endif]-->2<!--[if supportfields=""><![endif]-->
input_open_file
/* driver/input/input.c */
static int input_open_file(struct inode *inode, structfile *file)
{
structinput_handler *handler;
conststruct file_operations *old_fops, *new_fops = NULL;
int err;
lock_kernel();
/* Noload-on-demand here? */
handler= input_table[iminor(inode) >> 5];
<!--[if supportfields=""> = 1 /* GB2
<![endif]-->⑴<!--[if supportfields=""><![endif]-->
if(!handler || !(new_fops = fops_get(handler->fops))) {
err= -ENODEV;
gotoout;
}
if(!new_fops->open) {
fops_put(new_fops);
err= -ENODEV;
gotoout;
}
old_fops= file->f_op;
file->f_op= new_fops;
<!--[if supportfields=""> = 2 /* GB2
<![endif]-->⑵<!--[if supportfields=""><![endif]-->
err =new_fops->open(inode, file);
<!--[if supportfields=""> = 3 /* GB2
<![endif]-->⑶<!--[if supportfields=""><![endif]-->
if (err){
fops_put(file->f_op);
file->f_op= fops_get(old_fops);
}
fops_put(old_fops);
out:
unlock_kernel();
returnerr;
}
这个函数做了以下工作:
<!--[if supportfields=""> =1 /* GB2
<![endif]-->⑴<!--[if supportfields=""><![endif]-->根据次设备号从input_table取出handler。
<!--[if supportfields=""> =2 /* GB2
<![endif]-->⑵<!--[if supportfields=""><![endif]-->将handler对应的文件结构体赋给struct file *file。
<!--[if supportfields=""> =3 /* GB2
<![endif]-->⑶<!--[if supportfields=""><![endif]-->调用文件结构体的open函数。
3.2 输入子系统的整体结构
input core有两个链表表头input_dev_list和input_handler_list,分别用来连接input_dev(设备驱动)结构和input_handler(事件处理)结构,另外还有一个input_table[8]数组,可以存放8个支持文件操作的handler指针。另外从1.4<!--[if gte="" mso="" 9=""><![endif]-->和2.2<!--[if gte="" mso="" 9=""><![endif]-->两节中可以看出input_dev和input_handler注册的时候都是将自己注册进input
core的链表,然后从对方的链表中寻找可以匹配的节点建立连接。并且可以建立一对多的连接。连接后的结构图如<!--[if supportfields="">REF _Ref282529523 /h
<![endif]-->图 3.1<!--[if gte="" mso="" 9=""><![endif]--><!--[if supportfields=""><![endif]-->所示。
图中有两个输入设备,key_dev代表一个按键设备,mice_dev代表一个鼠标设备。根据<!--[if supportfields="">REF _Ref282529849 /r /h
<![endif]-->2.3.1<!--[if gte="" mso="" 9=""><![endif]--><!--[if supportfields=""><![endif]-->节的分析我们知道,mice_dev和key_dev都可以和evdev_handler匹配连接,而只有mice_dev可以和mousedev_handler匹配连接。
图 <!--[if supportfields=""> STYLEREF 1 /s
<![endif]-->3<!--[if supportfields=""><![endif]-->.<!--[if supportfields="">
SEQ 图 /* ARABIC /s 1
<![endif]-->1<!--[if supportfields=""><![endif]-->
input core结构
图 <!--[if supportfields=""> STYLEREF 1 /s
<![endif]-->3<!--[if supportfields=""><![endif]-->.<!--[if supportfields="">
SEQ 图 /* ARABIC /s 1
<![endif]-->2<!--[if supportfields=""><![endif]-->
evdev和evdev_client的关系
连接input_dev和input_handler的结构体input_handle往往作为一个更大结构体的成员。对evdev_handler来说这个大结构体是struct
evdev。这个结构体负责管理打开该设备节点的所有线程。每个打开设备的线程用一个struct evdev_client结构体表示。它们的关系如<!--[if supportfields=""> REF_Ref282534100 /h
<![endif]-->图 3.2<!--[if gte="" mso="" 9=""><![endif]--><!--[if supportfields=""><![endif]-->所示。
3.3 输入子系统实例分析-触摸屏
<!--[if supportfields=""> REF _Ref282534487 /r /h<![endif]-->3.1<!--[if gte="" mso="" 9=""><![endif]--><!--[if supportfields=""><![endif]-->节已经分析过,input core会在/proc/bus/input下建立两个文件,devices和handlers,读取它们的内容可以得到设备的信息。
在开发板上运行“cat /proc/bus/input/devices”命令,得到以下输出:
[root@zlg /]# cat /proc/bus/input/devices
I: Bus=0019 Vendor=0001 Product=0002Version=0100
<!--[if supportfields="">= 1 /* GB2
<![endif]-->⑴<!--[if supportfields=""><![endif]-->
N: Name="LPC32xxTouchscreen"
<!--[if supportfields="">= 2 /* GB2
<![endif]-->⑵<!--[if supportfields=""><![endif]-->
P: Phys=lpc32xx/input0
<!--[if supportfields="">= 3 /* GB2
<![endif]-->⑶<!--[if supportfields=""><![endif]-->
S:Sysfs=/class/input/input0
<!--[if supportfields="">= 4 /* GB2
<![endif]-->⑷<!--[if supportfields=""><![endif]-->
U: Uniq=
H: Handlers=mouse0 event0
<!--[if supportfields="">= 5 /* GB2
<![endif]-->⑸<!--[if supportfields=""><![endif]-->
B: EV=b
<!--[if supportfields="">= 6 /* GB2
<![endif]-->⑹<!--[if supportfields=""><![endif]-->
B: KEY=400 0 0 0 0 0 0 00 0 0
<!--[if supportfields="">= 7 /* GB2
<![endif]-->⑺<!--[if supportfields=""><![endif]-->
B: ABS=1000003
<!--[if supportfields="">= 8 /* GB2
<![endif]-->⑻<!--[if supportfields=""><![endif]-->
可以看出开发板上只有一个输入设备“LPC32xx Touchscreen”,这是一个触摸屏。各行的含义如下:
<!--[if supportfields=""> =1 /* GB2
<![endif]-->⑴<!--[if supportfields=""><![endif]-->这一行对应input_dev的struct input_id成员的内容,参考<!--[if
supportfields=""> REF _Ref282001696 /h
<![endif]-->程序清单 1.4<!--[if gte="" mso="" 9=""><![endif]--><!--[if supportfields=""><![endif]-->。
<!--[if supportfields=""> =2 /* GB2
<![endif]-->⑵<!--[if supportfields=""><![endif]-->这一行对应input_dev的名字。
<!--[if supportfields=""> =3 /* GB2
<![endif]-->⑶<!--[if supportfields=""><![endif]-->这一行对应input_dev的phys成员。
<!--[if supportfields=""> =4 /* GB2
<![endif]-->⑷<!--[if supportfields=""><![endif]-->这一行对应该设备在/sys下的路径。
<!--[if supportfields=""> =5 /* GB2
<![endif]-->⑸<!--[if supportfields=""><![endif]-->这一行对应和该设备建立连接的handler。可以看到有两个handler与设备建立了连接,这与我们上文的分析一致。对应的两个节点分别是mouse0和event0。
<!--[if supportfields=""> =6 /* GB2
<![endif]-->⑹<!--[if supportfields=""><![endif]-->这一行对应该设备支持的事件,和input_dev的evbit成员一致。由此看出该设备支持三类事件:按键、绝对坐标和同步事件。
<!--[if supportfields=""> =7 /* GB2
<![endif]-->⑺<!--[if supportfields=""><![endif]-->这一行对应该设备支持的按键,和input_dev的keybit成员一致。该设备只支持一个按键:BTN_TOUCH。
<!--[if supportfields=""> =8 /* GB2
<![endif]-->⑻<!--[if supportfields=""><![endif]-->这一行对应该设备支持的绝对值事件,和input_dev的absbit成员一致。该设备支持X轴绝对坐标、Y轴绝对坐标和压力(ABS_PRESSURE)。
下面看看handler的信息:
[root@zlg /]# cat /proc/bus/input/handlers
N: Number=0 Name=kbd
N: Number=1 Name=mousedevMinor=32
N: Number=2 Name=evdevMinor=64
可以看到有三个已经注册的handler,分别处理键盘事件、鼠标事件和一般事件。其中后两个占用设备号,起始的次设备号分别是32和64。这里与上面的分析相符。
用户程序一般不从触摸屏直接读取数据,使用触摸屏一般要通过tslib的接口。下面看一看qt界面的配置文件:
exportQWS_MOUSE_PROTO=Tslib:/dev/input/event0
‘’‘’‘’‘’‘’‘’‘’‘’‘’‘’‘’‘’‘’‘’‘’‘’‘’‘’‘’‘’‘’‘’‘’‘’‘’‘’‘
./hello -qws -fontwenquanyi
第一行的意思是配置鼠标的驱动程序是tslib,使用的设备节点是/dev/input/event0。
现在概括一下触摸屏在输入子系统中的使用方式:系统中有三个可用的handler,分别对应键盘、鼠标和一般事件,触摸屏设备的input_dev可以和后两个建立连接,对应event0和mouse0这两个设备节点,同时tslib使用event0读取触摸屏的事件消息。
可以看出触摸屏的事件是直接传给tslib的,不需要象鼠标一样建立一个专门的handler。

相关文章推荐
- linux驱动——input输入子系统(1)—输入子系统核心层(Input Core)
- linux 输入子系统(4)---- input子系统的初始化
- Linux输入子系统:输入设备编程指南 -- input-programming.txt
- Linux输入子系统:事件的编码 -- event-codes.txt
- Linux输入子系统介绍
- Linux输入子系统:事件的编码 -- event-codes.txt
- linux输入子系统
- Linux输入子系统:事件的编码 -- event-codes.txt
- Linux输入子系统简要分析
- linux input输入子系统分析《三》:S3C2440的触摸屏驱动实例
- linux驱动子系统之输入子系统(2)
- linux输入子系统
- 基于 mini2440 电阻式触摸屏(三):Linux输入子系统(InputSubsystem)
- linux输入子系统之按键驱动
- linux输入子系统
- Linux输入子系统(3):evdev.c
- linux内核输入子系统分析
- Linux输入子系统(Input Subsystem)
- linux 输入子系统(2) platform device
- linux输入子系统--按键驱动