实现FLEX 通过AMF跟PHP通信
2010-11-12 17:33
465 查看
AMF flex一种远调用协议
目标:目前基本使用AMF3 初步会使用flex编写基本程序 熟悉RPC调用
queryphp
框架 目前目前是国内最强大ORM类之一,还附带国内最强的通用权限系统
通用权限系统看这里
http://bbs.chinaunix .net/thread-1691979-1-1.html
queryphp amf插件从symfony 的sfAmfPlugin移植过来
amf调用跟 远程过程调用(RPC)差不多。
服务
文件
放在框架项目 lib/services
或框架目录lib framework/lib/services 没有建一个
如果flex生成的swf和amf调用地址不在同域名,请放一个
crossdomain.xml 文件在URL根目录
crossdomain.xml内容如下
我在本地虚拟了一个域名guofang.com
<?xml version="1.0"?>
<!DOCTYPE cross-domain-policy SYSTEM "http://www.macromedia
.com/xml/dtds/cross-domain-policy.dtd">
<cross-domain-policy>
<allow-access-from domain="*.guofang.com" />
</cross-domain-policy>
复制代码
我们在framework/lib/services 建一个HelloWorldService.class.php文件
没有services目录自己建一个就可以了插件会搜索这里的
HelloWorldService.class.php内容如下
class HelloWorldService extends sfAmfService {
public function sayHello($who) {
return "Hello ".$who; //直接返回名字
}
}
复制代码
我们只要几行代码就可以调用服务文件了。我们在某个项目中调用比如project/router目录下面
路由文件调用内容如下amfRouter.class.php
<?php
class amfRouter extends controller{
public function index()
{
//加载amf插件
import('@plugin.amf.sfAmfGateway');
//调用amf插件
$gateway = new sfAmfGateway();
//输出内容 $gateway->service();为返回内容
//handleRequest 中自动调用 header(SabreAMF_Const::MIMETYPE);
//因为我没有别的内容输出了所以直接输出内容
$gateway->handleRequest();
Return 'ajax';
}
}
?>
复制代码
访问地址记下来,我的是 http://www.guofang.com/project/amf/index
现在我们做前端部分flex 程序
flex 前端文件程序
目标:学会编写flex 程序
其实感觉flex比js好多了,不会有浏览器兼容问题
而且还自带虚拟机,UI很漂亮
缺点是不能到处画UI,不像js那么方便,特别是jQuery很方便做动画效果
我们可以在网上下载flex builder4 安装好,和输入注册码
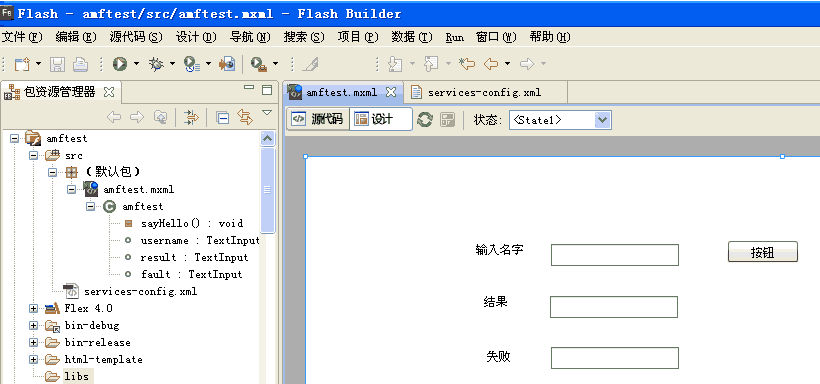
我们创建一个amftest项目


下载
(14.42 KB)
2010-10-03 11:56
创建好mxml文件注意命名input的ID名字,如下面样子
amftest.mxml内容如下
<?xml version="1.0" encoding="utf-8"?>
<s:Application xmlns:fx="http://ns.adobe.com/mxml/2009"
xmlns:s="library://ns.adobe.com/flex/spark"
xmlns:mx="library://ns.adobe.com/flex/mx" minWidth="955" minHeight="600">
<fx:Script>
<![CDATA[
import mx.events.CloseEvent;
import mx.controls.Alert;
import mx.rpc.remoting.mxml.RemoteObject;
import mx.managers.CursorManager;
import mx.rpc.events.ResultEvent;
import mx.rpc.events.FaultEvent;
private function sayHello():void {
var remote:RemoteObject = new RemoteObject("helloworld");
remote.source = "HelloWorldService";
remote.addEventListener("result", function (event:ResultEvent):void {
result.text = event.result.toString();
});
remote.addEventListener("fault", function(event:FaultEvent):void {
Alert.show(event.fault.toString(), "Error");
});
remote.sayHello(username.text);
}
]]>
</fx:Script>
<fx:Declarations>
</fx:Declarations>
<s:TextInput x="246" y="88" id="username"/>
<s:TextInput x="245" y="140" id="result"/>
<s:TextInput x="246" y="191" id="fault"/>
<s:Button x="423" y="85" click="sayHello();" label="按钮"/>
<s:Label x="171" y="88" text="输入名字" width="63" height="24"/>
<s:Label x="179" y="140" text="结果" width="58" height="22"/>
<s:Label x="182" y="195" text="失败" width="58" height="22"/>
</s:Application>
复制代码
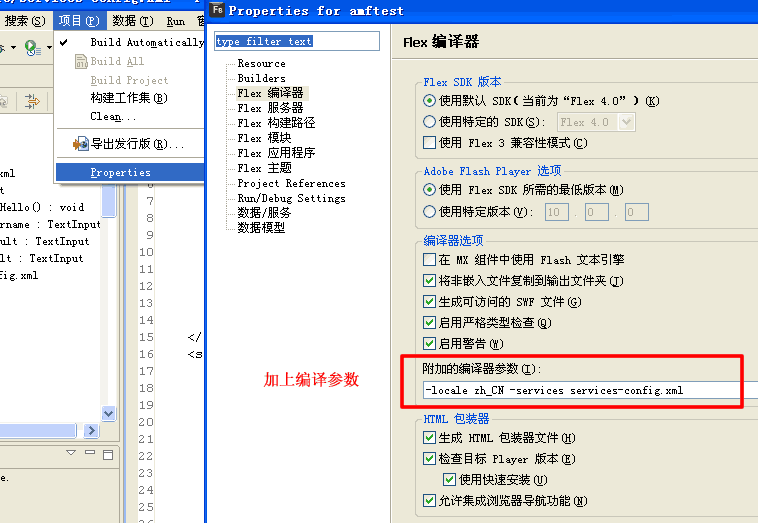
services-config.xml是Remoting设置文件,本测试我们只操作这两个文件就可以了,注意services-config.xml可以导进来
在编译时候我们要把services-config.xml编译上去 加上:-services services-config.xml参数


下载
(22.28 KB)
2010-10-03 11:56
//多个service 服务文件URL可以如下这样添加
//红色表示amf文件地址,注意换成你自己的域名
//上面var remote:RemoteObject = new RemoteObject("helloworld"

; 中的helloworld就是下面id="helloworld"名
services-config.xml内容如下
<?xml version="1.0" encoding="UTF-8"?>
<services-config>
<services>
<service id="helloworld-service"
class="flex.messaging.services.RemotingService"
messageTypes="flex.messaging.messages.RemotingMessage">
<destination id="helloworld">
<channels>
<channel ref="helloworld-channel"/>
</channels>
<properties>
<source>*</source>
</properties>
</destination>
</service>
<service id="flextest-service"
class="flex.messaging.services.RemotingService"
messageTypes="flex.messaging.messages.RemotingMessage">
<destination id="flextest">
<channels>
<channel ref="flextest-channel"/>
</channels>
<properties>
<source>*</source>
</properties>
</destination>
</service>
</services>
<channels>
<channel-definition id="flextest-channel"
class="mx.messaging.channels.AMFChannel">
<endpoint uri="http://www.guofang.com/project/amf/index" class="flex.messaging.endpoints.AMFEndpoint"/>
</channel-definition>
<channel-definition id="helloworld-channel"
class="mx.messaging.channels.AMFChannel">
<endpoint uri="http://www.guofang.com/project/amf/index" class="flex.messaging.endpoints.AMFEndpoint"/>
</channel-definition>
</channels>
</services-config>
复制代码
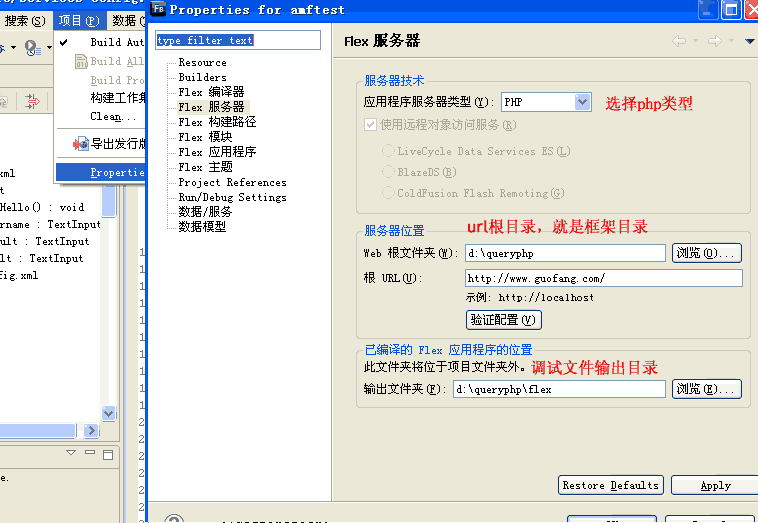
我们编译调试之前还要设置下服务器
,当然可以编译出来再拷过去就可以的


下载
(20.95 KB)
2010-10-03 11:56
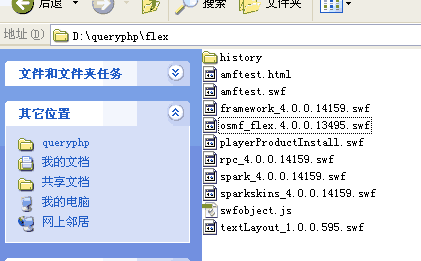
我们开始编译了。如果修改了最好是清除项目已生成的文件
项目->clean选择你的项目就可以了
将会生成如下图样子。浏览器访问
http://www.guofang.com/flex/amftest.html
就可以看到生成好的flex了,可以测试有没有问题


下载
(7.82 KB)
2010-10-03 11:56
可以到http://code.google
.com/p/queryphp/downloads/list
下载queryphp1.0 beta2
附flex程序

amftest.zip
(1.39 MB)
目标:目前基本使用AMF3 初步会使用flex编写基本程序 熟悉RPC调用
queryphp
框架 目前目前是国内最强大ORM类之一,还附带国内最强的通用权限系统
通用权限系统看这里
http://bbs.chinaunix .net/thread-1691979-1-1.html
queryphp amf插件从symfony 的sfAmfPlugin移植过来
amf调用跟 远程过程调用(RPC)差不多。
服务
文件
放在框架项目 lib/services
或框架目录lib framework/lib/services 没有建一个
如果flex生成的swf和amf调用地址不在同域名,请放一个
crossdomain.xml 文件在URL根目录
crossdomain.xml内容如下
我在本地虚拟了一个域名guofang.com
<?xml version="1.0"?>
<!DOCTYPE cross-domain-policy SYSTEM "http://www.macromedia
.com/xml/dtds/cross-domain-policy.dtd">
<cross-domain-policy>
<allow-access-from domain="*.guofang.com" />
</cross-domain-policy>
复制代码
我们在framework/lib/services 建一个HelloWorldService.class.php文件
没有services目录自己建一个就可以了插件会搜索这里的
HelloWorldService.class.php内容如下
class HelloWorldService extends sfAmfService {
public function sayHello($who) {
return "Hello ".$who; //直接返回名字
}
}
复制代码
我们只要几行代码就可以调用服务文件了。我们在某个项目中调用比如project/router目录下面
路由文件调用内容如下amfRouter.class.php
<?php
class amfRouter extends controller{
public function index()
{
//加载amf插件
import('@plugin.amf.sfAmfGateway');
//调用amf插件
$gateway = new sfAmfGateway();
//输出内容 $gateway->service();为返回内容
//handleRequest 中自动调用 header(SabreAMF_Const::MIMETYPE);
//因为我没有别的内容输出了所以直接输出内容
$gateway->handleRequest();
Return 'ajax';
}
}
?>
复制代码
访问地址记下来,我的是 http://www.guofang.com/project/amf/index
现在我们做前端部分flex 程序
flex 前端文件程序
目标:学会编写flex 程序
其实感觉flex比js好多了,不会有浏览器兼容问题
而且还自带虚拟机,UI很漂亮
缺点是不能到处画UI,不像js那么方便,特别是jQuery很方便做动画效果
我们可以在网上下载flex builder4 安装好,和输入注册码
我们创建一个amftest项目


下载
(14.42 KB)
2010-10-03 11:56
创建好mxml文件注意命名input的ID名字,如下面样子
amftest.mxml内容如下
<?xml version="1.0" encoding="utf-8"?>
<s:Application xmlns:fx="http://ns.adobe.com/mxml/2009"
xmlns:s="library://ns.adobe.com/flex/spark"
xmlns:mx="library://ns.adobe.com/flex/mx" minWidth="955" minHeight="600">
<fx:Script>
<![CDATA[
import mx.events.CloseEvent;
import mx.controls.Alert;
import mx.rpc.remoting.mxml.RemoteObject;
import mx.managers.CursorManager;
import mx.rpc.events.ResultEvent;
import mx.rpc.events.FaultEvent;
private function sayHello():void {
var remote:RemoteObject = new RemoteObject("helloworld");
remote.source = "HelloWorldService";
remote.addEventListener("result", function (event:ResultEvent):void {
result.text = event.result.toString();
});
remote.addEventListener("fault", function(event:FaultEvent):void {
Alert.show(event.fault.toString(), "Error");
});
remote.sayHello(username.text);
}
]]>
</fx:Script>
<fx:Declarations>
</fx:Declarations>
<s:TextInput x="246" y="88" id="username"/>
<s:TextInput x="245" y="140" id="result"/>
<s:TextInput x="246" y="191" id="fault"/>
<s:Button x="423" y="85" click="sayHello();" label="按钮"/>
<s:Label x="171" y="88" text="输入名字" width="63" height="24"/>
<s:Label x="179" y="140" text="结果" width="58" height="22"/>
<s:Label x="182" y="195" text="失败" width="58" height="22"/>
</s:Application>
复制代码
services-config.xml是Remoting设置文件,本测试我们只操作这两个文件就可以了,注意services-config.xml可以导进来
在编译时候我们要把services-config.xml编译上去 加上:-services services-config.xml参数


下载
(22.28 KB)
2010-10-03 11:56
//多个service 服务文件URL可以如下这样添加
//红色表示amf文件地址,注意换成你自己的域名
//上面var remote:RemoteObject = new RemoteObject("helloworld"
; 中的helloworld就是下面id="helloworld"名
services-config.xml内容如下
<?xml version="1.0" encoding="UTF-8"?>
<services-config>
<services>
<service id="helloworld-service"
class="flex.messaging.services.RemotingService"
messageTypes="flex.messaging.messages.RemotingMessage">
<destination id="helloworld">
<channels>
<channel ref="helloworld-channel"/>
</channels>
<properties>
<source>*</source>
</properties>
</destination>
</service>
<service id="flextest-service"
class="flex.messaging.services.RemotingService"
messageTypes="flex.messaging.messages.RemotingMessage">
<destination id="flextest">
<channels>
<channel ref="flextest-channel"/>
</channels>
<properties>
<source>*</source>
</properties>
</destination>
</service>
</services>
<channels>
<channel-definition id="flextest-channel"
class="mx.messaging.channels.AMFChannel">
<endpoint uri="http://www.guofang.com/project/amf/index" class="flex.messaging.endpoints.AMFEndpoint"/>
</channel-definition>
<channel-definition id="helloworld-channel"
class="mx.messaging.channels.AMFChannel">
<endpoint uri="http://www.guofang.com/project/amf/index" class="flex.messaging.endpoints.AMFEndpoint"/>
</channel-definition>
</channels>
</services-config>
复制代码
我们编译调试之前还要设置下服务器
,当然可以编译出来再拷过去就可以的


下载
(20.95 KB)
2010-10-03 11:56
我们开始编译了。如果修改了最好是清除项目已生成的文件
项目->clean选择你的项目就可以了
将会生成如下图样子。浏览器访问
http://www.guofang.com/flex/amftest.html
就可以看到生成好的flex了,可以测试有没有问题


下载
(7.82 KB)
2010-10-03 11:56
可以到http://code.google
.com/p/queryphp/downloads/list
下载queryphp1.0 beta2
附flex程序
amftest.zip
(1.39 MB)
相关文章推荐
- Flex与java通过BlazeDS实现通信(简单Demo)
- flex通过非AmfPHP途径与后台交互
- 一个跟操作系统linux和windows差异有关的问题:通过soap的无wsdl实现php程序通信的程序(经典的吐血)
- php与java通过socket通信的实现代码
- php-通过共享内存实现消息队列和进程通信
- php与java通过socket通信的实现代码
- Flex与java通过BlazeDS实现通信(简单Demo)
- flex 通过HTTPService与php通信
- flex4.5+php5.2+amfphp通过RemoteObject交互
- Flex与java 通过BlazeDS实现通信(简单Demo)
- Flex中利用AMFPHP开发包通过PHP调用轻松生成输出PDF文档
- Flex与java通过BlazeDS实现通信(简单Demo)
- PHP实现物流查询(通过快递网API实现)
- linux多线程编程详解教程(线程通过信号量实现通信代码)
- [转]PHP通过zlib扩展实现GZIP压缩输出
- C语言通过串口实现两台电脑通信
- socket编程(二)通过服务端实现客户端之间通信
- SQL实现分页(通过PHP)以及增删改查核心语句
- PHP 通过WMI来实现获取客户端计算机硬件及系统信息:
- php通过baihui网API实现读取word文档并展示
