StatusBar下拉Notification宽度满屏解决方法
2010-11-04 11:37
435 查看
我的是800x600的屏,在Android 的Notifications没有达到满屏幕宽度

原以为就是xml布局文件的问题,直接找到确定其布局的文件status_bar_expanded.xml,发现并无异样,也就是并非是此问题导致。由于经常使用emulator,一个偶尔的机会发现,我自己建立的avd设备也没有达到宽度满屏,但官方内置的几个skins却是可以。看来这里面肯定有差别。在进入到sdk的skins的目录。发现有一硬件配置文件:hardware.ini,里面记载着hw.lcd.density=240,如下
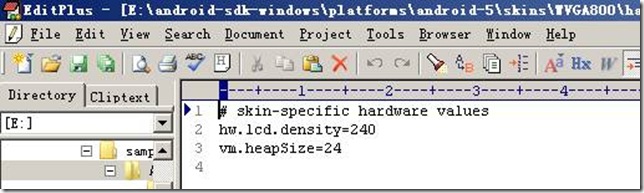
回头看看我自定义的avd设备,density为160。尝试性的,我把自定义的density改为240。果然发现,Notifications竟然也能满屏了。density究竟是何物。在官方的网站上有如下定义:
Density
Based on the screen resolution, the spread of pixels across the physical width and height of the screen.
A screen with lower density has fewer available pixels spread across the screen width and height, where a screen with higher density has more — sometimes significantly more — pixels spread across the same area. The density of a screen is important because, other things being equal, a UI element (such as a button) whose height and width are defined in terms of screen pixels will appear larger on the lower density screen and smaller on the higher density screen.
For simplicity, Android collapses all actual screen densities into three generalized densities: high, medium, and low. Applications can provide custom resources for each of these three densities — the platform handles the scaling of the resources up or down to meet the actual screen density.
再来到相关的源码部分,看系统式如何设置density的。
Density获取的部分在DisplayMetrics.java这个类里面,如果SDK文档中所说的,系统定义了3个等级的density,分别是low-120,medium-160,high-240。
1
public
class
DisplayMetrics
{
2
/*
*
3
*
Standard
quantized
DPI
for
low-density
screens.
4
*/
5
public
static
final
int
DENSITY_LOW
=
120
;
6
7
/*
*
8
*
Standard
quantized
DPI
for
medium-density
screens.
9
*/
10
public
static
final
int
DENSITY_MEDIUM
=
160
;
11
12
/*
*
13
*
Standard
quantized
DPI
for
high-density
screens.
14
*/
15
public
static
final
int
DENSITY_HIGH
=
240
;
16
17
/*
*
18
*
The
reference
density
used
throughout
the
system.
19
*/
20
public
static
final
int
DENSITY_DEFAULT
=
DENSITY_MEDIUM;
21
22
.
.
.
.
同时,代码中把160的Density设置为默认的Density,也就是当前,机器中的Density。那如何设置这个Density。同样在这个类最下面,找到系统获取Density的方法:
1
private
static
int
getDeviceDensity()
{
2
//
qemu.sf.lcd_density
can
be
used
to
override
ro.sf.lcd_density
3
//
when
running
in
the
emulator,
allowing
for
dynamic
configurations.
4
//
The
reason
for
this
is
that
ro.sf.lcd_density
is
write-once
and
is
5
//
set
by
the
init
process
when
it
parses
build.prop
before
anything
else.
6
return
SystemProperties
.
getInt(
"
qemu.sf.lcd_density
"
,
7
SystemProperties
.
getInt(
"
ro.sf.lcd_density
"
,
DENSITY_DEFAULT));
8
}
从这个方法中可以看到,系统会去读系统的属性。先去读ro.sf..lcd_density,若存在,那么设置这个属性记录的density的值。否则,则取默认值也就是160。看来我源码的属性中并没有设置这一density的值。这个值在源码中的system.prop中修改
由于我不想重新编译系统。所以,我直接在编译好的build.prop中加上
ro.sf.lcd_density=240
重启测试,发现果然,屏幕的分辨率发生了变化,且Notification也全屏了。
觉得240的图标都太大了,我重新设置到200。(试验过在我的800x600的屏上,低于200,都不能使之满屏)
此方法也使用于当你机器玩游戏不满屏的情况。把这个density设置低一点,那么就能满屏玩了。
对于手机用户,使用adb shell连接到手机,取得root权限后修改ro.sf.lcd_density的值就能达到效果
另一种方法:
当然,如果你想保证你的Density不变,那可以只修改CompatibilityInfo.java这个文件,把DEFAULT分辨率的值改成当前的屏幕分辨率,我的是800x600的,于是改成:
1
/*
*
2
*
The
default
width
of
the
screen
in
portrait
mode.
3
*/
4
//
public
static
final
int
DEFAULT_PORTRAIT_WIDTH
=
320;
5
public
static
final
int
DEFAULT_PORTRAIT_WIDTH
=
600
;
6
/*
*
7
*
The
default
height
of
the
screen
in
portrait
mode.
8
*/
9
//
public
static
final
int
DEFAULT_PORTRAIT_HEIGHT
=
480;
10
public
static
final
int
DEFAULT_PORTRAIT_HEIGHT
=
800
;

原以为就是xml布局文件的问题,直接找到确定其布局的文件status_bar_expanded.xml,发现并无异样,也就是并非是此问题导致。由于经常使用emulator,一个偶尔的机会发现,我自己建立的avd设备也没有达到宽度满屏,但官方内置的几个skins却是可以。看来这里面肯定有差别。在进入到sdk的skins的目录。发现有一硬件配置文件:hardware.ini,里面记载着hw.lcd.density=240,如下
回头看看我自定义的avd设备,density为160。尝试性的,我把自定义的density改为240。果然发现,Notifications竟然也能满屏了。density究竟是何物。在官方的网站上有如下定义:
Density
Based on the screen resolution, the spread of pixels across the physical width and height of the screen.
A screen with lower density has fewer available pixels spread across the screen width and height, where a screen with higher density has more — sometimes significantly more — pixels spread across the same area. The density of a screen is important because, other things being equal, a UI element (such as a button) whose height and width are defined in terms of screen pixels will appear larger on the lower density screen and smaller on the higher density screen.
For simplicity, Android collapses all actual screen densities into three generalized densities: high, medium, and low. Applications can provide custom resources for each of these three densities — the platform handles the scaling of the resources up or down to meet the actual screen density.
再来到相关的源码部分,看系统式如何设置density的。
Density获取的部分在DisplayMetrics.java这个类里面,如果SDK文档中所说的,系统定义了3个等级的density,分别是low-120,medium-160,high-240。
1
public
class
DisplayMetrics
{
2
/*
*
3
*
Standard
quantized
DPI
for
low-density
screens.
4
*/
5
public
static
final
int
DENSITY_LOW
=
120
;
6
7
/*
*
8
*
Standard
quantized
DPI
for
medium-density
screens.
9
*/
10
public
static
final
int
DENSITY_MEDIUM
=
160
;
11
12
/*
*
13
*
Standard
quantized
DPI
for
high-density
screens.
14
*/
15
public
static
final
int
DENSITY_HIGH
=
240
;
16
17
/*
*
18
*
The
reference
density
used
throughout
the
system.
19
*/
20
public
static
final
int
DENSITY_DEFAULT
=
DENSITY_MEDIUM;
21
22
.
.
.
.
同时,代码中把160的Density设置为默认的Density,也就是当前,机器中的Density。那如何设置这个Density。同样在这个类最下面,找到系统获取Density的方法:
1
private
static
int
getDeviceDensity()
{
2
//
qemu.sf.lcd_density
can
be
used
to
override
ro.sf.lcd_density
3
//
when
running
in
the
emulator,
allowing
for
dynamic
configurations.
4
//
The
reason
for
this
is
that
ro.sf.lcd_density
is
write-once
and
is
5
//
set
by
the
init
process
when
it
parses
build.prop
before
anything
else.
6
return
SystemProperties
.
getInt(
"
qemu.sf.lcd_density
"
,
7
SystemProperties
.
getInt(
"
ro.sf.lcd_density
"
,
DENSITY_DEFAULT));
8
}
从这个方法中可以看到,系统会去读系统的属性。先去读ro.sf..lcd_density,若存在,那么设置这个属性记录的density的值。否则,则取默认值也就是160。看来我源码的属性中并没有设置这一density的值。这个值在源码中的system.prop中修改
由于我不想重新编译系统。所以,我直接在编译好的build.prop中加上
ro.sf.lcd_density=240
重启测试,发现果然,屏幕的分辨率发生了变化,且Notification也全屏了。
觉得240的图标都太大了,我重新设置到200。(试验过在我的800x600的屏上,低于200,都不能使之满屏)
此方法也使用于当你机器玩游戏不满屏的情况。把这个density设置低一点,那么就能满屏玩了。
对于手机用户,使用adb shell连接到手机,取得root权限后修改ro.sf.lcd_density的值就能达到效果
另一种方法:
当然,如果你想保证你的Density不变,那可以只修改CompatibilityInfo.java这个文件,把DEFAULT分辨率的值改成当前的屏幕分辨率,我的是800x600的,于是改成:
1
/*
*
2
*
The
default
width
of
the
screen
in
portrait
mode.
3
*/
4
//
public
static
final
int
DEFAULT_PORTRAIT_WIDTH
=
320;
5
public
static
final
int
DEFAULT_PORTRAIT_WIDTH
=
600
;
6
/*
*
7
*
The
default
height
of
the
screen
in
portrait
mode.
8
*/
9
//
public
static
final
int
DEFAULT_PORTRAIT_HEIGHT
=
480;
10
public
static
final
int
DEFAULT_PORTRAIT_HEIGHT
=
800
;

相关文章推荐
- iOS7的Cell的分割线宽度不满屏,解决方法
- iOS7的Cell的分割线宽度不满屏,解决方法
- iOS解决Cell的分割线宽度不满屏的方法
- StatusBar下拉Notification宽度满屏解决方法
- iOS7的Cell的分割线宽度不满屏,解决方法
- StatusBar下拉Notification宽度满屏解决方法
- 解决IE7一下版本的最小宽度。最大可以使用类似方法
- grid(datagrid、treegrid)自适应高度和宽度解决方法
- ecshop加广告出现广告位的宽度值必须在1到1024之间的解决方法
- css 行级元素在多浏览器下的宽度问题 与解决方法
- Android编程中TextView宽度过大导致Drawable无法居中问题解决方法
- 固定宽度下拉列表中option内容显示不全问题解决方法
- vmware下ubuntu不满屏解决方法
- grid(datagrid、treegrid)自适应高度和宽度解决方法
- 解决表格设置table-layout:fixed后单元格宽度设置无效的方法
- 表格Table宽度设置无效的解决方法
- 固定宽度下拉列表中option内容显示不全问题解决方法
- 在ie7、ie8下 td th宽度解决方法
- Word表格不能调整宽度的解决方法