AMFPHP 入门教程。
2010-08-12 14:32
155 查看
不想传递拆分字符串,解析串行XML了吧?
厌烦JSON了?
试试AMF吧,传送多种数据格式。
首先下载AMFPHP
(本教程使用1.9BETA2)你可以选择其他版本 在这里选择下载
下载后,解压缩,把文件夹中的amfphp
文件夹拷贝到 APACHE服务器的网站根目录。
然后打开浏览器,输入
http://localhost/amfphp/gateway.php
确定
如果提示:
amfphp and this gateway are installed correctly. You may
now connect to this gateway from Flash.
Note: If you're reading an old tutorial, it will tell you
that you should see a download window instead of this message. This
confused people so this is the new behaviour starting from amfphp 1.2.
View the amfphp
documentation
Load the service browser
说明安装成功。
打开网站根目录的AMFPHP文件夹,进入SERVICES文件夹,新建一个PHP文件命名为HELLOWORLD.php
拷贝以下代码:
<?
php
class
HelloWorld
{
function
HelloWorld()
{
$this
->
methodTable
=
array
(
"
say
"
=>
array
(
"
access
"
=>
"
remote
"
,
"
description
"
=>
"
Pings back a message
"
)
);
}
function
say(
$sMessage
)
{
return
'
You said:
'
.
$sMessage
;
}
}
?>
保存!
在浏览器地址栏输入 http://localhost/amfphp/browser/
回车
AMFPHP的项目管理器:
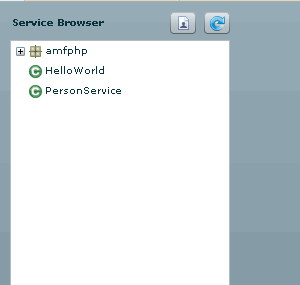
单击 HelloWorld
看到一下内容,就是HELLOWORLD项目具体内容:
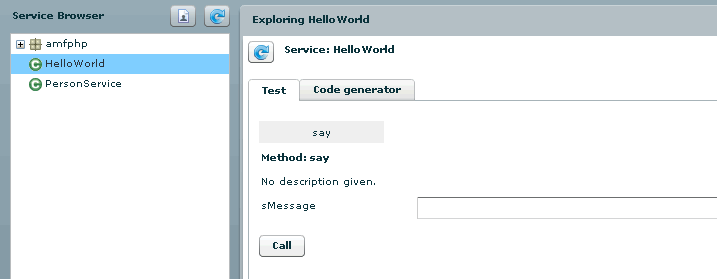
在sMessage输入内容(比如"xiaoxiaocainiao"), 单击call按钮:
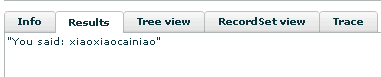
看到页面下方的提示结果:
好了,你已经初步学会安装AMFPHP并使用了,具体的语法,函数,还需要查看一下官方的文档啦。
下面一起来做一个FLASH通过AMFPHP和PHP交互的小例子:
到这里下载AMFPHP for FLASH8
的组件,如果你使用其他版本,请到这里选择下载:http://www.adobe.com/products/flashremoting/downloads/components/
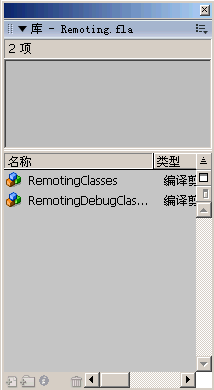
下载后安装,完毕后打开FLASH ,查看 “窗口|公用库|Remoting”就可以看到AMFPHP的组件了。
新建立一个工程,拖一个RemotingClasses组件到舞台的任何地方,再拖一个List组件,命名为myls,拖一个Button组件,命名
为"mybt"
在第一帧的代码行复制以下代码:
import mx.remoting.
*
;
import mx.rpc.
*
;
import mx.utils.Delegate;
import mx.remoting.debug.NetDebug;
var
gatewayUrl:String
=
"
http://localhost/amfphp/gateway.php
"
;
var
service:Service;
NetDebug.initialize();
service
=
new
Service(gatewayUrl,
null
,
"
PersonService
"
);
function
getPerson() {
trace(
"
getPerson
"
);
var
pc:PendingCall
=
service.getPerson();
pc.responder
=
new
RelayResponder(
this
,
"
handleGetPerson
"
);
}
function
handleGetPerson(re:ResultEvent) {
trace(
"
handleGetPerson
"
);
trace(re.result.getItemAt(
0
).name);
_root.mytree.dataProvider
=
re.result;
_root.mydg.dataProvider
=
re.result;
}
function
onClick() {
getPerson();
}
mybt.addEventListener(
"
click
"
, Delegate.create(
this
, onClick));
在AMFPHP的SERVICES文件夹下新建一个文件,命名为PersonService.php
复制一下内容到PersonService.php
<?
php
class
PersonService
{
function
PersonService()
{
$this
->
methodTable
=
array
(
"
getPerson
"
=>
array
(
"
access
"
=>
"
remote
"
)
);
mysql_connect
(
'
localhost
'
,
'
root
'
,
'
wuliqunao
'
);
mysql_select_db
(
'
test
'
);
}
function
getPerson()
{
$sql
=
sprintf
(
"
SELECT * FROM persons
"
);
$query
=
mysql_query
(
$sql
);
return
$query
;
}
}
?>
好了,发布你的程序,单击Button按钮,看到结果:
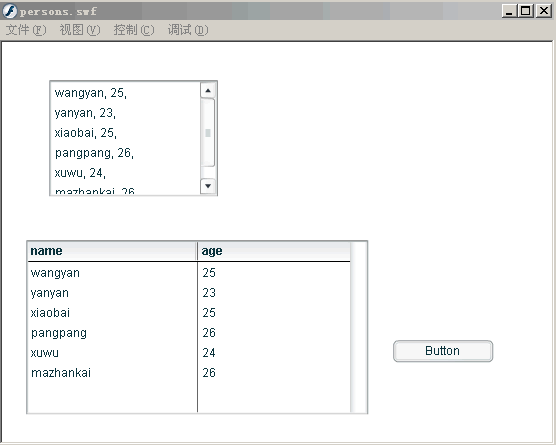
当然了,你的本机需要有个MYSQL数据有,里面简历一个test数据库,这个库里面创建一个persons数据表,表里2个字段,一个是name,一个
是age.(表告诉我,你搞不好这个库啊,搜一个MYSQL数据库入门教程,一下就知道啦。)
好了,大功告成,开始学习AMFPHP之路吧~~~~
转自:http://www.cnblogs.com/xxcainiao/archive/2008/04/17/1158606.html
厌烦JSON了?
试试AMF吧,传送多种数据格式。
首先下载AMFPHP
(本教程使用1.9BETA2)你可以选择其他版本 在这里选择下载
下载后,解压缩,把文件夹中的amfphp
文件夹拷贝到 APACHE服务器的网站根目录。
然后打开浏览器,输入
http://localhost/amfphp/gateway.php
确定
如果提示:
amfphp and this gateway are installed correctly. You may
now connect to this gateway from Flash.
Note: If you're reading an old tutorial, it will tell you
that you should see a download window instead of this message. This
confused people so this is the new behaviour starting from amfphp 1.2.
View the amfphp
documentation
Load the service browser
说明安装成功。
打开网站根目录的AMFPHP文件夹,进入SERVICES文件夹,新建一个PHP文件命名为HELLOWORLD.php
拷贝以下代码:
<?
php
class
HelloWorld
{
function
HelloWorld()
{
$this
->
methodTable
=
array
(
"
say
"
=>
array
(
"
access
"
=>
"
remote
"
,
"
description
"
=>
"
Pings back a message
"
)
);
}
function
say(
$sMessage
)
{
return
'
You said:
'
.
$sMessage
;
}
}
?>
保存!
在浏览器地址栏输入 http://localhost/amfphp/browser/
回车
AMFPHP的项目管理器:
单击 HelloWorld
看到一下内容,就是HELLOWORLD项目具体内容:
在sMessage输入内容(比如"xiaoxiaocainiao"), 单击call按钮:
看到页面下方的提示结果:
好了,你已经初步学会安装AMFPHP并使用了,具体的语法,函数,还需要查看一下官方的文档啦。
下面一起来做一个FLASH通过AMFPHP和PHP交互的小例子:
到这里下载AMFPHP for FLASH8
的组件,如果你使用其他版本,请到这里选择下载:http://www.adobe.com/products/flashremoting/downloads/components/
下载后安装,完毕后打开FLASH ,查看 “窗口|公用库|Remoting”就可以看到AMFPHP的组件了。
新建立一个工程,拖一个RemotingClasses组件到舞台的任何地方,再拖一个List组件,命名为myls,拖一个Button组件,命名
为"mybt"
在第一帧的代码行复制以下代码:
import mx.remoting.
*
;
import mx.rpc.
*
;
import mx.utils.Delegate;
import mx.remoting.debug.NetDebug;
var
gatewayUrl:String
=
"
http://localhost/amfphp/gateway.php
"
;
var
service:Service;
NetDebug.initialize();
service
=
new
Service(gatewayUrl,
null
,
"
PersonService
"
);
function
getPerson() {
trace(
"
getPerson
"
);
var
pc:PendingCall
=
service.getPerson();
pc.responder
=
new
RelayResponder(
this
,
"
handleGetPerson
"
);
}
function
handleGetPerson(re:ResultEvent) {
trace(
"
handleGetPerson
"
);
trace(re.result.getItemAt(
0
).name);
_root.mytree.dataProvider
=
re.result;
_root.mydg.dataProvider
=
re.result;
}
function
onClick() {
getPerson();
}
mybt.addEventListener(
"
click
"
, Delegate.create(
this
, onClick));
在AMFPHP的SERVICES文件夹下新建一个文件,命名为PersonService.php
复制一下内容到PersonService.php
<?
php
class
PersonService
{
function
PersonService()
{
$this
->
methodTable
=
array
(
"
getPerson
"
=>
array
(
"
access
"
=>
"
remote
"
)
);
mysql_connect
(
'
localhost
'
,
'
root
'
,
'
wuliqunao
'
);
mysql_select_db
(
'
test
'
);
}
function
getPerson()
{
$sql
=
sprintf
(
"
SELECT * FROM persons
"
);
$query
=
mysql_query
(
$sql
);
return
$query
;
}
}
?>
好了,发布你的程序,单击Button按钮,看到结果:
当然了,你的本机需要有个MYSQL数据有,里面简历一个test数据库,这个库里面创建一个persons数据表,表里2个字段,一个是name,一个
是age.(表告诉我,你搞不好这个库啊,搜一个MYSQL数据库入门教程,一下就知道啦。)
好了,大功告成,开始学习AMFPHP之路吧~~~~
转自:http://www.cnblogs.com/xxcainiao/archive/2008/04/17/1158606.html

相关文章推荐
- AMFPHP入门教程。
- 韩顺平_php从入门到精通_视频教程_第20讲_仿sohu首页面布局_可爱屋首页面_学习笔记_源代码图解_PPT文档整理
- 一贴学会PHP 新手入门教程
- 【PHP面向对象(OOP)编程入门教程】12.重载新的方法(parent::)
- php入门教程:stripos 实例教程
- PHPExcel入门教程
- 【PHP面向对象(OOP)编程入门教程】4.如何抽象出一个类?
- 最好的PHP入门教程推荐:100篇PHP教程精华推荐
- Memcache 入门教程 Memcache php 缓存技术
- php和mysql web开发(原书第4版) 最佳的PHP快速入门到精通教程
- PHP 数组入门教程小结
- php 模板标签入门教程[file_get_content]
- RabbitMQ官方中文入门教程(PHP版) 第三部分:发布/订阅(Publish/Subscribe)
- php版交通银行网银支付接口开发入门教程
- PHP模板之Smarty安装与使用入门教程
- 韩顺平_php从入门到精通_视频教程_学习笔记_源代码图解_PPT文档整理_目录
- php七天入门教程第二天
- PHP快速入门教程:WHILE循环的使用示例
- PHP入门教程之上传文件实例详解
- PHP入门教程之字符串处理技巧总结(转换,过滤,解析,查找,截取,替换等)