基于Visual C++2010 与office2010开发办公自动化(19)- 使用自动化生成Word图表
2010-06-13 22:01
471 查看
VS2010新特性:
Office Word 2010
Office Word 2010 增强了 Navigation Pane 特性,用户可在 Navigation Pane 中快速切换至任何一章节的开头(根据标题样式判断),同时也可在输入框中进行即时搜索,包含关键词的章节标题会高亮显示。例如
Office Word 2010 也增加了在线实时协作功能,用户可以从 Office Word Web App 中启动 Word 2010 进行在线文档的编辑,并可在左下角看到同时编辑的其他用户(包括其他联系方式、IM 等信息,需要 Office Communicator)。而当其他用户修改了某处后,Word 2010 会提醒当前用户进行同步。(注:此功能也存在于部分其他 Office 2010 程序中)
另外,用户可在 Office Word 2010, Office PowerPoint 2010 以及 Office OneNote 2010 等 Office 2010 程序中直接插入其他正在运行的软件的截图。

废话不多说了,下面来用vc++2010实现在应用程序中使用自动化生成Word图表
1.启动VS2010

2.创建一个CLR项目如下,在窗体中插入一个Button,插入背景,如下图所示:
3.添加下列引用

4.在Form1.h中插入以下代码,详细见代码分析与注释
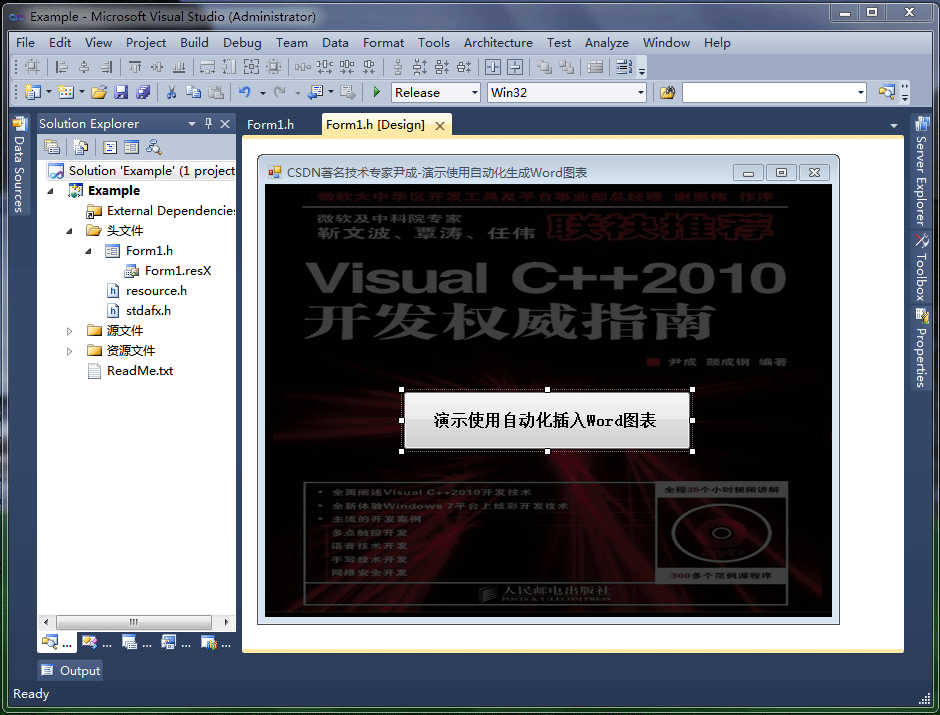
5.启动调试运行如下:

点击”演示使用自动化插入Word图表“按钮启动word,显示如下,word中自动插入了一个图表:

成功的演示了在word中插入图表的方法,实际应用还需读者自行研究揣摩,以实现更为复杂高效的功能。
Office Word 2010
Office Word 2010 增强了 Navigation Pane 特性,用户可在 Navigation Pane 中快速切换至任何一章节的开头(根据标题样式判断),同时也可在输入框中进行即时搜索,包含关键词的章节标题会高亮显示。例如
Office Word 2010 也增加了在线实时协作功能,用户可以从 Office Word Web App 中启动 Word 2010 进行在线文档的编辑,并可在左下角看到同时编辑的其他用户(包括其他联系方式、IM 等信息,需要 Office Communicator)。而当其他用户修改了某处后,Word 2010 会提醒当前用户进行同步。(注:此功能也存在于部分其他 Office 2010 程序中)
另外,用户可在 Office Word 2010, Office PowerPoint 2010 以及 Office OneNote 2010 等 Office 2010 程序中直接插入其他正在运行的软件的截图。
废话不多说了,下面来用vc++2010实现在应用程序中使用自动化生成Word图表
1.启动VS2010
2.创建一个CLR项目如下,在窗体中插入一个Button,插入背景,如下图所示:
3.添加下列引用
4.在Form1.h中插入以下代码,详细见代码分析与注释
#pragma once

namespace yincheng {
using namespace System;
using namespace System::ComponentModel;
using namespace System::Collections;
using namespace System::Windows::Forms;
using namespace System::Data;
using namespace System::Drawing;
/// <summary>
/// Form1 摘要
///
/// 警告: 如果更改此类的名称,则需要更改
///          与此类所依赖的所有 .resx 文件关联的托管资源编译器工具的
///          “资源文件名”属性。否则,
///          设计器将不能与此窗体的关联
///          本地化资源正确交互。
/// </summary>
public ref class Form1 : public System::Windows::Forms::Form
{
public:
Form1(void)
{
InitializeComponent();
//
//TODO: 在此处添加构造函数代码
//
}
protected:
/// <summary>
/// 清理所有正在使用的资源。
/// </summary>
~Form1()
{
if (components)
{
delete components;
}
}
private: System::Windows::Forms::Button^  button1;
protected:
private:
/// <summary>
/// 必需的设计器变量。
/// </summary>
System::ComponentModel::Container ^components;
#pragma region Windows Form Designer generated code
/// <summary>
/// 设计器支持所需的方法 - 不要
/// 使用代码编辑器修改此方法的内容。
/// </summary>
void InitializeComponent(void)
{
System::ComponentModel::ComponentResourceManager^  resources = (gcnew System::ComponentModel::ComponentResourceManager(Form1::typeid));
this->button1 = (gcnew System::Windows::Forms::Button());
this->SuspendLayout();
//
// button1
//
this->button1->Font = (gcnew System::Drawing::Font(L"SimSun", 12, System::Drawing::FontStyle::Bold, System::Drawing::GraphicsUnit::Point,
static_cast<System::Byte>(134)));
this->button1->Location = System::Drawing::Point(138, 207);
this->button1->Name = L"button1";
this->button1->Size = System::Drawing::Size(288, 59);
this->button1->TabIndex = 0;
this->button1->Text = L"演示使用自动化插入Word图表";
this->button1->UseVisualStyleBackColor = true;
this->button1->Click += gcnew System::EventHandler(this, &Form1::button1_Click);
//
// Form1
//
this->AutoScaleDimensions = System::Drawing::SizeF(6, 12);
this->AutoScaleMode = System::Windows::Forms::AutoScaleMode::Font;
this->BackColor = System::Drawing::Color::Black;
this->BackgroundImage = (cli::safe_cast<System::Drawing::Image^  >(resources->GetObject(L"$this.BackgroundImage")));
this->ClientSize = System::Drawing::Size(567, 433);
this->Controls->Add(this->button1);
this->Name = L"Form1";
this->StartPosition = System::Windows::Forms::FormStartPosition::CenterScreen;
this->Text = L"CSDN著名技术专家尹成-演示使用自动化生成Word图表";
this->ResumeLayout(false);
}
#pragma endregion
//演示使用自动化插入Word图表
private: System::Void button1_Click(System::Object^  sender, System::EventArgs^  e) {
Microsoft::Office::Interop::Word::ApplicationClass^ MyWord;
Object^ MyMissing;
Object^ MyEndOfDoc;
Microsoft::Office::Interop::Word::Range^ MyRange;
Microsoft::Office::Interop::Word::_Document^ MyDoc;
Microsoft::Office::Interop::Word::InlineShape^ MyShape;
Object^ MyClassType;
Object^ MyChart;
Object^ MyChartApp;
array<System::Object^>^ MyArray;
try
{
MyMissing=System::Reflection::Missing::Value;
// endofdoc 是一个预定义的书签
MyEndOfDoc="//endofdoc";
MyWord=gcnew Microsoft::Office::Interop::Word::ApplicationClass();
MyWord->Visible= true;
MyDoc=MyWord->Documents->Add(MyMissing,MyMissing,MyMissing, MyMissing);
//插入图表
MyClassType="MSGraph.Chart.8";
MyRange=MyDoc->Bookmarks[MyEndOfDoc]->Range;
System::Reflection::Binder^ MyBinder;
MyShape=MyRange->InlineShapes->AddOLEObject(MyClassType,MyMissing, MyMissing, MyMissing,MyMissing,MyMissing, MyMissing, MyMissing);
MyChart=MyShape->OLEFormat->Object;
MyChartApp=MyChart->GetType()->InvokeMember("Application",System::Reflection::BindingFlags::GetProperty,MyBinder, MyChart,MyArray);
MyShape->Width=MyWord->InchesToPoints((float)5.50);
MyShape->Height=MyWord->InchesToPoints((float)2.57);
MyRange=MyDoc->Bookmarks[MyEndOfDoc]->Range;
MyRange->InsertParagraphAfter();
this->Close();
}
catch(Exception^ MyEx)
{
MessageBox::Show(MyEx->Message,"信息提示", MessageBoxButtons::OK, MessageBoxIcon::Information);
}
}
};
}
5.启动调试运行如下:
点击”演示使用自动化插入Word图表“按钮启动word,显示如下,word中自动插入了一个图表:
成功的演示了在word中插入图表的方法,实际应用还需读者自行研究揣摩,以实现更为复杂高效的功能。

相关文章推荐
- 基于Visual C++2010 与office2010开发办公自动化(25)-如何使用自动化生成Excel图表
- 基于Visual C++2010 与office2010开发办公自动化(26)-如何使用自动化输出Excel查询表
- 基于Visual C++2010 与office2010开发办公自动化(23)- 使用剪贴板导出Excel文件
- 基于Visual C++2010 与office2010开发办公自动化(16)-如何设置新建Word文档属性
- 基于Visual C++2010 与office2010开发办公自动化(18)- 如何使用自动化导出Word文件
- 基于Visual C++2010 与office2010开发办公自动化(24)-使用自动化导出Excel文件
- 基于Visual C++2010 与office2010开发办公自动化(24)-使用自动化导出Excel文件
- 基于Visual C++2010 与office2010开发办公自动化(17)-使用自动化运行Word宏
- 基于Visual C++2010 与office2010开发办公自动化(22)- 动态创建播放幻灯片
- 基于Visual C++2010 与office2010开发办公自动化(27)-实现Office晚期自动化绑定
- 基于Visual C++2010 与office2010开发办公自动化(20)- 动态创建播放幻灯片
- 基于Visual C++2010 与office2010开发办公自动化(21)- 直接播放幻灯片文件
- 基于MVC+EasyUI的Web开发框架经验总结(4)--使用图表控件Highcharts
- Android开发——使用Jword生成本地word文档
- 使用Eclipse基于Maven使用Java开发WordCount程序项目
- 基于Visual Studio 2010与Office 2010开发办公自动化应用(VSTO)
- 基于MVC4+EasyUI的Web开发框架经验总结(4)--使用图表控件Highcharts
- 基于Visual C++2010与office2010开发办公自动应用(1)在自己的程序里面打开office文档
- 前端基于react,后端基于.net core2.0的开发之路(番外篇) 后端使用T4模板,生成某些类
- python使用open flash chart生成图表(基于pyofc2)