SuperSocket Quick Start
2010-06-11 17:12
253 查看
This guide will introduce how to
create a simple command line socket application using SupperSocket
application framework.
About SuperSocket
:
http://www.cnblogs.com/jzywh/archive/2010/06/09/supersocket.html
1. Create a new project named “EchoService” in a new empty
solution
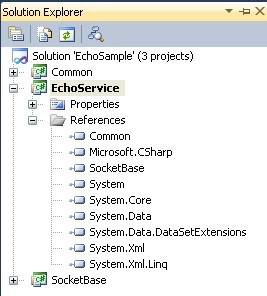
2. Add the project “SocketServiceCore”(which is belong to SuperSocket)
into the solution, and then let the project “EchoService” reference it
3. Add session class and server class
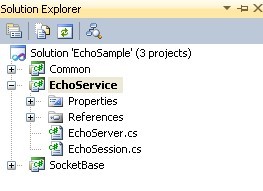
EchoSession.cs


EchoSession
using
System;
using
System.Collections.Generic;
using
System.Linq;
using
System.Text;
using
SuperSocket.SocketServiceCore;
namespace
EchoService
{
public
class
EchoSession : AppSession
<
EchoSession
>
{
private
SocketContext m_Context;
protected
override
void
OnClosed()
{
}
protected
override
void
OnInit()
{
m_Context
=
new
SocketContext();
}
public
override
void
SayWelcome()
{
SendResponse(
"
Welcome to EchoServer!
"
);
}
public
override
void
HandleExceptionalError(Exception e)
{
SendResponse(
"
Server side error occurred!
"
);
}
public
override
SocketContext Context
{
get
{
return
m_Context; }
}
}
}
EchoServer.cs
EchoServer
using
System;
using
System.Collections.Generic;
using
System.Linq;
using
System.Text;
using
SuperSocket.SocketServiceCore;
namespace
EchoService
{
public
class
EchoServer : AppServer
<
EchoSession
>
{
public
override
bool
IsReady
{
get
{
return
true
; }
}
}
}
4. Add command class
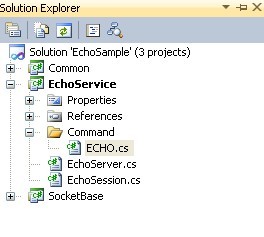
ECHO.cs
ECHO
using
System;
using
System.Collections.Generic;
using
System.Linq;
using
System.Text;
using
SuperSocket.SocketServiceCore.Command;
namespace
EchoService.Command
{
public
class
ECHO : ICommand
<
EchoSession
>
{
#region
ICommand<EchoSession> Members
public
void
Execute(EchoSession session, CommandInfo commandData)
{
session.SendResponse(commandData.Param);
}
#endregion
}
}
5. Build the project “EchoService” and then copy outputted assemblies to
the output dir of the project “SocketService” (provided by
SupperSocket, build it in advance please)
6. Update app.config of SocketService to use EchoService
SuperSocket.SocketService.exe.config
<?
xml version
=
"
1.0
"
encoding
=
"
utf-8
"
?>
<
configuration
>
<
configSections
>
<
section name
=
"
loggingConfiguration
"
type
=
"
Microsoft.Practices.EnterpriseLibrary.Logging.Configuration.LoggingSettings, Microsoft.Practices.EnterpriseLibrary.Logging
"
/>
<
section name
=
"
socketServer
"
type
=
"
SuperSocket.SocketServiceCore.Configuration.SocketServiceConfig, SuperSocket.SocketServiceCore
"
/>
</
configSections
>
<
appSettings
>
<
add key
=
"
ServiceName
"
value
=
"
EchoService
"
/>
</
appSettings
>
<
socketServer
>
<
servers
>
<
add name
=
"
Default Echo Server
"
serviceName
=
"
EchoService
"
ip
=
"
Any
"
port
=
"
911
"
mode
=
"
Async
"
/>
</
servers
>
<
services
>
<
add serviceName
=
"
EchoService
"
baseAssembly
=
"
EchoService.EchoServer, EchoService
"
/>
</
services
>
</
socketServer
>
<
loggingConfiguration name
=
"
Logging Application Block
"
tracingEnabled
=
"
true
"
defaultCategory
=
""
logWarningsWhenNoCategoriesMatch
=
"
true
"
>
//
Log configuration
</
loggingConfiguration
>
</
configuration
>
Please note the "socketServer" node in above code.
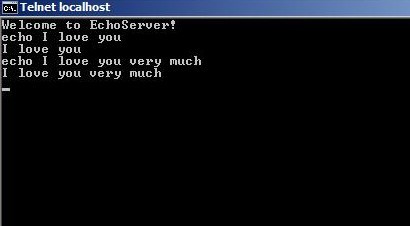
7. Click “RunServer.bat” and then enter “start” to start the server,
then you can test the echo server by telnet (you also can click
"InstallService.bat" to intsall the server application as windows
service, the service name is defined in appSetting of app.config with
the key "ServiceName")
You can check out the QuickStart's code from the address below:
http://supersocket.codeplex.com/SourceControl/changeset/changes/53902
create a simple command line socket application using SupperSocket
application framework.
About SuperSocket
:
http://www.cnblogs.com/jzywh/archive/2010/06/09/supersocket.html
1. Create a new project named “EchoService” in a new empty
solution
2. Add the project “SocketServiceCore”(which is belong to SuperSocket)
into the solution, and then let the project “EchoService” reference it
3. Add session class and server class
EchoSession.cs
EchoSession
using
System;
using
System.Collections.Generic;
using
System.Linq;
using
System.Text;
using
SuperSocket.SocketServiceCore;
namespace
EchoService
{
public
class
EchoSession : AppSession
<
EchoSession
>
{
private
SocketContext m_Context;
protected
override
void
OnClosed()
{
}
protected
override
void
OnInit()
{
m_Context
=
new
SocketContext();
}
public
override
void
SayWelcome()
{
SendResponse(
"
Welcome to EchoServer!
"
);
}
public
override
void
HandleExceptionalError(Exception e)
{
SendResponse(
"
Server side error occurred!
"
);
}
public
override
SocketContext Context
{
get
{
return
m_Context; }
}
}
}
EchoServer.cs
EchoServer
using
System;
using
System.Collections.Generic;
using
System.Linq;
using
System.Text;
using
SuperSocket.SocketServiceCore;
namespace
EchoService
{
public
class
EchoServer : AppServer
<
EchoSession
>
{
public
override
bool
IsReady
{
get
{
return
true
; }
}
}
}
4. Add command class
ECHO.cs
ECHO
using
System;
using
System.Collections.Generic;
using
System.Linq;
using
System.Text;
using
SuperSocket.SocketServiceCore.Command;
namespace
EchoService.Command
{
public
class
ECHO : ICommand
<
EchoSession
>
{
#region
ICommand<EchoSession> Members
public
void
Execute(EchoSession session, CommandInfo commandData)
{
session.SendResponse(commandData.Param);
}
#endregion
}
}
5. Build the project “EchoService” and then copy outputted assemblies to
the output dir of the project “SocketService” (provided by
SupperSocket, build it in advance please)
6. Update app.config of SocketService to use EchoService
SuperSocket.SocketService.exe.config
<?
xml version
=
"
1.0
"
encoding
=
"
utf-8
"
?>
<
configuration
>
<
configSections
>
<
section name
=
"
loggingConfiguration
"
type
=
"
Microsoft.Practices.EnterpriseLibrary.Logging.Configuration.LoggingSettings, Microsoft.Practices.EnterpriseLibrary.Logging
"
/>
<
section name
=
"
socketServer
"
type
=
"
SuperSocket.SocketServiceCore.Configuration.SocketServiceConfig, SuperSocket.SocketServiceCore
"
/>
</
configSections
>
<
appSettings
>
<
add key
=
"
ServiceName
"
value
=
"
EchoService
"
/>
</
appSettings
>
<
socketServer
>
<
servers
>
<
add name
=
"
Default Echo Server
"
serviceName
=
"
EchoService
"
ip
=
"
Any
"
port
=
"
911
"
mode
=
"
Async
"
/>
</
servers
>
<
services
>
<
add serviceName
=
"
EchoService
"
baseAssembly
=
"
EchoService.EchoServer, EchoService
"
/>
</
services
>
</
socketServer
>
<
loggingConfiguration name
=
"
Logging Application Block
"
tracingEnabled
=
"
true
"
defaultCategory
=
""
logWarningsWhenNoCategoriesMatch
=
"
true
"
>
//
Log configuration
</
loggingConfiguration
>
</
configuration
>
Please note the "socketServer" node in above code.
7. Click “RunServer.bat” and then enter “start” to start the server,
then you can test the echo server by telnet (you also can click
"InstallService.bat" to intsall the server application as windows
service, the service name is defined in appSetting of app.config with
the key "ServiceName")
You can check out the QuickStart's code from the address below:
http://supersocket.codeplex.com/SourceControl/changeset/changes/53902

相关文章推荐
- SuperSocket Quick Start
- SuperSocket Quick Start
- WPF/E CTP Quick Start - 第五部分:公有图形属性(翻译)
- supersocket 调试
- Firefox OS Quick Start(Firefox OS快速开始)
- QUICK START GUIDE: GEAR VR + UNITY
- ActiveMQ Quick Start
- Chapter 0.SymmetricDS快速入门指南( Quick Start Guide)
- iPhoto 6 for Mac OS X (Visual QuickStart Guide)
- MySQL, Second Edition (Visual QuickStart Guide)
- TensorFlow学习笔记6----tf.contrib.learn Quickstart
- SQL, Second Edition (Visual QuickStart Guide)
- SpringBoot Quickstart
- Virtual Appliances Quick Start Guide - BitNami documentation
- SuperSocket服务器架设(三):在SuperSocket中自定义Command、AppServer和AppSession
- SuperSocket框架学习笔记2-构建SuperWebSocket服务器程序
- Ubuntu"无法连接到 Upstart: Failed to connect to socket /com/ubuntu/upstart: 拒绝连接"的解决方案
- etcd quickstart
- Purify Quick Start
- QUICK START GUIDE