iPhone Programming Tutorial – Creating a ToDo List Using SQLite
2010-05-10 17:49
567 查看
http://icodeblog.com/2008/08/19/iphone-programming-tutorial-creating-a-todo-list-using-sqlite-part-1/
If you have been following my tutorials,you know that we have been working primarily with UITableViews. This is
mostly because SO many applications

can be developed using this simple
control. This final UITableView tutorial will be taking all of the
skills learned from previous tutorials, putting them all together, and
adding SQLite to create a prioritized To-Do list. I will also be
showing you how to add multiple columns to your table cells and we will
be exploring some of the other controls that the iPhone has to offer.
What good would the tutorials be if we didn’t use them to create
something useful.
I will move a little faster in this tutorial while still explaining
the new stuff in detail. I will assume that you have completed the fruits
tutorial
and it’s prerequisites.
This tutorial will be a multipart series as it will be a little
longer than my previous ones. In this first tutorial, you will learn:
Create
a NavigationBased Application
Create
a Database
Add
the Database to Your Project
Add
the SQLite3 Framework
Create
a Todo Class Object
Initialize
the Database
So let’s get started…
Select
Navigation-Based Application
and click Choose…

Name your project todo
.
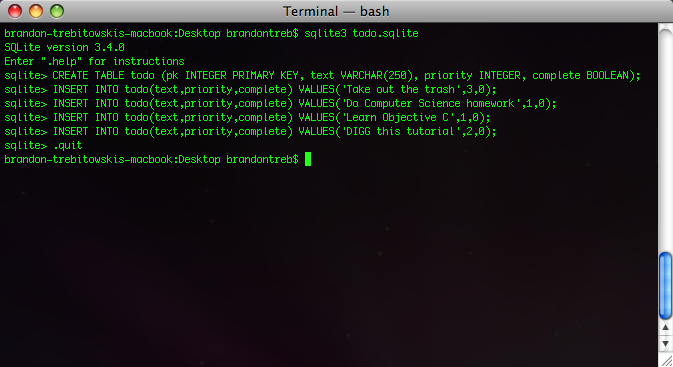
Now let’s create the todo database
that we will be using. Open up the Terminal
application
on your Mac. This is located in Applications > Utilities.
your computer. To check this, type:
sqlite3
into the Terminal and
sqlite3 should start. Type
.quit
to exit. If sqlite3 is
not installed, install all of the XTools
from your Mac
Installation Disk
.
Now that the terminal is open let’s create
the database. This is done with the command:
sqlite3 todo.sqlite
SQLite3 will now start and load the
todo.sqlite database. By default the database is empty and contains no
tables. If you need a refresher on the basics of SQL databases Google
It.
Since our application is fairly simple, we only need to create
one table. We will create a table called todo by typing the following
statement:
CREATE TABLE todo(pk INTEGER PRIMARY
KEY, text VARCHAR(25), priority INTEGER, complete BOOLEAN);
One thing to note here is the pk
field. It is the primary key of the table. This adds functionality
such that every time a row is added to the database, it auto-increments
this field. This will be a unique identifier to identify each row. All
of the other fields should be fairly self explanitory.
Now that our table has been created, let’s
add some data. We will eventually be adding todo items within our app,
but for now we will add some defaults. Type the following commands
below.
INSERT INTO
todo(text,priority,complete) VALUES('Take out the trash',3,0);

INSERT INTO todo(text,priority,complete) VALUES('Do Computer Science
homework',1,0);

INSERT INTO todo(text,priority,complete) VALUES('Learn Objective
C',1,0);

INSERT INTO todo(text,priority,complete) VALUES('DIGG this
tutorial',2,0);
You can add as many todo items as you would
like. For this tutorial, make sure you enter a priority between 1 and 3
(You’ll see why later). Now our database has been created and
populated let’s exit out of SQLite3. Do this by typing .quit. Your
terminal window should look something like this.
named Resources
. Click Add -> Existing
Files…
and browse to your todo.sqlite file and click Add
.
It will then prompt you with a screen like this.

Make sure you check the box that says Copy
items into destination group’s folder (if needed).
You should
now see the todo.sqlite file inside of the resource folder.

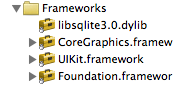
libraries so we can use it. Do a control-click (right click) on the Frameworks
folder. Click Add -> Existing Frameworks
.
Now this part is a little strange. It has been my experience that
these libraries are not in the same place on all machines. So in the
search bar type in libsqlite3.
The file we are looking
for is called libsqlite3.0.dylib.
This may pull up
multiple files as OSX has it’s own versions of this file. Just click on
the largest of the files that show up and click Add.
As you can see, mine is about 1.7 MB.

Now it should add the framework and your
directory will look something like this:
eventually be making an array of these objects to populate a
UITableView. Go ahead and click File -> New File…
Select NSObject Subclass
and click Next.
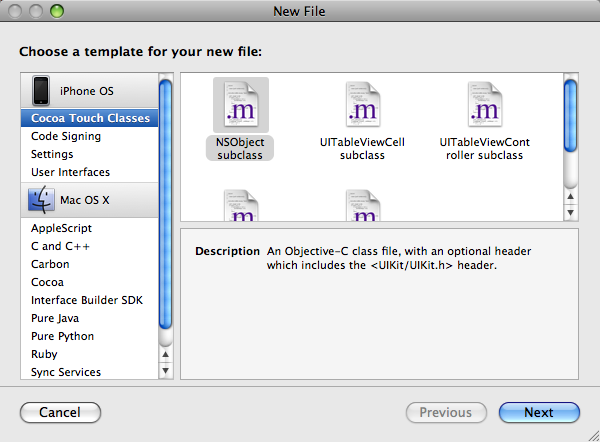
Name this object todo.m
and check the box that says Also create “Todo.h”
and
click Finish.

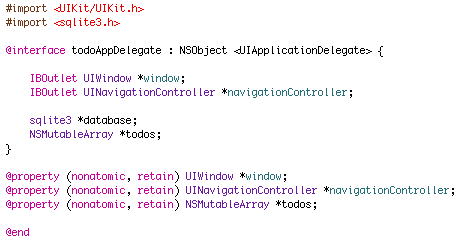
Open up todo.h
and add the
following code.
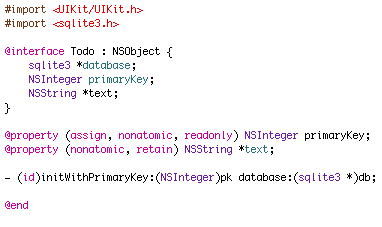
We see some new things here…First, there is
a variable of type sqlite3 called database. This will be a reference
to the applications database and will allow the todo object to
communicate with it. Make sure you add a #import<sqlite3.h> in
your imports.
Next, we see a primary key. Notice that in
the property declaration it has the keywords assign
and readonly
. This tells the compiler that this
variable, once assiged, can not be changed again. This is good since
each todo will be uniquely identified by this variable.
Also, I have declared a method called
initWithPrimaryKey. This will be the contstructor for this object. It
takes an integer to assign as the primary key and an sqlite3 object to
use as the database reference.
Let’s implement this method…Open up todo.m
and add the following code.

Advertisement
<a href="http://ad4.netshelter.net/jump/ns.icodeblog/general;kw=;tile=4;sz=300x250,336x280;ord=123456789?" target="_blank" ><img src="http://ad4.netshelter.net/ad/ns.icodeblog/general;kw=;tile=4;sz=300x250,336x280;ord=123456789?" border="0" alt="" /></a>
There are quite a few new things that need
to be explained here. I will just go through it line by line.
static sqlite3_stmt *init_statement =
nil
This will hold our initialize statement
when retrieving todo data from the database. This statement is static,
meaning it is independent of any instance. In other words, there will
be only one of them no matter how many todo objects we create. This
statement will get compiled and allow us to do some neat things. I’ll
explain more in a bit.
The next lines makes sure that the super
class (NSObject) initilizes properly before we initilize a todo object.
We then set the local primary key
and database
objects to the parameters passed to the initWithPrimaryKey method.
Now some interesting stuff happens. The
next lines checks if our init_statment is null. This will happen only
once per launch of the application. If it is null, we create a new
string containing an SQL statement. If you are familiar with SQL at
all, this should look pretty familiar with one exception. What is a
question mark doing in there? Well, I will tell you. After the SQL
statement gets compiled, we can bind a value to it that will eventually
replace the question mark. So this allows us to have 1 generic SQL
statement, but bind different values to it to retrieve different
results. So the next line, you guessed it, prepares the statement and
stores it in our init_statement. The if statement
just
checks to see if this finished correctly and prints an error if there
was a problem.
Moving on… The line sqlite3_bind_int simply
replaces that question mark with the primary key of the current todo
object, so what we end up with is statements like this:
SELECT text FROM todo WHERE pk = 1;

SELECT text FROM todo WHERE pk = 2;

SELECT text FROM todo WHERE pk = 3;

SELECT text FROM todo WHERE pk = n;
After that, the
sqlite3_step(init_statement) method is called. This method executes the
SQL statement on the database. It is contained inside of an if
statement to make sure it executed properly. Now we can finally access
the todo data. We see this line:
self.text = [NSString
stringWithUTF8String:(char*) sqlite3_column_text(init_statement,0)];
Wow, that’s a mouthful… Let’s analyze it.
The sqlite3_column_text method tells SQL that we want to retrieve a
string object from the database. It has 2 parameters. The first, is
just a reference to the SQL statement that was used. The second is the
column number that we wish to get text from. So in this case, we only
have one column (SELECT text FROM…) so there is only 1 index and that’s
the 0th index. Next, the (char *) is just a cast to a string (might not
be needed, but good practice). And finally, we build an NSString
object with the data returned so that we can assign self.text to it.
This is quite a bit to explain in just
text. If I have lost you, feel free to ask me questions in the
comments.
We are done with the todo object for now…
and add the
following code.
This should look a little familiar with the
exception of a few lines. Notice that I have created an NSMutableArray
of todo objects. This will be (like the fruit
example
) an array to hold our todo items. We will eventually use
this array to populate a UITableView. The only new lines here are the
import of sqlite3.h
and the sqlite3 *database
line.
Now let’s open up todoAppDelegate.m
and add some code.

One new thing we see here is a private interface
.
We declared it here because it’s specific to this object so it does not
need to be declared in the .h file. The 2 functions we will implement
are createEditableCopyOfDatabaseIfNeeded and initializeDatabase. Much
of the code for these has already been written for us inside of Apple’s
SQLBooks tutorial. I will going through this code and explaining it the
best that I can. Add the following code.

What this method is essentially doing is
copying the database from your project folder to the documents folder on
your iPhone. This will only happen once as it first checks if the
database already exists in the documents folder. I’m not going to go
through this line by line as it is fairly self explanitory. Apple does a
great job of naming functions and variables so that we can understand
what is going on. If I get enough requests in the comments, I’ll do a
line-by-line writup of this function.
The next function we will implement is initializeDatabase.
Add the following code:
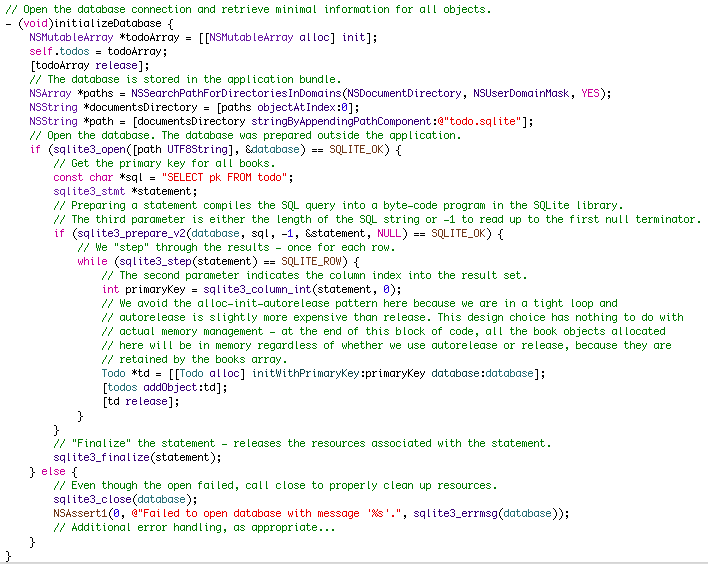
That’s a lot of text! Don’t worry it’s
mostly comments. Let’s analyze this code…Some of it is very similar to
the fruits example.
The first line creates and initializes a NSMutableArray
.
We then go on to set this array to our object’s todos array and release
the temporary object.
The next 3 lines locate the database we
created inside of the documents folder. Following that, the sqlite3_open
line open’s the database so we can access its data. If the database
opens correctly, we then proceed to retrieve todo items. The first
line:
const char *sql = "SELECT pk FROM
todo";
is an SQL statement that we will use to get
all of the primary keys from the database. We then prepare the
statement (as we did inside the todo.m
file) only this
time there is no “?” in the statement. That is because there is not
condition for retrieving the primary keys. We are simply saying “give
me all of the primary keys in the database”.
Now we see a while loop
that is stepping through the SQL results. Every time we call sqlite3_step
,
the next result gets retrieved. The line:
int primaryKey =
sqlite3_column_int(statement,0);
retrieves the primary key from each
result. This is very similar to retrieving the text in the todo.m
class only we use the sqlite3_column_int
method
instead of the sqlite3_column_text
method. This is
done for obvious reasons.
After we have the primary key, we create a
new Todo object and call the initWithPrimaryKey
constructor that we created. The primary key gets passed as well as a
reference to the database. This allows the Todo object to essentially
“look itself up” in the database. Finally, we add the newly created
Todo object to our array of todos.
The last statement sqlite3_finalize
clears the statement from memory and does some other cleanup.
The last part of this tutorial is calling
these functions to create and initialize the database. So add the
following code to applicationDidFinishLaunching:

We are simply calling these functions. You
can now click Build and Go
but your application won’t
display anything! You might be quite frustrated that you completed this
portion of the tutorial and have yet to see anything. Well, stay
tuned! I will have the next portion of this tutorial up soon.
For you ambitious programmers you could
move on. If you notice, at this point we are in a similar situation as
the fruit tutorial. We have an Array of objects that will eventually
populate a UITableView.
This tutorial will be a 4 part series and I
will show you how to use a few more controls. We will be adding,
editing, and deleting todo items. If you have any questions, please
leave them in the comments. Also, if you get lost you can download the
sample code here
Happy iCoding!
This entry was
posted in SQLite
, iPhone Programming Tutorials
and tagged iphone programming
, iphone
tutorial
, SQLite
,
uitableview
,
xcode
.
Bookmark the permalink
. Post a comment
or leave a trackback: Trackback URL
.

相关文章推荐
- Neat Stuff to Do in List Controls Using Custom Draw
- Neat Stuff to Do in List Controls Using Custom Draw
- sharepoint ECMA using a custom contentType to creating a list in SubSite
- sharepoint ECMA using a list template to creating a list in SubSIte
- flask, SQLAlchemy, sqlite3 实现 RESTful API 的 todo list, 同时支持form操作
- Using jdbc to access sqlite in Android
- 使用 Shark 来对你的 iPhone 应用进行性能调优(Using Shark to Performance Tune Your iPhone App)
- How do I list all tables/indices contained in an SQLite database
- TODO list for the next week
- To Do List
- 【Author : DS❤MZ 】 To Do list
- 【工作】to-do-list
- How to do sparse input text classification(dnn) using tensorflow
- to-do-list
- linux - How do I write stderr to a file while using "tee" with a pipe?
- To Do List
- 定制个人的todo list
- qOrganizer -- 方便的日程管理和 todo list 软件
- SP2010开发和VS2010专家"食谱"--第七章节--使用客户端对象模型(1)--Creating a list using a Managed OM
- TODO list in Visual Studio 2005