WPF开发学习笔记
2010-02-27 15:02
211 查看
总结下学习WPF的笔记,方便查阅
1 编译
添加程序集引用:WindowsBase.dll,PresentationCore.dll,PresentationFramework.dll
2 布局 Layout
Grid
<Grid VerticalAlignment="Top" HorizontalAlignment="Left" ShowGridLines="True" >
<Grid.RowDefinitions>
<RowDefinition/> <RowDefinition/>
</Grid.RowDefinitions>
<Button Width="125" Grid.Row ="0" >Add Column</Button>
<Button Width="125" Grid.Row="1" >Delete Column</Button>
</Grid>
DockPanel
<DockPanel LastChildFill=”true”>
<Button Width="125" DockPanel.Dock=”Top” >Add Column</Button>
<Button Width="125" >Delete Column</Button>
</DockPanel>
StackPanel <StackPanel HorizontalAlignment="Left" >
<Button Width="125" >Add Column</Button>
<Button Width="125" >Delete Column</Button>
</StackPanel>
Canvas
<Canvas Background=”Yellow”>
<Button Width="125" >Add Column</Button>
<Button Width="125" >Delete Column</Button>
</Canvas>
3 控件 Control
WPF的控件模型 WPF中几乎任何的控件(Element)都可以作为一个容器存在,在它的Content属性中包含其他任何你想要显示的内容,不仅仅是字符串。
这个特性有点像ASP.NET中GridView的Template列,可以在模板列中放任何控件。
1) Button <Button Width="125" >Add Column</Button>
2)<TextBox Height="23" Name="textBox1" Width="120" />
3) TextBlock <TextBlock FontSize="18" FontStyle="Italic"> Hello, world! </TextBlock>
4) ComboBox
<ComboBox Height="23" Name="comboBox1" Width="120">
<ComboBoxItem>A</ComboBoxItem>
<ComboBoxItem>B</ComboBoxItem>
</ComboBox>
5) ListBox
<ListBox Height="100" Name="listBox1" Width="120">
<ListBoxItem>A</ListBoxItem>
<ListBoxItem>B</ListBoxItem>
</ListBox>
4 样式Style ,资源Resource
样式
1) inline 样式 内联样式
<Button Name="btnOK">
<Button.Style>
<Style>
<Setter Property="Button.FontSize" Value="32"></Setter>
<Setter Property="Button.FontWeight" Value="Bold"></Setter>
</Style>
</Button.Style>
</Button>
2) named样式 命名样式
<Window.Resources>
<Style x:Key ="MyStyle">
<Setter Property ="Button.FontSize" Value ="20"/>
<Setter Property ="Button.Background">
<Setter.Value>
<LinearGradientBrush StartPoint="0,0" EndPoint="1,1">
<GradientStop Color="Green" Offset="0" />
<GradientStop Color="Yellow" Offset="0.25" />
<GradientStop Color="Pink" Offset="0.75" />
<GradientStop Color ="Red" Offset="1" />
</LinearGradientBrush>
</Setter.Value>
</Setter>
</Style>
</Window.Resources>
使用命名资源的方法
<Button Name="btnClickMe" Height="80" Width = "100"
Style ="{StaticResource MyStyle}"
注意:别忘记在窗体的声明代码引入命名空间
xmlns:x="clr-namespace:System;assembly=mscorlib"
资源 添加页面资源
<Window.Resources>
<SolidColorBrush x:Key="Foo" Color="Green"></SolidColorBrush>
<x:String x:Key="Hello">Hello,World</x:String>
</Window.Resources>
定义应用程序资源的方式如下
<Application.Resources>
<SolidColorBrush x:Key="Foo" Color="Green"></SolidColorBrush>
<x:String x:Key="Hello">Hello,World</x:String>
</Application.Resources>
读取代码
Brush b=(Brush)this.Resources[“Foo”];
String s=(string) this.Resources[“Hello”];
也可以用FindResource 和TryFindResource,前者找不到资源会抛出异常,后者找不到资源返回null
资源范围:Application 应用程序资源,Page/Windows窗体资源
应用程序资源适用于当前项目的所有窗体,窗体资源适用于它所在的窗体
WPF的资源可以包含所有的任意CLR对象,该对象必须要有一个默认的构造函数和独立的属性。
资源的加载形式
Static资源 静态资源,定义在xmal文件中
Dynamic资源 动态资源 在CS文件中定义
5 数据绑定 Data Binding
举例,ComboBox绑定系统字体
<ComboBox ItemsSource=”{ x:Static Fonts.SysetemFontFamilies }”/>
注意要加xmlns:x="clr-namespace:System;assembly=mscorlib"
绑定自定义对象 可以直接在资源中定义对象,然后绑定给控件
如果要创建变化通知的CLR绑定对象,该对象必须实现INotifiyPropertyChanged。可以理解为当数据值变化后,绑定数据值的element自动更新,当element的值更新后,对象的绑定对象值也会更新。
6 XAML的编译过程
对于一个Foo.xaml文件
1 调用解析器解析Foo.xaml ,使用System.Xml.XmlTextReader读取并解析
2 markup编译器调用Baml writer在obj\release目录中产生Foo.baml
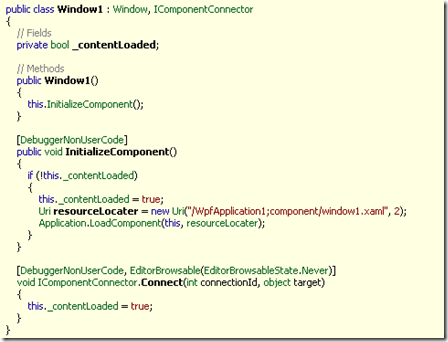
3 markup编译器生成一个partical类保存到Foo.g.cs文件中
如果需要反编译WPF的项目时,需要使用插件Reflector.BamlViewer.dll
如图,WPF初试化时加载界面文件XAML文件,界面文件被编译成Baml,这个文件是二进制的。
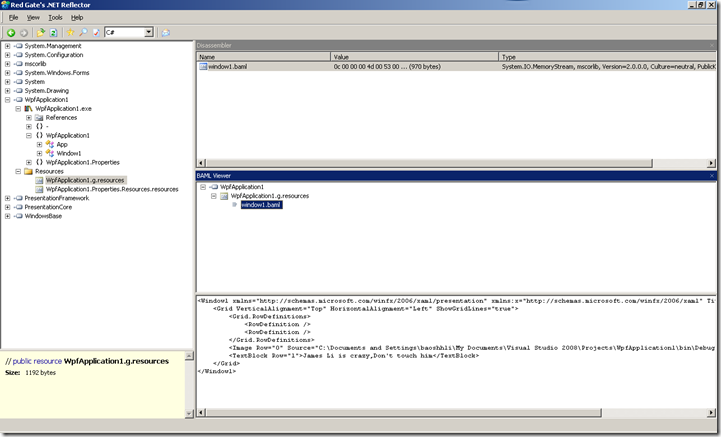
通过BamlViewer插件,可以还原界面XAML文件。
对WPF研究的很肤浅,目前也只限于把服务器类的程序(比如WCF服务器端)驻留在WPF中,体会一下它的编程模型。先开始会用它做些项目的小工具,数据维护工具之类的应用,等把它研究透了,并且小组的成员都会这项目技术,再应用于实际的项目。
1 编译
添加程序集引用:WindowsBase.dll,PresentationCore.dll,PresentationFramework.dll
2 布局 Layout
Grid
<Grid VerticalAlignment="Top" HorizontalAlignment="Left" ShowGridLines="True" >
<Grid.RowDefinitions>
<RowDefinition/> <RowDefinition/>
</Grid.RowDefinitions>
<Button Width="125" Grid.Row ="0" >Add Column</Button>
<Button Width="125" Grid.Row="1" >Delete Column</Button>
</Grid>
DockPanel
<DockPanel LastChildFill=”true”>
<Button Width="125" DockPanel.Dock=”Top” >Add Column</Button>
<Button Width="125" >Delete Column</Button>
</DockPanel>
StackPanel <StackPanel HorizontalAlignment="Left" >
<Button Width="125" >Add Column</Button>
<Button Width="125" >Delete Column</Button>
</StackPanel>
Canvas
<Canvas Background=”Yellow”>
<Button Width="125" >Add Column</Button>
<Button Width="125" >Delete Column</Button>
</Canvas>
3 控件 Control
WPF的控件模型 WPF中几乎任何的控件(Element)都可以作为一个容器存在,在它的Content属性中包含其他任何你想要显示的内容,不仅仅是字符串。
这个特性有点像ASP.NET中GridView的Template列,可以在模板列中放任何控件。
1) Button <Button Width="125" >Add Column</Button>
2)<TextBox Height="23" Name="textBox1" Width="120" />
3) TextBlock <TextBlock FontSize="18" FontStyle="Italic"> Hello, world! </TextBlock>
4) ComboBox
<ComboBox Height="23" Name="comboBox1" Width="120">
<ComboBoxItem>A</ComboBoxItem>
<ComboBoxItem>B</ComboBoxItem>
</ComboBox>
5) ListBox
<ListBox Height="100" Name="listBox1" Width="120">
<ListBoxItem>A</ListBoxItem>
<ListBoxItem>B</ListBoxItem>
</ListBox>
4 样式Style ,资源Resource
样式
1) inline 样式 内联样式
<Button Name="btnOK">
<Button.Style>
<Style>
<Setter Property="Button.FontSize" Value="32"></Setter>
<Setter Property="Button.FontWeight" Value="Bold"></Setter>
</Style>
</Button.Style>
</Button>
2) named样式 命名样式
<Window.Resources>
<Style x:Key ="MyStyle">
<Setter Property ="Button.FontSize" Value ="20"/>
<Setter Property ="Button.Background">
<Setter.Value>
<LinearGradientBrush StartPoint="0,0" EndPoint="1,1">
<GradientStop Color="Green" Offset="0" />
<GradientStop Color="Yellow" Offset="0.25" />
<GradientStop Color="Pink" Offset="0.75" />
<GradientStop Color ="Red" Offset="1" />
</LinearGradientBrush>
</Setter.Value>
</Setter>
</Style>
</Window.Resources>
使用命名资源的方法
<Button Name="btnClickMe" Height="80" Width = "100"
Style ="{StaticResource MyStyle}"
注意:别忘记在窗体的声明代码引入命名空间
xmlns:x="clr-namespace:System;assembly=mscorlib"
资源 添加页面资源
<Window.Resources>
<SolidColorBrush x:Key="Foo" Color="Green"></SolidColorBrush>
<x:String x:Key="Hello">Hello,World</x:String>
</Window.Resources>
定义应用程序资源的方式如下
<Application.Resources>
<SolidColorBrush x:Key="Foo" Color="Green"></SolidColorBrush>
<x:String x:Key="Hello">Hello,World</x:String>
</Application.Resources>
读取代码
Brush b=(Brush)this.Resources[“Foo”];
String s=(string) this.Resources[“Hello”];
也可以用FindResource 和TryFindResource,前者找不到资源会抛出异常,后者找不到资源返回null
资源范围:Application 应用程序资源,Page/Windows窗体资源
应用程序资源适用于当前项目的所有窗体,窗体资源适用于它所在的窗体
WPF的资源可以包含所有的任意CLR对象,该对象必须要有一个默认的构造函数和独立的属性。
资源的加载形式
Static资源 静态资源,定义在xmal文件中
Dynamic资源 动态资源 在CS文件中定义
5 数据绑定 Data Binding
举例,ComboBox绑定系统字体
<ComboBox ItemsSource=”{ x:Static Fonts.SysetemFontFamilies }”/>
注意要加xmlns:x="clr-namespace:System;assembly=mscorlib"
绑定自定义对象 可以直接在资源中定义对象,然后绑定给控件
如果要创建变化通知的CLR绑定对象,该对象必须实现INotifiyPropertyChanged。可以理解为当数据值变化后,绑定数据值的element自动更新,当element的值更新后,对象的绑定对象值也会更新。
6 XAML的编译过程
对于一个Foo.xaml文件
1 调用解析器解析Foo.xaml ,使用System.Xml.XmlTextReader读取并解析
2 markup编译器调用Baml writer在obj\release目录中产生Foo.baml
3 markup编译器生成一个partical类保存到Foo.g.cs文件中
如果需要反编译WPF的项目时,需要使用插件Reflector.BamlViewer.dll

如图,WPF初试化时加载界面文件XAML文件,界面文件被编译成Baml,这个文件是二进制的。
通过BamlViewer插件,可以还原界面XAML文件。
对WPF研究的很肤浅,目前也只限于把服务器类的程序(比如WCF服务器端)驻留在WPF中,体会一下它的编程模型。先开始会用它做些项目的小工具,数据维护工具之类的应用,等把它研究透了,并且小组的成员都会这项目技术,再应用于实际的项目。

相关文章推荐
- WPF and Silverlight 学习笔记(一):开发环境及参考资料
- WPF下的地图开发控件(GMap.NET)使用心得—— GMap学习笔记(二)
- WPF and Silverlight 学习笔记(一):开发环境及参考资料
- 【整理】HTML5游戏开发学习笔记(1)- 骰子游戏
- 游戏开发学习笔记-5.摄像机自动导航
- 用S60操作系统SDK开发NOKIA手机应用程序-学习笔记(3)
- NDK开发笔记(二)---JNI的学习
- Android Native 代码NDK开发学习笔记
- 安卓艺术开发学习笔记之IPC机制
- Asp.Net Ajax 学习笔记25 利用Microsoft AJAX Library开发客户端组件(下)
- Activiti学习笔记1 — 下载与开发环境的配置
- WPF and Silverlight 学习笔记(十):WPF控件模型
- wpf-学习笔记3
- WPF and Silverlight 学习笔记(十八):WPF样式(Style)与模板(Template)
- Android Map开发基础知识学习笔记
- C#学习笔记一:C#开发环境的设置
- 敏捷开发学习笔记(一)
- 我的iphone开发学习笔记(九): 使用NSUserDefaults读写用户默认设置
- Ionic学习笔记六 Cordova 插件开发
- 步步为营 SharePoint 开发学习笔记系列 七、SharePoint Timer Job 开发