WPF编游戏系列 之九 物品清单再优化
2009-12-20 10:33
295 查看
在“第三篇”和“第四篇”中通过用户控件和数据绑定功能对物品清单进行一些优化减少了部分C#代码,但感觉使用Grid设置物品显示位置实在是太繁琐,而且还要为n个物品重复创建新UserControl很浪费资源,所以决定使用ListBox、UserControl和DataTemplate来对物品清单再优化下,让XAML多干些活而不是总用C#调用UI,这样日后维护起来也方便。
1. 替换掉原来的Gird,将ListBox加入到Window1.xaml中。
3. 放物品的ListBox和物品控件(GoodsElement.xaml)都做好了,下面就要从数据库(Access)读取物品数据,将它们加到控件中并显示在ListBox中。首先在Window.Resources中为物品清单定义一个数据模板(DataTemplate),让物品控件知道应该去哪找它的数据。
4. 部分源代码下载
1. 替换掉原来的Gird,将ListBox加入到Window1.xaml中。
<ListBox x:Name="queryList" ItemsPanel="{StaticResource queryListBoxStyle}" ScrollViewer.HorizontalScrollBarVisibility="Disabled" BorderThickness="0" Background="{Binding WinBackground, Mode=OneWay}" ItemContainerStyle="{StaticResource listBoxItemStyle}"></ListBox> 由于ListBox默认情况下Item是竖直排列,在点击某ListBoxItem后背景色会变蓝,该效果在程序中很不和谐,决定重新定义ListBox和ListBoxItem样式,将其写入Window.Resources,再赋给在上面的ItemsPanel和ItemContainerStyle。<ItemsPanelTemplate x:Key="queryListBoxStyle"> <!-- 将Item水平显示,Width可以控制每行显示的个数 --> <WrapPanel IsItemsHost="True" Orientation="Horizontal" Width="920" /> </ItemsPanelTemplate> <Style x:Key="listBoxItemStyle" TargetType="ListBoxItem"> <Setter Property="OverridesDefaultStyle" Value="true"/> <Setter Property="Template"> <Setter.Value> <ControlTemplate TargetType="ListBoxItem"> <Border Name="Border" Padding="2"> <ContentPresenter /> </Border> </ControlTemplate> </Setter.Value> </Setter> </Style>2. 物品控件也需要进一步更新,使用数据绑定使其自己去找数据源。其中goodsBuy_MouseLeftButtonDown事件用于增加物品数量,详情可下载源代码。
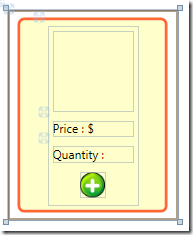
<UserControl x:Class="XMarket.GoodsElement"      xmlns="http://schemas.microsoft.com/winfx/2006/xaml/presentation"      xmlns:x="http://schemas.microsoft.com/winfx/2006/xaml"      Height="210" Width="170">      <Grid>          <Border BorderThickness="3" CornerRadius ="5" Height="195" Width="150"                  Background="#FFFFCC" BorderBrush="#FF6633">              <StackPanel Orientation="Vertical" Margin="5"
HorizontalAlignment="Center">                  <Image x:Name="goodsImage" Height="80" Width="80" Margin="5"
Source="{Binding GoodsImage}"></Image> <StackPanel Orientation="Horizontal" Margin="5"> <TextBlock Text="Price : $"></TextBlock> <TextBlock x:Name="goodsPrice" Text="{Binding GoodsPrice}"></TextBlock> </StackPanel> <StackPanel Orientation="Horizontal" Margin="5"> <TextBlock x:Name="buyInfo" Text="Quantity : "></TextBlock> <TextBlock x:Name="goodsQty" Text="{Binding GoodsQty}"></TextBlock> </StackPanel> <Image x:Name="goodsBuy" Source="image/add.png" Height="25" Width="25" Cursor="Hand" Margin="5" Tag="{Binding GoodsBuyImageTag}" MouseLeftButtonDown="goodsBuy_MouseLeftButtonDown"> <Image.ToolTip>Add Quantity</Image.ToolTip> </Image> </StackPanel> </Border> </Grid> </UserControl> 效果图:3. 放物品的ListBox和物品控件(GoodsElement.xaml)都做好了,下面就要从数据库(Access)读取物品数据,将它们加到控件中并显示在ListBox中。首先在Window.Resources中为物品清单定义一个数据模板(DataTemplate),让物品控件知道应该去哪找它的数据。
<!-- GoodsInfo类就是物品控件要找的数据源 -->
<DataTemplate DataType="{x:Type local:GoodsInfo}">
<!-- 由于GoodsElement已经是UserControl所以直接调用即可 -->       <local:GoodsElement></local:GoodsElement>
</DataTemplate>
数据模板搞定了,下面需要让C# 开始工作,把数据取出来赋给物品控件。首先要创建一个物品的Collection这样可以将GoodsInfo类的数据放入其中。public ObservableCollection<GoodsInfo> Goods = new ObservableCollection<GoodsInfo>();在判断用户点击了“My Shop”图标后,C#就要去取数了。
Goods.Clear();  Image image = sender as Image;  string imageTag = image.ToolTip.ToString();    if (imageTag == "My Shop")  {     //设置列表颜色     wColor.WinBorderBrush = "#FF6633";     wColor.WinBackground = "#FFCC66";     queryBorder.DataContext = wColor;     //取数     object[,] res = dbCon.Data_Query("select count(*) from goods where typeid=1 and available=1",                                      "select * from goods where typeid=1 and available=1");     int num = res.Length / 7;       for (int i = 0; i < num; i++)     {        //将数据传给goodsinfo
GoodsInfo goodsinfo = new GoodsInfo        {            GoodsImage = "image/shop/" + res[i, 2].ToString(),            GoodsPrice = res[i, 6].ToString(),            GoodsQty = res[i, 5].ToString(),            GoodsBuyImageTag = res[i, 0].ToString()        };
//将goodsinfo加到Goods        Goods.Add(goodsinfo);     }
//将Goods加入ListBox queryList.ItemsSource = Goods; } 在“第三篇”的3.2.1和3.2.2两部分代码加起来干的活继续上面几行就搞定了,这样在以后的维护中就需要修改那么多C#程序,只需调整相应的XAML和类即可。同时也感谢颜昌钢提出的很多建议,关于你谈到如果物品数量很多在加载界面时会不会产生延迟,我测试了一下的确会有这个情况发生,随后我将物品的图片先拿掉再测试,发现延迟现象没有了,说明界面再加载大量图片时会花上一些时间。由于图片都是256*256的,实际在程序中只用80*80,有时间将图片尺寸处理后再测试下加载速度。4. 部分源代码下载

相关文章推荐
- WPF编游戏系列 之九 物品清单再优化
- WPF编游戏系列 之三 物品清单
- WPF编游戏系列 之三 物品清单
- C#开发WPF/Silverlight动画及游戏系列教程(Game Tutorial):(四十五)制作精美的可任意拖放对象的物品栏及装备栏
- C#开发WPF/Silverlight动画及游戏系列教程(Game Tutorial):(四十五)制作精美的可任意拖放对象的物品栏及装备栏
- C#开发WPF/Silverlight动画及游戏系列教程(Game Tutorial):(四十五)制作精美的可任意拖放对象的物品栏及装备栏
- C#开发WPF/Silverlight动画及游戏系列教程(Game Tutorial):(四十五)制作精美的可任意拖放对象的物品栏及装备栏
- C#开发WPF/Silverlight动画及游戏系列教程(Game Tutorial):(十七) 完美精灵之八面玲珑(WPF Only)①
- C#开发WPF/Silverlight动画及游戏系列教程(Game Tutorial):(二十二)重构 – 让代码插上翅膀自由飞翔
- C#开发WPF/Silverlight动画及游戏系列教程(Game Tutorial):(二十一)主位式地图移动模式
- C#开发WPF/Silverlight动画及游戏系列教程(Game Tutorial):(二十六)通用型角色头像面板
- C#开发WPF/Silverlight动画及游戏系列教程(Game Tutorial):(五)实现2D人物动画②
- C#开发WPF/Silverlight动画及游戏系列教程(Game Tutorial):(九) 2D游戏角色在地图上的移动
- C#开发WPF/Silverlight动画及游戏系列教程(Game Tutorial):(三)让物体动起来③
- C#开发WPF/Silverlight动画及游戏系列教程(Game Tutorial):(十一)地图遮罩层的实现
- C#开发WPF/Silverlight动画及游戏系列教程(Game Tutorial):(十五) 精灵控件横空出世!②
- C#开发WPF/Silverlight动画及游戏系列教程(Game Tutorial):(十七) 完美精灵之八面玲珑(WPF Only)①
- C#开发WPF/Silverlight动画及游戏系列教程(Game Tutorial):(四十六)飞行模式 – 自由VS天空
- C#开发WPF/Silverlight动画及游戏系列教程(Game Tutorial):(四十八) 落雷!治疗!陷阱!连锁闪电!多段群伤!魔法之终极五重奏①
- C#开发WPF/Silverlight动画及游戏系列教程(Game Tutorial):(四十九) 落雷!治疗!陷阱!连锁闪电!多段群伤!魔法之终极五重奏②