arcgis server for .NET学习转载4
2009-08-26 11:29
369 查看
http://www.cnblogs.com/hll2008/archive/2008/08/17/1269650.html
目的:
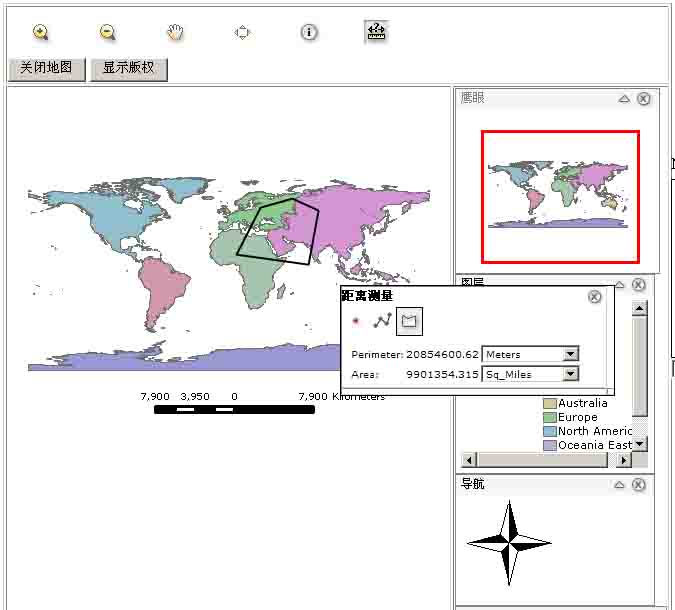
1.距离测量功能。
准备:
1.(一、三)的工程,具体见前篇。
开始:
1.新建名为Measure.ascx的用户控件,并且实现ICallbackEventHandler接口,具体代码如下:
1namespace MappingApp
2namespace MappingApp
2<script language="javascript" type="text/javascript" src="JavaScript/display_measure.js"></script>
3</style>
<table width="400" border="1" cellspacing="0" cellpadding="0" id="MeasureToolbar" style="color:Black;background-color:White;border-color:Black; border-width:1px;border-style:Outset;width:275px;visibility:hidden;position: absolute; left: 10px; top: 10px; z-index:11000; ">
<!-- 给tr加上拖拽的事件 -->
<tr id="MeasureToolbar_Title" onmousedown="dragMeasureToolbarStart(event, 'MeasureToolbar')" onmouseover="this.style.cursor='move'" style="background-image:url(images/blank.gif); cursor:move; ">
<td><table width="100%" border="0" cellspacing="0" cellpadding="0">
<tr>
<td width="92%"><span class="STYLE1">距离测量</span></td>
<td width="30">
<!-- 给给关闭按钮图片加上关闭事件的事件 -->
<img src="images/dismiss.png" width="20" height="20" id="MeasureToolbar_CloseButton" onclick="closeMeasureToolbarTool('MeasureToolbar')" style="cursor:pointer;" alt="Close" hspace="0" vspace="0" /></td>
</tr>
<tr>
<td><table cellpadding="0" cellspacing="0" ><tr>
<!-- 点功能按钮 -->
<td id="MeasureToolbarButton_point" style="border: solid White 1px; background-color: White;" onmouseover="this.style.cursor='pointer'; this.style.borderColor='Black';" onmouseout="checkMeasureToolbarBorder(this, 'point')" onmousedown="setMeasureToolbarTool('point')"><img id="ToolbarImage_point" src="images/measure-point.png" align="middle" alt="Point - Coordinates" title="Point - Coordinates" style="padding: 0px 0px 0px 0px" /></td>
<!-- 线功能按钮 -->
<td id="MeasureToolbarButton_polyline" style="border: solid Black 1px; background-color: #EEEEEE;" onmouseover="this.style.cursor='pointer';this.style.borderColor='Black';" onmouseout="checkMeasureToolbarBorder(this, 'polyline')" onmousedown="setMeasureToolbarTool('polyline')"><img id="ToolbarImage_polyline" src="images/measure-line.png" align="middle" alt="Line - Distance" title="Line - Distance" style="padding: 0px 0px 0px 0px" /></td>
<!-- 面功能按钮 -->
<td id="MeasureToolbarButton_polygon" style="border: solid White 1px; background-color: White;" onmouseover="this.style.cursor='pointer';this.style.borderColor='Black';" onmouseout="checkMeasureToolbarBorder(this, 'polygon')" onmousedown="setMeasureToolbarTool('polygon')"><img id="ToolbarImage_polygon" src="images/measure-poly.png" align="middle" alt="Polygon - Area" title="Polygon - Area" style="padding: 0px 0px 0px 0px" /> </td>
</tr></table>
<!-- 测试单位隐藏值 -->
<input id="MeasureUnits" type="hidden" value="<%=MeasureUnits %>"/>
<!-- 面积单位隐藏值 -->
<input id="AreaUnits" type="hidden" value="<%=AreaUnits %>"/>
</td>
<td> </td>
</tr>
<!-- 显示测量结果的表格行 -->
<tr id="MeasureToolbar_BodyRow" >
<td id="MeasureToolbar_BodyCell" style="background-image:url(images/blank.gif);vertical-align:top;padding-left:5px;padding-top:5px;">
<table id="MeasureToolbarTable" cellspacing="2" cellpadding="1" style=" width: 100%;font: normal 7pt Verdana; ">
<tr><td style="background-color: #ffffff" id="MeasureDisplay" colspan="2" valign="top">
在地图上点击画线,双击鼠标结束画线
</td></tr>
</table>
</td>
<td id="MeasureToolbar_SideResizeCell" ><img width="5px" height="100%" src="images/blank.gif" alt="" /></td>
</tr>
</table></td>
</tr>
<tr id="MeasureToolbar_ResizeRow">
<td ><img height="5px" width="100%" src="images/blank.gif" alt="" /></td>
<td><img width="5px" src="images/blank.gif" alt="" /></td>
</tr>
</table>
</script>
6.在完成上面的代码后,就把这个用户控件拖到Default.aspx页面中,并且设置相应的属性,具体设置好后的代码如下:
<uc1:Measure id="Measure1" runat="server" AreaUnits="Sq_Miles" MapBuddyId="Map1" MapUnits="Resource_Default" MeasureUnits="Meters" NumberDecimals="3">
</uc1:Measure>7. 在Toolbar1中新增加一个Tool,设置相应的属性,如果设置后代码如下:
<esri:Tool ClientAction="startMeasure()" DefaultImage="~/images/measure.png" HoverImage="~/images/measure_HOVER.gif" JavaScriptFile="" Name="Measure" SelectedImage="~/images/measure_ON.gif" Text="Measure" ToolTip="Measure" />8.接下来实现ClientAction的startMeasure()的js方法,在javascript目录中新建display_measure.js文件,同时在Measure.ascx文件中添加对这个js文件的引用。
<script language="javascript" type="text/javascript" src="JavaScript/display_measure.js"></script>9.在js文件中编写startMeasure()方法,代码和说明如下:
1//测量控件的内容显示,必须定义为m_measureDisplay,在Esri的display_dotnetadf.js的processCallbackResult的方法中有用到
2var m_measureDisplay = "MeasureDisplay";
3//测量控件的状态
4var m_currentMeasureToolbarTool = "polyline";
5
6//测量类型
7var m_MeasureTypes = new Array();
8m_MeasureTypes[0] = "point";
9m_MeasureTypes[1] = "polyline";
10m_MeasureTypes[2] = "polygon";
11
12//
13
50
51
72function MeasurePolyline(divid)
73
86function MeasurePolygon(divid)
87
99//点
function MapCoordsClick(e)
//测量按钮鼠标移上去的显示效果
2function checkMeasureToolbarBorder(cell, type)
3
//测量按钮切换
function setMeasureToolbarTool(type)
//测量控件拖拽开始
2function dragMeasureToolbarStart(e, id)
3
//测量控件拖拽移动
function dragMeasureToolbarMove(e)
//测量控件拖拽停止
function dragMeasureToolbarStop(e)
{
document.onmousemove = m_measureMoveFunction;
document.onmouseup = null;
return false;
}12.到这里这个Common_WebMappingAppCSharp.zip示例大体上分析完成了,剩下的就是一些比较简单的功能这样也不作分析了。
目的:
1.距离测量功能。
准备:
1.(一、三)的工程,具体见前篇。
开始:
1.新建名为Measure.ascx的用户控件,并且实现ICallbackEventHandler接口,具体代码如下:
1namespace MappingApp
2namespace MappingApp
2<script language="javascript" type="text/javascript" src="JavaScript/display_measure.js"></script>
3</style>
<table width="400" border="1" cellspacing="0" cellpadding="0" id="MeasureToolbar" style="color:Black;background-color:White;border-color:Black; border-width:1px;border-style:Outset;width:275px;visibility:hidden;position: absolute; left: 10px; top: 10px; z-index:11000; ">
<!-- 给tr加上拖拽的事件 -->
<tr id="MeasureToolbar_Title" onmousedown="dragMeasureToolbarStart(event, 'MeasureToolbar')" onmouseover="this.style.cursor='move'" style="background-image:url(images/blank.gif); cursor:move; ">
<td><table width="100%" border="0" cellspacing="0" cellpadding="0">
<tr>
<td width="92%"><span class="STYLE1">距离测量</span></td>
<td width="30">
<!-- 给给关闭按钮图片加上关闭事件的事件 -->
<img src="images/dismiss.png" width="20" height="20" id="MeasureToolbar_CloseButton" onclick="closeMeasureToolbarTool('MeasureToolbar')" style="cursor:pointer;" alt="Close" hspace="0" vspace="0" /></td>
</tr>
<tr>
<td><table cellpadding="0" cellspacing="0" ><tr>
<!-- 点功能按钮 -->
<td id="MeasureToolbarButton_point" style="border: solid White 1px; background-color: White;" onmouseover="this.style.cursor='pointer'; this.style.borderColor='Black';" onmouseout="checkMeasureToolbarBorder(this, 'point')" onmousedown="setMeasureToolbarTool('point')"><img id="ToolbarImage_point" src="images/measure-point.png" align="middle" alt="Point - Coordinates" title="Point - Coordinates" style="padding: 0px 0px 0px 0px" /></td>
<!-- 线功能按钮 -->
<td id="MeasureToolbarButton_polyline" style="border: solid Black 1px; background-color: #EEEEEE;" onmouseover="this.style.cursor='pointer';this.style.borderColor='Black';" onmouseout="checkMeasureToolbarBorder(this, 'polyline')" onmousedown="setMeasureToolbarTool('polyline')"><img id="ToolbarImage_polyline" src="images/measure-line.png" align="middle" alt="Line - Distance" title="Line - Distance" style="padding: 0px 0px 0px 0px" /></td>
<!-- 面功能按钮 -->
<td id="MeasureToolbarButton_polygon" style="border: solid White 1px; background-color: White;" onmouseover="this.style.cursor='pointer';this.style.borderColor='Black';" onmouseout="checkMeasureToolbarBorder(this, 'polygon')" onmousedown="setMeasureToolbarTool('polygon')"><img id="ToolbarImage_polygon" src="images/measure-poly.png" align="middle" alt="Polygon - Area" title="Polygon - Area" style="padding: 0px 0px 0px 0px" /> </td>
</tr></table>
<!-- 测试单位隐藏值 -->
<input id="MeasureUnits" type="hidden" value="<%=MeasureUnits %>"/>
<!-- 面积单位隐藏值 -->
<input id="AreaUnits" type="hidden" value="<%=AreaUnits %>"/>
</td>
<td> </td>
</tr>
<!-- 显示测量结果的表格行 -->
<tr id="MeasureToolbar_BodyRow" >
<td id="MeasureToolbar_BodyCell" style="background-image:url(images/blank.gif);vertical-align:top;padding-left:5px;padding-top:5px;">
<table id="MeasureToolbarTable" cellspacing="2" cellpadding="1" style=" width: 100%;font: normal 7pt Verdana; ">
<tr><td style="background-color: #ffffff" id="MeasureDisplay" colspan="2" valign="top">
在地图上点击画线,双击鼠标结束画线
</td></tr>
</table>
</td>
<td id="MeasureToolbar_SideResizeCell" ><img width="5px" height="100%" src="images/blank.gif" alt="" /></td>
</tr>
</table></td>
</tr>
<tr id="MeasureToolbar_ResizeRow">
<td ><img height="5px" width="100%" src="images/blank.gif" alt="" /></td>
<td><img width="5px" src="images/blank.gif" alt="" /></td>
</tr>
</table>
</script>
6.在完成上面的代码后,就把这个用户控件拖到Default.aspx页面中,并且设置相应的属性,具体设置好后的代码如下:
<uc1:Measure id="Measure1" runat="server" AreaUnits="Sq_Miles" MapBuddyId="Map1" MapUnits="Resource_Default" MeasureUnits="Meters" NumberDecimals="3">
</uc1:Measure>7. 在Toolbar1中新增加一个Tool,设置相应的属性,如果设置后代码如下:
<esri:Tool ClientAction="startMeasure()" DefaultImage="~/images/measure.png" HoverImage="~/images/measure_HOVER.gif" JavaScriptFile="" Name="Measure" SelectedImage="~/images/measure_ON.gif" Text="Measure" ToolTip="Measure" />8.接下来实现ClientAction的startMeasure()的js方法,在javascript目录中新建display_measure.js文件,同时在Measure.ascx文件中添加对这个js文件的引用。
<script language="javascript" type="text/javascript" src="JavaScript/display_measure.js"></script>9.在js文件中编写startMeasure()方法,代码和说明如下:
1//测量控件的内容显示,必须定义为m_measureDisplay,在Esri的display_dotnetadf.js的processCallbackResult的方法中有用到
2var m_measureDisplay = "MeasureDisplay";
3//测量控件的状态
4var m_currentMeasureToolbarTool = "polyline";
5
6//测量类型
7var m_MeasureTypes = new Array();
8m_MeasureTypes[0] = "point";
9m_MeasureTypes[1] = "polyline";
10m_MeasureTypes[2] = "polygon";
11
12//
13
50
51
72function MeasurePolyline(divid)
73
86function MeasurePolygon(divid)
87
99//点
function MapCoordsClick(e)
//测量按钮鼠标移上去的显示效果
2function checkMeasureToolbarBorder(cell, type)
3
//测量按钮切换
function setMeasureToolbarTool(type)
//测量控件拖拽开始
2function dragMeasureToolbarStart(e, id)
3
//测量控件拖拽移动
function dragMeasureToolbarMove(e)
//测量控件拖拽停止
function dragMeasureToolbarStop(e)
{
document.onmousemove = m_measureMoveFunction;
document.onmouseup = null;
return false;
}12.到这里这个Common_WebMappingAppCSharp.zip示例大体上分析完成了,剩下的就是一些比较简单的功能这样也不作分析了。

相关文章推荐
- arcgis server for .NET学习转载5
- arcgis server for .NET学习转载6
- arcgis server for .NET学习转载8
- arcgis server for .NET学习转载2
- arcgis server for .NET学习转载3
- ArcIMS 和 ArcGIS Server for .net 9.2版本联合开发
- ArcGIS Server Rest for Javascript API 学习教程-2
- ArcGIS Server ADF for .net 参数错误
- ArcGIS Server ADF for .net 参数错误
- ArcGIS Server .Net Web ADF的类库简介(转载)
- ArcGIS API For Flex对ImageServer发布的服务进行渲染及RasterFunction支持函数(学习笔记)
- ArcGIS API For Flex对ImageServer发布的服务进行渲染及RasterFunction支持函数(学习笔记)
- 转载的arcgis for flex api version3.7 教程,多学习啊!!!
- ArcGIS Server API For Flex 学习收集1
- arcgis server for .net soapexcetion
- ArcGIS server for .net 中应用API for flex 问题解决办法
- ArcGIS Server Rest for Javascript API 学习教程-4
- ArcGIS Server Rest for Javascript API 学习教程-1
- ArcGIS Server Rest for Javascript API 学习教程-3
- ArcGIS.Server.9.3和ArcGIS API for JavaScript中GraphicsLayer应用高亮显示(初学GIS)