Building and Debugging PJSIP on Symbian S60 3rd Edition Device using Carbide C++ 1.2
2009-08-07 14:55
696 查看
Deploying PJSIP on Symbian S60 is recommended only on real devices as the emulator has audio and networking problems.
This document covers the following topics:
Requirements
Installations
SDK
Carbide
Nokia PC Suite
PJSIP
Importing PJSIP Projects
Building the Projects
Select the Build Configuration
Build the Project
Preparing the .sis/.sisx File
Set the .pkg File to be Used
Build the SISX File
Deploy the sisx file to phone
Configuring On-Device Debugging
Configuring Device Security
Installing TRK 3.x Application on the Phone
Running TRK Application on the Phone
Setting and Testing Connection Settings
Start Debugging
Common Problems
Problem with Build/Clean
I/O Error: File in Use (I/O Fault)
TRKProtocolPlugin: Failed to download the specified file to target
TRKProtocolPlugin: Failed to continue thread
TRK Not Running Error
Load Failed: TRKProtocolPlugin: Failed to launch the application
Load Failed: TRKProtocolPlugin: Unable to install the application
High Audio Latency
Random Crash/Stack Size Problem
Other Resources
Requirements 
For this tutorial, we will need:
Symbian S60 3rd Edition Maintenance Release (MR)
. We also have tried this on FP1. Other SDK versions may work, but I did not test it.
Carbide C++ version 2.0
. You will need choose Developer Edition during install to do on-device debugging.
Nokia PC Suite
for the connectivity between the device and your PC (I use version 6.85)
pjsip source code
Nokia S60 3rd Edition device
(I use Nokia E70, but any S60 3rd Edition device should do, I think).
The date and time of this device need to be the same as development PC
otherwise you may get certificate errors.
Nokia data cable for on-device debugging (you can also use Bluetooth connection, but this tutorial will not cover it)
Installations 
SDK 
Follow the installation instructions in the SDK documentation (make sure that the SDK requisites, such as Perl version
, are satisfied). Please install Symbian SDK on the same drive as PJSIP.
Carbide 
Follow the installation instructions in the Carbide C++
documentation. The installation should be straightforward, but don't
forget to select the Developer's Edition
to get the On-Device debugging/TRK Debugging feature.
Nokia PC Suite 
Install PC Suite, connect your device with the USB cable, and make sure your PC can access your device.
Connect Data Cable 
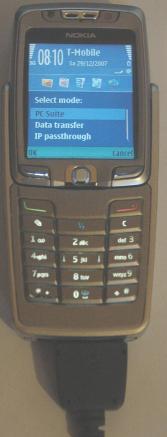
Connect the USB cable to the phone, and on the phone, select PC Suite
:
If this is the first time you connect your phone to the PC, then it may
take some time for Windows to install the USB drivers for the phone.
Wait for it to complete and the Nokia PC Suite and PC Sync icons on the
task bar tray become green:

Leave PC Suite running with the device connected using the USB cable throughout this tutorial session.
PJSIP 
Retrieve and configure PJSIP:
For this tutorial, I assume pjsip will be checked out to C:/project/pjproject
directory.
Checkout PJSIP from the usual location (see PJSIP Download page
for details).
Fill in your config_site.h
with:
Importing PJSIP Projects 
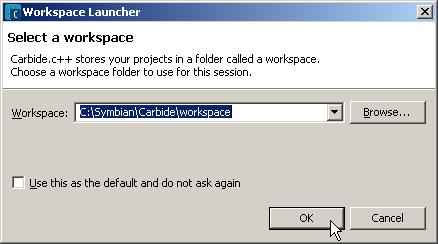
Run Carbide C++. When it asks the workspace location, enter a
directory where you would want to put Carbide specific settings for
PJSIP (or just accept the default value):
You will now be presented with Carbide Welcome page.
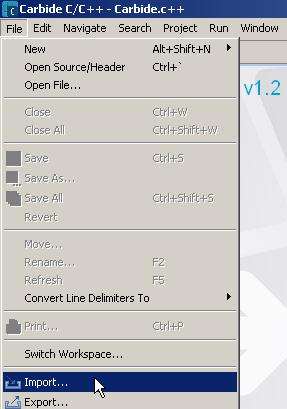
Now we need to import PJSIP's project files (the MMP files) into Carbide's workspace.
Select File
--> Import
from the menu:
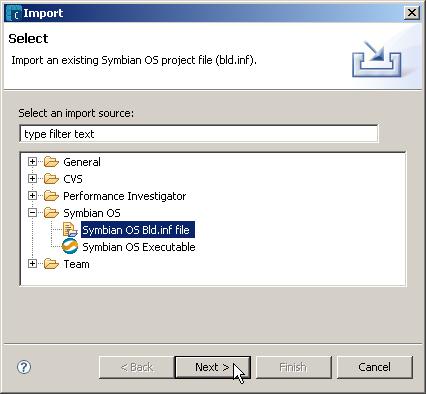
This dialog below will pop up. Select Symbian OS
--> Symbian OS Bld.inf file
from the list, then press Next
button:
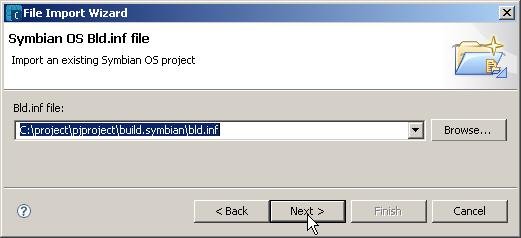
On the next dialog, click Browse..
button to select bld.inf
file from PJSIP's build.symbian
directory, then press Next
button:
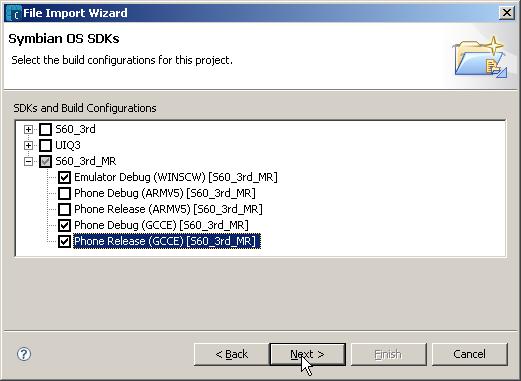
Then on the SDK selection dialog, select the build configurations
that you want to support. For this tutorial, select WINSCW and GCCE
from S60 3rd Edition MR SDK, and press Next
button (do not select ARMV5 unless you have the commercial ARMV5 compiler
):
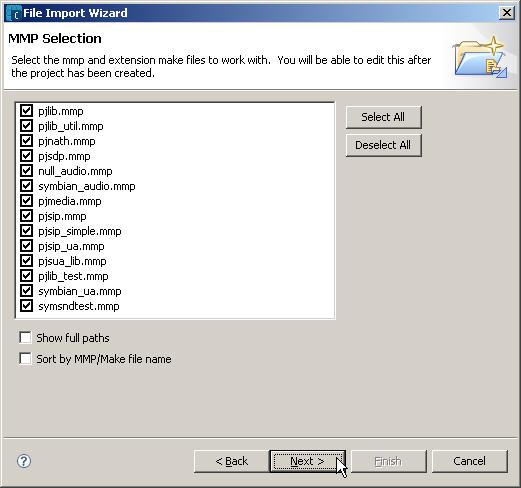
You will then presented with MMP selection dialog. Leave the default selection (normally it should select all MMPs) and press Next
:
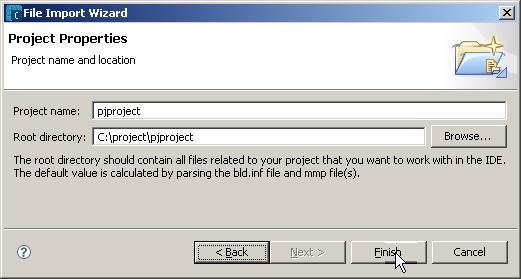
The project now is ready to be imported, press the Finish
button:
Carbide is now exporting the MMP files into the workspace and this progress window will be displayed:
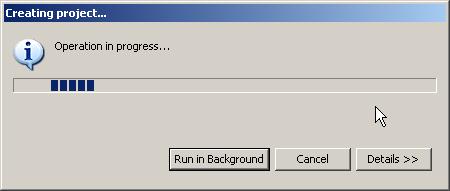
Wait for the process to complete.
Once it completes, you will see the PJSIP project tree on the bottom left part of the Carbide main window:

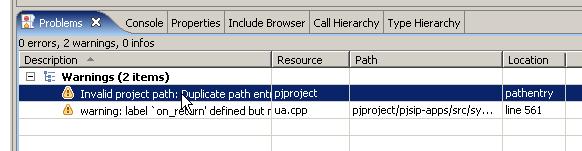
On the Problems
pane (bottom center of the main window) you may see one Warning
about duplicate path, but we can ignore this for now.
The projects should now be ready to be build.
Building the Projects 
Let's try to build the project first to make sure that the source is okay.
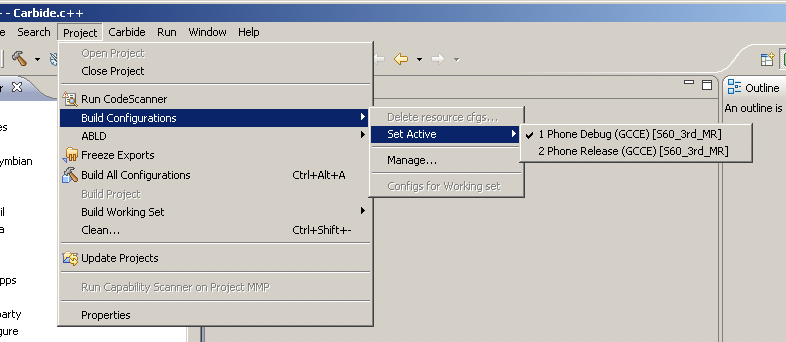
Select the Build Configuration 
First select the build target by selecting Project
--> Build Configuration
--> Set Active
from main menu (or right clicking the Bld.inf
or pjproject
item from Symbian Project Navigator
pane from the bottom left part of the main window).
Select Phone Debug (GCCE) [S60_3rd_MR]
from the menu:
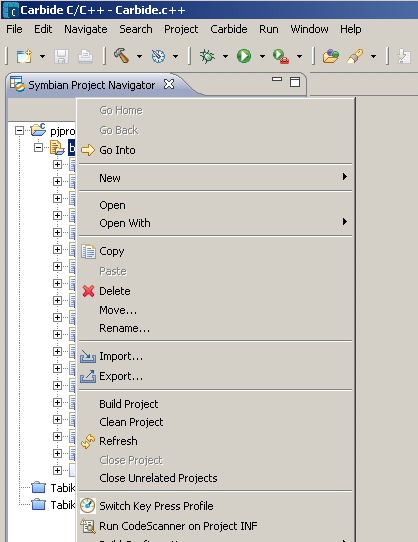
Build the Project 
Then right click Bld.inf
or pjproject
item from Symbian Project Navigator
pane from the bottom left part of the main window, and select Build Project
:
Wait for the build process to complete. You may take a peek on what Carbide is doing by clicking on Console
pane/tab in the bottom part of main window.
Once it completes, watch out for any errors in the Problems
pane (at the bottom center). There shouldn't be any errors, although
there may be few warnings which I think can be ignored, for now:
We are now ready to build the .sis/.sisx file to be deployed to the phone.
Preparing the .sis/.sisx File 
The .sis file is the packaging for the executable to be deployed in
the device. The .sisx file is a signed .sis. Both the .sis and .sisx
file can be created very easily with Carbide C++.
Set the .pkg File to be Used 
First we'll need to configure the .pkg file to be used to generate
the .sisx file. PJSIP provides some sample .pkg files which can be
used, however there may be few editing needed before you can use them
(this is because the .pkg file contains absolute directory path for
your Symbian SDK, which may be different on your installation).
Assign the .pkg file to be used by the project by selecting Project Properties:
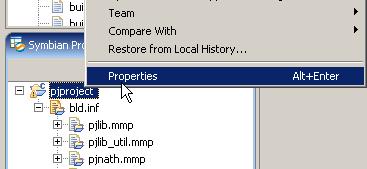
Then Project Properties dialog will appear. On this dialog:
Select Carbide Build Configuration
from the tree (left part of the dialog).
Make sure that the Active Configuration is set to Phone Debug (GCCE) [S60_3rd_MR]
(the SDK name will be different, if you use different SDK version)
Set the PKG File
by clicking Add
button, and choose symbian_ua.pkg
from PJSIP's build.symbian
directory.
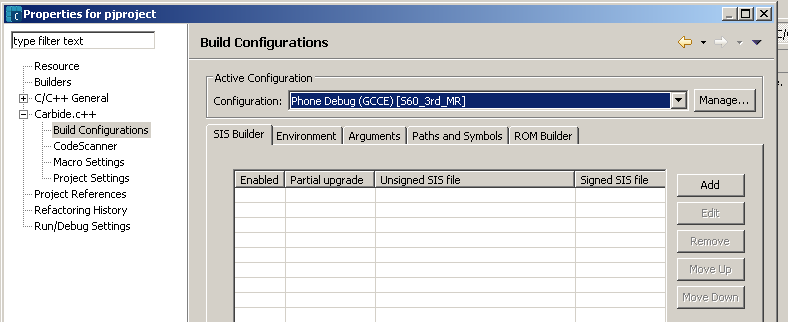
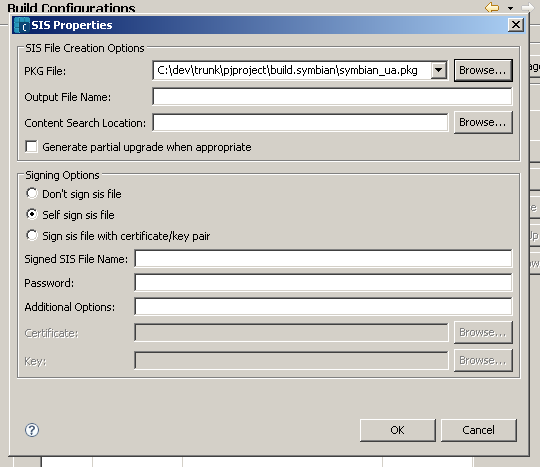
We can leave the "SIS creation and Signing" settings empty to use the default settings.
Press OK
button to save the project configuration.
Now right click bld.inf
(or pjproject
) and click Refresh
:
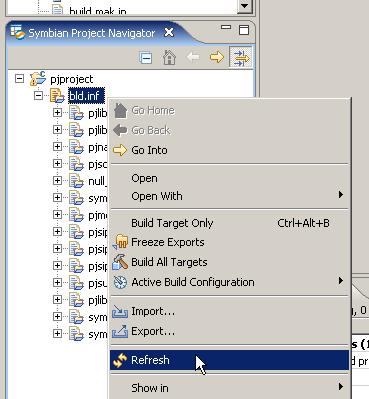
Wait for few seconds (30 seconds on my computer) for Carbide to do its job, once it's done, you will see the .pkg file in the Project Navigator
pane:

Build the SISX File 
Once PKG has been setup on the project, a SISX file will be created
everytime we build the project. So lets build the project now.
Right click Bld.inf
or pjproject
item from Symbian Project Navigator
pane from the bottom left part of the main window, and select Build Project
:
The build process will start. You can take a peek on the Console
tab to see what's being done. Once the build process completes, you should see something like this on the Console
tab:
Check the Problems
tab again to see if we have any errors (there shouldn't be any).
Deploy the sisx file to phone 
Using Nokia Application Installer (included with PC Suite), try installing the symbian_ua.sisx
file, located in the build.symbian
directory. It should install successfully. If not, double check:
Application Manager has been set to allow all
Date and time of phone matches development PC
Configuring On-Device Debugging 
Make sure the phone is connected to the PC using the data cable.
Configuring Device Security 
By default, your phone does not allow self-signed certificate to be installed on the phone, I think. To change this setting:
Go to Menu
--> Tools
--> App. Mgr
On App. manager
, select menu Options
--> Settings
Set Software installation
to All
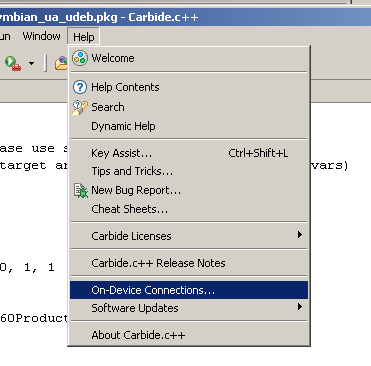
Installing TRK 3.x Application on the Phone 
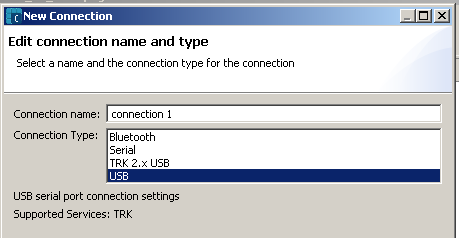
Install TRK 3.x support on the phone. You can do this via the On Device Connections menu on Carbide:
You will be presented with a choice of connections. Choose USB
, not TRK 2.x USB
.
In the next screen, choose the tab Install Remote Agent
:
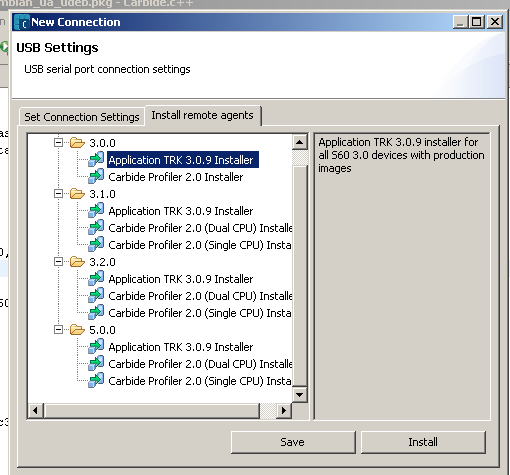
You will need to choose the appropriate installer for your phone:
Now click Install
.
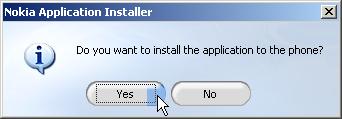
When asked if we want to install, click Yes
:
On the PC, this window should be displayed.
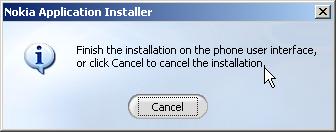
Leave it this way, the installation will start on the phone now. Your phone should display something like this:
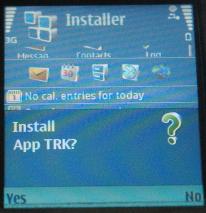
Click Yes.
Now the phone will display Details
information:
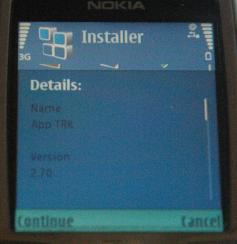
Click Continue.
Your phone may now display the target memory location:
Select the memory and press Select
menu.
Now the phone will display license agreement:
Click OK
(if you agree, of course). The phone should display installation progress window for couple of seconds now:
Once it's done, Installation Complete
window will appear briefly:
TRK is now installed on the phone. Next step is to run it.
Running TRK Application on the Phone 
Run it from Menu
--> Installations
--> TRK (it may be different on your phone).
When it asks to switch on Blueetooth, click No
. We use USB cable for this session.
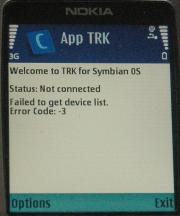
The TRK window will appear. We can ignore the error message for now:
Select Options
--> Settings
menu.
Change the Connection
to USB, and leave all settings unchanged. (Note: You may not get the baud rate settings input):

Click Back
to get back to TRK main window.
Now select Options
--> Connect
from the menu.
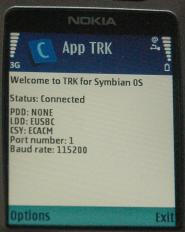
TRK main window should display Status: Connected
now. There might less info on newer version of TRK, but as long as it says Connected, you're good to go:
Leave TRK running on the phone for the duration of this tutorial, and move on back to Carbide to set the connection up.
Setting and Testing Connection Settings 
Click on the Set Connection Settings
tab, and
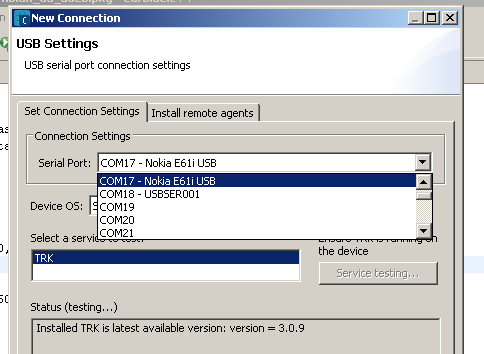
choose the serial port that have your device name next to it. You might
need to scroll a long way down, mine was COM17:
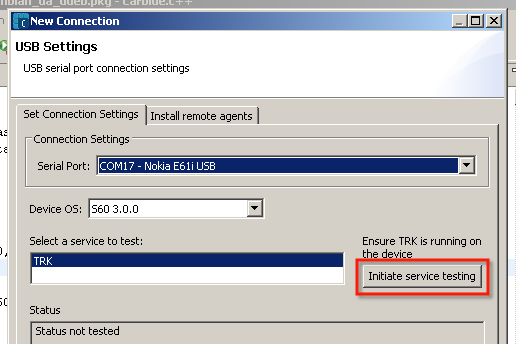
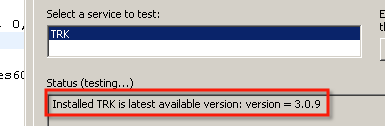
Now you can test the connection. Click on Test Service Testing
:
If everything is successful, you will get the following on the area in the big status textbox:
Click Finish
, and you should be rewarded by a new connection appearing in the Remote Connections
area in Carbide C++:

Start Debugging 
Because we haven't setup a debug configuration, if you start debugging, Carbide C++ will offer you to setup one.
On the Symbian Project Navigator
select bld.inf, and press debug on the toolbar (the picture of the bug...):
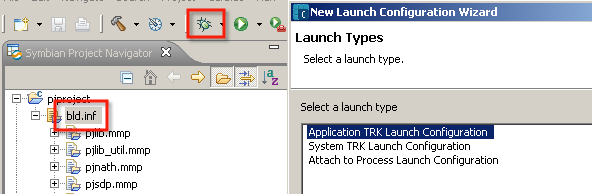
You will get the Launch Configuration Wizard. Click Next
. You'll get :
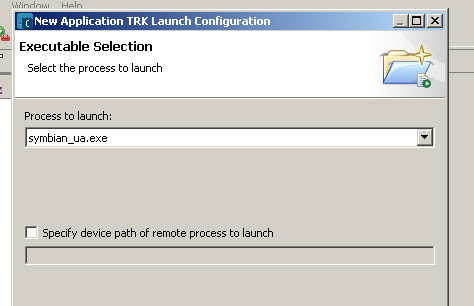
Executable should already be set to symbian_ua.exe
, so just click Next
. You'll get:
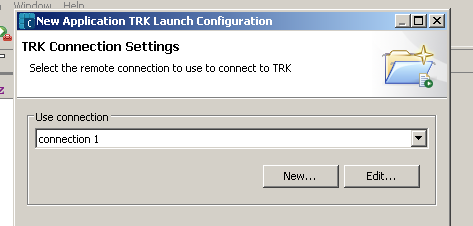
This should be defaulted to connection 1
which we have setup earlier. Click Next
. You'll get:
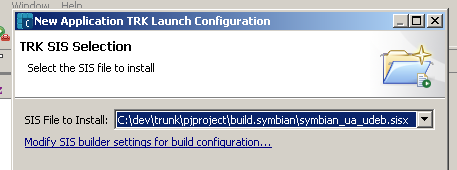
Verify that the sisx is symbian_ua.sisx
which we already tested beforehand. Click Next
then Finish
. You should immediately begin debugging.
Carbide now may rebuild the project (you may take a peek on what it's doing by looking at Console
tab). Once it's done, Carbide will switch to Debug Perspective
and the SIS file will be downloaded to the phone and this window will appear briefly:
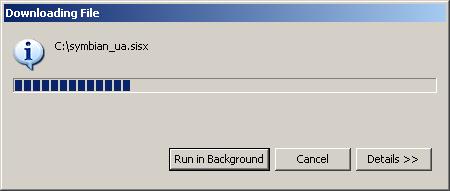
When this window dissappear, you should see the application runs on the phone:
You may make calls, receive calls, do presence stuffs, etc. Full
debugging should also be possible; you may set breakpoints, step into
functions, etc.
You can now move on to bigger and better things: APS & VAS
Common Problems 
Problem with Build/Clean 
Sometimes Carbide does not build the project properly after we make
some changes to the source. This will cause the old code to be built
instead of the new changes.
My standard work flow is to always clean the library/application
project containing the modified source before building the whole
project, to make sure that the modified libraries/application gets
rebuilt properly.
I/O Error: File in Use (I/O Fault) 
Sometimes .SIS creation fails with I/O error message in the Problems
pane similar to this message:
This sounds like a generic error from the build system, and it
may be caused by several problems. You can try these and see which one
solves it:
First check that the build process has completed without errors
(a build error will cause the executable not to get built, and this
will cause .sis creation to fail).
Rather than selecting "Build Target Only", try with "Build
Project" from the menu. Sometimes build directories are not created
when "Build Target Only" is used.
Try cleaning and re-building the project.
Sometimes restarting Carbide C++ also fixes it.
TRKProtocolPlugin: Failed to download the specified file to target 
I had experienced this few times. The file seems to be downloaded to
the phone fine (the download progress bar shows progress), but once
debugging starts Carbide displays "Carbide Alert": "Load Failed",
"TRKProtocolPlugin: Failed to download the specified file to target"
(as shown in the picture below).
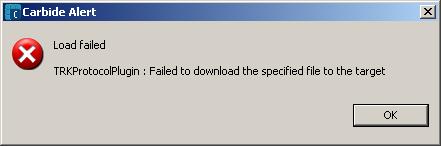
I'm not sure what's causing this, but closing TRK on the phone, then
reconnecting the USB cable and restarting TRK seems to have fixed this.
TRKProtocolPlugin: Failed to continue thread 
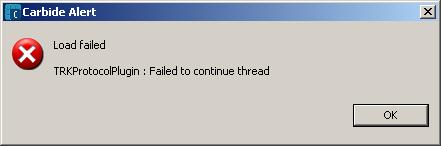
The solution is similar to above.
TRK Not Running Error 
Sometimes I get Carbide complaining about TRK not running:
Like this dialog:
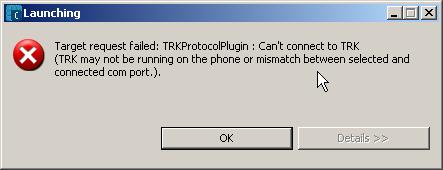
If you see TRK is running on the phone, it means that your phone is
hung now. Restart the phone by disconnecting the USB cable, taking of
the battery, put it back on, start the phone, connect the USB cable,
and re-run TRK again.
Load Failed: TRKProtocolPlugin: Failed to launch the application 
If you get this error while trying to debug the application:
Solution:
the application may genuinely be missing some dependent libraries
try to install the app manually from Windows Explorer, then run
it in the phone (not from Carbide). If it won't run (it may or may not
display any error messages, in the later case, the application just
won't start when you click it on the phone), then it may be missing the
dependent libraries.
think about the libraries that the application needs (for
example: APSServer, SSL and PIPS if for the TLS, and so on), and
install them to the phone.
make sure the .sisx specified in Debug - Installation matches the .sisx specified in the Project Build properties:
check the .sisx in Debug - Installation:
open Debug Configurations dialog (from Run menu),
select the debug configuration item from the left tree panel (e.g. select "pjproject phone Debug ((GCCE) [S60_3rd_FP1])")
go to "Installation" tab
check the .sisx name
check the .sisx in Project Build properties:
right click the project from "Symbian Project Navigator" panel, select "Properties"
in the "Properties" dialog, from the left tree panel, select "Carbide C++" then "Build Configurations"
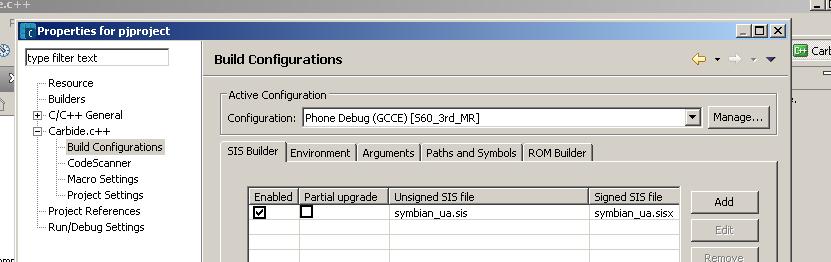
in the "SIS Builder" tab, make sure build for symbian_ua.sisx is checked, and "Partial Upgrade" is also checked
if you don't see the symbian_ua.sisx entry in the list:
press "Add"
set "PKG File:" to symbian_ua.pkg
leave "Signing Options" to "Self sign sis file"
press "OK"
If everything above has been set correctly and you still get the error, this is what I did that fixed it:
install the .sisx manually from Windows Explorer (right click
symbian_ua.sisx and select Install with Nokia Application Installer)
the installation was successful
uninstall the app from the phone
delete both the .sis and .sisx in the Windows computer
build the project again in Carbide
and launch debug
Load Failed: TRKProtocolPlugin: Unable to install the application 
If you get this error when trying to launch debug:
The solution is hinted in the message. Common causes are:
your PC clock is ahead of the phone clock
there may be other application installed in the phone which uses the same UID.
we may inadvertenly use the same UID for other PJSIP
applications such as pjlib-test. In this case uninstall all of these
other apps.
High Audio Latency 
We're working on this issue.
Random Crash/Stack Size Problem 
When you have random crash (sometimes in ICE/pjnath or in DNS SRV
resolver) or KERN-EXEC 3 when running without debugger, check if
increasing stack size in the MMP fixes the problem. The default stack
size (8KB) is not sufficient
, hence in symbian_ua.mmp
the EPOCSTACKSIZE setting is set to 12KB.
Other Resources 
Checkout:
Carbide.c++: Setting up On Target Debugging | NewLC
- this article describes how to set up on-device debugging using Bluetooth connection.
(54.2 kB) - added by ismangil on 05/06/09 18:25:23.
build-project.png
(62.1 kB) - added by ismangil on 05/06/09 18:43:27.
add-sis-builder.png
(19.8 kB) - added by ismangil on 05/06/09 18:49:27.
connection-type.png
(9.3 kB) - added by ismangil on 05/11/09 12:59:08.
setup-connection.png
(14.8 kB) - added by ismangil on 05/11/09 13:02:06.
install-remote-agent.png
(24.0 kB) - added by ismangil on 05/11/09 13:45:14.
choose-serial-port.png
(14.6 kB) - added by ismangil on 05/11/09 17:11:48.
initiate-trk-testing.png
(14.3 kB) - added by ismangil on 05/11/09 17:12:29.
test-trk-success.png
(4.3 kB) - added by ismangil on 05/11/09 17:12:55.
trk-connection-list.png
(10.2 kB) - added by ismangil on 05/11/09 17:13:13.
new-application-trk.png
(16.4 kB) - added by ismangil on 05/11/09 23:57:04.
set-debug-configuration.png
(13.6 kB) - added by ismangil on 05/11/09 23:57:34.
new-debug-configuration.png
(26.5 kB) - added by ismangil on 05/11/09 23:58:04.
pkg-in-explorer.png
(16.7 kB) - added by ismangil on 05/12/09 19:28:06.
new-launch-configuration.png
(19.5 kB) - added by ismangil on 05/13/09 11:21:14.
executable-selection.png
(16.3 kB) - added by ismangil on 05/13/09 11:24:00.
trk-conn-settings.png
(15.2 kB) - added by ismangil on 05/13/09 11:25:54.
trk-sis-selection.png
(14.9 kB) - added by ismangil on 05/13/09 11:28:41.
add-pkg-file.png
(17.6 kB) - added by ismangil on 05/13/09 11:43:40.
select-pkg.png
(16.7 kB) - added by ismangil on 05/13/09 11:49:11.
This document covers the following topics:
Requirements
Installations
SDK
Carbide
Nokia PC Suite
PJSIP
Importing PJSIP Projects
Building the Projects
Select the Build Configuration
Build the Project
Preparing the .sis/.sisx File
Set the .pkg File to be Used
Build the SISX File
Deploy the sisx file to phone
Configuring On-Device Debugging
Configuring Device Security
Installing TRK 3.x Application on the Phone
Running TRK Application on the Phone
Setting and Testing Connection Settings
Start Debugging
Common Problems
Problem with Build/Clean
I/O Error: File in Use (I/O Fault)
TRKProtocolPlugin: Failed to download the specified file to target
TRKProtocolPlugin: Failed to continue thread
TRK Not Running Error
Load Failed: TRKProtocolPlugin: Failed to launch the application
Load Failed: TRKProtocolPlugin: Unable to install the application
High Audio Latency
Random Crash/Stack Size Problem
Other Resources
Requirements 
For this tutorial, we will need:Symbian S60 3rd Edition Maintenance Release (MR)
. We also have tried this on FP1. Other SDK versions may work, but I did not test it.
Carbide C++ version 2.0
. You will need choose Developer Edition during install to do on-device debugging.
Nokia PC Suite
for the connectivity between the device and your PC (I use version 6.85)
pjsip source code
Nokia S60 3rd Edition device
(I use Nokia E70, but any S60 3rd Edition device should do, I think).
The date and time of this device need to be the same as development PC
otherwise you may get certificate errors.
Nokia data cable for on-device debugging (you can also use Bluetooth connection, but this tutorial will not cover it)
Installations 
SDK 
Follow the installation instructions in the SDK documentation (make sure that the SDK requisites, such as Perl version, are satisfied). Please install Symbian SDK on the same drive as PJSIP.
Carbide 
Follow the installation instructions in the Carbide C++documentation. The installation should be straightforward, but don't
forget to select the Developer's Edition
to get the On-Device debugging/TRK Debugging feature.
Nokia PC Suite 
Install PC Suite, connect your device with the USB cable, and make sure your PC can access your device.Connect Data Cable 
Connect the USB cable to the phone, and on the phone, select PC Suite:
If this is the first time you connect your phone to the PC, then it may
take some time for Windows to install the USB drivers for the phone.
Wait for it to complete and the Nokia PC Suite and PC Sync icons on the
task bar tray become green:
Leave PC Suite running with the device connected using the USB cable throughout this tutorial session.
PJSIP 
Retrieve and configure PJSIP:For this tutorial, I assume pjsip will be checked out to C:/project/pjproject
directory.
Checkout PJSIP from the usual location (see PJSIP Download page
for details).
Fill in your config_site.h
with:
#include <pj/config_site_sample.h>
Importing PJSIP Projects 
Run Carbide C++. When it asks the workspace location, enter adirectory where you would want to put Carbide specific settings for
PJSIP (or just accept the default value):
You will now be presented with Carbide Welcome page.
Now we need to import PJSIP's project files (the MMP files) into Carbide's workspace.
Select File
--> Import
from the menu:
This dialog below will pop up. Select Symbian OS
--> Symbian OS Bld.inf file
from the list, then press Next
button:
On the next dialog, click Browse..
button to select bld.inf
file from PJSIP's build.symbian
directory, then press Next
button:
Then on the SDK selection dialog, select the build configurations
that you want to support. For this tutorial, select WINSCW and GCCE
from S60 3rd Edition MR SDK, and press Next
button (do not select ARMV5 unless you have the commercial ARMV5 compiler
):
You will then presented with MMP selection dialog. Leave the default selection (normally it should select all MMPs) and press Next
:
The project now is ready to be imported, press the Finish
button:
Carbide is now exporting the MMP files into the workspace and this progress window will be displayed:
Wait for the process to complete.
Once it completes, you will see the PJSIP project tree on the bottom left part of the Carbide main window:
On the Problems
pane (bottom center of the main window) you may see one Warning
about duplicate path, but we can ignore this for now.
The projects should now be ready to be build.
Building the Projects 
Let's try to build the project first to make sure that the source is okay.Select the Build Configuration 
First select the build target by selecting Project--> Build Configuration
--> Set Active
from main menu (or right clicking the Bld.inf
or pjproject
item from Symbian Project Navigator
pane from the bottom left part of the main window).
Select Phone Debug (GCCE) [S60_3rd_MR]
from the menu:
Build the Project 
Then right click Bld.infor pjproject
item from Symbian Project Navigator
pane from the bottom left part of the main window, and select Build Project
:
Wait for the build process to complete. You may take a peek on what Carbide is doing by clicking on Console
pane/tab in the bottom part of main window.
Once it completes, watch out for any errors in the Problems
pane (at the bottom center). There shouldn't be any errors, although
there may be few warnings which I think can be ignored, for now:
We are now ready to build the .sis/.sisx file to be deployed to the phone.
Preparing the .sis/.sisx File 
The .sis file is the packaging for the executable to be deployed inthe device. The .sisx file is a signed .sis. Both the .sis and .sisx
file can be created very easily with Carbide C++.
Set the .pkg File to be Used 
First we'll need to configure the .pkg file to be used to generatethe .sisx file. PJSIP provides some sample .pkg files which can be
used, however there may be few editing needed before you can use them
(this is because the .pkg file contains absolute directory path for
your Symbian SDK, which may be different on your installation).
Assign the .pkg file to be used by the project by selecting Project Properties:
Then Project Properties dialog will appear. On this dialog:
Select Carbide Build Configuration
from the tree (left part of the dialog).
Make sure that the Active Configuration is set to Phone Debug (GCCE) [S60_3rd_MR]
(the SDK name will be different, if you use different SDK version)
Set the PKG File
by clicking Add
button, and choose symbian_ua.pkg
from PJSIP's build.symbian
directory.
We can leave the "SIS creation and Signing" settings empty to use the default settings.
Press OK
button to save the project configuration.
Now right click bld.inf
(or pjproject
) and click Refresh
:
Wait for few seconds (30 seconds on my computer) for Carbide to do its job, once it's done, you will see the .pkg file in the Project Navigator
pane:
Build the SISX File 
Once PKG has been setup on the project, a SISX file will be createdeverytime we build the project. So lets build the project now.
Right click Bld.inf
or pjproject
item from Symbian Project Navigator
pane from the bottom left part of the main window, and select Build Project
:
The build process will start. You can take a peek on the Console
tab to see what's being done. Once the build process completes, you should see something like this on the Console
tab:
Signing

***SIS Creation Complete

Total Time: 12 sec
Check the Problems
tab again to see if we have any errors (there shouldn't be any).
Deploy the sisx file to phone 
Using Nokia Application Installer (included with PC Suite), try installing the symbian_ua.sisxfile, located in the build.symbian
directory. It should install successfully. If not, double check:
Application Manager has been set to allow all
Date and time of phone matches development PC
Configuring On-Device Debugging 
Make sure the phone is connected to the PC using the data cable.Configuring Device Security 
By default, your phone does not allow self-signed certificate to be installed on the phone, I think. To change this setting:Go to Menu
--> Tools
--> App. Mgr
On App. manager
, select menu Options
--> Settings
Set Software installation
to All
Installing TRK 3.x Application on the Phone 
Install TRK 3.x support on the phone. You can do this via the On Device Connections menu on Carbide:You will be presented with a choice of connections. Choose USB
, not TRK 2.x USB
.
In the next screen, choose the tab Install Remote Agent
:
You will need to choose the appropriate installer for your phone:
| Phone | Installer |
| S60 3rd Plain/MR | 3.0.0 |
| S60 3rd FP1 | 3.1.0 |
| S60 3rd FP2 | 3.2.0 |
| S60 5th | 5.0.0 |
.
When asked if we want to install, click Yes
:
On the PC, this window should be displayed.
Leave it this way, the installation will start on the phone now. Your phone should display something like this:
Click Yes.
Now the phone will display Details
information:
Click Continue.
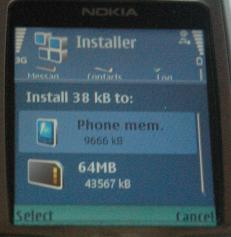
Your phone may now display the target memory location:
Select the memory and press Select
menu.
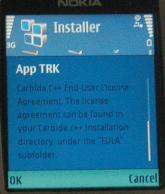
Now the phone will display license agreement:
Click OK
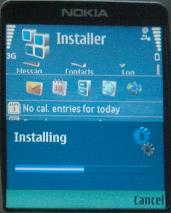
(if you agree, of course). The phone should display installation progress window for couple of seconds now:
Once it's done, Installation Complete
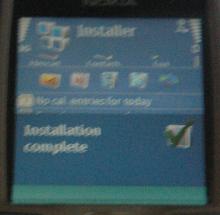
window will appear briefly:
TRK is now installed on the phone. Next step is to run it.
Running TRK Application on the Phone 
Run it from Menu--> Installations
--> TRK (it may be different on your phone).
When it asks to switch on Blueetooth, click No
. We use USB cable for this session.
The TRK window will appear. We can ignore the error message for now:
Select Options
--> Settings
menu.
Change the Connection
to USB, and leave all settings unchanged. (Note: You may not get the baud rate settings input):
Click Back
to get back to TRK main window.
Now select Options
--> Connect
from the menu.
TRK main window should display Status: Connected
now. There might less info on newer version of TRK, but as long as it says Connected, you're good to go:
Leave TRK running on the phone for the duration of this tutorial, and move on back to Carbide to set the connection up.
Setting and Testing Connection Settings 
Click on the Set Connection Settingstab, and
choose the serial port that have your device name next to it. You might
need to scroll a long way down, mine was COM17:
Now you can test the connection. Click on Test Service Testing
:
If everything is successful, you will get the following on the area in the big status textbox:
Click Finish
, and you should be rewarded by a new connection appearing in the Remote Connections
area in Carbide C++:
Start Debugging 
Because we haven't setup a debug configuration, if you start debugging, Carbide C++ will offer you to setup one.On the Symbian Project Navigator
select bld.inf, and press debug on the toolbar (the picture of the bug...):
You will get the Launch Configuration Wizard. Click Next
. You'll get :
Executable should already be set to symbian_ua.exe
, so just click Next
. You'll get:
This should be defaulted to connection 1
which we have setup earlier. Click Next
. You'll get:
Verify that the sisx is symbian_ua.sisx
which we already tested beforehand. Click Next
then Finish
. You should immediately begin debugging.
Carbide now may rebuild the project (you may take a peek on what it's doing by looking at Console
tab). Once it's done, Carbide will switch to Debug Perspective
and the SIS file will be downloaded to the phone and this window will appear briefly:
When this window dissappear, you should see the application runs on the phone:
You may make calls, receive calls, do presence stuffs, etc. Full
debugging should also be possible; you may set breakpoints, step into
functions, etc.
You can now move on to bigger and better things: APS & VAS
Common Problems 
Problem with Build/Clean 
Sometimes Carbide does not build the project properly after we makesome changes to the source. This will cause the old code to be built
instead of the new changes.
My standard work flow is to always clean the library/application
project containing the modified source before building the whole
project, to make sure that the modified libraries/application gets
rebuilt properly.
I/O Error: File in Use (I/O Fault) 
Sometimes .SIS creation fails with I/O error message in the Problemspane similar to this message:
file I/O fault

makesis.exe returned with exit value == 1

The process cannot access the file because it is being used by another process.
This sounds like a generic error from the build system, and it
may be caused by several problems. You can try these and see which one
solves it:
First check that the build process has completed without errors
(a build error will cause the executable not to get built, and this
will cause .sis creation to fail).
Rather than selecting "Build Target Only", try with "Build
Project" from the menu. Sometimes build directories are not created
when "Build Target Only" is used.
Try cleaning and re-building the project.
Sometimes restarting Carbide C++ also fixes it.
TRKProtocolPlugin: Failed to download the specified file to target 
I had experienced this few times. The file seems to be downloaded tothe phone fine (the download progress bar shows progress), but once
debugging starts Carbide displays "Carbide Alert": "Load Failed",
"TRKProtocolPlugin: Failed to download the specified file to target"
(as shown in the picture below).
I'm not sure what's causing this, but closing TRK on the phone, then
reconnecting the USB cable and restarting TRK seems to have fixed this.
TRKProtocolPlugin: Failed to continue thread 
The solution is similar to above.
TRK Not Running Error 
Sometimes I get Carbide complaining about TRK not running:Launching Target request failed: TRKProtocolPlugin: Can't connect to TRK (TRK may not be running on the phone or mismatch between selected and connected com port.).
Like this dialog:
If you see TRK is running on the phone, it means that your phone is
hung now. Restart the phone by disconnecting the USB cable, taking of
the battery, put it back on, start the phone, connect the USB cable,
and re-run TRK again.
Load Failed: TRKProtocolPlugin: Failed to launch the application 
If you get this error while trying to debug the application:Load Failed: TRKProtocolPlugin: Failed to launch the application (Installing the application may have failed or dependent libraries may be missing)
Solution:
the application may genuinely be missing some dependent libraries
try to install the app manually from Windows Explorer, then run
it in the phone (not from Carbide). If it won't run (it may or may not
display any error messages, in the later case, the application just
won't start when you click it on the phone), then it may be missing the
dependent libraries.
think about the libraries that the application needs (for
example: APSServer, SSL and PIPS if for the TLS, and so on), and
install them to the phone.
make sure the .sisx specified in Debug - Installation matches the .sisx specified in the Project Build properties:
check the .sisx in Debug - Installation:
open Debug Configurations dialog (from Run menu),
select the debug configuration item from the left tree panel (e.g. select "pjproject phone Debug ((GCCE) [S60_3rd_FP1])")
go to "Installation" tab
check the .sisx name
check the .sisx in Project Build properties:
right click the project from "Symbian Project Navigator" panel, select "Properties"
in the "Properties" dialog, from the left tree panel, select "Carbide C++" then "Build Configurations"
in the "SIS Builder" tab, make sure build for symbian_ua.sisx is checked, and "Partial Upgrade" is also checked
if you don't see the symbian_ua.sisx entry in the list:
press "Add"
set "PKG File:" to symbian_ua.pkg
leave "Signing Options" to "Self sign sis file"
press "OK"
If everything above has been set correctly and you still get the error, this is what I did that fixed it:
install the .sisx manually from Windows Explorer (right click
symbian_ua.sisx and select Install with Nokia Application Installer)
the installation was successful
uninstall the app from the phone
delete both the .sis and .sisx in the Windows computer
build the project again in Carbide
and launch debug
Load Failed: TRKProtocolPlugin: Unable to install the application 
If you get this error when trying to launch debug:Load Failed: TRKProtocolPlugin: Unable to install the application. If self signing, certificate could be invalid if your PC clock is ahead of your phone clock. If not, your developer certificate may be invalid or UID of your application may be invalid or already in use.
The solution is hinted in the message. Common causes are:
your PC clock is ahead of the phone clock
there may be other application installed in the phone which uses the same UID.
we may inadvertenly use the same UID for other PJSIP
applications such as pjlib-test. In this case uninstall all of these
other apps.
High Audio Latency 
We're working on this issue.Random Crash/Stack Size Problem 
When you have random crash (sometimes in ICE/pjnath or in DNS SRVresolver) or KERN-EXEC 3 when running without debugger, check if
increasing stack size in the MMP fixes the problem. The default stack
size (8KB) is not sufficient
, hence in symbian_ua.mmp
the EPOCSTACKSIZE setting is set to 12KB.
Other Resources 
Checkout:Carbide.c++: Setting up On Target Debugging | NewLC
- this article describes how to set up on-device debugging using Bluetooth connection.
Attachments
SetActiveBuildConfiguration.png(54.2 kB) - added by ismangil on 05/06/09 18:25:23.
build-project.png
(62.1 kB) - added by ismangil on 05/06/09 18:43:27.
add-sis-builder.png
(19.8 kB) - added by ismangil on 05/06/09 18:49:27.
connection-type.png
(9.3 kB) - added by ismangil on 05/11/09 12:59:08.
setup-connection.png
(14.8 kB) - added by ismangil on 05/11/09 13:02:06.
install-remote-agent.png
(24.0 kB) - added by ismangil on 05/11/09 13:45:14.
choose-serial-port.png
(14.6 kB) - added by ismangil on 05/11/09 17:11:48.
initiate-trk-testing.png
(14.3 kB) - added by ismangil on 05/11/09 17:12:29.
test-trk-success.png
(4.3 kB) - added by ismangil on 05/11/09 17:12:55.
trk-connection-list.png
(10.2 kB) - added by ismangil on 05/11/09 17:13:13.
new-application-trk.png
(16.4 kB) - added by ismangil on 05/11/09 23:57:04.
set-debug-configuration.png
(13.6 kB) - added by ismangil on 05/11/09 23:57:34.
new-debug-configuration.png
(26.5 kB) - added by ismangil on 05/11/09 23:58:04.
pkg-in-explorer.png
(16.7 kB) - added by ismangil on 05/12/09 19:28:06.
new-launch-configuration.png
(19.5 kB) - added by ismangil on 05/13/09 11:21:14.
executable-selection.png
(16.3 kB) - added by ismangil on 05/13/09 11:24:00.
trk-conn-settings.png
(15.2 kB) - added by ismangil on 05/13/09 11:25:54.
trk-sis-selection.png
(14.9 kB) - added by ismangil on 05/13/09 11:28:41.
add-pkg-file.png
(17.6 kB) - added by ismangil on 05/13/09 11:43:40.
select-pkg.png
(16.7 kB) - added by ismangil on 05/13/09 11:49:11.

相关文章推荐
- Symbian开发——Carbide.c++ debug on device
- Symbian开发——Carbide.c++ debug on device
- Linux Device Drivers 3rd Edition Building and Running
- How to access HBase from spark-shell using YARN as the master on CDH 5.3 and Spark 1.2
- Linux Device Drivers 3rd Edition Time Delays and Deferred Work
- Linux Device Drivers 3rd Edition Memory Mapping and DMA
- Read and Write to a Keyboard device in Linux using C++
- API Plug-in for the S60 3rd Edition SDK for Symbian OS, for C++, supporting Feature Pack 2
- build sl4a in eclipse and using on device.
- Building and Installing ACE on Windows with Microsoft Visual C++
- API Plug-in for the S60 3rd Edition SDK for Symbian OS, for C++, supporting Feature Pack 1
- Symbian开发——Video Player on S60 3rd FP1
- 用Carbide和S60 SDK构建Symbian C++开发环境
- API Plug-in for the S60 3rd Edition SDK for Symbian OS, for C++, MR
- Symbian 3rd Debug on Device
- Linux Device Drivers 3rd Edition Debugging Techniques
- Linux Device Drivers 3rd Edition Concurrency and Race Conditions
- 搭建Symbian S60 5th的Carbide.C++开发环境
- On-Device Debugging with Carbide.j 1.5