WPF中的动画——(5)
2009-03-05 22:42
148 查看
我们见识了普通的动画类、关键帧动画类,当然,还有一种动画类需要我们了解,那就是基于路径的动画。它有3个类型:DoubleAnimationUsingPath、MatrixAniamtionUsingPath和PointAnimationUsingPath。
基于路径的动画允许你指定PathGeometry作为对象行进的路径来改变对象的位置。这些路径可以是矩形、椭圆、弧形或任何组合。
以PointAniamtionUsingPath为例:
<Canvas xmlns="http://schemas.microsoft.com/winfx/2006/xaml/presentation"
xmlns:x="http://schemas.microsoft.com/winfx/2006/xaml">
<Path Fill="Blue">
<Path.Data>
<EllipseGeometry x:Name="elips" RadiusX="12" RadiusY="12"/>
</Path.Data>
<Path.Triggers>
<EventTrigger RoutedEvent="Path.Loaded">
<BeginStoryboard>
<Storyboard TargetName="elips" TargetProperty="Center">
<PointAnimationUsingPath Duration="0:0:2.5" AutoReverse="True"
RepeatBehavior="Forever">
<PointAnimationUsingPath.PathGeometry>
<PathGeometry Figures="M 96 288 C 576 0, 0 0, 480 288"/>
</PointAnimationUsingPath.PathGeometry>
</PointAnimationUsingPath>
</Storyboard>
</BeginStoryboard>
</EventTrigger>
</Path.Triggers>
</Path>
<Path Stroke="Black" Data="M 96 288 C 576 0, 0 0, 480 288"/>
</Canvas>
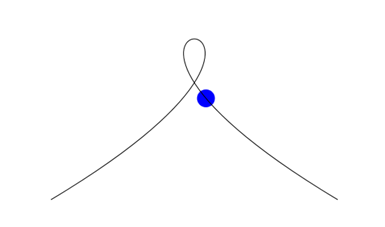
运行起来,可以看到,球的中心,会精确地沿着定义的贝塞尔曲线移动。
如图:
在DoubleAnimationUsingPath中,你会使用到指定PathGeometry的X、Y和Angle为目标的X值、Y值以及目标的旋转角度,这样,目标不光能沿着路径前进,还能根据路径的斜率来改变自己的角度,使自己始终平行于路径。
三个DoubleAnimationUsingPath来改变目标的水平和垂直位置并旋转角度,这样的一个效果往往可以只用一个MatrixAnimationUsingPath来实现(路径的X、Y会变成Matrix的OffsetX和OffsetY,Matrix剩下的部分用来定义旋转——需要设定DoesRotateWithTangent为True)。接下来,用骑单轮车的机器人绕行于山丘大道来为MatrixAnimationUsingPath作例子:
<Canvas xmlns="http://schemas.microsoft.com/winfx/2006/xaml/presentation"
xmlns:x="http://schemas.microsoft.com/winfx/2006/xaml">
<Canvas.Resources>
<PathGeometry x:Key="path"
Figures="M 200 200
C 300 0 500 400 700 200
C 900 0 1000 200 900 300
C 100 1100 1200 800 400 500
C 100 400 100 400 200 200"/>
<Style TargetType="{x:Type Path}">
<Setter Property="Stroke" Value="{DynamicResource {x:Static SystemColors.WindowTextBrushKey}}"/>
</Style>
</Canvas.Resources>
<Path Data="{StaticResource path}"/>
<Path>
<Path.Data>
<GeometryGroup>
<EllipseGeometry Center="0 -25" RadiusX="25" RadiusY="25"/>
<GeometryGroup>
<LineGeometry StartPoint="0 0" EndPoint="0 -50"/>
<LineGeometry StartPoint="-25 -25" EndPoint="25 -25"/>
<LineGeometry StartPoint="-18 -7" EndPoint="18 -43"/>
<LineGeometry StartPoint="18 -7" EndPoint="-18 -43"/>
<GeometryGroup.Transform>
<RotateTransform x:Name="xformSpokes"
CenterX="0" CenterY="-25"/>
</GeometryGroup.Transform>
</GeometryGroup>
<LineGeometry StartPoint="0 -25" EndPoint="0 -80"/>
<EllipseGeometry Center="0 -90" RadiusX="10" RadiusY="10"/>
<LineGeometry StartPoint="9 -85" EndPoint="0 -90"/>
<LineGeometry StartPoint="-35 -70" EndPoint="35 -70">
<LineGeometry.Transform>
<RotateTransform x:Name="xformArm" CenterX="0" CenterY="-70"/>
</LineGeometry.Transform>
</LineGeometry>
</GeometryGroup>
</Path.Data>
<Path.RenderTransform>
<MatrixTransform x:Name="xformUnicycleMan"/>
</Path.RenderTransform>
</Path>
<Canvas.Triggers>
<EventTrigger RoutedEvent="Canvas.Loaded">
<BeginStoryboard>
<Storyboard SpeedRatio="1">
<MatrixAnimationUsingPath Storyboard.TargetName="xformUnicycleMan"
Storyboard.TargetProperty="Matrix"
Duration="0:0:12"
PathGeometry="{StaticResource path}"
DoesRotateWithTangent="True"
RepeatBehavior="Forever"/>
<DoubleAnimation Storyboard.TargetName="xformSpokes"
Storyboard.TargetProperty="Angle"
Duration="0:0:1" RepeatBehavior="Forever"
From="0" To="360"/>
<DoubleAnimation Storyboard.TargetName="xformArm"
Storyboard.TargetProperty="Angle"
Duration="0:0:0.2"
AutoReverse="True"
RepeatBehavior="Forever"
From="-20" To="20"/>
</Storyboard>
</BeginStoryboard>
</EventTrigger>
</Canvas.Triggers>
</Canvas>
运行结果如图:
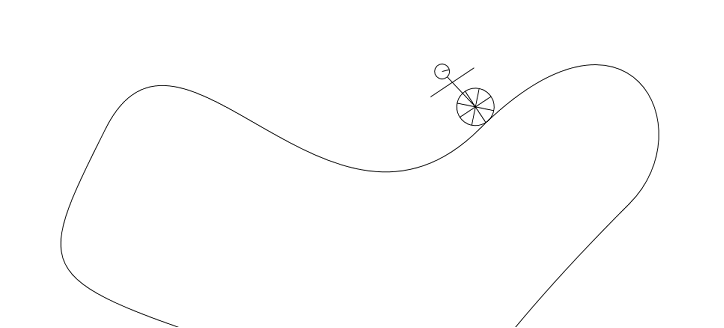
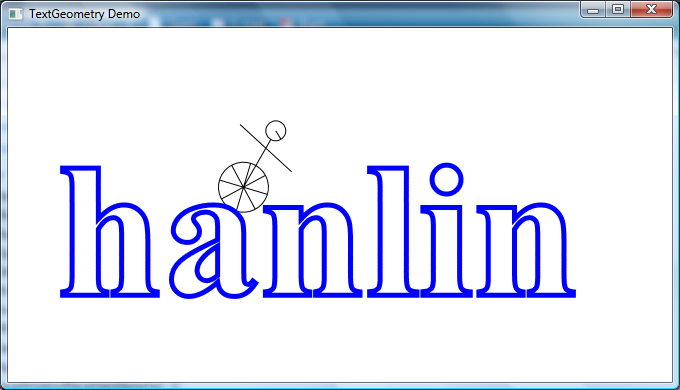
另外,可以让骑单轮车的机器人沿着文字运动,可以参考Demo。抓个图吧。
基于路径的动画允许你指定PathGeometry作为对象行进的路径来改变对象的位置。这些路径可以是矩形、椭圆、弧形或任何组合。
以PointAniamtionUsingPath为例:
<Canvas xmlns="http://schemas.microsoft.com/winfx/2006/xaml/presentation"
xmlns:x="http://schemas.microsoft.com/winfx/2006/xaml">
<Path Fill="Blue">
<Path.Data>
<EllipseGeometry x:Name="elips" RadiusX="12" RadiusY="12"/>
</Path.Data>
<Path.Triggers>
<EventTrigger RoutedEvent="Path.Loaded">
<BeginStoryboard>
<Storyboard TargetName="elips" TargetProperty="Center">
<PointAnimationUsingPath Duration="0:0:2.5" AutoReverse="True"
RepeatBehavior="Forever">
<PointAnimationUsingPath.PathGeometry>
<PathGeometry Figures="M 96 288 C 576 0, 0 0, 480 288"/>
</PointAnimationUsingPath.PathGeometry>
</PointAnimationUsingPath>
</Storyboard>
</BeginStoryboard>
</EventTrigger>
</Path.Triggers>
</Path>
<Path Stroke="Black" Data="M 96 288 C 576 0, 0 0, 480 288"/>
</Canvas>
运行起来,可以看到,球的中心,会精确地沿着定义的贝塞尔曲线移动。
如图:
在DoubleAnimationUsingPath中,你会使用到指定PathGeometry的X、Y和Angle为目标的X值、Y值以及目标的旋转角度,这样,目标不光能沿着路径前进,还能根据路径的斜率来改变自己的角度,使自己始终平行于路径。
三个DoubleAnimationUsingPath来改变目标的水平和垂直位置并旋转角度,这样的一个效果往往可以只用一个MatrixAnimationUsingPath来实现(路径的X、Y会变成Matrix的OffsetX和OffsetY,Matrix剩下的部分用来定义旋转——需要设定DoesRotateWithTangent为True)。接下来,用骑单轮车的机器人绕行于山丘大道来为MatrixAnimationUsingPath作例子:
<Canvas xmlns="http://schemas.microsoft.com/winfx/2006/xaml/presentation"
xmlns:x="http://schemas.microsoft.com/winfx/2006/xaml">
<Canvas.Resources>
<PathGeometry x:Key="path"
Figures="M 200 200
C 300 0 500 400 700 200
C 900 0 1000 200 900 300
C 100 1100 1200 800 400 500
C 100 400 100 400 200 200"/>
<Style TargetType="{x:Type Path}">
<Setter Property="Stroke" Value="{DynamicResource {x:Static SystemColors.WindowTextBrushKey}}"/>
</Style>
</Canvas.Resources>
<Path Data="{StaticResource path}"/>
<Path>
<Path.Data>
<GeometryGroup>
<EllipseGeometry Center="0 -25" RadiusX="25" RadiusY="25"/>
<GeometryGroup>
<LineGeometry StartPoint="0 0" EndPoint="0 -50"/>
<LineGeometry StartPoint="-25 -25" EndPoint="25 -25"/>
<LineGeometry StartPoint="-18 -7" EndPoint="18 -43"/>
<LineGeometry StartPoint="18 -7" EndPoint="-18 -43"/>
<GeometryGroup.Transform>
<RotateTransform x:Name="xformSpokes"
CenterX="0" CenterY="-25"/>
</GeometryGroup.Transform>
</GeometryGroup>
<LineGeometry StartPoint="0 -25" EndPoint="0 -80"/>
<EllipseGeometry Center="0 -90" RadiusX="10" RadiusY="10"/>
<LineGeometry StartPoint="9 -85" EndPoint="0 -90"/>
<LineGeometry StartPoint="-35 -70" EndPoint="35 -70">
<LineGeometry.Transform>
<RotateTransform x:Name="xformArm" CenterX="0" CenterY="-70"/>
</LineGeometry.Transform>
</LineGeometry>
</GeometryGroup>
</Path.Data>
<Path.RenderTransform>
<MatrixTransform x:Name="xformUnicycleMan"/>
</Path.RenderTransform>
</Path>
<Canvas.Triggers>
<EventTrigger RoutedEvent="Canvas.Loaded">
<BeginStoryboard>
<Storyboard SpeedRatio="1">
<MatrixAnimationUsingPath Storyboard.TargetName="xformUnicycleMan"
Storyboard.TargetProperty="Matrix"
Duration="0:0:12"
PathGeometry="{StaticResource path}"
DoesRotateWithTangent="True"
RepeatBehavior="Forever"/>
<DoubleAnimation Storyboard.TargetName="xformSpokes"
Storyboard.TargetProperty="Angle"
Duration="0:0:1" RepeatBehavior="Forever"
From="0" To="360"/>
<DoubleAnimation Storyboard.TargetName="xformArm"
Storyboard.TargetProperty="Angle"
Duration="0:0:0.2"
AutoReverse="True"
RepeatBehavior="Forever"
From="-20" To="20"/>
</Storyboard>
</BeginStoryboard>
</EventTrigger>
</Canvas.Triggers>
</Canvas>
运行结果如图:
另外,可以让骑单轮车的机器人沿着文字运动,可以参考Demo。抓个图吧。

相关文章推荐
- 用WF流程控制WPF动画
- WPF中的动画——(4)
- WPF之动画
- C#开发WPF/Silverlight动画及游戏系列教程(Game Tutorial):(六)完美移动
- C#开发WPF/Silverlight动画及游戏系列教程(Game Tutorial):(七)传说中的A*寻径算法
- C#开发WPF/Silverlight动画及游戏系列教程(Game Tutorial):(九) 2D游戏角色在地图上的移动
- C#开发WPF/Silverlight动画及游戏系列教程(Game Tutorial):(十)斜度α地图的构造及算法
- C#开发WPF/Silverlight动画及游戏系列教程(Game Tutorial):(二)让物体动起来②
- C#开发WPF/Silverlight动画及游戏系列教程(Game Tutorial):(十)斜度α地图的构造及算法
- C#开发WPF/Silverlight动画及游戏系列教程(Game Tutorial):(十三)牵引式地图移动模式①
- C#开发WPF/Silverlight动画及游戏系列教程(Game Tutorial):(十四) 精灵控件横空出世!①
- C#开发WPF/Silverlight动画及游戏系列教程(Game Tutorial):(十六) 牵引式地图移动模式②
- C#开发WPF/Silverlight动画及游戏系列教程(Game Tutorial):(十九) 完美精灵之八面玲珑(WPF Only)③
- C#开发WPF/Silverlight动画及游戏系列教程(Game Tutorial):(二十一)主位式地图移动模式
- C#开发WPF/Silverlight动画及游戏系列教程(Game Tutorial):(二十二)重构 – 让代码插上翅膀自由飞翔
- C#开发WPF/Silverlight动画及游戏系列教程(Game Tutorial):(二十六)通用型角色头像面板
- WPF中播放Flash动画
- C#开发WPF/Silverlight动画及游戏系列教程(Game Tutorial):(二十四) Be careful!前方怪物出没
- C#开发WPF/Silverlight动画及游戏系列教程(Game Tutorial):(三十) 大法师 – 华丽经典之轮回
- C#开发WPF/Silverlight动画及游戏系列教程(Game Tutorial):(三十二) 雷、混、冰、毒、火、风 - 幻化中的魔法魅力!