ListView控件的使用
2008-09-13 06:48
232 查看
近日在用ListView中的一些注意点,和公用代码,整理如下
1.ListView.Items.Clear而不是ListView.Clear
一般如果ListView是动态填充的,我们在填充之前都会先进行清理。但需要注意一下,我们是清理Items,如果去直接Clear整个ListView,就连原先定义好的列都没有了
2.给ListView绑定数据
ListView并不能直接进行绑定,而是要通过代码。究其原因,因为它在绑定的时候,还需要设置图片等信息。而ListView一般都与TreeView配合使用,它的绑定行为是通过TreeView的点击来引发的
.csharpcode, .csharpcode pre
{
font-size: small;
color: black;
font-family: consolas, "Courier New", courier, monospace;
background-color: #ffffff;
/*white-space: pre;*/
}
.csharpcode pre { margin: 0em; }
.csharpcode .rem { color: #008000; }
.csharpcode .kwrd { color: #0000ff; }
.csharpcode .str { color: #006080; }
.csharpcode .op { color: #0000c0; }
.csharpcode .preproc { color: #cc6633; }
.csharpcode .asp { background-color: #ffff00; }
.csharpcode .html { color: #800000; }
.csharpcode .attr { color: #ff0000; }
.csharpcode .alt
{
background-color: #f4f4f4;
width: 100%;
margin: 0em;
}
.csharpcode .lnum { color: #606060; }
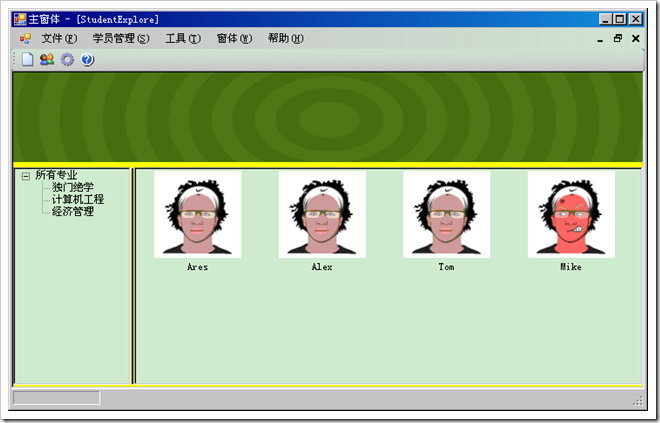
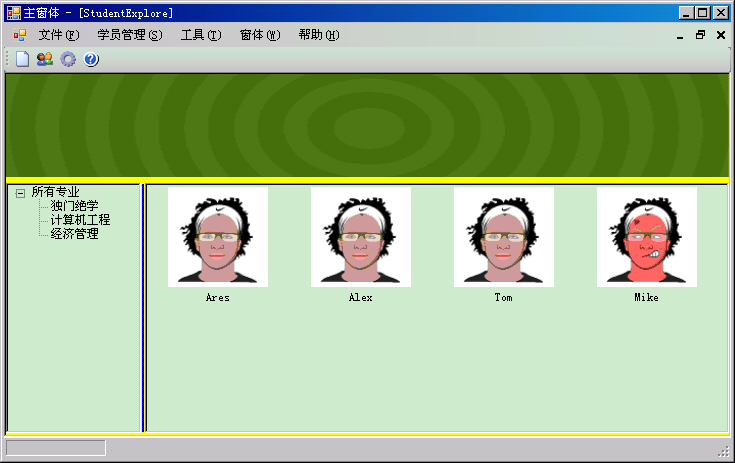
3.切换ListView的显示视图
.csharpcode, .csharpcode pre
{
font-size: small;
color: black;
font-family: consolas, "Courier New", courier, monospace;
background-color: #ffffff;
/*white-space: pre;*/
}
.csharpcode pre { margin: 0em; }
.csharpcode .rem { color: #008000; }
.csharpcode .kwrd { color: #0000ff; }
.csharpcode .str { color: #006080; }
.csharpcode .op { color: #0000c0; }
.csharpcode .preproc { color: #cc6633; }
.csharpcode .asp { background-color: #ffff00; }
.csharpcode .html { color: #800000; }
.csharpcode .attr { color: #ff0000; }
.csharpcode .alt
{
background-color: #f4f4f4;
width: 100%;
margin: 0em;
}
.csharpcode .lnum { color: #606060; }
4.一些公用代码(图片和字节转换)
.csharpcode, .csharpcode pre
{
font-size: small;
color: black;
font-family: consolas, "Courier New", courier, monospace;
background-color: #ffffff;
/*white-space: pre;*/
}
.csharpcode pre { margin: 0em; }
.csharpcode .rem { color: #008000; }
.csharpcode .kwrd { color: #0000ff; }
.csharpcode .str { color: #006080; }
.csharpcode .op { color: #0000c0; }
.csharpcode .preproc { color: #cc6633; }
.csharpcode .asp { background-color: #ffff00; }
.csharpcode .html { color: #800000; }
.csharpcode .attr { color: #ff0000; }
.csharpcode .alt
{
background-color: #f4f4f4;
width: 100%;
margin: 0em;
}
.csharpcode .lnum { color: #606060; }
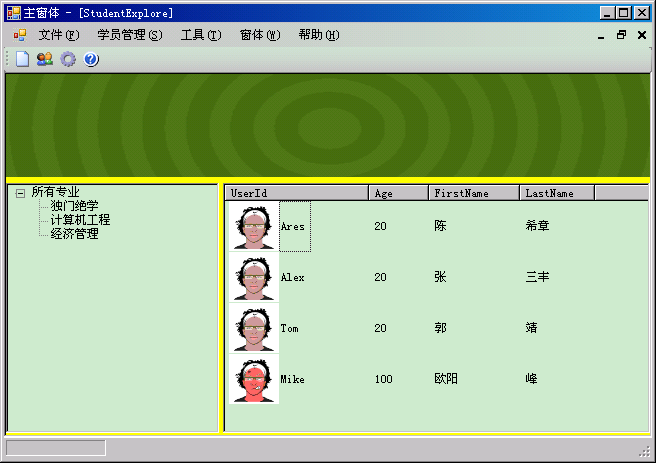
大致截图如下
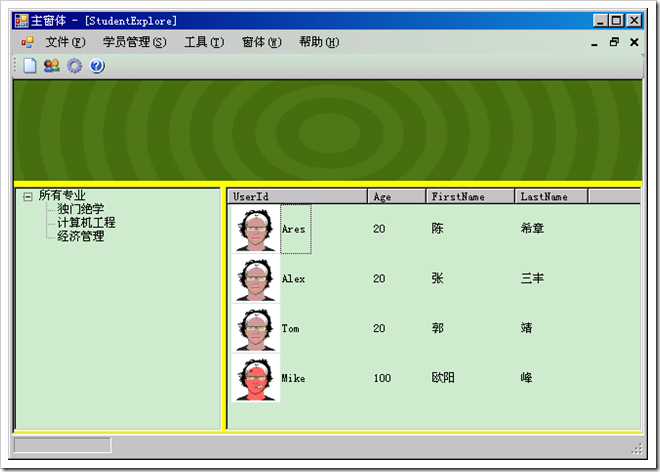
1.ListView.Items.Clear而不是ListView.Clear
一般如果ListView是动态填充的,我们在填充之前都会先进行清理。但需要注意一下,我们是清理Items,如果去直接Clear整个ListView,就连原先定义好的列都没有了
2.给ListView绑定数据
ListView并不能直接进行绑定,而是要通过代码。究其原因,因为它在绑定的时候,还需要设置图片等信息。而ListView一般都与TreeView配合使用,它的绑定行为是通过TreeView的点击来引发的
/// <summary>
/// 当点击了左边的Treeview的时候触发事件
/// </summary>
/// <param name="sender"></param>
/// <param name="e"></param>
private void treeView1_NodeMouseClick(object sender,
TreeNodeMouseClickEventArgs e)
{
TreeNode node = e.Node;
List<DTOStudent> result = new List<DTOStudent>();
if (node.Nodes.Count == 0)//如果不是根节点
{
//按照专业读取学员信息
result = dal.GetStudentBySpec(node.Text);
}
else
{
//读取全部学员信息
result = dal.GetAllStudents();
}

BindListView(result);
}

private void BindListView(List<DTOStudent> result)
{
//将ListView先进行清理
//一定要注意,是Items.Clear,而不是ListView1.Clear
listView1.Items.Clear();

//两个ImageList也清理一下(因为是动态添加图片)
imageList1.Images.Clear();
imageList2.Images.Clear();

int i = 0;
foreach (DTOStudent student in result)
{
ListViewItem item = new ListViewItem(student.UID);
//动态得到每个学员所对应的图片
Image image = Utility.ImageProcessor.ConvertToImage(student.Photo);
//加入到两个ImageList里面去
//这两个ImageList与ListView的LargeIcon和SmallIcon对应
imageList1.Images.Add(image);
imageList2.Images.Add(image);
item.ImageIndex = i;
i++;

listView1.Items.Add(item);

item.SubItems.Add(student.Age.ToString());
item.SubItems.Add(student.FirstName);
item.SubItems.Add(student.LastName);
}
}
.csharpcode, .csharpcode pre
{
font-size: small;
color: black;
font-family: consolas, "Courier New", courier, monospace;
background-color: #ffffff;
/*white-space: pre;*/
}
.csharpcode pre { margin: 0em; }
.csharpcode .rem { color: #008000; }
.csharpcode .kwrd { color: #0000ff; }
.csharpcode .str { color: #006080; }
.csharpcode .op { color: #0000c0; }
.csharpcode .preproc { color: #cc6633; }
.csharpcode .asp { background-color: #ffff00; }
.csharpcode .html { color: #800000; }
.csharpcode .attr { color: #ff0000; }
.csharpcode .alt
{
background-color: #f4f4f4;
width: 100%;
margin: 0em;
}
.csharpcode .lnum { color: #606060; }
3.切换ListView的显示视图
private void 大图标ToolStripMenuItem_Click(object sender, EventArgs e)
{
listView1.View = View.LargeIcon;
}

private void 小图标ToolStripMenuItem_Click(object sender, EventArgs e)
{
listView1.View = View.SmallIcon;
}

private void 清单ToolStripMenuItem_Click(object sender, EventArgs e)
{
listView1.View = View.List;
}

private void 详细详细ToolStripMenuItem_Click(object sender, EventArgs e)
{
listView1.View = View.Details;
}
.csharpcode, .csharpcode pre
{
font-size: small;
color: black;
font-family: consolas, "Courier New", courier, monospace;
background-color: #ffffff;
/*white-space: pre;*/
}
.csharpcode pre { margin: 0em; }
.csharpcode .rem { color: #008000; }
.csharpcode .kwrd { color: #0000ff; }
.csharpcode .str { color: #006080; }
.csharpcode .op { color: #0000c0; }
.csharpcode .preproc { color: #cc6633; }
.csharpcode .asp { background-color: #ffff00; }
.csharpcode .html { color: #800000; }
.csharpcode .attr { color: #ff0000; }
.csharpcode .alt
{
background-color: #f4f4f4;
width: 100%;
margin: 0em;
}
.csharpcode .lnum { color: #606060; }
4.一些公用代码(图片和字节转换)
using System.Drawing;
using System.Runtime.Serialization.Formatters.Binary;
using System.IO;

namespace Utility
{
public class ImageProcessor
{
/// <summary>
/// 把图片转换为字节(主要是考虑存储到数据库)
/// </summary>
/// <param name="fileName"></param>
/// <returns></returns>
public static byte[] ConvertToBytes(string fileName) {
Image image = Image.FromFile(fileName);
BinaryFormatter bf = new BinaryFormatter();
MemoryStream ms = new MemoryStream();

bf.Serialize(ms, image);
byte[] result = new byte[ms.Length];
ms.Position = 0;

ms.Read(result, 0, result.Length);
ms.Close();

return result;
}

/// <summary>
/// 从字节再生成一个图片(主要是从数据库读取)
/// </summary>
/// <param name="buffer"></param>
/// <returns></returns>
public static Image ConvertToImage(byte[] buffer) {
MemoryStream ms = new MemoryStream(buffer);
BinaryFormatter bf = new BinaryFormatter();
Image result = (Image)bf.Deserialize(ms);
ms.Close();
return result;
}

}
}
.csharpcode, .csharpcode pre
{
font-size: small;
color: black;
font-family: consolas, "Courier New", courier, monospace;
background-color: #ffffff;
/*white-space: pre;*/
}
.csharpcode pre { margin: 0em; }
.csharpcode .rem { color: #008000; }
.csharpcode .kwrd { color: #0000ff; }
.csharpcode .str { color: #006080; }
.csharpcode .op { color: #0000c0; }
.csharpcode .preproc { color: #cc6633; }
.csharpcode .asp { background-color: #ffff00; }
.csharpcode .html { color: #800000; }
.csharpcode .attr { color: #ff0000; }
.csharpcode .alt
{
background-color: #f4f4f4;
width: 100%;
margin: 0em;
}
.csharpcode .lnum { color: #606060; }
大致截图如下

相关文章推荐
- Win32 GUI编程之二-------------使用Win32控件(ListView)
- ListView控件使用简介
- cocos2dx-ScrollView和 ListView、PageView控件的使用
- ListView控件的使用
- ListView控件使用
- 在listview的item中使用其他通过适配器传值的控件如Recyclerview不显示的问题
- ListView header 中使用控件ViewPager手势滑动影响问题
- Gson的使用——Gson解析json数组并展示在ListView控件上
- asp.net中ListView控件动态绑定数据源后,使用DataPager出现错误的原因及解决办法
- SQLite数据库、ListView控件的使用
- Android高级控件系列二之第三方控件PullToRefreshListView下拉刷新的使用
- ListView 控件的使用
- Android控件 – ListView的使用(一)– 使用Adapter绑定数据
- DataList和ListView数据控件的使用
- ListView控件的使用2
- listview控件的使用,listview控件的优化
- 安卓控件使用系列34:ListView列表控件显示表单的使用方法1
- Android ListView控件的使用
- Android_UI控件:ListView 属性+使用+优化+Header+Footer+单选+多选+全选+setEmptyView (View emptyView)
- 列表视图控件之ListView_SetItemState简单使用