Json.NET的简单介绍
2008-05-27 10:00
399 查看
首先介绍一个为方便在.NET中使用JSON的API,Json.NET。它方便我们读取从浏览器流向服务器的JSON对象,也方便在响应流中写入JSON对象。这里下载:Json.NET。
Json.NET只提供了服务器端的方法,主要有实现JSON文本与XML互相转换的类,有自定义读写JSON的JsonReader类和JsonWriter类,还有一个非自定义读写JSON的JavaScriptSerializer类。
ASP.NET AJAX中,服务器端由JavaScriptSerializer类的几个方法来用于实现序列化和反序列化能力。在Json.NET中,服务器端的序列化和反序列化能力则主要由JavaScriptConvert类的几个方法提供。本篇的例子只使用了JavaScriptConvert。
JavaScriptConvert
Json.NET中,这个类用于序列化和反序列化JavaScript对象。
这个类有两个方法:
SerializeObject(object value, params JsonConverter[] converters),序列化,它有个重载方法SerializeObject(object value)
DeserializeObject(string value, Type type),反序列化,它有个重载方法DeserializeObject(string value)
在客户端,Json.NET未提供支持。如果需要则可以结合使用上一篇“What is JSON:初识JSON”提到的json.js来处理客户端的系列化与反序列化。
下面我们尝试用这个API在ASP.NET中实现用JSON交互数据。
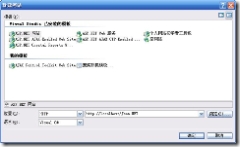
将下载到的Binary文件夹中的Newtonsoft.Json.dll和Newtonsoft.Json.XML放入网站的bin文件,当然要先新建bin文件夹。然后对dll添加引用。
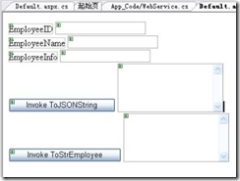
切换到设计模式,从标准工具箱向页面上添加三个Label,Text分别为EmployeeID、EmployeeName、EmployeeInfo;三个Textbox,ID分别为txtID、txtName、txtInfo;然后添加一个Button,ID为btnToJSONString,Text为Invoke ToJSONString;然后添加一个Textbox,ID为txtJSON,Textmode为MultiLine,rows设为5;接着再分别添加一个Button和Textbox,ID为btnToObject、txtStrEmployee,Button的Text为Invoke ToStrEmployee。
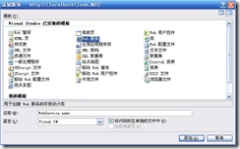
添加一个WebService项目。
编写一个Employee类,然后两个WebMethod,接着在项目中对该Web服务添加引用。代码如下:
using System;
using System.Web;
using System.Collections;
using System.Web.Services;
using System.Web.Services.Protocols;
using Newtonsoft.Json;
class Employee
{
private string[] employeeInfo;
public int EmployeeID;
public string EmployeeName;
public string[] EmployeeInfo
{
get { return this.employeeInfo; }
set { this.employeeInfo = value;}
}
}
/**//// <summary>
/// WebService 的摘要说明
/// </summary>
[WebService(Namespace = "http://tempuri.org/")]
[WebServiceBinding(ConformsTo = WsiProfiles.BasicProfile1_1)]
public class WebService : System.Web.Services.WebService {
public WebService () {
//如果使用设计的组件,请取消注释以下行
//InitializeComponent();
}
[WebMethod]
public string ToJSONString(int employeeID, string employeeName, string[] employeeInfo)
{
Employee employee = new Employee();
employee.EmployeeID = employeeID;
employee.EmployeeName = employeeName;
employee.EmployeeInfo = employeeInfo;
return JavaScriptConvert.SerializeObject(employee);
}
[WebMethod]
public string ToStrEmployee(string strJSON)
{
Employee decerializedEmployee = (Employee)JavaScriptConvert.DeserializeObject(strJSON, typeof(Employee));
return "ID: " + decerializedEmployee.EmployeeID + " "
+ "Name: " + decerializedEmployee.EmployeeName + " "
+ "Info: " + decerializedEmployee.EmployeeInfo.ToString();
}
}
成员的属性类型分别为数字、字符串和数组。
5、对两个Button编写事件代码
protected void btnToJSONString_Click(object sender, EventArgs e)
{
MyServ.WebService MyWebServ = new MyServ.WebService();
string employeeJSON = MyWebServ.ToJSONString(Int32.Parse(txtID.Text), txtName.Text, txtInfo.Text.Split(','));
txtJSON.Text = employeeJSON;
}
protected void btnToStrEmployee_Click(object sender, EventArgs e)
{
MyServ.WebService MyWevServ = new MyServ.WebService();
string strEmployee = MyWevServ.ToStrEmployee(txtJSON.Text);
txtStrEmployee.Text = strEmployee;
}
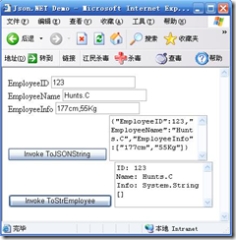
6、按Ctrl + F5运行;在EmployeeID、EmployeeName、EmployeeInfo中输入123、Hunts.C及一些个人信息(用逗号隔开);点击Invoke ToJSONString,经服务器端序列化后,结果在txtJSON文本框中;然后点击Invoke ToStrEmployee,此时txtJSON文本框中的JSON文本传输给服务器端,服务器端读取该JSON并反序列化成对象,而后在txtStrEmployee中写入Employee的成员值。
转贴自:
http://hi.baidu.com/chenjj1010/blog/item/b1d9bd0884d5bed562d986ae.html
Json.NET只提供了服务器端的方法,主要有实现JSON文本与XML互相转换的类,有自定义读写JSON的JsonReader类和JsonWriter类,还有一个非自定义读写JSON的JavaScriptSerializer类。
ASP.NET AJAX中,服务器端由JavaScriptSerializer类的几个方法来用于实现序列化和反序列化能力。在Json.NET中,服务器端的序列化和反序列化能力则主要由JavaScriptConvert类的几个方法提供。本篇的例子只使用了JavaScriptConvert。
JavaScriptConvert
Json.NET中,这个类用于序列化和反序列化JavaScript对象。
这个类有两个方法:
SerializeObject(object value, params JsonConverter[] converters),序列化,它有个重载方法SerializeObject(object value)
DeserializeObject(string value, Type type),反序列化,它有个重载方法DeserializeObject(string value)
在客户端,Json.NET未提供支持。如果需要则可以结合使用上一篇“What is JSON:初识JSON”提到的json.js来处理客户端的系列化与反序列化。
下面我们尝试用这个API在ASP.NET中实现用JSON交互数据。
使用Json.NET在C/S中交互JSON数据的简单例子
先新建一个ASP.NET 网站。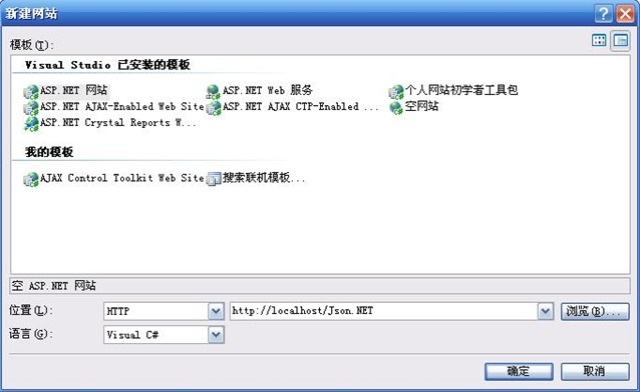
将下载到的Binary文件夹中的Newtonsoft.Json.dll和Newtonsoft.Json.XML放入网站的bin文件,当然要先新建bin文件夹。然后对dll添加引用。
切换到设计模式,从标准工具箱向页面上添加三个Label,Text分别为EmployeeID、EmployeeName、EmployeeInfo;三个Textbox,ID分别为txtID、txtName、txtInfo;然后添加一个Button,ID为btnToJSONString,Text为Invoke ToJSONString;然后添加一个Textbox,ID为txtJSON,Textmode为MultiLine,rows设为5;接着再分别添加一个Button和Textbox,ID为btnToObject、txtStrEmployee,Button的Text为Invoke ToStrEmployee。

添加一个WebService项目。

编写一个Employee类,然后两个WebMethod,接着在项目中对该Web服务添加引用。代码如下:
using System;
using System.Web;
using System.Collections;
using System.Web.Services;
using System.Web.Services.Protocols;
using Newtonsoft.Json;
class Employee
{
private string[] employeeInfo;
public int EmployeeID;
public string EmployeeName;
public string[] EmployeeInfo
{
get { return this.employeeInfo; }
set { this.employeeInfo = value;}
}
}
/**//// <summary>
/// WebService 的摘要说明
/// </summary>
[WebService(Namespace = "http://tempuri.org/")]
[WebServiceBinding(ConformsTo = WsiProfiles.BasicProfile1_1)]
public class WebService : System.Web.Services.WebService {
public WebService () {
//如果使用设计的组件,请取消注释以下行
//InitializeComponent();
}
[WebMethod]
public string ToJSONString(int employeeID, string employeeName, string[] employeeInfo)
{
Employee employee = new Employee();
employee.EmployeeID = employeeID;
employee.EmployeeName = employeeName;
employee.EmployeeInfo = employeeInfo;
return JavaScriptConvert.SerializeObject(employee);
}
[WebMethod]
public string ToStrEmployee(string strJSON)
{
Employee decerializedEmployee = (Employee)JavaScriptConvert.DeserializeObject(strJSON, typeof(Employee));
return "ID: " + decerializedEmployee.EmployeeID + " "
+ "Name: " + decerializedEmployee.EmployeeName + " "
+ "Info: " + decerializedEmployee.EmployeeInfo.ToString();
}
}
成员的属性类型分别为数字、字符串和数组。
5、对两个Button编写事件代码
protected void btnToJSONString_Click(object sender, EventArgs e)
{
MyServ.WebService MyWebServ = new MyServ.WebService();
string employeeJSON = MyWebServ.ToJSONString(Int32.Parse(txtID.Text), txtName.Text, txtInfo.Text.Split(','));
txtJSON.Text = employeeJSON;
}
protected void btnToStrEmployee_Click(object sender, EventArgs e)
{
MyServ.WebService MyWevServ = new MyServ.WebService();
string strEmployee = MyWevServ.ToStrEmployee(txtJSON.Text);
txtStrEmployee.Text = strEmployee;
}
6、按Ctrl + F5运行;在EmployeeID、EmployeeName、EmployeeInfo中输入123、Hunts.C及一些个人信息(用逗号隔开);点击Invoke ToJSONString,经服务器端序列化后,结果在txtJSON文本框中;然后点击Invoke ToStrEmployee,此时txtJSON文本框中的JSON文本传输给服务器端,服务器端读取该JSON并反序列化成对象,而后在txtStrEmployee中写入Employee的成员值。

转贴自:
http://hi.baidu.com/chenjj1010/blog/item/b1d9bd0884d5bed562d986ae.html

相关文章推荐
- Json.NET 之 Json的简单介绍
- Json.Net的介绍与简单实用(兼容2.0/3.0/3.5/4.5/RT)
- 【转】Json.NET的简单介绍
- .NET Framewok 3.5 中 JSON 序列化和反序列化的简单实现
- ASP.NET一款免费富文本(RichText)编辑器KindEditor,实现在线排版编辑文章。这里简单介绍下如何使用
- <转>下一代Asp.net开发规范OWIN(1)—— OWIN产生的背景以及简单介绍
- ADO.Net 类型化DataSet的简单介绍
- JSON.NET 简单的使用
- OBOUT控件简单介绍——ASP.NET控件
- ASP.NET MVC 3 Model【通过一简单实例一步一步的介绍】【续Model验证部分】
- jqGrid简单使用、json格式和jsonReader介绍
- ASP.NET MVC 几种简单的Action介绍
- @JsonView 简单介绍
- Json.net简单用法
- ASP.NET AJAX入门系列之:UpdateProgress控件简单介绍
- 【Android 应用开发】Android 网络编程 API笔记 - java.net 包 权限 地址 套接字 相关类 简单介绍
- Json.net的简单使用
- ASP.NET Atlas简单控件介绍——Sys.Component基类与Sys.UI.Control基类
- Json.NET简单应用
- JSON.NET 简单的使用