使用ASP.NET Atlas ItemView控件显示集合中的单个数据
2006-04-09 20:38
851 查看
English Version: http://dflying.dflying.net/1/archive/114_display_one_item_in_a_collection_using_aspnet_atlas_itemview_control.html
在这个系列中,我将介绍一些Atlas Sys.UI.Data中较高级的控件,包括:
Sys.UI.Data.ListView:使用ASP.NET Atlas ListView控件显示列表数据
Sys.UI.Data.ItemView:使用ASP.NET Atlas ItemView控件显示集合中的单个数据
Sys.UI.Data.DataNavigator:使用 ASP.NET Atlas PageNavigator控件实现客户端分页导航
Sys.UI.Data.SortBehavior:使用ASP.NET Atlas SortBehavior实现客户端排序
Sys.UI.Data.XSLTView:使用ASP.NET Atlas XSLTView控件用XSLT修饰并显示XML数据
这篇是其中的第二篇:使用ASP.NET Atlas ItemView控件显示集合中的单个数据
有时候我们需要显示给用户列表中某一项的详细信息,例如,在购物程序中的产品详细情况。ASP.NET Atlas ItemView客户端控件为您提供了对这项功能的支持,就像ASP.NET服务器端控件DetailsView一样,但Atlas ItemView控件完全在客户端运行。
ItemView类(ListView类同样,见使用ASP.NET Atlas ListView控件显示列表数据 )继承于Sys.UI.Data.DataControl基类。该基类提供了一些公共的属性,包括:
canMoveNext:当前记录后是否有下一条记录。
canMovePrevious:当前记录前是否有前一条记录。
data:控件包含的数据集合。
dataIndex:当前记录的index。
dataItem:基于dataIndex的当前的记录。
length:记录的条目数。
同时还包括下列方法:
addItem:添加一条记录到当前的数据集合中。
deleteCurrentItem:删除基于dataIndex的当前记录。
moveNext:如果canMoveNext为true,将dataIndex加1,指向下一条记录。
movePrevious:如果canMovePrevious为true,将dataIndex减1,指向前一条记录。
请注意所有的以上操作都仅在客户端,也就是说只修改了客户端的数据。所以如果您希望将改变提交到服务器,则需要调用DataSource的相应方法。
ItemView通过继承获得了以上的属性和方法,并且还对基类有如下扩展:
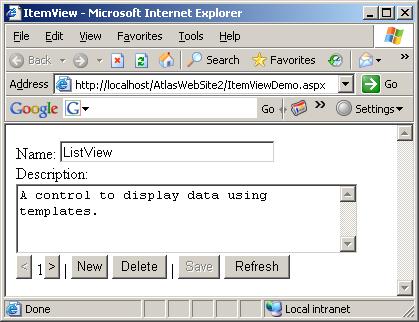
itemTemplate:指定项目模版。Atlas可以根据这个模版渲染您的内容。
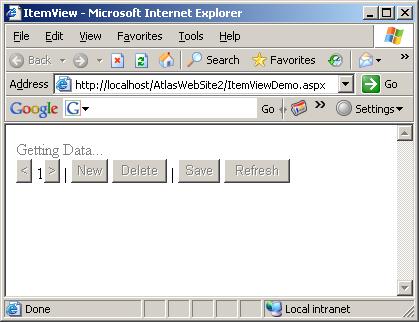
emptyTemplate:指定无数据时的模版。当数据集合为空或者DataSource还在取得数据的过程中时,Atlas会显示这个模版。
以上是ItemView的简要介绍。让我们通过一个例子来熟悉ItemView。这个程序基于Atlas官方发布的示例程序,并适当做了一些简化。
首先暴露一个Web Service以被Atlas使用。
定义item entry类:
public class Entry
[WebService(Namespace = "http://tempuri.org/")]
[WebServiceBinding(ConformsTo = WsiProfiles.BasicProfile1_1)]
public class MyDataService : DataService
<!-- ScriptManager -->
<atlas:ScriptManager runat="server" ID="scriptManager" />
<!-- Element for ItemView (container) -->
<div id="detailsView">
</div>
<!-- Navigators -->
<input type="button" id="previousButton" value="<" title="Go to previous row" />
<span id="rowIndexLabel"></span>
<input id="nextButton" type="button" value=">" title="Go to next row" />
|
<!-- Commands -->
<input type="button" id="addButton" value="New" title="Create a new row" />
<input type="button" id="delButton" value="Delete" title="Delete the current row" />
|
<input type="button" id="saveButton" value="Save" title="Save all pending changes" />
<input type="button" id="refreshButton" value="Refresh" title="Discard pending changes and get the latest data from the server" />
<!-- Templates -->
<div style="visibility: hidden; display: none">
<div id="detailsTemplate">
Name:
<input id="nameField" size="30" /><br />
Description:<br />
<textarea id="descriptionField" rows="4" cols="40"></textarea><br />
</div>
<div id="emptyTemplate">
Getting Data
</div>
</div>
最后需要做的是在页面上添加Atlas脚本。
下面是DataSource的脚本:
<dataSource id="dataSource" serviceURL="MyDataService.asmx" autoLoad="true" />
下面是ItemView的脚本。我们将绑定上面的DataSource控件作为数据源,并且将ItemView的enabled属性绑定到DataSource的isReady属性上,以期在数据源没有装载完成前禁用ItemView。同样为ItemView定义了itemTemplate和emptyTemplate。
<itemView id="detailsView">
<bindings>
<binding dataContext="dataSource" dataPath="data" property="data"/>
<binding dataContext="dataSource" dataPath="isReady" property="enabled"/>
</bindings>
<itemTemplate>
<template layoutElement="detailsTemplate">
<textBox id="nameField">
<bindings>
<binding dataPath="Name" property="text" direction="InOut"/>
</bindings>
</textBox>
<textBox id="descriptionField">
<bindings>
<binding dataPath="Description" property="text" direction="InOut"/>
</bindings>
</textBox>
</template>
</itemTemplate>
<emptyTemplate>
<template layoutElement="emptyTemplate" />
</emptyTemplate>
</itemView>
下面是导航部分的脚本。我们提供了一个label用来显示当前的记录编号(记录index加上1,使用了Atlas的Add transformer。关于Atlas transformer,您可以参考:在ASP.NET Atlas中创建自定义的Transformer )。还提供了前后移动记录的导航按钮(通过使用Atlas的InvokeMethod action调用相应的ItemView的方法)。
<button id="previousButton">
<bindings>
<binding dataContext="detailsView" dataPath="canMovePrevious" property="enabled"/>
</bindings>
<click>
<invokeMethod target="detailsView" method="movePrevious" />
</click>
</button>
<label id="rowIndexLabel">
<bindings>
<binding dataContext="detailsView" dataPath="dataIndex" property="text" transform="Add" />
</bindings>
</label>
<button id="nextButton">
<bindings>
<binding dataContext="detailsView" dataPath="canMoveNext" property="enabled"/>
</bindings>
<click>
<invokeMethod target="detailsView" method="moveNext" />
</click>
</button>
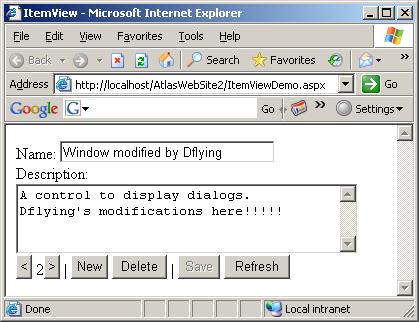
下面是命令部分的脚本。这里我们能够在客户端添加/删除记录,并将改变提交给服务器或者放弃提交。
<button id="addButton">
<bindings>
<binding dataContext="dataSource" dataPath="isReady" property="enabled"/>
</bindings>
<click>
<invokeMethod target="detailsView" method="addItem" />
</click>
</button>
<button id="delButton">
<bindings>
<binding dataContext="dataSource" dataPath="isReady" property="enabled"/>
</bindings>
<click>
<invokeMethod target="detailsView" method="deleteCurrentItem" />
</click>
</button>
<button id="saveButton">
<bindings>
<binding dataContext="dataSource" dataPath="isDirtyAndReady" property="enabled"/>
</bindings>
<click>
<invokeMethod target="dataSource" method="save" />
</click>
</button>
<button id="refreshButton">
<bindings>
<binding dataContext="dataSource" dataPath="isReady" property="enabled"/>
</bindings>
<click>
<invokeMethod target="dataSource" method="load" />
</click>
</button>
大功告成,可以在浏览器中测试了。
装载中:
装载完成:
记录间导航:

修改并保存:
上述示例代码可以在此处下载:http://files.cnblogs.com/dflying/AtlasItemViewDemo.zip
在这个系列中,我将介绍一些Atlas Sys.UI.Data中较高级的控件,包括:
Sys.UI.Data.ListView:使用ASP.NET Atlas ListView控件显示列表数据
Sys.UI.Data.ItemView:使用ASP.NET Atlas ItemView控件显示集合中的单个数据
Sys.UI.Data.DataNavigator:使用 ASP.NET Atlas PageNavigator控件实现客户端分页导航
Sys.UI.Data.SortBehavior:使用ASP.NET Atlas SortBehavior实现客户端排序
Sys.UI.Data.XSLTView:使用ASP.NET Atlas XSLTView控件用XSLT修饰并显示XML数据
这篇是其中的第二篇:使用ASP.NET Atlas ItemView控件显示集合中的单个数据
有时候我们需要显示给用户列表中某一项的详细信息,例如,在购物程序中的产品详细情况。ASP.NET Atlas ItemView客户端控件为您提供了对这项功能的支持,就像ASP.NET服务器端控件DetailsView一样,但Atlas ItemView控件完全在客户端运行。
ItemView类(ListView类同样,见使用ASP.NET Atlas ListView控件显示列表数据 )继承于Sys.UI.Data.DataControl基类。该基类提供了一些公共的属性,包括:
canMoveNext:当前记录后是否有下一条记录。
canMovePrevious:当前记录前是否有前一条记录。
data:控件包含的数据集合。
dataIndex:当前记录的index。
dataItem:基于dataIndex的当前的记录。
length:记录的条目数。
同时还包括下列方法:
addItem:添加一条记录到当前的数据集合中。
deleteCurrentItem:删除基于dataIndex的当前记录。
moveNext:如果canMoveNext为true,将dataIndex加1,指向下一条记录。
movePrevious:如果canMovePrevious为true,将dataIndex减1,指向前一条记录。
请注意所有的以上操作都仅在客户端,也就是说只修改了客户端的数据。所以如果您希望将改变提交到服务器,则需要调用DataSource的相应方法。
ItemView通过继承获得了以上的属性和方法,并且还对基类有如下扩展:
itemTemplate:指定项目模版。Atlas可以根据这个模版渲染您的内容。
emptyTemplate:指定无数据时的模版。当数据集合为空或者DataSource还在取得数据的过程中时,Atlas会显示这个模版。
以上是ItemView的简要介绍。让我们通过一个例子来熟悉ItemView。这个程序基于Atlas官方发布的示例程序,并适当做了一些简化。
首先暴露一个Web Service以被Atlas使用。
定义item entry类:
public class Entry
[WebService(Namespace = "http://tempuri.org/")]
[WebServiceBinding(ConformsTo = WsiProfiles.BasicProfile1_1)]
public class MyDataService : DataService
<!-- ScriptManager -->
<atlas:ScriptManager runat="server" ID="scriptManager" />
<!-- Element for ItemView (container) -->
<div id="detailsView">
</div>
<!-- Navigators -->
<input type="button" id="previousButton" value="<" title="Go to previous row" />
<span id="rowIndexLabel"></span>
<input id="nextButton" type="button" value=">" title="Go to next row" />
|
<!-- Commands -->
<input type="button" id="addButton" value="New" title="Create a new row" />
<input type="button" id="delButton" value="Delete" title="Delete the current row" />
|
<input type="button" id="saveButton" value="Save" title="Save all pending changes" />
<input type="button" id="refreshButton" value="Refresh" title="Discard pending changes and get the latest data from the server" />
<!-- Templates -->
<div style="visibility: hidden; display: none">
<div id="detailsTemplate">
Name:
<input id="nameField" size="30" /><br />
Description:<br />
<textarea id="descriptionField" rows="4" cols="40"></textarea><br />
</div>
<div id="emptyTemplate">
Getting Data
</div>
</div>
最后需要做的是在页面上添加Atlas脚本。
下面是DataSource的脚本:
<dataSource id="dataSource" serviceURL="MyDataService.asmx" autoLoad="true" />
下面是ItemView的脚本。我们将绑定上面的DataSource控件作为数据源,并且将ItemView的enabled属性绑定到DataSource的isReady属性上,以期在数据源没有装载完成前禁用ItemView。同样为ItemView定义了itemTemplate和emptyTemplate。
<itemView id="detailsView">
<bindings>
<binding dataContext="dataSource" dataPath="data" property="data"/>
<binding dataContext="dataSource" dataPath="isReady" property="enabled"/>
</bindings>
<itemTemplate>
<template layoutElement="detailsTemplate">
<textBox id="nameField">
<bindings>
<binding dataPath="Name" property="text" direction="InOut"/>
</bindings>
</textBox>
<textBox id="descriptionField">
<bindings>
<binding dataPath="Description" property="text" direction="InOut"/>
</bindings>
</textBox>
</template>
</itemTemplate>
<emptyTemplate>
<template layoutElement="emptyTemplate" />
</emptyTemplate>
</itemView>
下面是导航部分的脚本。我们提供了一个label用来显示当前的记录编号(记录index加上1,使用了Atlas的Add transformer。关于Atlas transformer,您可以参考:在ASP.NET Atlas中创建自定义的Transformer )。还提供了前后移动记录的导航按钮(通过使用Atlas的InvokeMethod action调用相应的ItemView的方法)。
<button id="previousButton">
<bindings>
<binding dataContext="detailsView" dataPath="canMovePrevious" property="enabled"/>
</bindings>
<click>
<invokeMethod target="detailsView" method="movePrevious" />
</click>
</button>
<label id="rowIndexLabel">
<bindings>
<binding dataContext="detailsView" dataPath="dataIndex" property="text" transform="Add" />
</bindings>
</label>
<button id="nextButton">
<bindings>
<binding dataContext="detailsView" dataPath="canMoveNext" property="enabled"/>
</bindings>
<click>
<invokeMethod target="detailsView" method="moveNext" />
</click>
</button>
下面是命令部分的脚本。这里我们能够在客户端添加/删除记录,并将改变提交给服务器或者放弃提交。
<button id="addButton">
<bindings>
<binding dataContext="dataSource" dataPath="isReady" property="enabled"/>
</bindings>
<click>
<invokeMethod target="detailsView" method="addItem" />
</click>
</button>
<button id="delButton">
<bindings>
<binding dataContext="dataSource" dataPath="isReady" property="enabled"/>
</bindings>
<click>
<invokeMethod target="detailsView" method="deleteCurrentItem" />
</click>
</button>
<button id="saveButton">
<bindings>
<binding dataContext="dataSource" dataPath="isDirtyAndReady" property="enabled"/>
</bindings>
<click>
<invokeMethod target="dataSource" method="save" />
</click>
</button>
<button id="refreshButton">
<bindings>
<binding dataContext="dataSource" dataPath="isReady" property="enabled"/>
</bindings>
<click>
<invokeMethod target="dataSource" method="load" />
</click>
</button>
大功告成,可以在浏览器中测试了。
装载中:
装载完成:
记录间导航:
修改并保存:
上述示例代码可以在此处下载:http://files.cnblogs.com/dflying/AtlasItemViewDemo.zip

相关文章推荐
- 使用ASP.NET Atlas ItemView控件显示集合中的单个数据
- 使用ASP.NET Atlas XSLTView控件用XSLT修饰并显示XML数据
- 使用ASP.NET Atlas XSLTView控件用XSLT修饰并显示XML数据
- 使用ASP.NET Atlas XSLTView控件用XSLT修饰并显示XML数据
- 使用ASP.NET Atlas编写显示真实进度的ProgressBar(进度条)控件
- 使用ASP.NETAtlas编写显示真实进度的ProgressBar(进度条)控件
- 在ASP.NET中使用ObjectDataSource数据控件和GridView显示数据
- 使用ASP.NET Atlas编写显示真实进度的ProgressBar(进度条)控件
- 使用 asp.net 2.0 自带的TreeView控件显示内联表数据(树状数据)
- ASP.NET使用ListView数据绑定控件和DataPager实现数据分页显示(二)
- 使用ASP.NET Atlas编写显示进度条控件
- 在ASP.NET中使用ObjectDataSource数据控件和GridView显示数据(2)
- 使用ASP.NET Atlas编写显示真实进度的ProgressBar(进度条)控件
- ASP.NET使用ListView数据绑定控件和DataPager实现数据分页显示(一)
- 使用ASP.NET Atlas编写显示真实进度的ProgressBar(进度条)控件
- 使用ASP.NET Atlas编写显示真实进度的ProgressBar(进度条)控件
- 使用ASP.NET Atlas编写显示真实进度的ProgressBar(进度条)控件
- ASP.NET 使用DataList控件实现分页显示数据
- 使用ASP.NET Atlas编写显示真实进度的ProgressBar(进度条)控件
- 使用ASP.NET Atlas编写显示进度条控件